Do you want to set up Site Feed settings in Blogger? You’re in the right place.
In this tutorial, I will guide you step-by-step on how to set up Site Feed in Blogger.
Site feed has been one of the most confusing concepts in blogging. Most of the people including content creators and web publishers ignore blog site feeds because they fail to understand its purpose and how it works.
Following topics will be covered in this post:
- What is Site Feed?
- What are the benefits of Site Feed?
- How to create RSS Feed URL in Google FeedBurner
- How to set up Site Feed Settings in Blogger
- How to show RSS Feed URL & Icon on Blogger Blog
- How to show RSS Feed Content on Blogger Blog
RELATED
- What is Post Using Email in Blogger & How to Set Up?
- How To Redirect Blogspot To Custom Domain | Set Up A Third Party URL
- How To Set Up RSS Feed in MS Outlook
- How to Set Up Blogger Settings | A to Z
01. What is Site Feed?
Site Feed is an XML document that contains your website content (Titles, Posts, Post Links, Dates, & Comments) stored in XML format. The basic purpose of site feed is to; let other people receive the latest content of your blog/website in their blog/website/browser/app/online-service/email automatically.
People can receive your blog content using your site feed link(URL) that you will create and provide on your website. They can copy your site-feed link and add that link in their blog/website/browser/app/online-service/email, etc.
Your site feed links can be subscribed using the online feed readers like My Yahoo, Feedly, NewsGator, Netvibes, Shrook, RSSOwl, etc.
Blogger supports two site feed formats (1) RSS Feed (2) Atom Feed. The RSS Feed is the most popular format and widely used.
What is RSS Feed? RSS stands for Really Simple Syndication, is a site feed or web feed format that allows people to receive automatic website/blog updates in a standardized computer-readable format.
What is Google FeedBurner? A Google FeedBurner is a free site (web) feed management service that allows you to create your site (RSS/Atom) feed URLs, so that people can subscribe or add your site feed URLs in their blogs/websites/apps/browsers, etc, to receive the latest content and notifications.
Beside creating your site feed URL the Google FeedBurner publishes your content, sends emails to subscribers, counts your subscribers, analyzes your feed, optimizes your feed, and much more..
02. Benefits of Site Feed
In this section, you will learn about some of the benefits of site feed.
- The site feed increases your blog traffic by bringing back the visitors to your blog. Most of the publishers allow post titles and some portion of the post content to show on feed. In order to read the complete content of a post one must click its URL to open on your blog.
- It automates your content delivery process. You don’t have to send updates manually to subscribers and websites. They are sent and received automatically.
- It can act as your blog sitemap which means that search engines such as Google, Bing, etc, can index your content by taking data from your site feed.
- Subscribing to a site feed removes the need to manually check a blog for new content. They can easily receive automatic updates.
- People can get only the stuff what they want to read in one place coming from different sources.
- People are reluctant to subscribe via email, but not to subscribe site feed because you are not required to disclose email address while subscribing to a feed. It means that you are protected from spam, viruses, identity-theft, etc.
- You can display the updates/content of your favorite blogs on your blog.
- If you have more than one blog you can display updates/content on the other blogs. It means that you can send the traffic from one blog to the other blogs.
- You can create more than one site feed URL for your blog. Multi-niche blogs create separate category feed URLs, so that people can subscribe and receive only the updates of their desired category or categories.
03. Create RSS Feed URL in Google FeedBurner
In this section, you will learn to create RSS feed URL on Google FeedBurner for your Blogger blog.
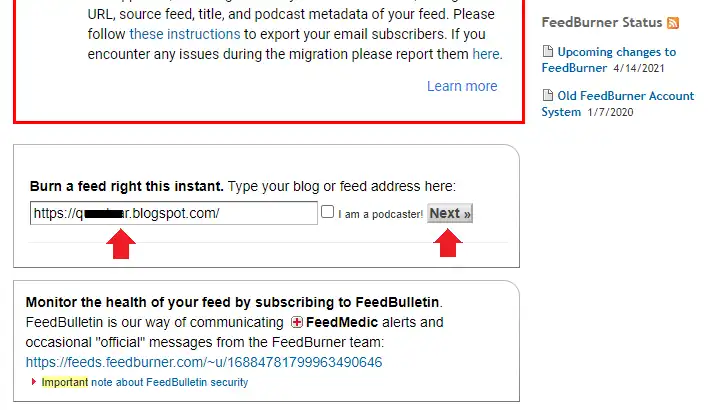
- Go to Google FeedBurner.
- Scroll-down to Burn a feed right this instant and enter your Blogger URL like “https://example.blogspot.com”.
- If you’re a podcaster tick I am a podcaster! otherwise ignore this option means don’t tick.
- Click Next.
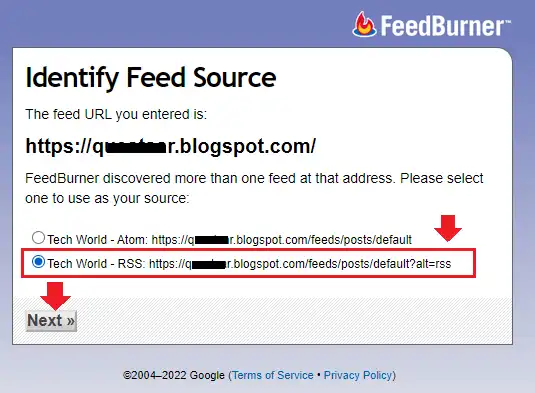
- Choose your Feed Source. You have two feed options (1) Atom (2) RSS.
- Choose the RSS option.
- Click the Next.
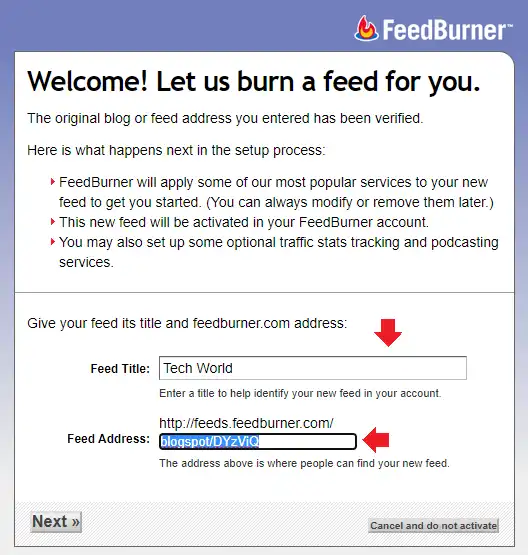
- In Feed Title enter the title/name of your blog.
- In Feed Address enter a meaningful name. It could be your blog name without spaces. Let’s say your blog title is Tech World, you can write techworld in the Feed Address. Remove the existing text in the textbox.
- Click the Next.
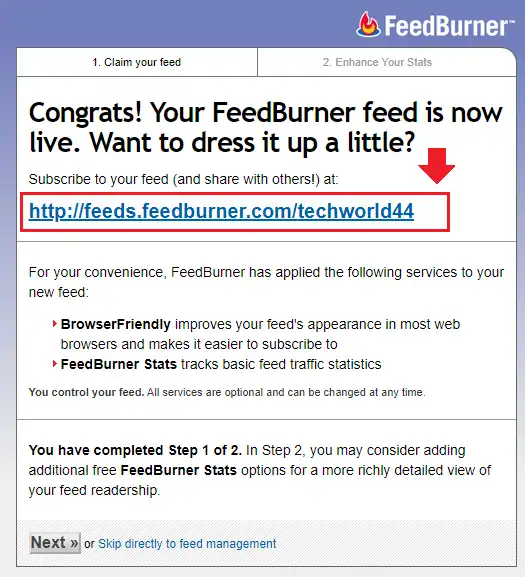
- You will see a congratulations message alongside your RSS Feed URL of your Blogger blog.
- Copy this link (URL). You will share this link with your blog visitors so that they can subscribe to your site feed.
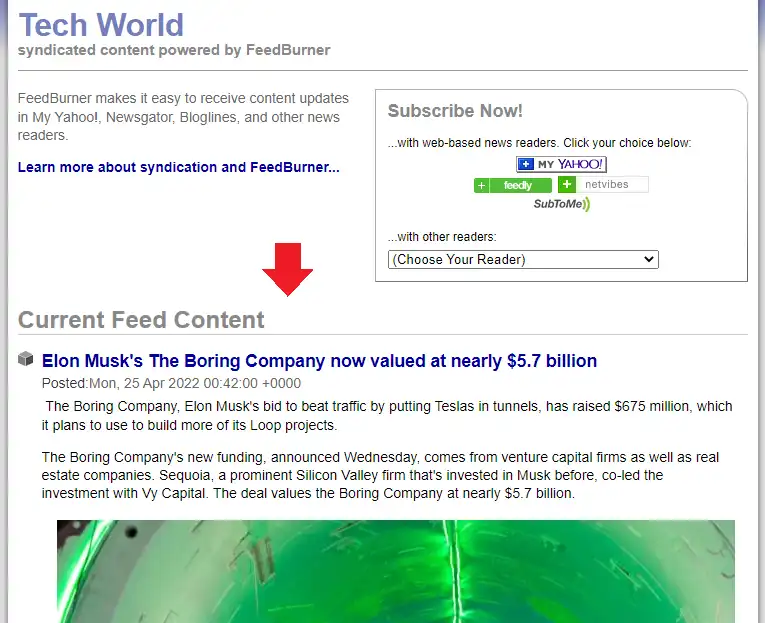
- Open the link in new tab. You can see how your site feeds are shown on Google FeedBurner. (Shown in the next step).
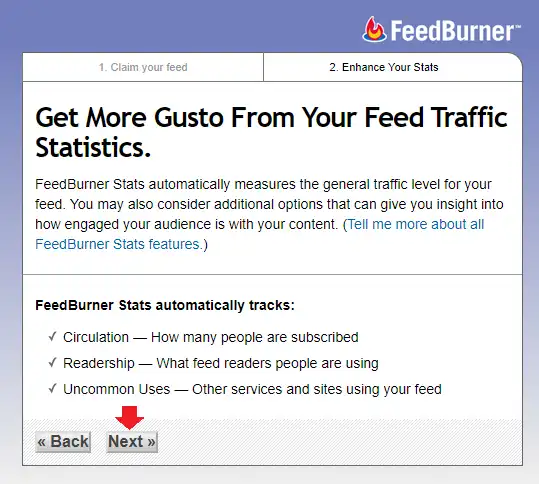
- The process of creating RSS feed URL has been completed. In order to access Google FeedBurner’s feed management Dashboard, click the Next button.
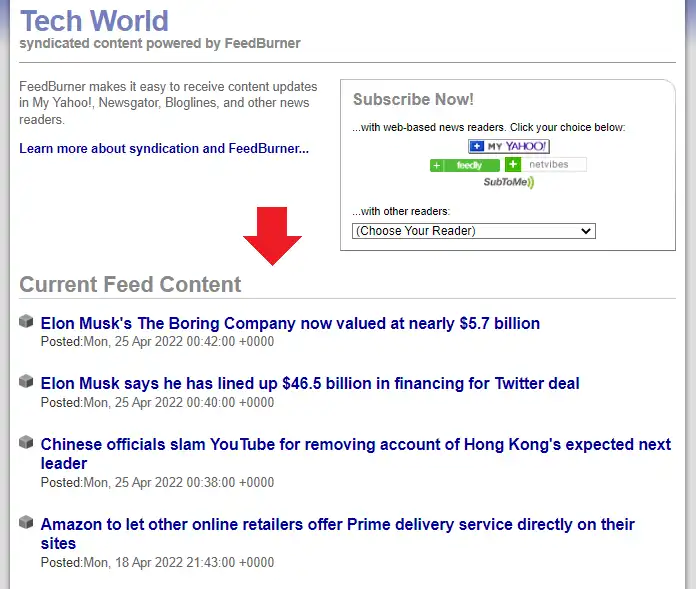
- This is your RSS site feed page on Google FeedBurner. You can view all your latest posts here. There is a Subscription section through which people can subscribe to your RSS feed via third-party online services. You can further modify the site feed content settings in your Blogger Settings, as shown in the Section 4.
- Follow the next steps to continue to Google FeedBurner Dashboard.
- Click the Next button.
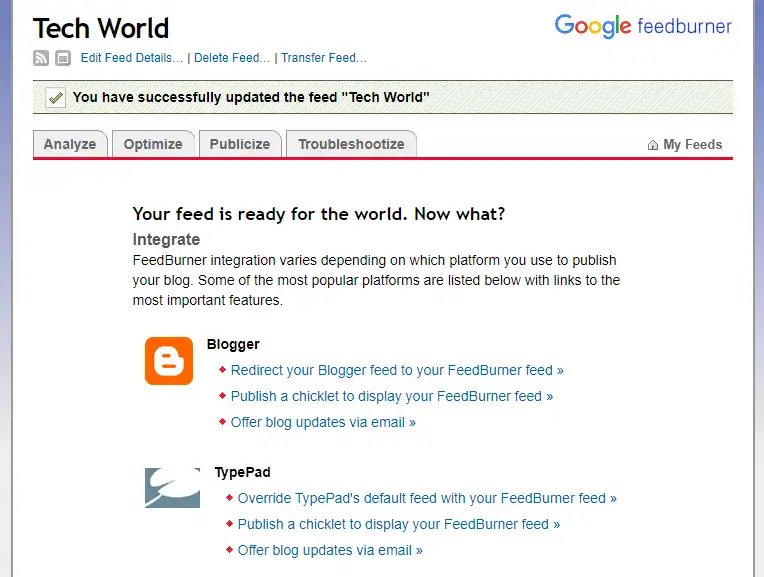
- This is the Dashboard (Feed Management) of Google FeedBurner where you can manage your site feeds.
- On Analyze section you can view your Feed Stats including your Subscribers count.
- On Optimize section you can optimize your feeds like you can activate Smart Feeds, Podcast Feeds, Browser Friendly, etc.
- On Publicize section you can get tips to grow your audience.
- On Troubleshootize section you can find general tips and quick-fixes to sort out problems and issues related to feeds.
04. Set Up Site Feed Settings in Blogger
You have successfully created your RSS feed URL, now it is time to set up Site Feed settings in Blogger.
- Login to your Blogger blog.
- Go to your sidebar and click the Settings.
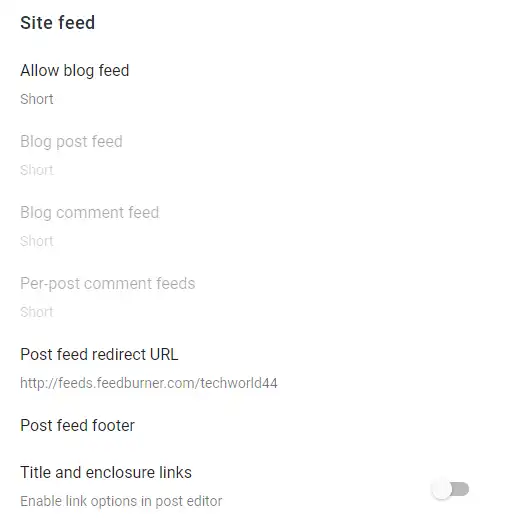
- Scroll-down to Site feed section.
I will cover these settings in 4 parts (1) Allow blog feed (2) Post feed redirect URL (3) Post feed footer (4) Title & enclosure links.
01. Allow Blog Feed
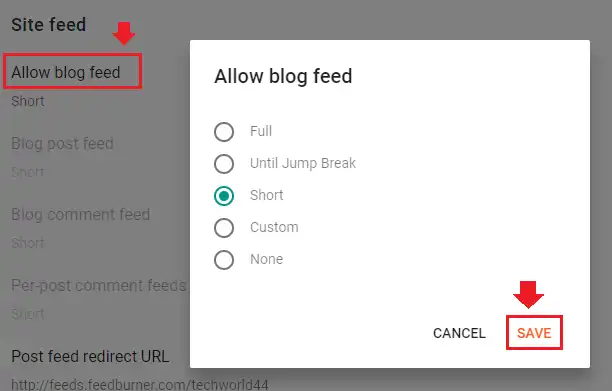
The Allow Blog Feed settings allow you to set up (1) How your blog feeds appear on Google FeedBurner or other feed reading services (2) Whether you want RSS Feed link & Icon to appear or not, on your Subscription Links gadget in Blogger. (Shown in the Section 5).
- Click on the Allow blog feed option.
There are 5 options:
- Full: It means your entire content of blog posts will be shown on Google FeedBurner feed.
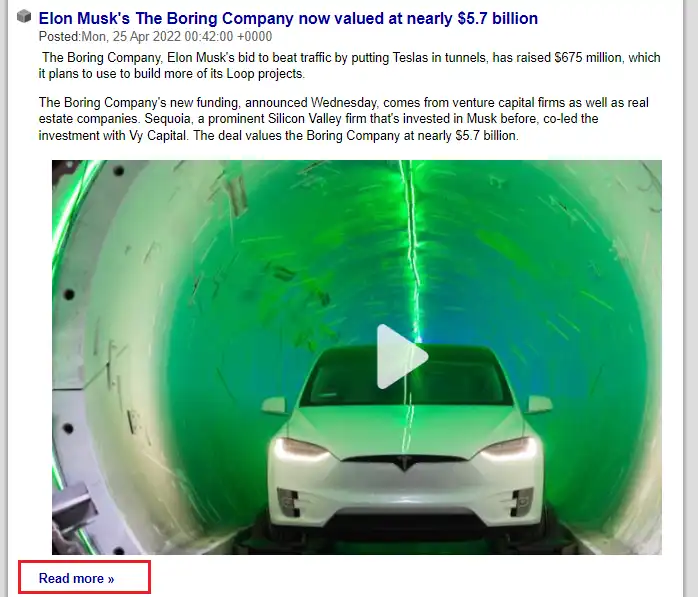
- Until Jump Break: It means the content of a blog post will be shown to the point where you have insert Page Break. If you enable this option you must insert Page Break in every post otherwise the entire content of post will be shown on feed. (Shown in the next step).
- Short: It means only the Title and Date of the posts will be shown on the Google FeedBurner feed. (Shown in the next steps).
- Custom: This option enables the inactive options below the Allow blog feed to set up Blog post feed, Blog comment feed, and Per-post comment feeds separately.
- None: This option doesn’t allow Subscription Link gadget in Blogger to show RSS Feed and Icons. (Shown in the Section 5 (How to show RSS feed URL & Icon in Blogger).
- Click Save, once you choose an option.
- This is how your post will be shown on Google FeedBurner if you choose Until Jump Break option. You can see the Read more >> link below the image.
- This is how your posts will be shown on Google FeedBurner if you choose Short option. You can see that there are only post Titles and Dates. Visitors can read the content on your blog by clicking the post links/titles.
02. Post feed redirect URL
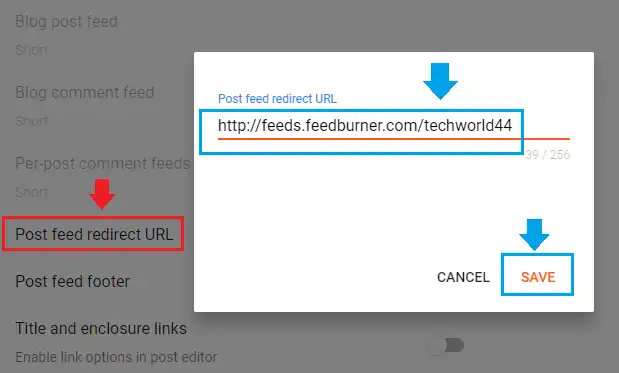
The Post feed redirect URL is the RSS Feed URL that you have created on Google FeedBurner.
The default Blogger feed URL is like this: “https://example.blogspot.com/feeds/posts/default“. Blogger will redirect this URL to Google FeedBurner RSS Feed URL like “http://feeds.feedburner.com/example“.
- Click on the Post feed redirect URL option.
- Paste your RSS Feed URL in the given location.
- Click SAVE.
03. Post feed footer
The Post feed footer option allows you to add a HTML code, ad code, text, image, signature, link, etc, that will appear after the end of every post on your post feed. (Shown in the next step).
To use this option you must set Allow blog feed to Full.
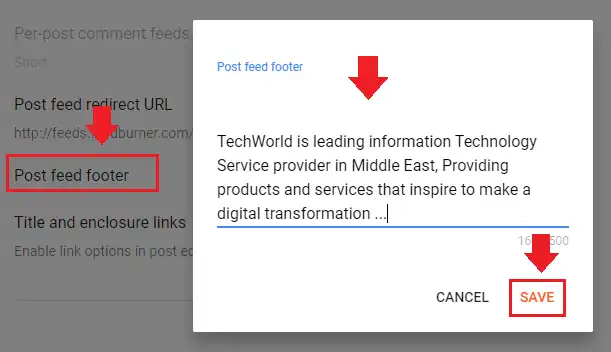
- Click on the Post feed footer option.
- Enter or Paste your code, text, etc, in the given location. You can enter maximum 500 characters.
- Click Save.
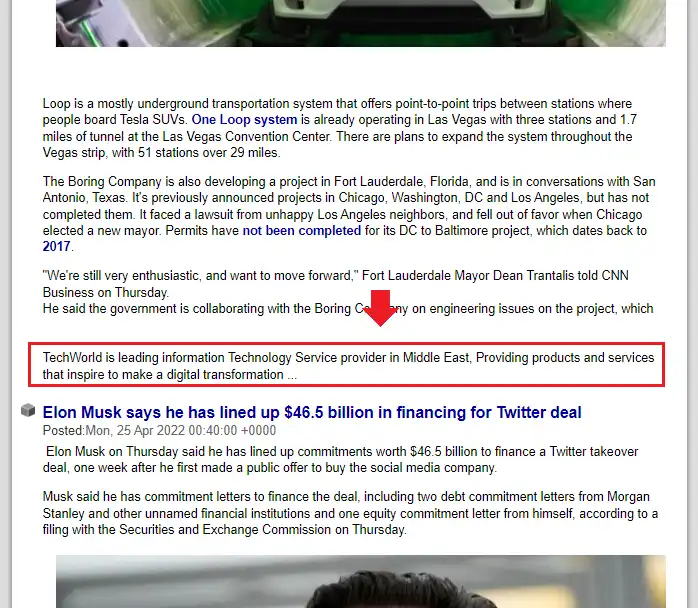
- Here you can see that the text that I have added in Post feed footer, appears on bottom of the post on Google FeedBurner post feed.
04. Title and enclosure links
In this section, you will learn about the Title and enclosure links in Blogger settings and how to use them.
The Title and enclosure links are optional features in your Blogger Post Editor. By default they are disabled/inactive from your Blogger settings. Once you enable them in Settings they appear under the Link tab in Blogger Post Editor.
The Title Links option allows you to link your Post Title to another URL.
The Enclosure Links option allows you to play your media files like audio, video, podcast, etc, in RSS feed. By default RSS feed supports only text and images. For media files you have to create enclosure link and add it in your posts.
Learn how to enable and view Title and enclosure options in Blogger.
- On the Title and enclosure links drag the slider towards your right to enable the options in your Post Editor.

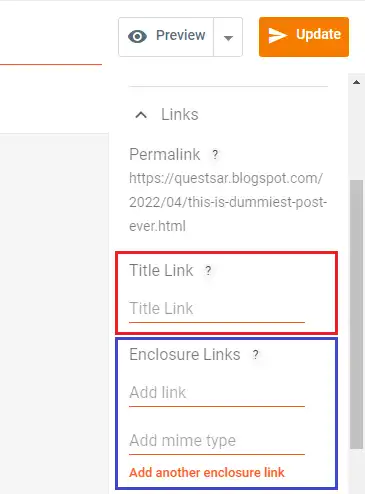
- Now open your Post Editor and expand the Links tab. You can find Title and Enclosure links options there.
- If you want to add a Title Link, Paste the URL of the page that you want to link in the given location and Update your post.
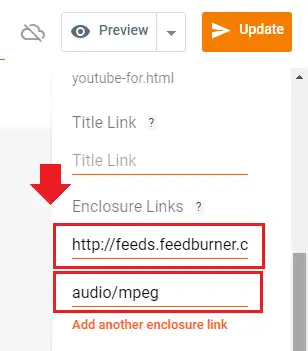
- If you want to add an Enclosure Link Paste the URL in the given location and also enter its MIME type. The MIME type for Audio is audio/mpeg, and Video is video/mpeg. You can add more than one Enclosure links in a single post. To do that click Add another enclosure link.
Follow the section below to learn how to use them.
01. Title Links
The Title link allows you to link your current post title with another page using its URL. When people will open your post in its detail page and click on its title, the target post will be opened.
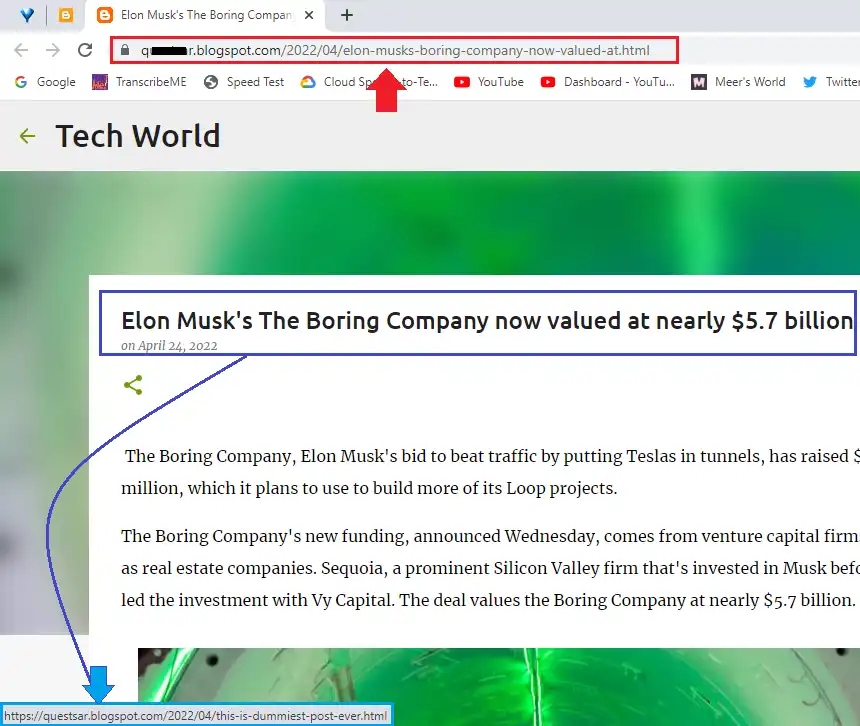
- Here you can see that the title of the post has been linked to another page. The URL in the browser’s URL Bar with the red border is the original URL of the post.
- The URL at the bottom of the page bordered with blue color is the linked URL that appears when you hover over the title.
02. Enclosure Link
In this section you will learn about How to upload an audio file in a Blogger post, How to create Enclosure link on Google FeedBurner, and How to add Enclosure link in your Blogger post.
You cannot directly upload audio file in a Blogger post the way you upload or add video files, but you can add audio file in HTML code of your blog post.
01. Add Audio
First of all I will add an audio file in a Blogger post.
- Open your Blogger post in which you want to add audio file or podcast.
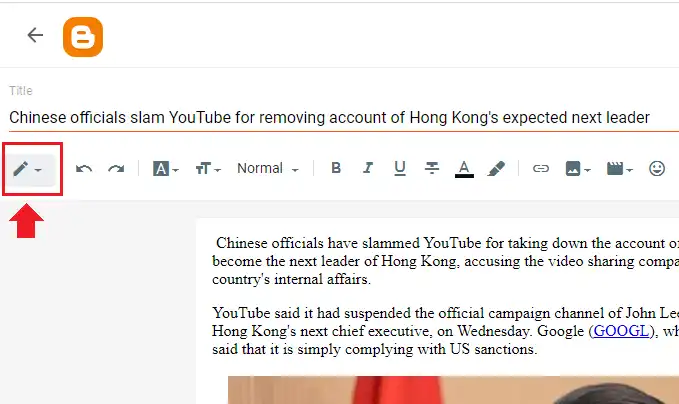
- Click on the Pencil Icon to change the view of your Post Editor.
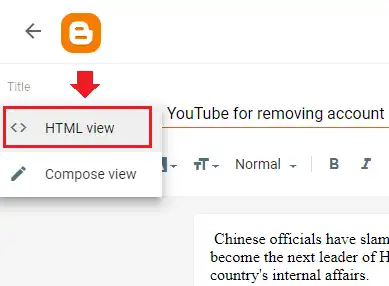
- Click the <> HTML view.
- Enter or Paste the code of your audio file. There are different ways to add audio in Blogger post, but here I have used <audio tag.
- The original audio is stored in Google Drive. I have copied the audio link and added in the source.

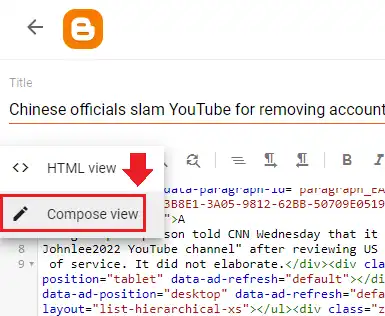
- Change your Post Editor view to Compose View and click Update button to save the changes.
02. Create FeedBurner Link
Since I have successfully added the audio in a blog post, now I will create FeedBurner URL with I am a podcaster! option enabled.
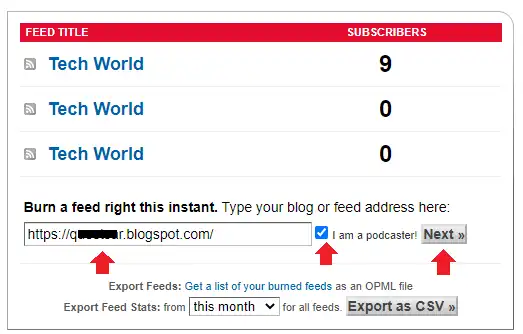
- Go to Google FeedBurner.
- Enter your Blogger blog URL in the Burn a feed right this instant textbox.
- Tick I am a podcaster!.
- Click the Next button.
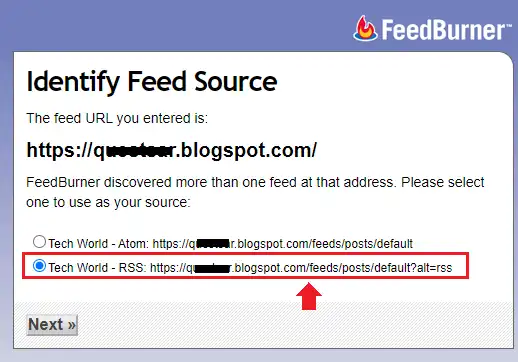
- Choose RSS feed source.
- Click the Next button.
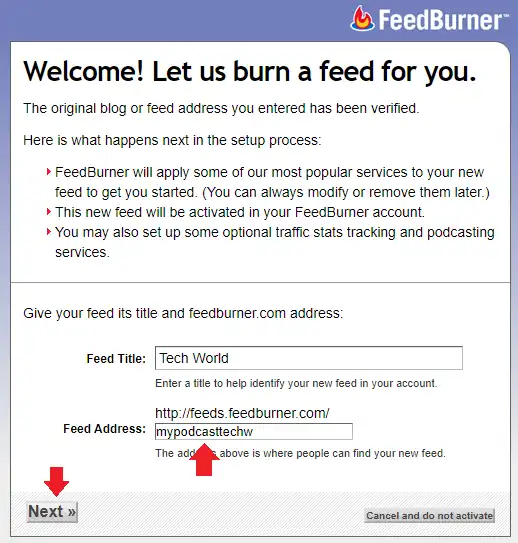
- Enter your Feed Title and a unique Feed Address.
- Click the Next button.
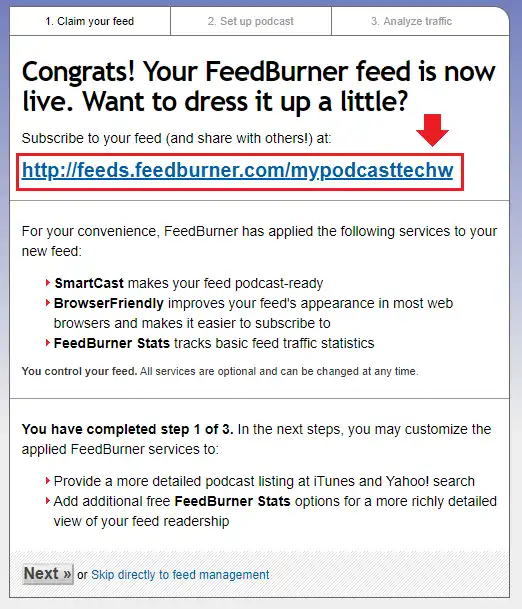
- Copy your FeedBurner RSS feed URL (Podcast Version). It is your Enclosure link.
- You can complete the remaining steps to manage your feeds, as shown in the Section 3.
03. Add Enclosure Link in Blogger Post
The enclosure link is ready, now you have to add the feed link in that blog post Links settings in which you have added the audio.
- Open your blog post and move to LINKS tab.
- Under the Enclosure Links paste your FeedBurner-RSS feed URL in the Add Link and enter MIME type in the Add mime type. For audio file mime type will be audio/mpeg.
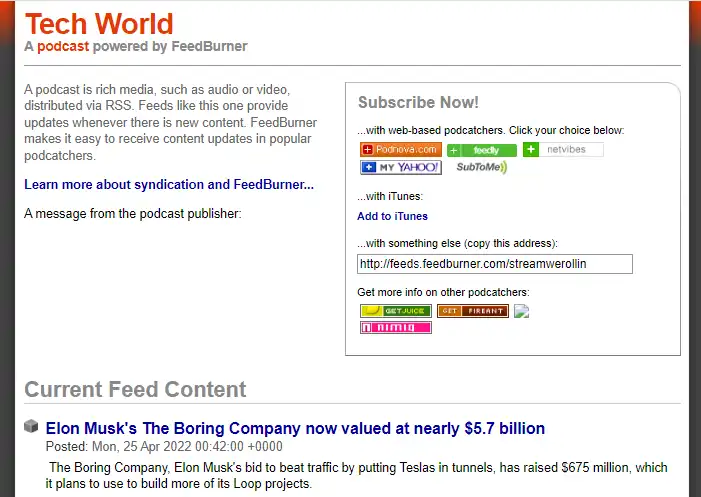
- I have opened the RSS feed URL (Podcast version). People can receive updates by subscribing to web-based podcatchers, like Podnova, feedly, My Yahoo, netvibes, iTunes, etc.
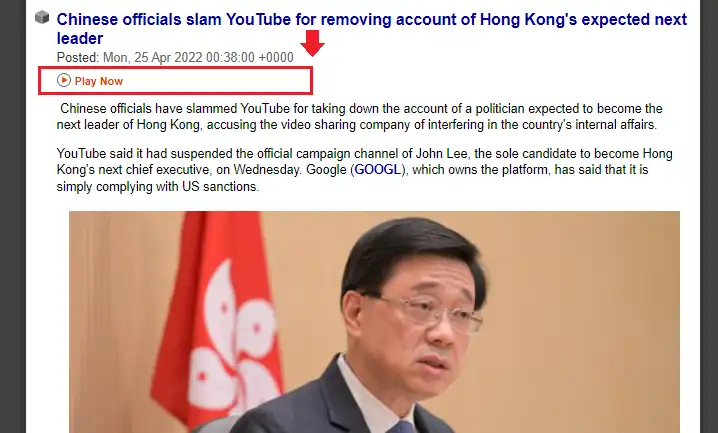
- You can see here, a Play button (link) on top of the post, below its title. The Google FeedBurner automatically finds the first enclosure link in the post and displays a Play Now icon (link) at top. We had added the audio in bottom of the post. Whenever someone opens your feed the audio will be played automatically in the audio player.
05. Show RSS Feed URL & Icon on Blogger Blog
In this section, you will learn about how to show your RSS feed URL and icons on your Blogger blog.
- Login to your Blogger account.
- Click the Layout.
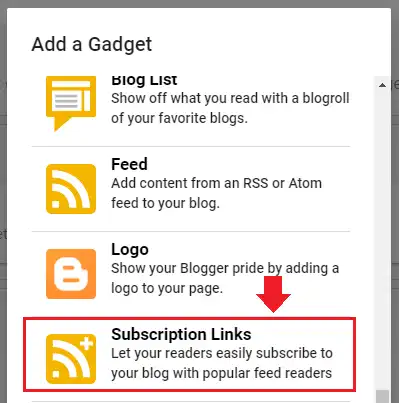
- On Layout click Add a Gadget.
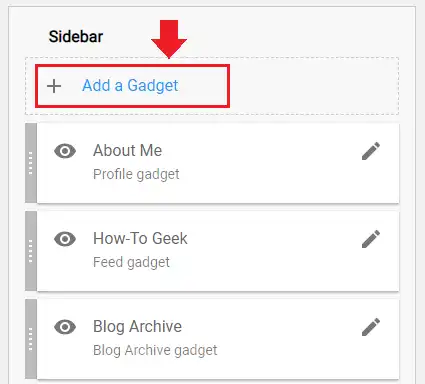
- Click the Subscription Links gadget.
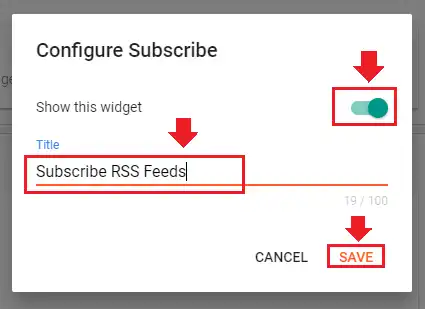
- Drag the Slider towards your right to show this widget on your blog.
- In the Title enter a title for your gadget.
- Click Save.
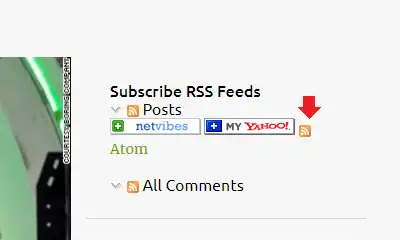
- Open your blog and see how your RSS feed gadget appears.
- You can see that there is RSS feed icon linked with your posts feed. There are also icons of some online feed subscription services through which people can subscribe to your RSS feed and receive updates.
06. Show RSS Feed Content On Blogger Blog
In this section, you will learn about how to show RSS feed content of your own blog or some other blog.
- Login to your Blogger account.
- Click Layout.
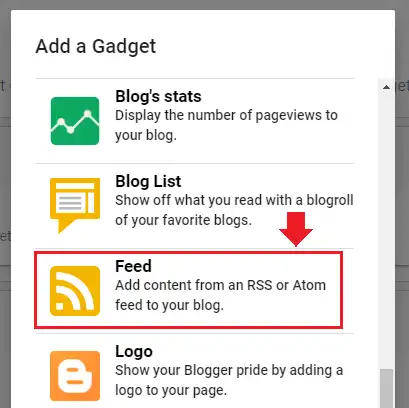
- Click Add a Gadget.
- Click Feed.
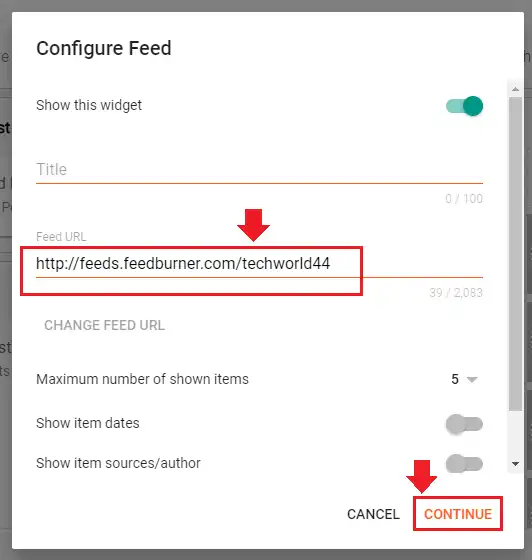
- Enter the RSS Feed URL of your desired blog in the Feed URL.
- Click CONTINUE.
- Note: The Title and other options will be activated once you add your RSS Feed URL and click Continue.
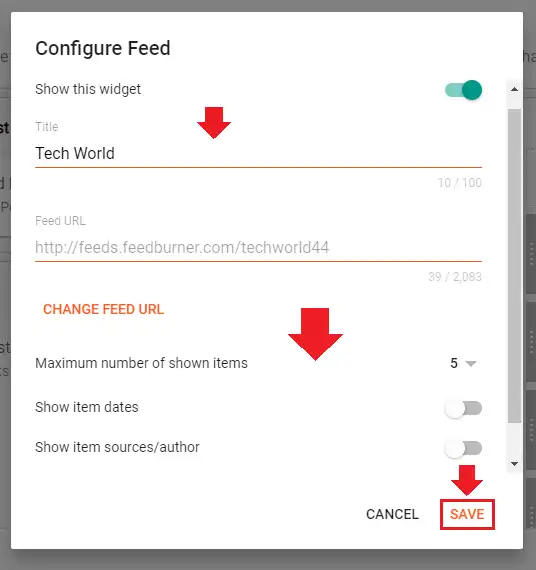
- Now you can modify your Title and set other options like (1) Maximum number of shown items (2) Show item dates (3) Show item sources/author (4) Open links in new window.
- Click SAVE.
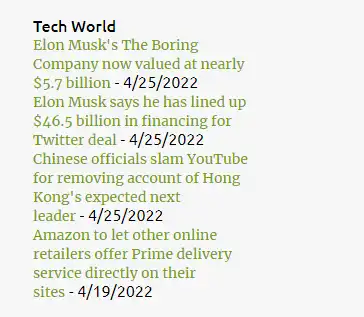
- Open your blog to see how the content from an RSS feed appears on your blog. You can style the content of this widget to make it look professional and presentable.
Conclusion
So it was all about setting up Site Feed Settings in Blogger. With basic Site Feed settings you have also learnt about advance features like Title Link and Enclosure Links in Blogger. If you like this post then don’t forget to share with the other people. Share your feedback in the comments section below.
Also Read



Leave a Reply