Do you want to know how to insert conditional tags in Blogger theme? You’re in the right place. In this tutorial, you will learn about different Blogger conditional tags and how to insert them in your Blogger theme.
Conditional tags are used when you customize your Blogger theme. By inserting a certain condition you can restrict a widget to appear/hide on certain page or pages like Homepage, Pages, Item Pages, Labels, Specific Label, Specific Page, and Specific Item Page.
Following topics will be covered in this tutorial:
- Different Types of Pages on Blogger
- Symbols Used in Conditions
- List of Conditional Tags in Blogger
- How To Insert Conditionals Tags in Blogger Theme.
RELATED
- How to Show Blogger Featured Post Only on Homepage
- How to Set Up Blogger Settings | A to Z
- How to Install Custom Theme in Blogger
01. Different Types Of Pages on Blogger
In this section, you will learn about the different types of pages on Blogger.
01. Homepage
Homepage is the main webpage of a website or a start page that appears on browser when you browse a domain URL like “https://www.example.blogspot.com“. All the sections and pages of a website can be navigated from the homepage.
02. Pages
Pages in Blogger are static pages that you create from Pages section, like About Us, Privacy Policy, Contact Us, etc. They have a URL in this format: “https://www.example.blogspot.com/p/about.html“. Here /p/ tells that it is a page. The year and month are not added in the Blogger page URL.
02. Item Page
When you click a post or article, its details are opened on an item page. It has a URL in this format: “https://www.example.blogspot.com/2020/02/how-to-download-tiktok-videos.html“.
03. Search/Label Page
Search/Label page contains the posts of a specific label. It has a URL in this format: “https://www.example.blogspot.com/search/label/Blogger“.

02. Symbols Used in Conditions
In this section, you will learn about some of the symbols used in the conditions.
01. “!=”
“!=” means not equal to.
02. “= =”
“= =” means equal to.
03. “=”
“=” indicates equality like 2+3=5 or like v=10, means v has the value 10.
03. List of Conditional Tags
In this section, you will learn about some of the Blogger conditional tags that you can insert in the theme.
01. Homepage
To show a widget only on the Homepage:
<b:if cond='data:blog.url == data:blog.homepageUrl'>

--------- Widget Code ----------

</b:if>
To show a widget on all the pages except Homepage:
<b:if cond='data:blog.url != data:blog.homepageUrl'>

--------- Widget Code ----------

</b:if>
02. Item Page
To show a widget only on the item page:
<b:if cond='data:blog.pageType == "item"'>

--------- Widget Code ---------

</b:if>
To show a widget on all the pages except item page:
<b:if cond='data:blog.pageType != "item"'>

----- Widget Code -----

</b:if>
03. Pages
To show a widget only on the static pages:
<b:if cond='data:blog.pageType == "static_page"'>

------ Widget Code ------

</b:if>
To show a widget on all the pages except the static pages:
<b:if cond='data:blog.pageType != "static_page"'>

------ Widget Code ------

</b:if>
04. Search/Label Page
To show a widget only on the search/label page:
<b:if cond='data:blog.searchLabel'>

----- Widget Code -----

</b:if>
To show a widget on all the pages except the search/label:
<b:if cond !='data:blog.searchLabel'>

----- Widget Code -----

</b:if>
To show a widget only on specific search/label. Replace Label_Name with your label name. For instance, we want to show a widget only on the label “Sports”, so we will replace Label_Name with “Sports”. Label names are case-sensitive, so write them as it is.
<b:if cond='data:blog.searchLabel == "Label_Name"'>

----- Widget Code -----

</b:if>
To show a widget on all the pages except a specific search/label:
<b:if cond='data:blog.searchLabel != "Label_Name"'>

----- Widget Code -----

</b:if>
05. Specific Page
To show a widget only on a specific page. In this conditional tag you can paste the URL of any post/article, page, item page or label. As I have shown on Different Types Of Pages On Blogger section above that how URLs of different pages look like.
For instance, this is a post URL : https://www.example.blogspot.com/2020/01/best-macbook-to-buy.html on which I want to set condition. I will simply replace Post_URL in the conditional tag with this URL.
<b:if cond='data:blog.url == "Post_URL"'>

---- Widget Code ----

</b:if>
06. If/Else Conditional Tags
In If/Else conditional tags you give more than one option to execute when the first condition is not met. You add Else after the If condition.
<b:if cond='data:blog.pageType == "static_page"'>

---- If this condition is true, means if a page that is opened is a static page, the code inside here will be executed and Else part will not be executed.----

<b:else/>

----- If the first condition is false, means if a page that is opened is not a static page, the code inside here will be executed -----

</b:if>
07. More Than One If Conditions
You can add more than 1 if conditions as well. It works like AND operator, means if both the if conditions are true than the code will be executed. For example, you don’t want to show a widget on static pages and item pages, following will be the syntax:
<b:if cond='data:blog.pageType != "item"'>
<b:if cond='data:blog.pageType != "static_page"'>

--- Widget Code -----

</b:if>
</b:if>
08. OR Condition
OR operator is used to execute a code when any of the IF condition is true. For instance, if you want to show a widget only on two pages you can use OR condition. To implement OR condition we use more than one IF conditions. One IF above the ELSE tag and the other IF conditions inside the ELSE tags. Here I am using the two IF conditions.
Syntax:
<b:if cond='data:blog.url == "FIRST_PAGE"'>

<b:else/>

  <b:if cond='data:blog.url == "SECOND_PAGE"'>

 ------------- Widget Code --------------

 </b:if>
</b:if>
04. How to Insert Conditional Tags in Blogger Theme
You must have understood different types of pages and conditional tags. Now in this section, I will guide you on how to insert these conditions in your Blogger theme.
It is a good practice to take a backup of your theme before you make any changes on it. Learn: How To Backup & Upload Blogger Template/Theme Step By Step.
- Sign In to your Blogger.
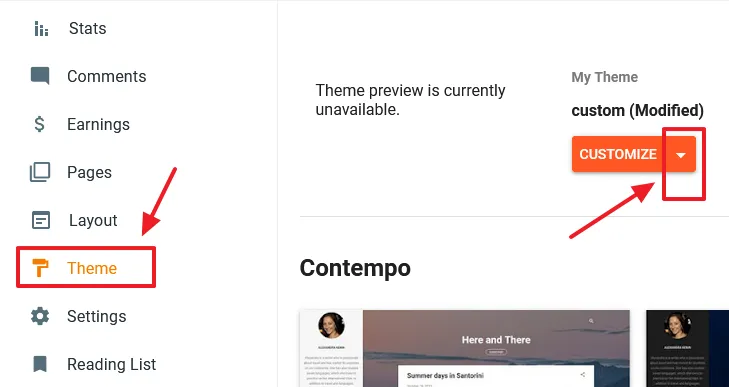
- Click Theme from the sidebar.
- Click the “Downward arrow” attached to CUSTOMIZE button.
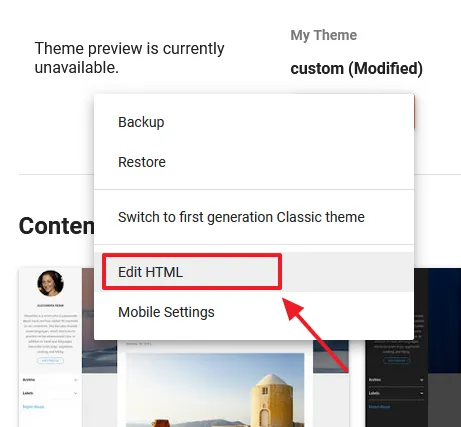
- Click the Edit HTML.
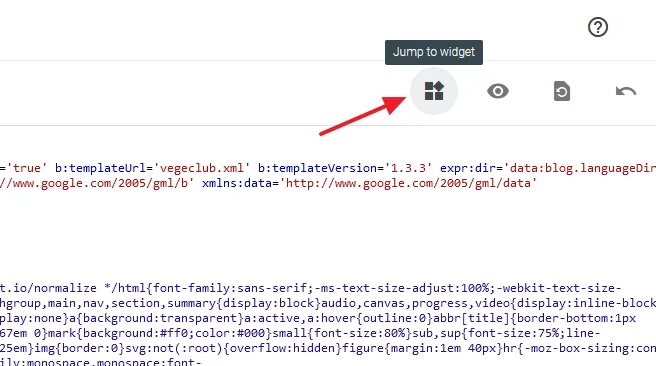
- Click the “Jump to widget” icon. It will list down all your widgets. Click on the widget on which you want to insert the conditional tag.
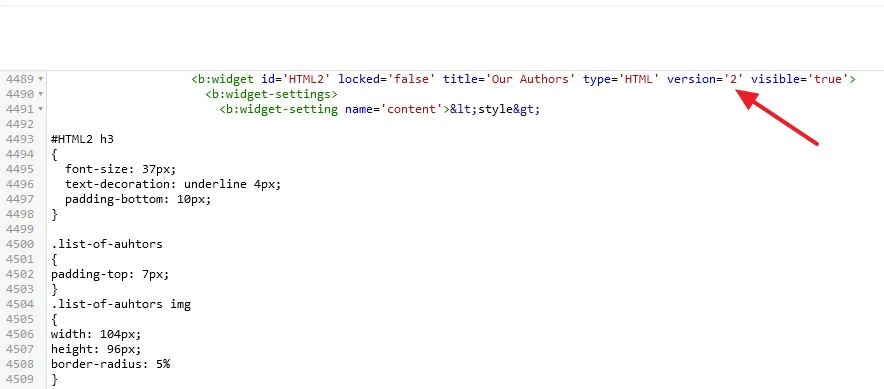
- Remember that the custom widgets will not be listed with the name. They will be listed with HTML ID like HTML 1, HTML 2, etc, but once you click the widget you can see the title of the widget along with the ID like this:
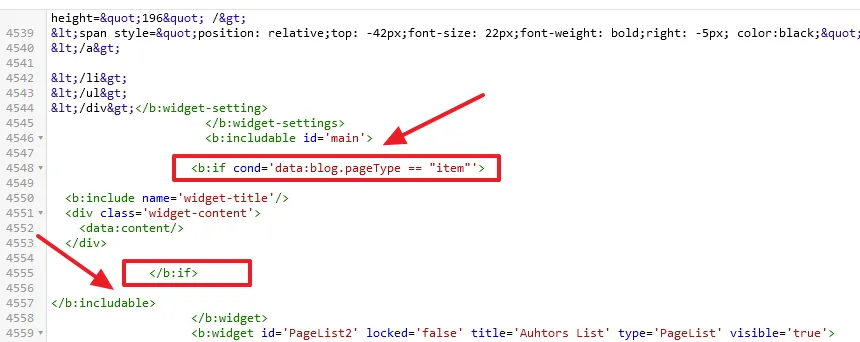
<b:widget id='HTML2' locked='false' title='Our Authors' type='HTML' version='2' visible='true'>- After you click the widget from the list your cursor will go to first line of the widget code, as shown below. Scroll down slowly to find the line <b:includable id=’main’>. For some built-in widgets like Header, Featured Post, etc, have <b:includable id=’main’ var=’this’>, so don’t get confused with the additional var=’this’.
- You have to insert the condition below <b:includable id=’main’>, and </b:if> before the </b:includable>, a shown below. The Widget body ends at </b:widget> tag.
- Save your theme. Refresh your blog and check whether the conditionals tags have been applied or not. You can add any conditional tag in the similar way on any widget, custom or built-in.
Get access to all our Blogger Tutorials. If you like this post then don’t forget to share with other people. Share your feedback in the comments section below.
Also Read
- How To Display Google Ads On Blogger – Step By Step | Monetize A Blogger Blog
- How To Configure Google Search Console On Blogger | Add Sitemap | Inspect URL
- How To Add & Test Custom Robots Txt On Blogger/Blogspot | Blogger SEO
- How To Configure/Set The Custom Robots Header Tags On Blogger | Blogger SEO



Leave a Reply