Do you want to optimize your Tumblr blog for search engines (Google, Yahoo, Bing, etc) to drive organic traffic? You’re in the right place. In this post, I will guide you on how to set up Tumblr SEO settings and Tumblr on-page SEO.
SEO stands for Search Engine Optimization. It is the process of optimizing your website and its pages for search engines (Google, Bing, Yahoo, etc) to perform better in the SERPs (Search Engine Results Pages). When a website/blog and its pages perform better in the SERPs, they drive organic traffic to your blog.
An organic traffic is a free traffic that naturally comes to your website/blog in response to user searches on the search engines (Google, Yahoo, Bing, etc), without any paid advertisement/campaigns or link building techniques.
Following topics will be covered in this post:
- How to Set Up SEO Settings in Tumblr
- Use a Responsive Theme
- Tumblr On-Page SEO
01. How to Set Up SEO Settings in Tumblr
In this section, I will guide you on how to set-up/configure Tumblr SEO settings step-by-step.
- Enable Search Engine Visibility
- Link Tumblr to Google Search Console
- Link Tumblr to Google Analytics
- Enable AMP
- Enable URL Handling
- Enable Related Posts
- Add Blog Description
- Add About Page
RELATED
- How To Setup & Activate Post+ in Tumblr | Make Money
- How To Setup Custom Domain On Tumblr | Buy Own Domain
- How to Create Tumblr Blog Post | Learn to Use Text Editor
- 30+ Websites to Buy Premium Tumblr Themes | Free Download
- Understand On-Page SEO and Off-Page SEO | Grow Your Blog Traffic
01. Enable Search Engine Visibility
They Visibility settings allow you to set whether you want your Tumblr blog to appear in the Tumblr searches and external search-engines (Google, Bing, Yahoo, etc) searches.
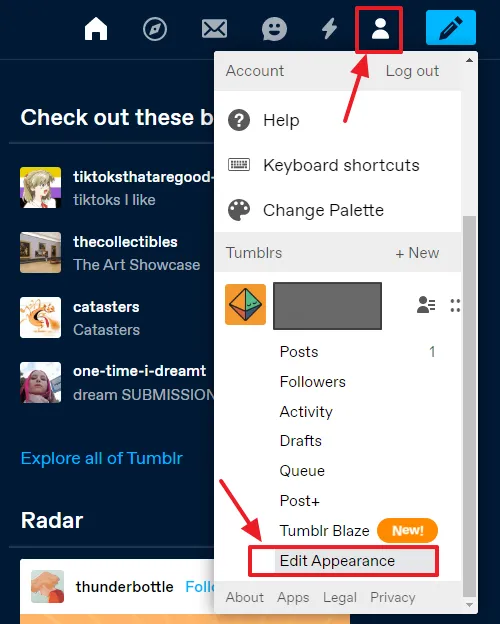
- Click on your Account icon, located at top-right corner.
- Scroll-down to bottom and click the Edit Appearance.
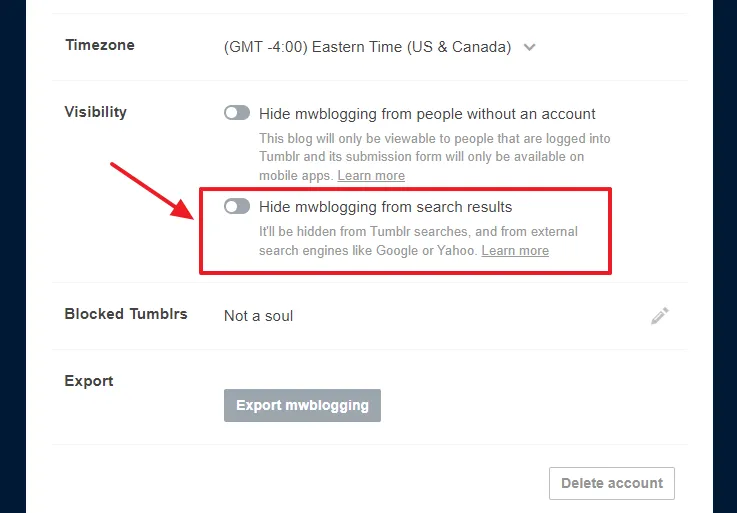
- Scroll-down to Visibility section.
- Turn-off the Hide your_blog_name from search results option. When this option is disabled, the visibility of your Tumblr blog will be enabled for search engines.
02. Link Tumblr to Google Search Console
Google Search Console is a free SEO tool that helps you to optimize the performance of your website/blog for Google search results.
In order to know more about Google Search Console, and how to link your Tumblr blog to Google Search Console, read our step-by-step tutorial:
03. Link Tumblr to Google Analytics 4
Google Analytics 4 is powerful free data analytics tool that provides you detail reports about your website traffic and performance.
Tumblr provides Google Analytics ID settings where you have to add your Google Analytics 4 Measurement ID, through which Google Analytics 4 tracks the traffic of your blog.
To know more about Google Analytics 4, How to Create Google Analytics 4 Account, How to Find & Add Measurement ID, How to add Global Site Tag, read our step-by-step tutorial:
03. Enable AMP
AMP stands for Accelerated Mobile Pages. It is used to optimize the web pages for slow mobile devices so that they load quickly on them. Fast loading pages provide a good page-experience to users, that ultimately improves the page ranking in the search results.
AMP also helps you to pass the Core Web Vitals metrics assessment, which is one of the ranking factors in the Google ranking system. Read more about Core Web Vitals metrics.
Follow the steps to enable AMP in Tumblr:
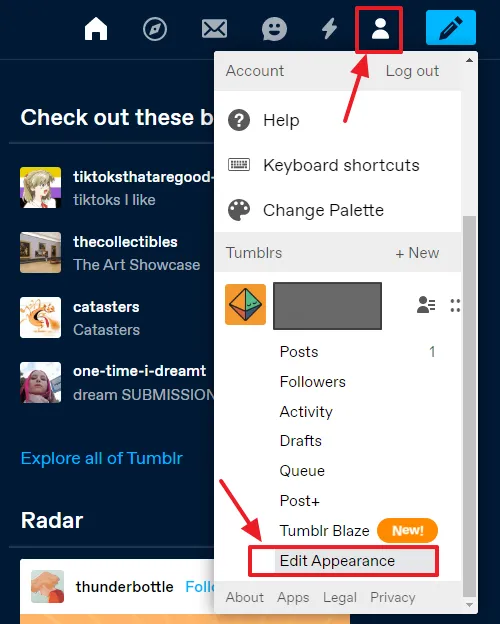
- Click the Account icon, located at top-right corner.
- Scroll-down to bottom and click the Edit Appearance.
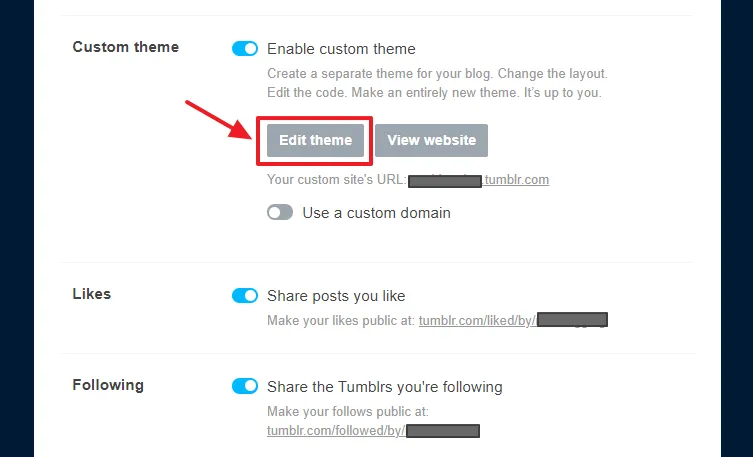
- Go to Custom theme section, and click the Edit theme button.
- Scroll-down to bottom and click the Advanced options tab.
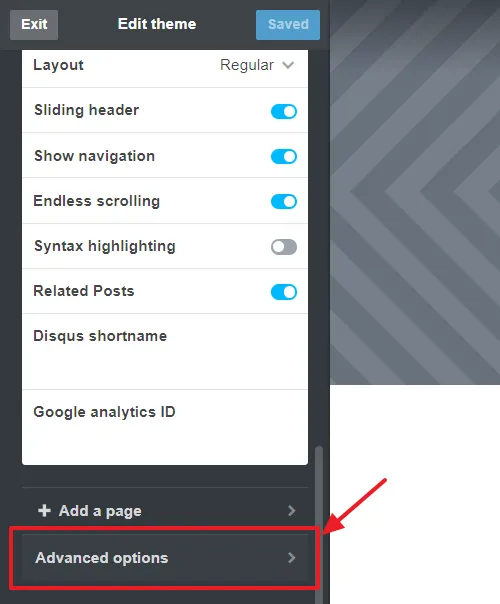
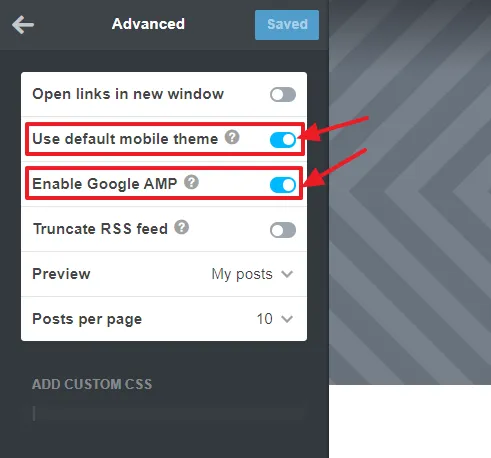
- Turn-on the Use default mobile theme. This will overwrite your theme with a special layout optimized for browsing on mobile devices because some themes are not compatible with AMP. If your theme is compatible with AMP you can disable this option.
- Turn-on the Enable Google AMP.
04. Enable URL Handling
The URL handling option affects how certain URLs to your blog are parsed. It does more reliable URL parsing for your searched and tagged pages.
URL Parsing is a process in which the flow of website traffic over a network is monitored and incoming network traffic is distributed across multiple servers (server pools), that reduces the load of handling demands/requests from a single server. It makes the overall process efficient and optimizes the response time by limiting the delays and freeing bandwidth.
Follow the steps to enable URL Handling in Tumblr:
- Click the Account icon, located at top-right corner.
- Scroll-down to bottom and click the Edit Appearance.
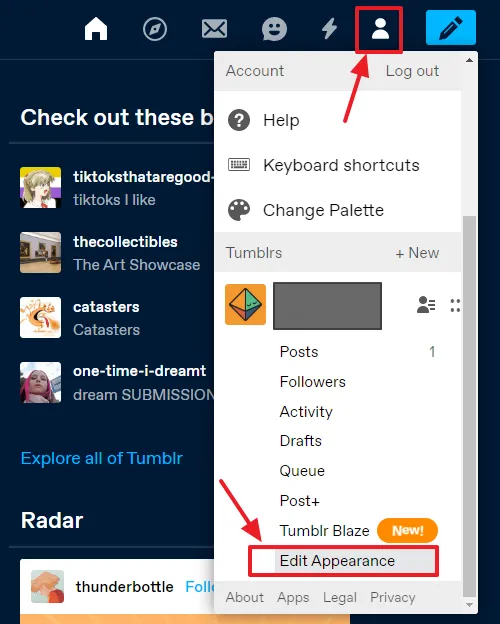
- Go to Custom theme section and click the Edit theme button.
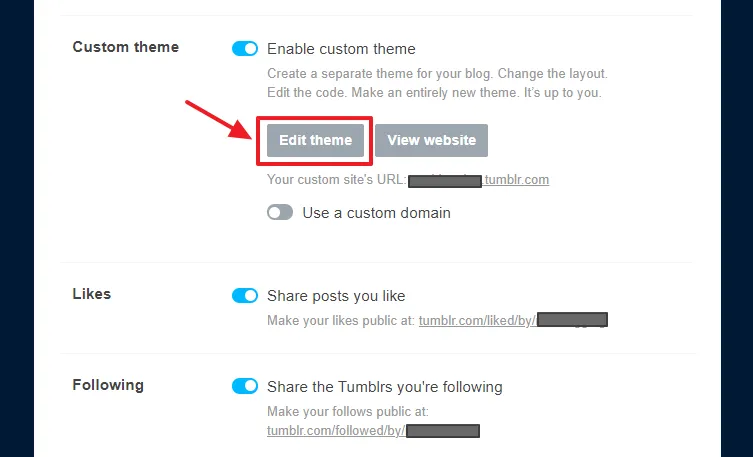
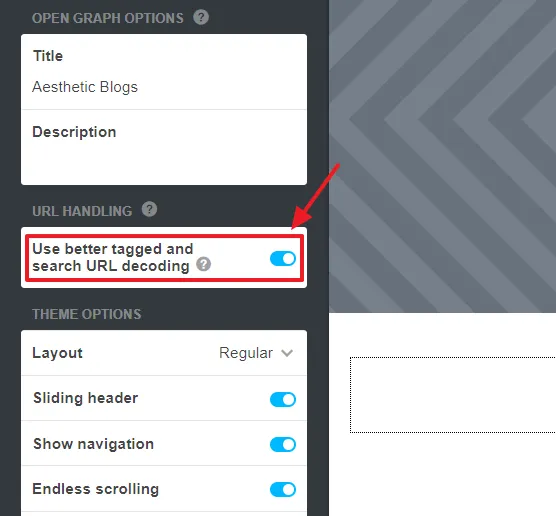
- Scroll-down to URL HANDLING section and enable Use better tagged and search URL decoding. The URL decoding process decodes a URL to a more readable form that helps in finding errors within a URL.
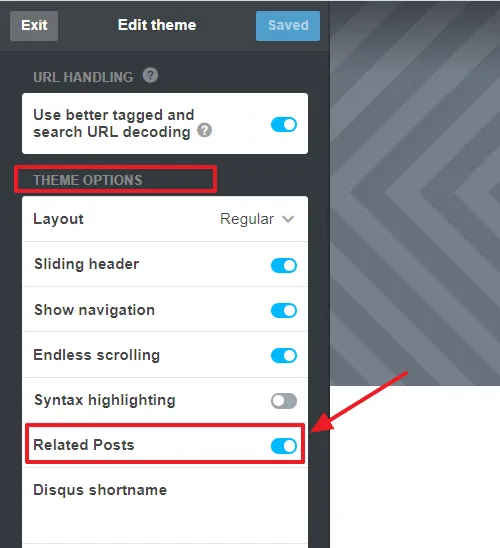
05. Enable Related Posts
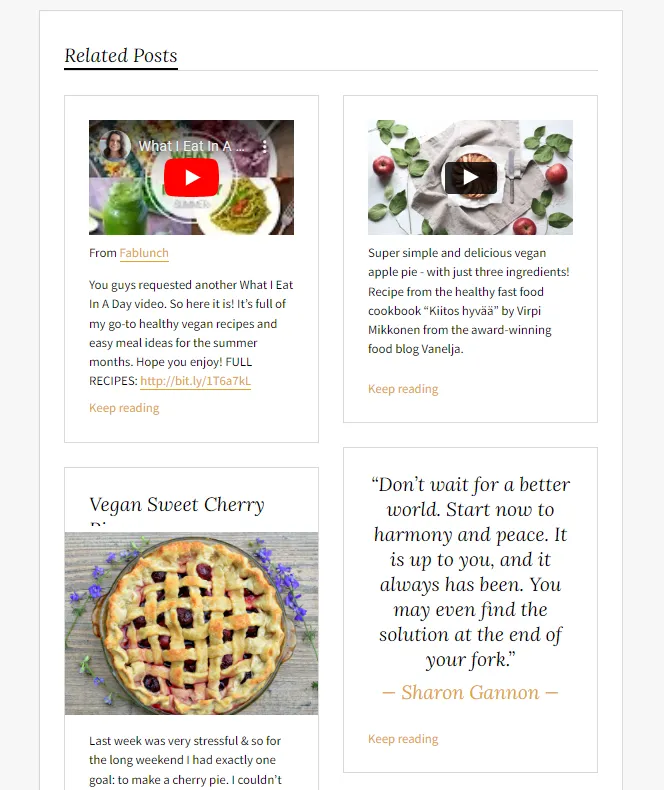
A Related Posts is a widget that displays the relevant posts to the current post that a visitor has opened. The widget is often placed at sidebar or bottom of the page, so that visitor would see and may open one of the relevant posts to read.
Related Posts helps you to improve the visitor’s engagement with your content, that increases the average stay period of a visitor on your website/blog and decreases the bounce rate.
Bounce rate can be defined as, a visitor visits your page and exits without reading other posts or exploring your blog. It doesn’t matter how much time a visitor spends on the first-visited page, counts as 0 seconds if he exits the page without visiting another page of your blog or clicking a link.
Related Posts has different names, like, More You Might Like, Recommended Posts, Similar Posts, etc. Example of a Related Posts widget on a Tumblr blog.
Follow the steps to learn about how to enable the Related Posts widget in Tumblr. Do remember that not every Tumblr theme supports Related Posts widget.
- Click the Account icon located at top-right corner.
- Scroll-down to bottom and click the Edit Appearance.
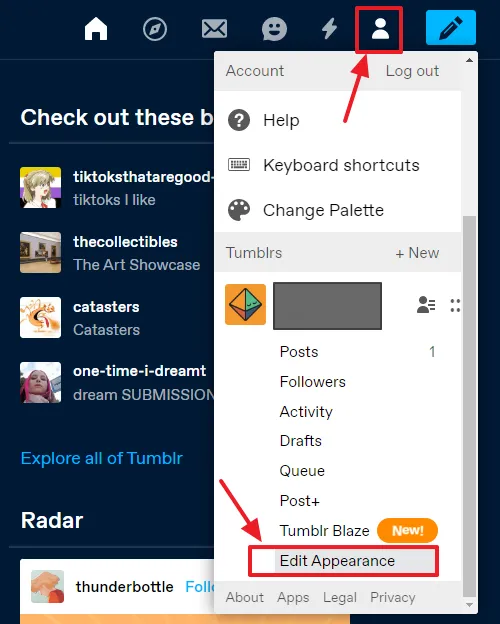
- Go to Custom theme section, and click the Edit theme button.
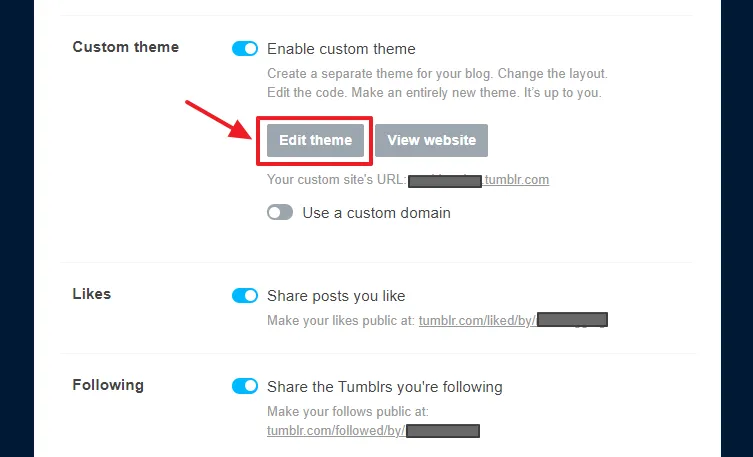
- Scroll-down to THEME OPTIONS and enable the Related Posts option. Also enable Show Navigation, located two rows above the Related Posts.
06. Add Blog Description
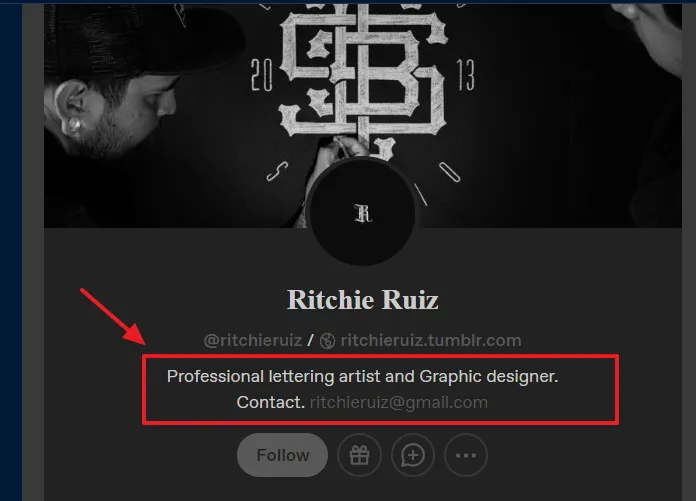
Blog Description is a brief introduction about your Tumblr blog that should contain the main words (keywords) of your niche, your business, or your work. It helps visitors to know what type of content they can expect on your blog or what exactly your Tumblr blog/website is about.
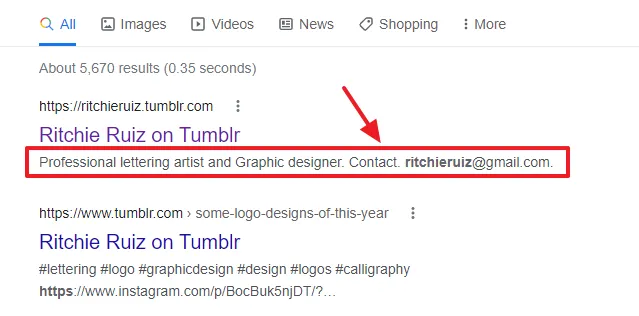
The Blog Description also appears in the search results. Keywords in the description can also get ranked for users searched queries. The way description helps visitors, it also helps search engines to understand your blog and list it in the search results against relevant search queries. So, it means that description can drive organic traffic to your Tumblr blog.
An example of a precise Tumblr Blog Description written by a professional lettering artist.
Here you can see, the blog description appears in the Google search results.
Follow the steps to learn about How to add a Blog Description in Tumblr:
- Click the Account icon located at your top-right corner.
- Scroll-down to bottom and click the Edit Appearance.
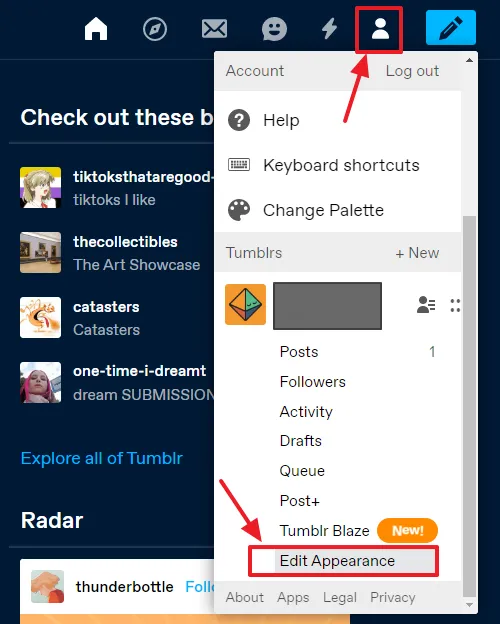
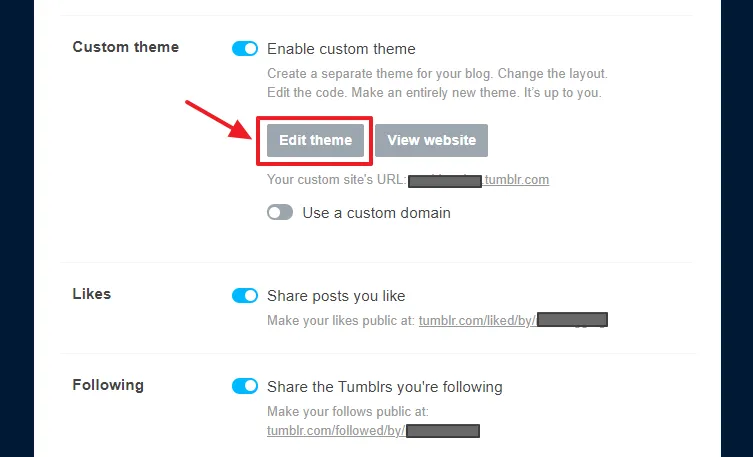
- Go to Custom theme section and click the Edit theme.
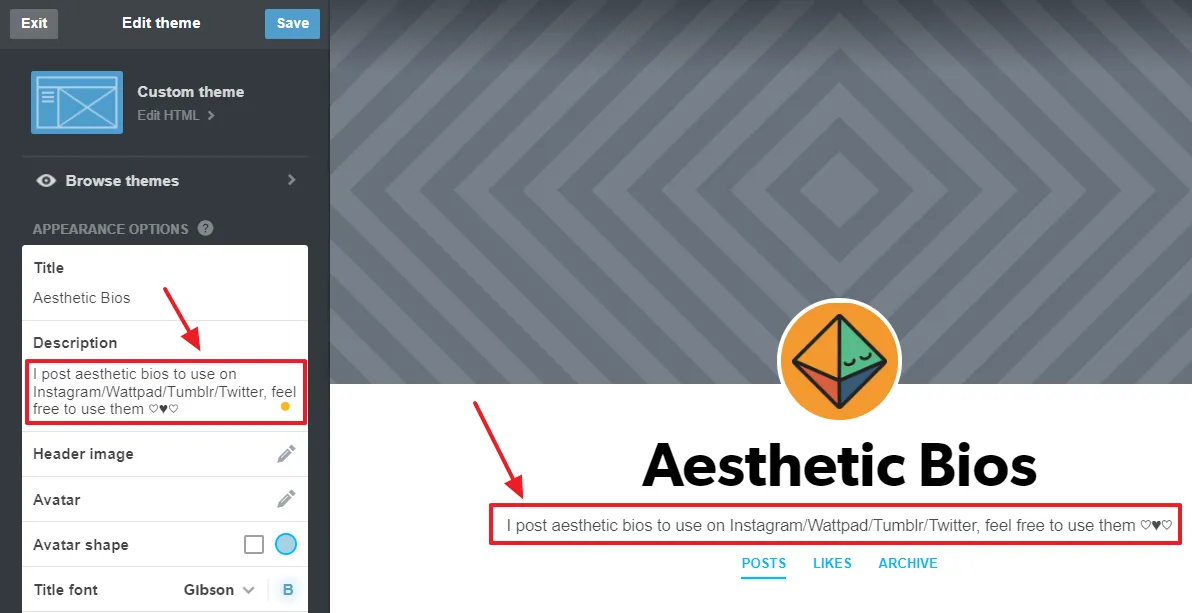
- Go to APPEARANCE OPTIONS and type your blog description in the Description.
07. Add About Page
Like Blog Description, About page is also very critical for blogs and websites. It is a special page where your blog visitors can read more about you, your business, your services, your goals, your skills, your story, your experiences, your mission, and much more.
Follow the steps to learn about How to add a page in Tumblr:
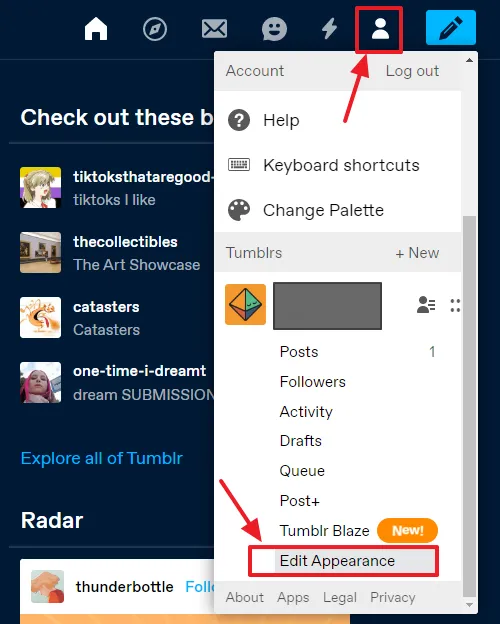
- Click the Account icon located at your top-right corner.
- Scroll-down to bottom and click the Edit Appearance.
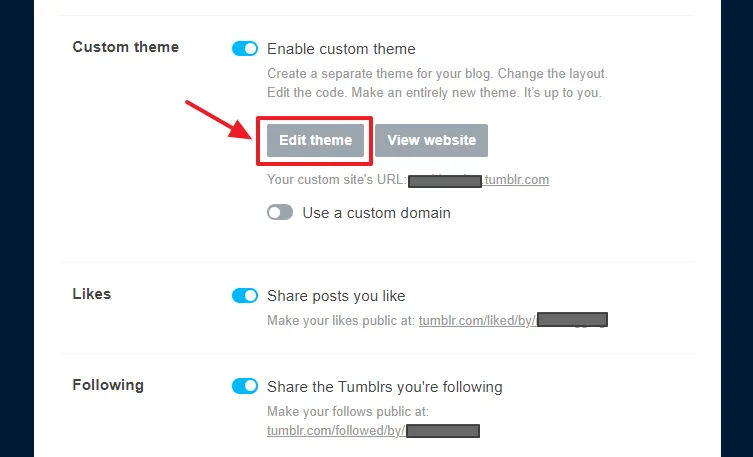
- Go to Custom theme section and click the Edit theme.
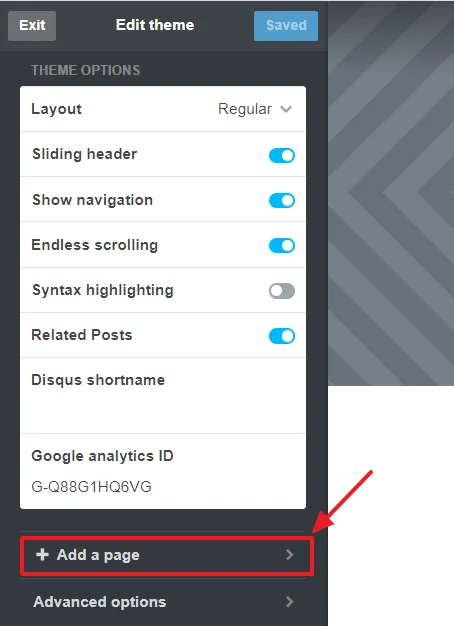
- Scroll-down to bottom and click the + Add a page tab.
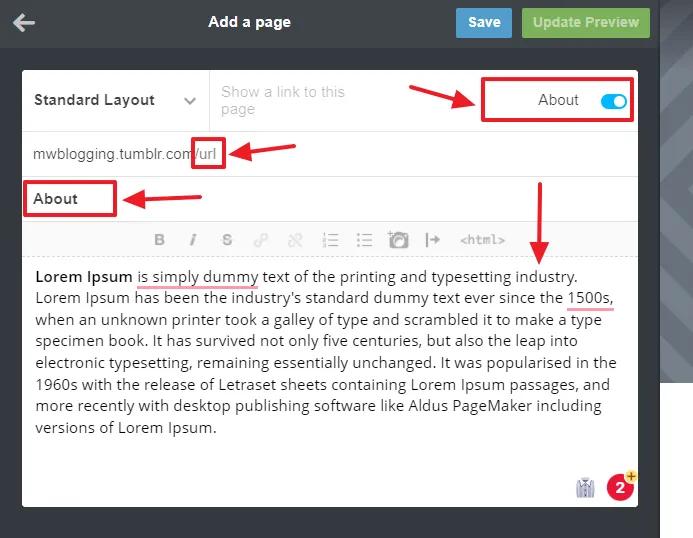
- Turn-on Show a link to this page and type “About”.
- In the Page URL, replace url with the “about” text. It will be like “example.tumblr.com/about”.
- In the Page Title enter “About”.
- Add your text in the content area. You can insert images, add style to text, and add links.
- Click the Save button, once you’re done.
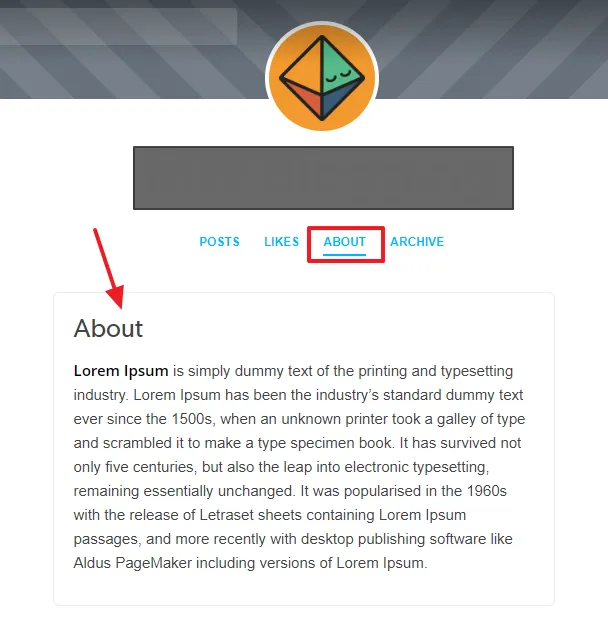
- Here you can see the live preview of About page. Its link also appears in the Navigation.
02. Use a Responsive Theme
A responsive theme is a theme that automatically adjust the website/blog content and images according to screen size and device, to provide a good user experience to visitors. When you provide a good user experience to visitors they tend to spend more time on your blog, and also revisits your blog frequently.
Search Engines prefer to show blogs and websites with good user page-experience in their search results.
All the builtin Tumblr themes are responsive. If you use/buy a third-party tumblr theme make sure to check its responsiveness on different devices. If a theme is non-responsive or having mobile usability issues, there will be a negative affect on your blog’s SEO.
Google Search Console identifies your theme issues and helps you to troubleshoot and fix them.
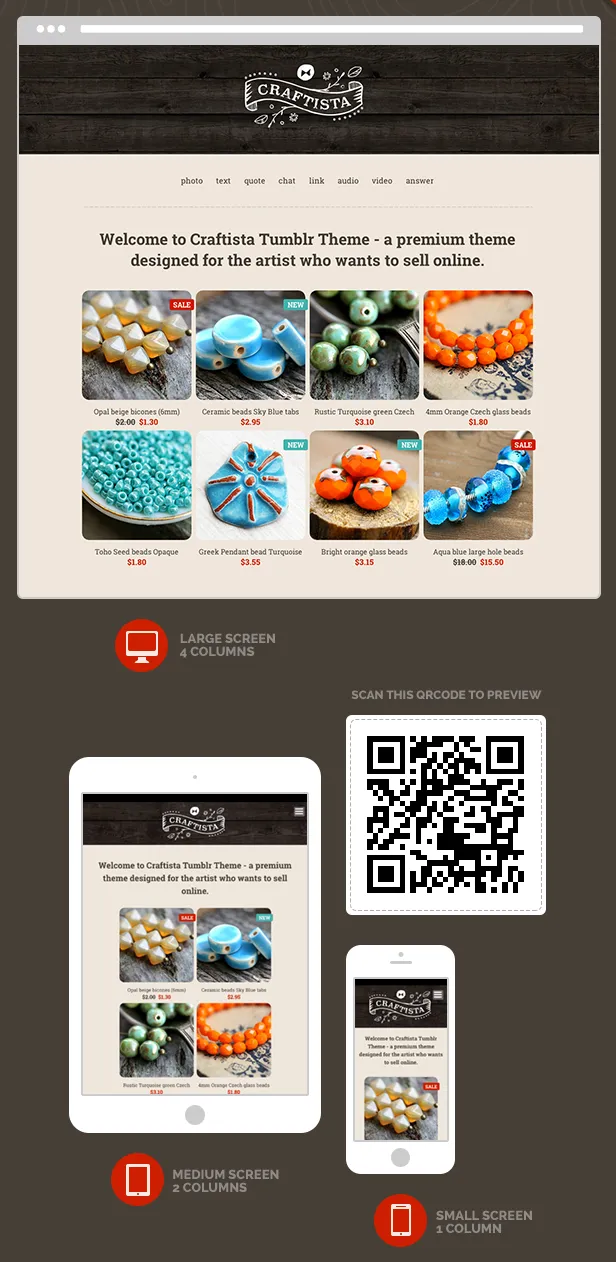
Below is an example of a responsive theme. You can find plenty of responsive aesthetics Tumblr themes on Themeforest.
02. Tumblr On-Page SEO
On-Page SEO also known as on-site SEO, is a practice through which you can optimize your website pages/posts to perform better and rank higher in the SERPs.
Here are some very important on-page SEO tips that you must practice to drive organic traffic to your Tumblr blog:
Post Title
The Post Title shouldn’t be too long. It must contain the main keywords of your post that people would use to search for your content.
Original Content
Create original, unique, and user-first content. From SEO point-of-view, it is the most important ranking factor. Do not copy the content from other blogs or websites. A copied/duplicate/spammy content doesn’t rank in the search results and also negatively affects the overall SEO of your blog.
Internal Linking
Add the relevant internal links in your posts, so that visitors can explore more content of your blog. It reduces the bounce rate of your posts as well as the overall bounce rate of your blog. An Internal link is a link from one post to another within a same domain (website/blog).
Tags
Tags are used to organize and group similar content (posts), so that people can easily find a post about a specific topic on your blog. They enhance the visibility and searchability of your posts. You can show your Tumblr content to communities/groups/audience that you want to reach.
Add only the relevant tags in your Tumblr posts because they are also indexed in search engines. User may find your blog and its pages in the search results via tags because they act as keywords. If you use irrelevant tags search engines might get confused.
Paragraphs & Headings
Write short paragraphs. The length of paragraphs should be 2 to 3 paragraphs. Try to include main keywords of your post Title in the first paragraph.
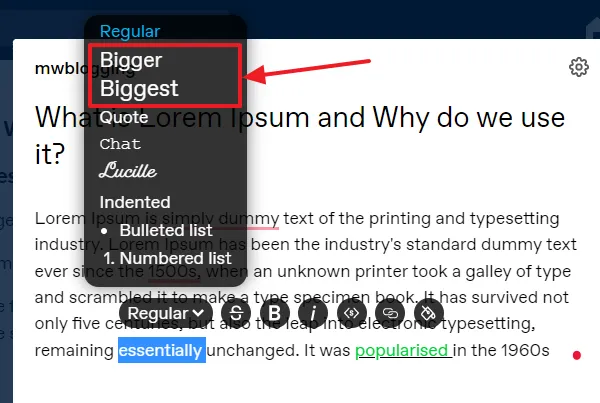
Use Headings to format the content of your post. A heading identifies a content within the sections of post. The main heading(s) of your post should contain the important keywords of the post Title. Other blogging platforms like Blogger, WordPress, etc, support H1, H2, H3, H4, H5… heading tags, but Tumblr only supports H1, and H2 heading tags.
In your Tumblr Rich Text editor, select the text that you want to make heading. The Bigger font-style represents H2 heading tag, and the Biggest font-style represents H1 heading tag.
Images/Photos
If necessary, you can add images, info-graphics, audios, and videos in your posts. They can quickly grab the attention of visitors.
Create quality thumbnails and images for your posts. Use Canva for free, the leading graphic designing tool.
Optimize the size of your images before you upload them because large size images take more time to load. If possible use the next-generation image formats like WebP, JPEC-2000, etc.
Give a meaningful name to your images. Don’t name images like image1.png, image2.jpeg, 1.png, 2.jpeg, abc.png, etc. Keep in mind, images are great source of driving organic traffic to your blog.
Add ALT text for every image/GIF that you add in the post. The ALT Text describes the appearance or purpose of the image/photo/GIF. It is mainly used for 3 purposes (1) Used by screen readers (browsers) that are used by visually impaired people (2) If for some reason image is not loaded, the ALT text appears (3) Provides image description to search engine crawlers so that they find and rank your image in the image searches.
Follow the steps to learn about How to add an ALT text for an image in Tumblr:
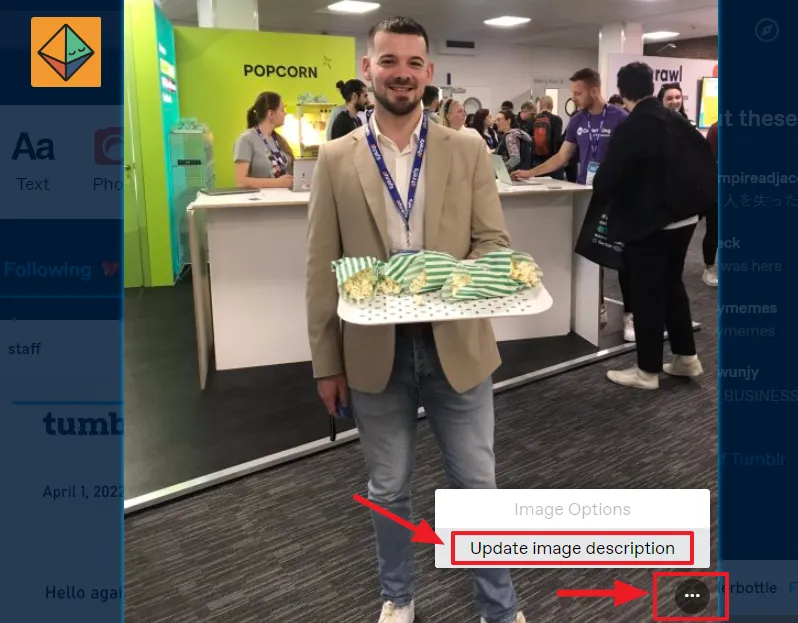
- Click the Ellipsis Icon (three horizontal dots) located at bottom-right corner of the image.
- Click the Update image description.
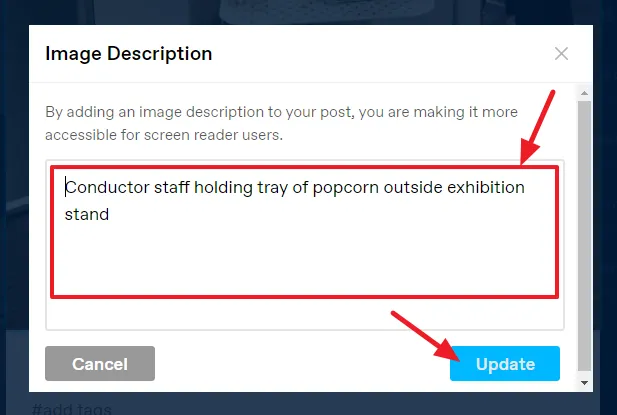
- Enter the ALT text in the Image Description.
- Click the Update button.
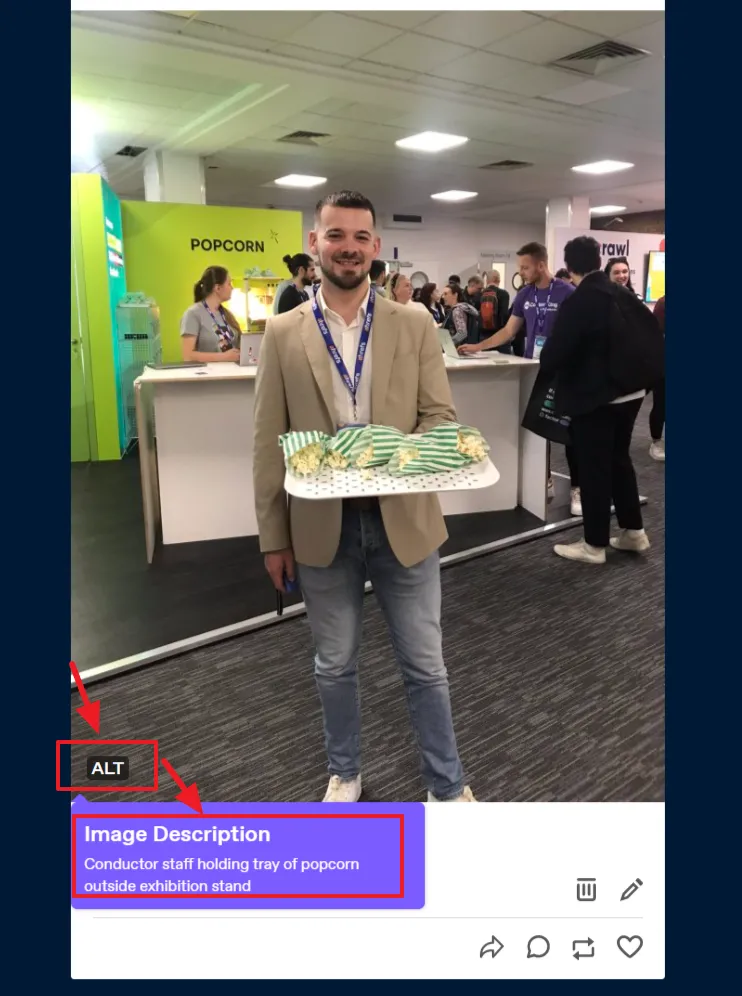
- ALT label appears on the images on which ALT text is added. When you click on the ALT label the image description appears in a rounded rectangular callout.
Final Thoughts
So it was all about Tumblr SEO settings and On-page SEO guide. Set up the SEO settings and follow the on-page SEO practices, as they are critical for achieving higher search rankings and driving organic traffic to your Tumblr blog.
If you like this post then don’t forget to share with the other people. Share your feedback in the comments section below.
Also Read
- How to Make Money on Tumblr Blog | 7 Ways
- How To Install a New Tumblr Theme From HTML File
- How to Take Backup in Tumblr & Download to Your Computer
- How to Restore a Tumblr Post from Backup
- Tumblr Help for Beginners | Guides | Step-By-Step Tutorials
- How to Add a Page on Tumblr | About Page
- How to Add a Custom Favicon on Tumblr | Change Favicon


Leave a Reply