Do you want to customize your Tumblr blog settings? You’re in the right place. In this tutorial, I will guide you step-by-step on how to do.
The Tumblr blog settings allow you to customize Edit Appearance (Cover, Profile Photo, Name), Username, Blog Address, Enable/Edit Custom Theme, Likes, Following, Featured Tags, Replies, Mentions, Tipping, Blaze, Ask, Submissions, Messaging, Affiliate Links, Queue, Language, Timezone, Visibility, Blocked Tumblrs, Export, and Delete Blog.
Following topics will be covered in the post:
- How to Open Tumblr Blog Settings
- How to Customize Tumblr Blog Settings
RELATED
01. How to Open Tumblr Blog Settings
Follow the steps to open the Tumblr blog settings.
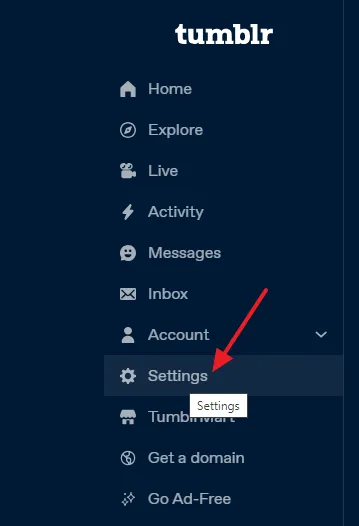
- On your Tumblr Dashboard, click on the Settings from the sidebar.
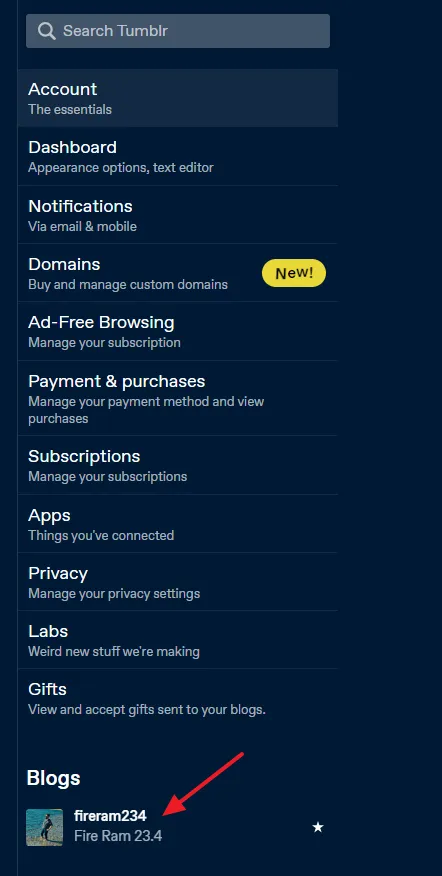
- At your right-sidebar you can see the different types of settings. Scroll-down to Blogs section and click on your blog.
02. How to Customize Tumblr Blog Settings
I have covered the blog settings in the same sequence as they are on Tumblr i.e. top to bottom.
- Edit Appearance
- Username and Address
- Custom Theme
- Likes & Following
- Featured Tags, Replies, and Mentions
- Tipping
- Blaze
- Ask
- Submissions
- Messaging
- Affiliate Link
- Queue
- Language, Timezone, and Visibility
- Blocked Tumblrs
- Export
- Delete blog
01. Edit Appearance
The Edit Appearance options allow you to change/edit Tumblr cover photo, Tumblr profile picture, Tumblr display name (title), Tumblr description/bio, Accent, and Background.
Apart from Edit Appearance setting there are Manage badges settings that allow you to (1) show/hide badges to display on your profile next to your username on posts (2) to purchase/shop badges. There are two types of badges on Tumblr (1) Badges that you purchase (2) Badges that you earn. For example, you earn the badge Top Poster Club when you make over 100 posts, your earn Blazer Badge when you blaze more than 5 posts. You can see on my profile that there is 601 Limit Breaker badge that I earned when I viewed more than 601 posts the previous day.
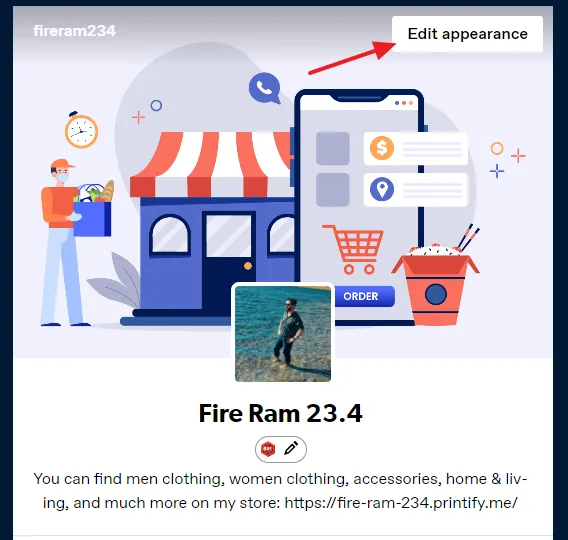
- Click on the Edit appearance button.
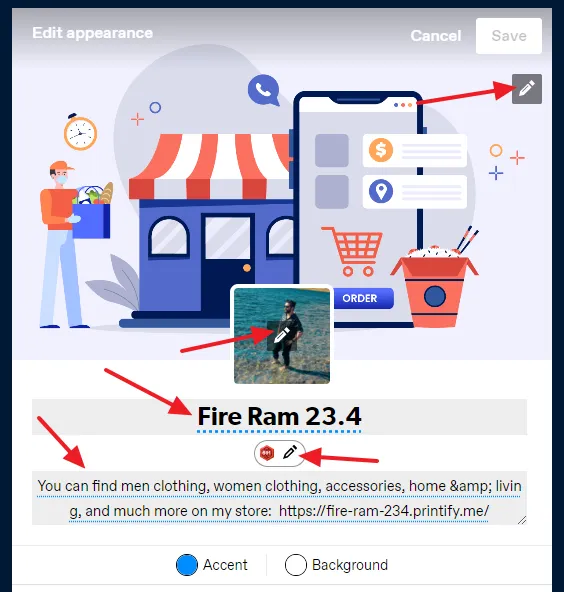
- Click on the Edit icons of Cover Photo and Profile Picture to upload/change the photos.
- You can edit your Tumblr Display Name (title).
- Click on the Manage badge icon to customize badge settings.
- Provide your Tumblr blog’s Description.
- Select the Accent and Background colors. Accent is the color of links/menu below your profile picture and title i.e. Posts, Likes, Following, and Archive. Background is the color behind your Title (display name).
02. Username and Address
The Username settings allow you to change the Tumblr username.
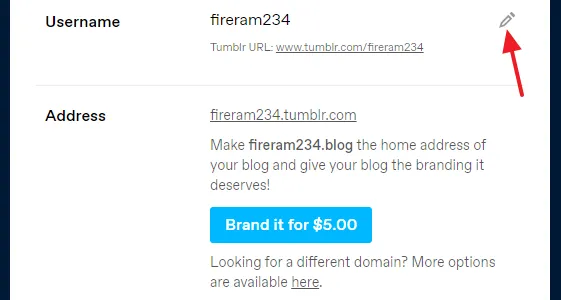
- Click on the Edit icon to change the Tumblr username.
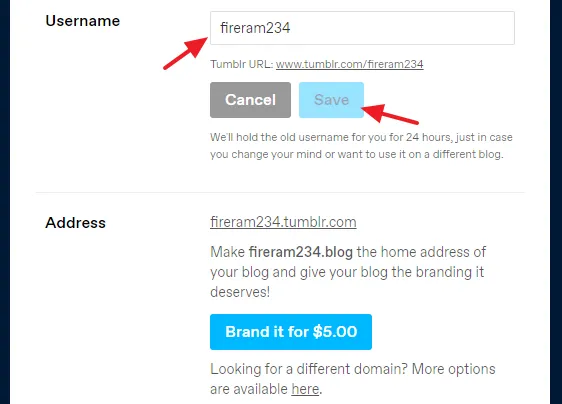
- Change/edit the Username and click on the Save button. Tumblr holds the old username for you for 24 hours, just in case you change your mind or want to use it on a different blog.
On Address section you can preview your Tumblr blog address. The blog address is created using your username, for example, “https://username.tumblr.com”. If you change username the blog address will also be changed.
Tumblr also provides you a Custom Domain feature that allows you to redirect your Tumblr blog address to a custom domain. Read this tutorial: How To Setup Custom Domain On Tumblr | Buy Own Domain.
03. Custom Theme
Custom Theme settings allow you to (1) enable/disable custom theme (2) edit custom theme. The Custom Theme option if enabled, Tumblr creates a separate theme (website) for your blog that you can access via your Tumblr blog address like this, “https://username.tumblr.com”. You can use the Official Tumblr theme as well as third-party paid themes.
- Drag the slider towards your right to enable the Custom theme.

- Once enabled, you can see the Edit theme and View website buttons. To know more about how to edit/customize blog theme, follow this step-by-step tutorial: How to Customize Tumblr Theme | Edit Blog.

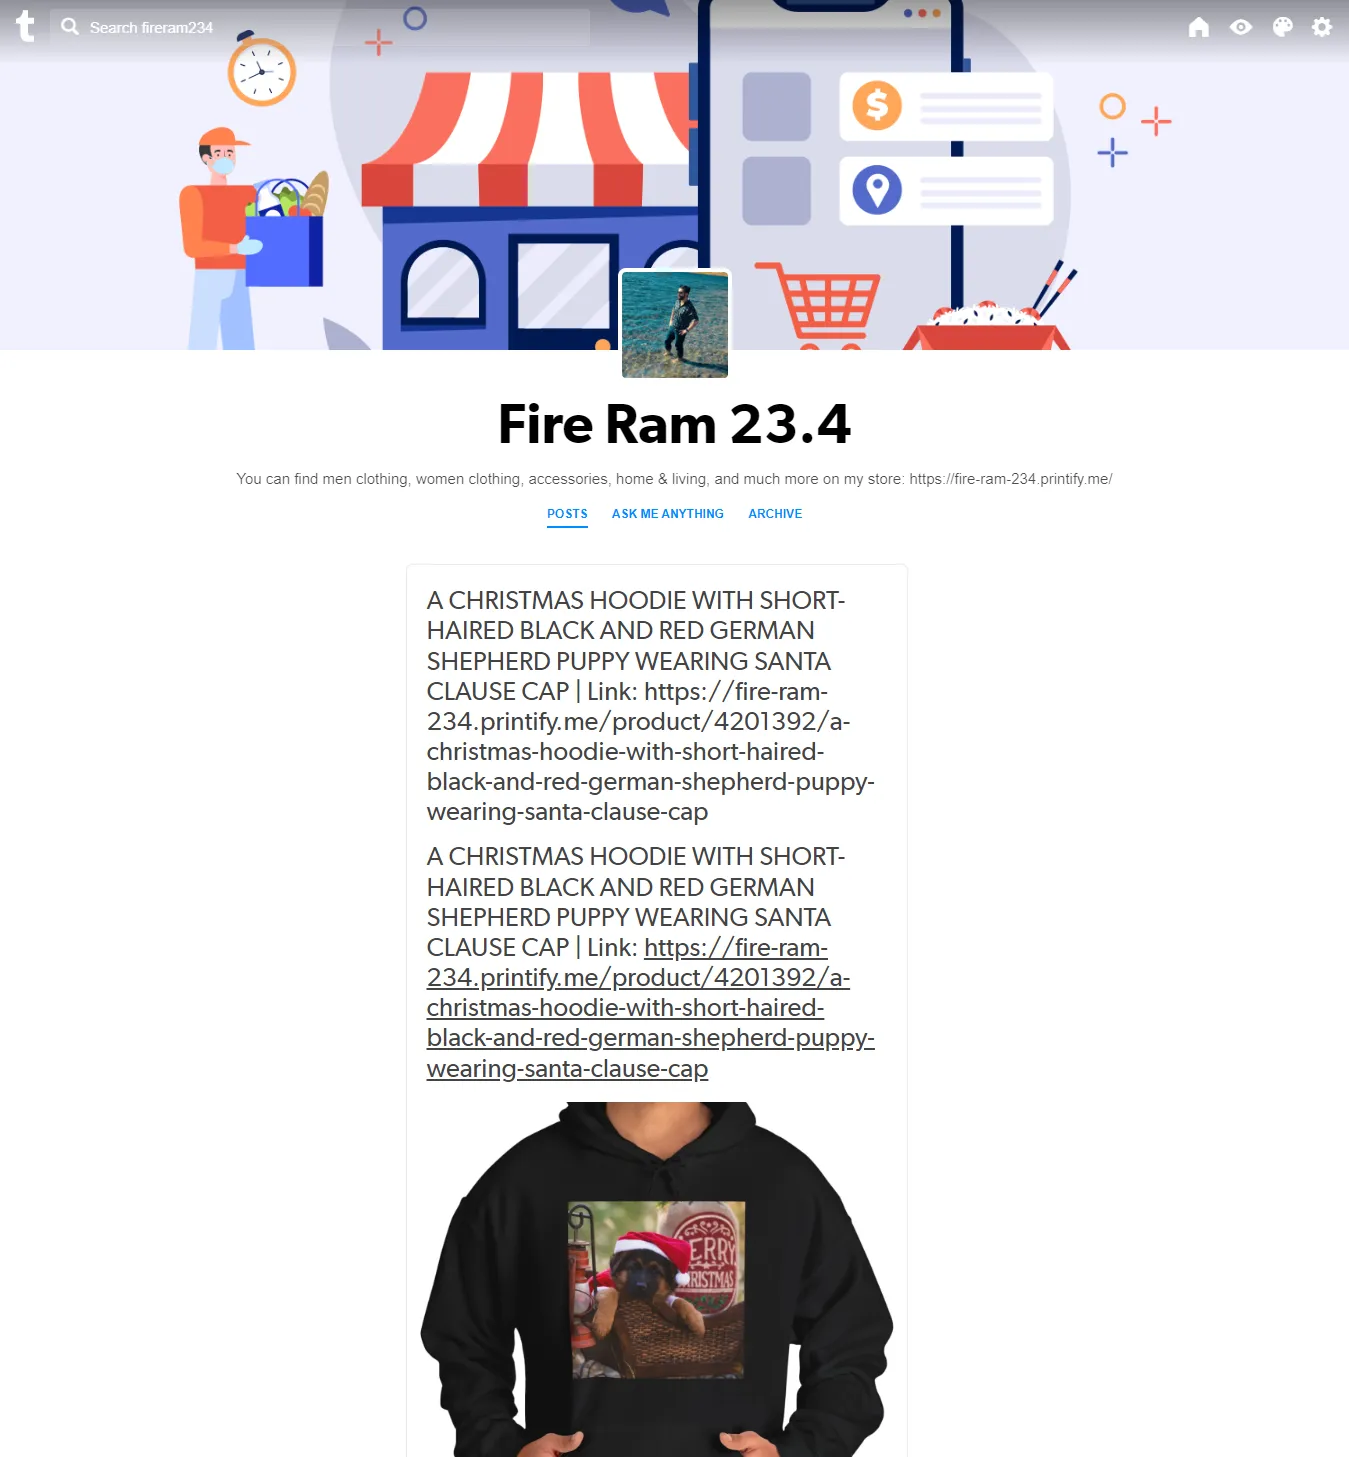
- This is how a Tumblr blog looks like with the Official Tumblr theme.
04. Likes & Following
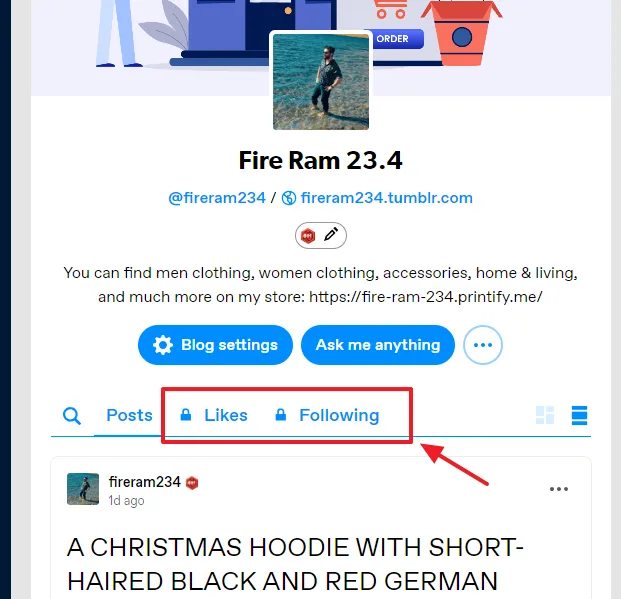
Likes and Following settings allow you whether you want your Following and Likes public or not. If you enable them people can see on your Tumblr profile who you’re following and which posts you have liked.
- To enable Likes and Following drag their sliders towards right.
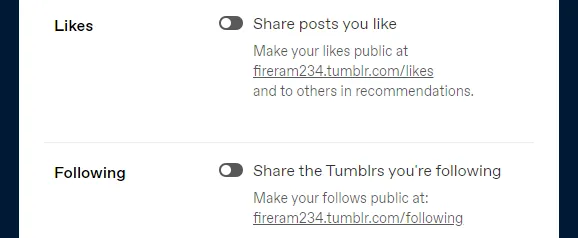
- This is my Tumblr profile, you can see that my Following and Likes are hidden from public.
05. Featured Tags, Replies, and Mentions
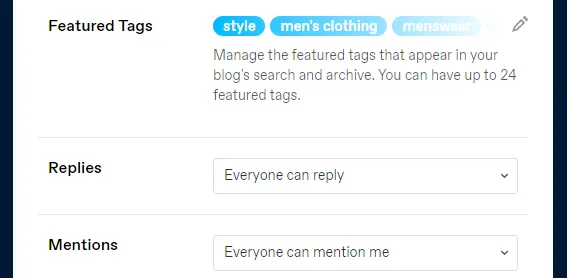
The Featured Tags are the keywords that you insert in your posts. Here you can add up to 24 featured tags. The benefit of adding your commonly used featured tags is that they appear on the Post Editor as a list when you click on the Tags. Instead of writing and searching for tags again and again you can quickly insert the tags from the list.
The Replies settings allow you to set who can reply to your tumblr posts. There are three options (1) Everyone can reply (2) Tumblrs you follow and Tumblr’s following you for a week can reply (3) Only Tumblrs you follow can reply.
The Mentions settings allow you to set who can tag/mention you on thier Tumblr posts. There are 4 options (1) Everyone can mention me (2) Only blogs I’m following can mention me (3) Only mutuals can mention me (4) No one can mention me.
06. Tipping
Tipping is a form of a monetization that allows people on Tumblr to tip a post or a blog to appreciate someone’s work. The minimum amount for a single tip is $1.99 and maximum is $100.
To know more about Tipping like who is eligible for accepting tips, how to set up tipping, how to tip a post and a blog, read this post:

07. Blaze
Blaze feature allows people over 18 years old to promote thier posts and other’s posts as a sponsored post on Tumblr to increase their reach to a wider audience depending on the number of impressions they select.
When a post appears on someone’s Tumblr dashboard or search results it is counted as an impression. For an impression to be counted, it doesn’t need to be liked, clicked, reblogged, or replied.
- Turn-on the slider Let people Blaze your posts to enable the Blaze on your Tumblr posts.

How to Blaze a Post on Tumblr
- If Blaze is enabled on a post you can see Blaze icon. Click on the Blaze icon to purchase a package.

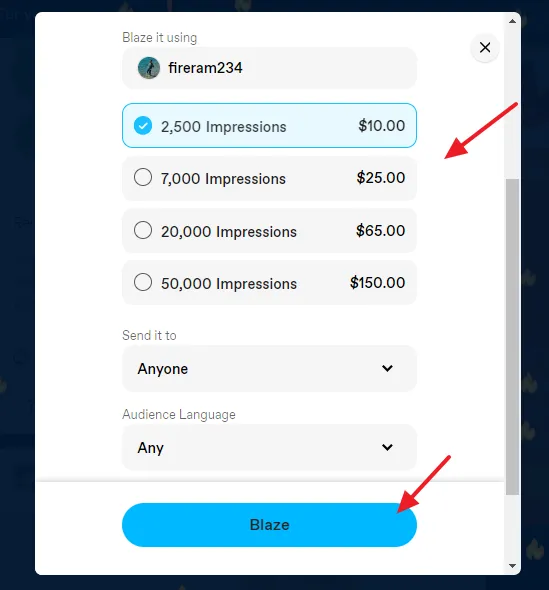
The Blaze feature offers 4 packages with different prices for different number of impressions (1) For 2500 Impressions the price is $10 (2) For 7000 Impressions the price is $25 (3) For 20,000 Impressions the price is $65 (4) For 50,000 Impressions the price is $150.
- Select the Package.
- Select the audience on Send it to. You can select from the list of available countries. If you don’t want to specify the audience, select Anyone.
- Select the Audience Language.
- Click on the Blaze button.
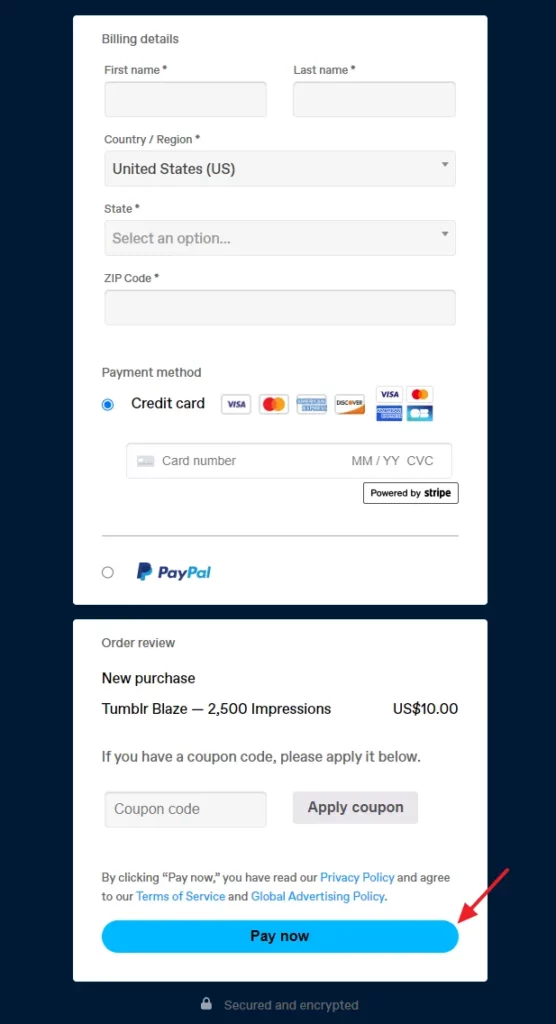
- Fill the Billing Details, select the Payment method (Credit Card or PayPal), and Review your order.
- Click on the Pay now button. The Blazed post will be reviewed by Tumblr team just to make sure that the content of the post is compliant with the Tumblr Community Guidelines. Once Blaze is activated on a post, it is labelled with Sponsored with Blaze.
How to Disable Blaze on an Individual Post
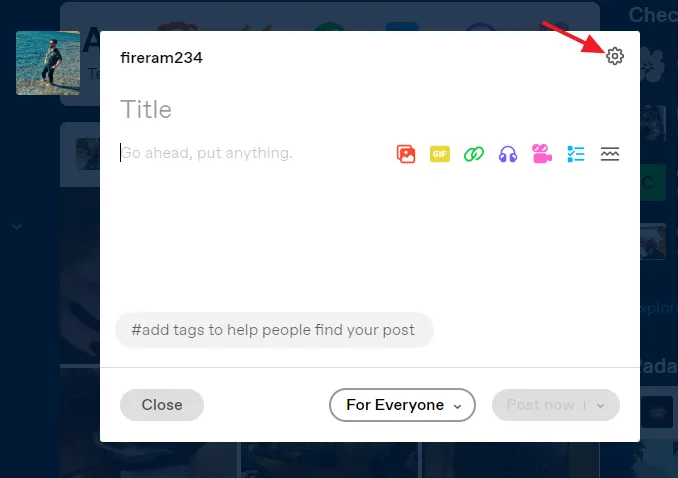
Tumblr also provides you an option on Post Editor to disable Blaze on Individual posts.
- Click on the Settings icon.
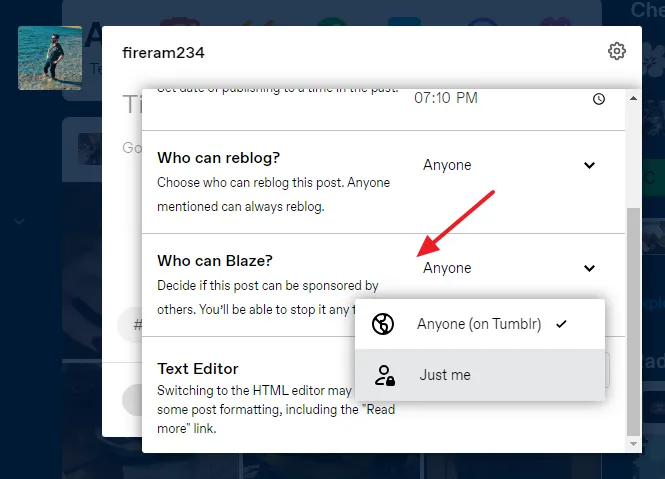
- Go to Who can Blaze? section. There are two options (1) Anyone on Tumblr (2) Just me.
- To disable the Blaze on a post, select Just me.
Read more about Blaze here: Blaze FAQs.
08. Ask
The Ask feature on Tumblr allows other people to ask questions. It is a way through which your followers and other Tumblr users can communicate with you. If you enable reblog and Blaze options on Post Editor settings the Asks (questions) can be published on your blog and other users can also reblog and Blaze.
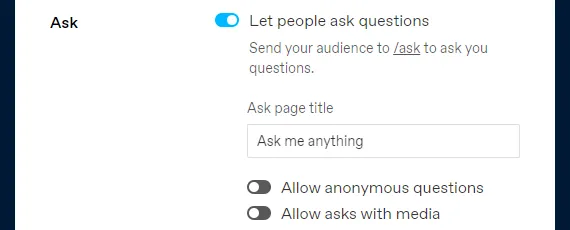
- Turn on the slider Let people ask questions.
- You can also change the default Ask page title.
- If you want to allow anonymous questions turn on the Allow anonymous questions.
- If you want to allow users to upload media alongside question turn-on the Allow asks with media.
How to Ask a Question on Tumblr
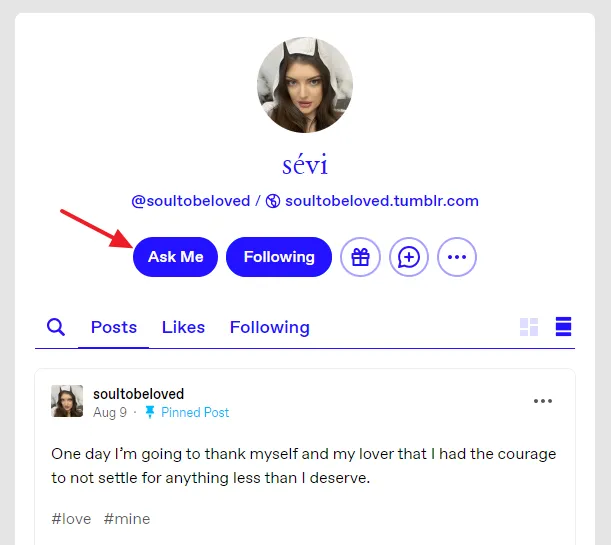
- Open the Tumblr account of the person to who you want to ask a question.
- Click on the Ask button. The title of the button can be different as well.
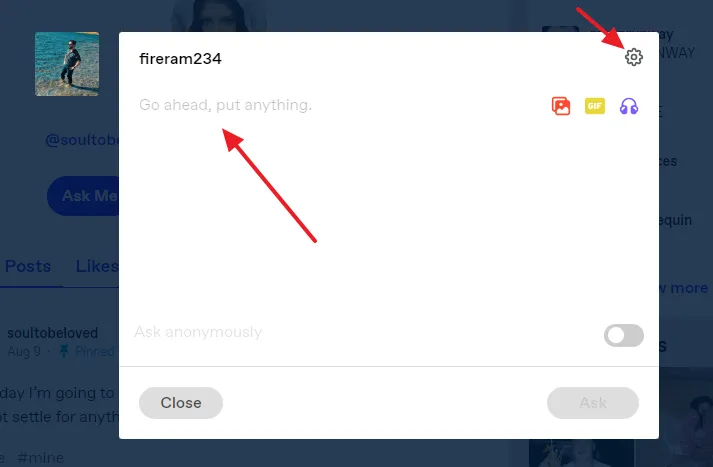
- Type your question in the Post Editor.
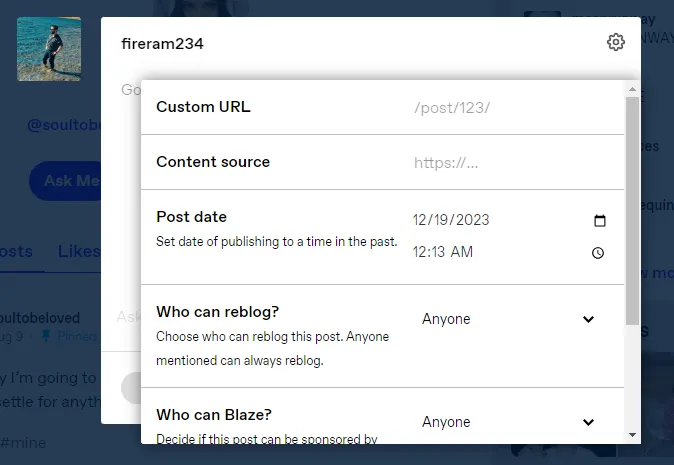
- To customize the post settings, click on the Settings icon.
- You can add Custom URL for your Ask post.
- If you have taken the post content from some other source you can add its URL on Content source.
- The Post date option allows you to schedule your post to be published in the past.
- Select who can Reblog your post.
- Select who can Blaze your post.
- You can also select/switch the Post Editor.
09. Submissions
The Submissions option on Tumblr allows people to submit thier posts to your blog. The submitted posts are sent to Queue for your approval. You can decide which post to publish and which post not.
There can be many reasons for people to publish posts on your blog (1) Your blog is noteworthy and has good reach and following that may help to promote someone’s profile, brand, product, or services (2) They are inspired by your content and may feel proud to write for your blog.
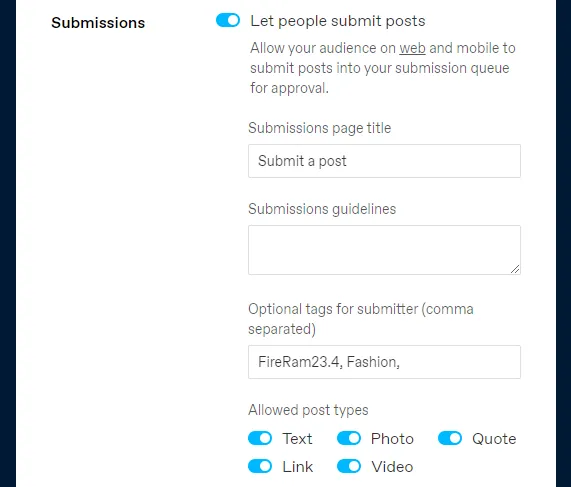
- Turn-on the slider Let people submit posts to enable Submissions.
- The Submission page title is the text that appears on your blog.
- Add Submission guidelines so that people can write content according to the standards of your blog content.
- You can also add Optional tags for post submitter. Separate each tag by comma. With relevant tags add your own hashtags as well. Tags help you get you content in front of more people, increase engagement, and brand awareness.
- Select Allowed post types. There are 5 post types i.e. Text, Photo, Quote, Link, and Video.
How to Submit a Post on Tumblr
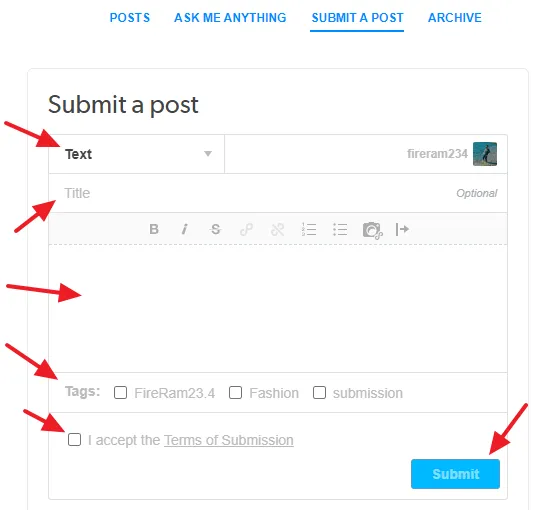
- Open the Tumblr profile or blog of the person to who you want to submit the post.
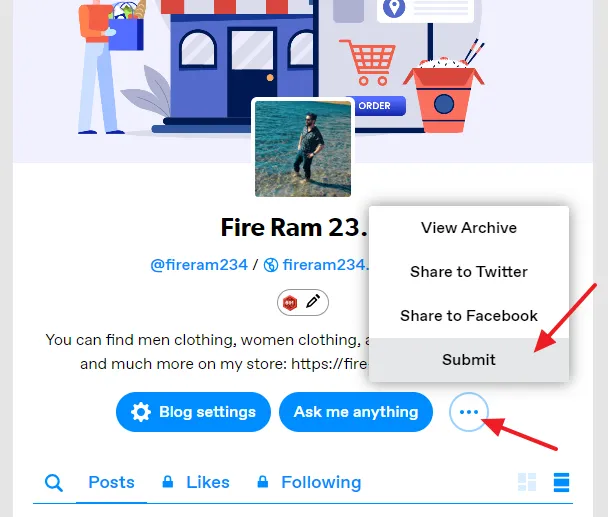
- Click on the Submit a Post option. If it is not visible click on the Addition Options icon.
- Click on the Submit.
- Select the Post Type.
- Enter the Post Title.
- Write the post content. You can use the Post Editor tools to style your content.
- Select the optional Tags that you want to add.
- Check the I accept the Terms of Submission.
- Click on the Submit button.
10. Messaging
Messaging is by default enabled on all Tumblr blogs that allows users to send messages to you.
- If you want to limit messaging to people who you follow on Tumblr turn-on the option Only allow messages from Tumblrs you follow. Your followers and other users on Tumblr won’t be able to send messages to you.

How to Send a Message on Tumblr
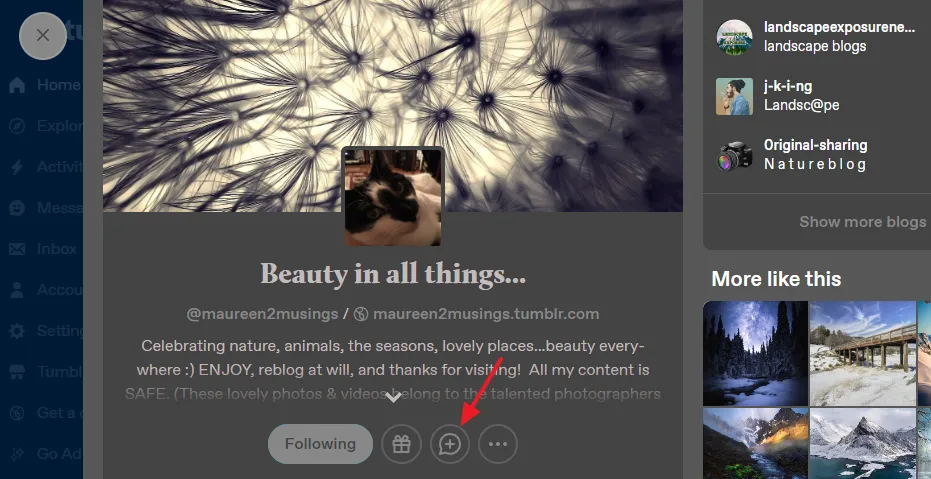
Open the Tumblr profile/blog of a person to who you want to send a message.
- Click on the Message icon.
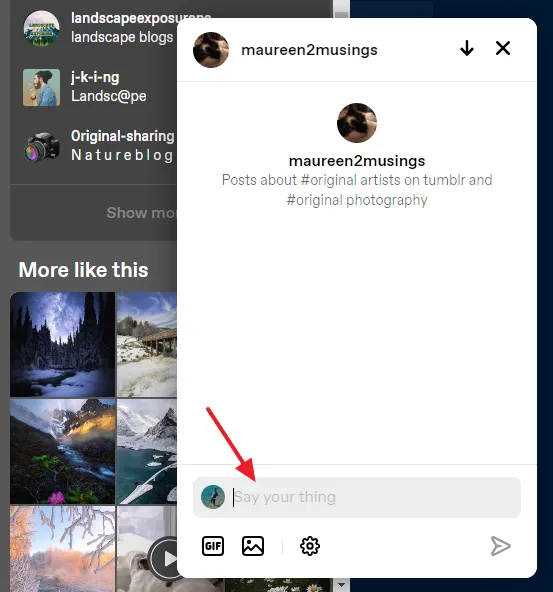
- Type your message in the Message Box and press Enter or hit the Arrow icon to send the message.
11. Affiliate Link
Affiliate link is a special link assigned to an affiliate which he uses to promote products and services to earn commission. An affiliate link contains a Unique ID (Publisher ID) alongside the link of the product/service page. When someone purchases a product/service via your affiliate link you are paid commission.
Tumblr also allows you to use your affiliate links in posts, but the primary purpose of your Tumblr blog shouldn’t be for affiliate marketing, as mentioned in thier Community Guidelines.
On Tumblr there is an option to change the unaffiliated links into Tumblr affiliate links. If you enable this option Tumblr will earn money by making your links affiliated. Your links will look and work just like they always have.
If you add your own affiliate links Tumblr won’t change them into its affiliate links because it gives priority to your links. Read more about affiliate links.

12. Queue
Queue on Tumblr is a location where you can access/manage/customize/edit/delete queued posts. The benefit of adding posts to Queue is that it automatically publishes those posts over a period of hours to keep your blog active.
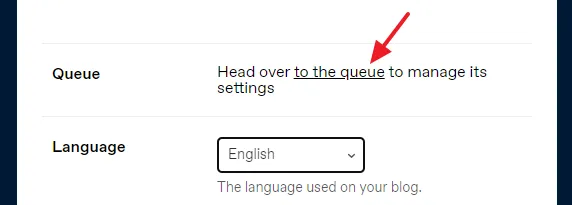
- Click on the to the queue link to open the Queue.
On top of the Queue you can see the settings. Below the settings you can see the queued posts which you can edit and delete.
- You can specify the amount of time in between queued posts (1 to 1440 minute(s)) to Automatically publish. You can schedule up to 5 posts at every interval.
- You can change the Timezone.
- The Shuffle Queue option changes the order of queued posts.
- The Pause Queue option stops the publishing of queued posts. No queued posts can be published after Queue is passed. Once the queue is un-paused, queued posts will be re-calculated and resume publication.
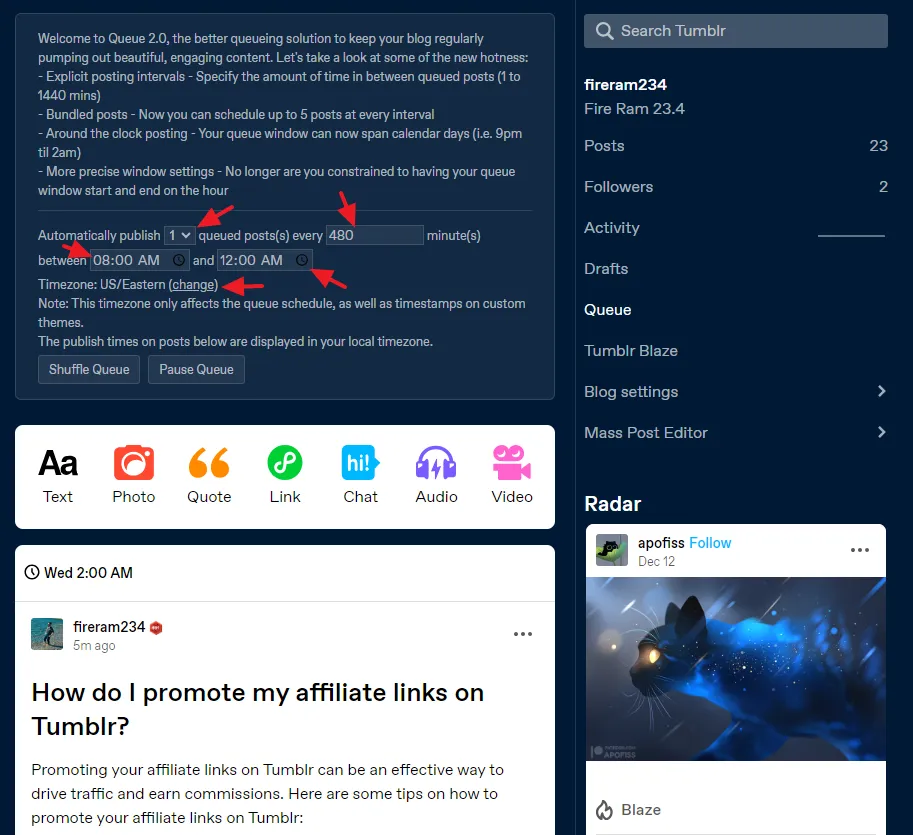
How to Add a Post to Queue on Tumblr
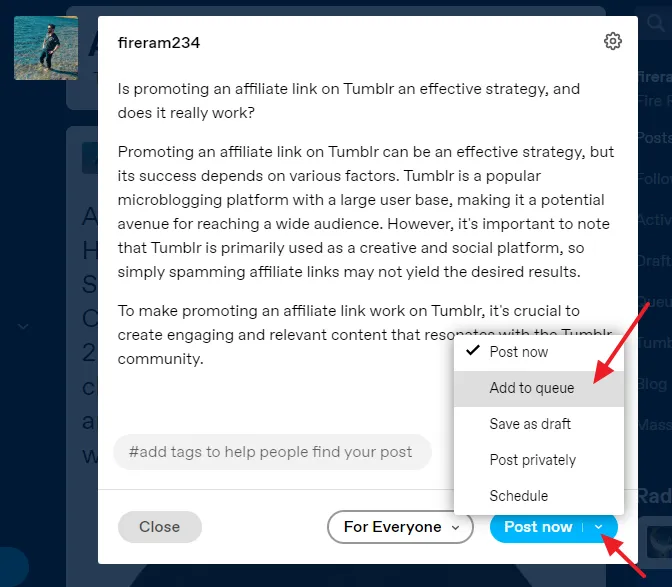
- On Post Editor click on the Downward Arrow attached to Post now button to expand the options.
- Click on the Add to queue.
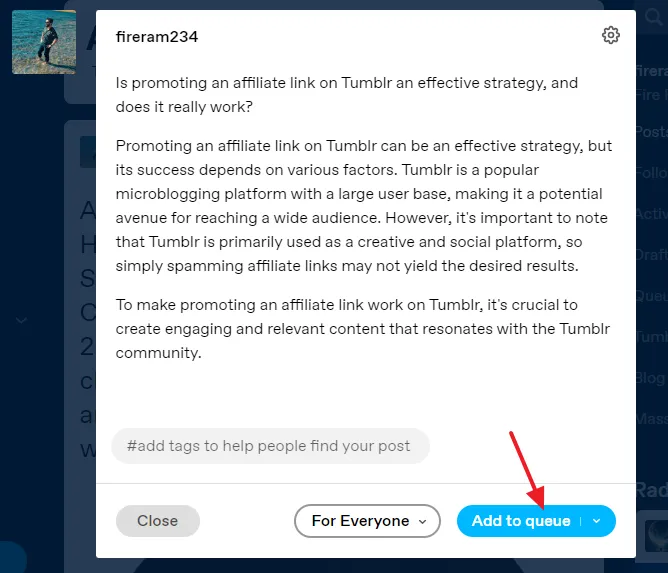
- Click on the Add to queue button.
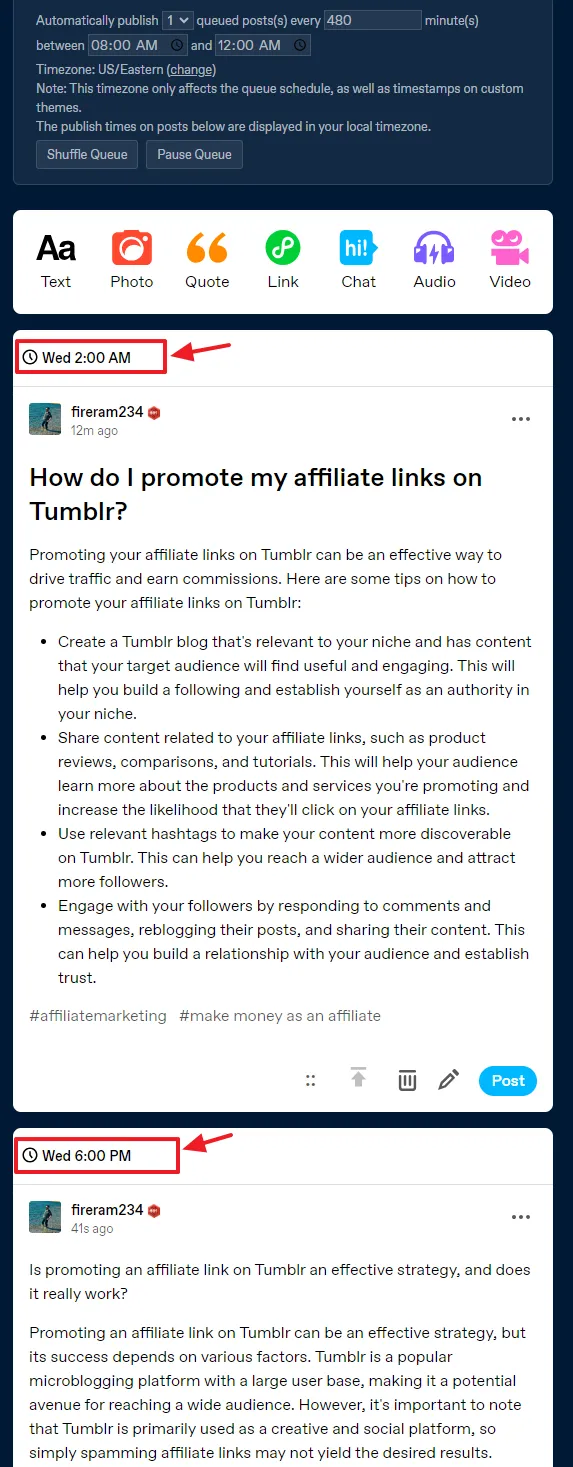
- You can see here that the two posts are in Queue which will be automatically published at 2 AM and 6 PM.
13. Language, Timezone, and Visibility
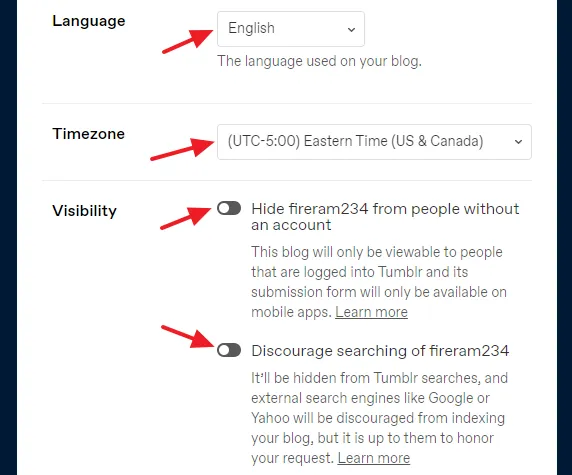
The Language option allows you to change the language of your Tumblr blog.
The Timezone option allows you to change the Timezone.
There are two Visibility options (1) Hide your blog from people without an account. This option, if enabled, one can view your blog only when he is logged-in on Tumblr (2) Discourage searching of your blog. This option, if enabled, hides your blog from Tumblr searches and discourage search engines such as Google, Bing, etc, to index your blog and posts.
14. Blocked Tumblrs
The Blocked Tumblrs option allows you to block and unblock people on Tumblr.
- To block a user enter his username and click on the Block button. It will be listed below.
- To Unblock a user click on the Unblock button.
You can also block users from Meatballs Menu (User Profile/Blog-View), Post’s Notes, Chat, Inbox, Followers List, and Push Notification.

15. Export
The Export option allows you to take the backup of your Tumblr blog in a zip file.
- Click on the Export Blog_Name button to generate the backup file.
- After processing your request it generates a backup that you can download/export to your computer.
To know more about what’s included in the backup file, how to extract, read this tutorial: How to Take & Download Backup in Tumblr.

16. Delete blog
The Delete blog option allows you to delete your Secondary Tumblr blogs. You cannot delete your Primary Tumblr blog from this section.
- If you want to delete your Primary Tumblr account go to Account Settings or click on the account settings link here. On Account Settings page, scroll-down to bottom and delete your Tumblr account.

How to Delete a Secondary Blog on Tumblr
- Open the Blog Settings of your secondary Tumblr blog, as I have guided in the Section 1.
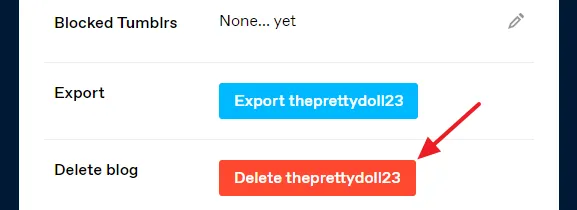
- Scroll-down to Delete blog section and click on the Delete Secondary_Blog_Name button.
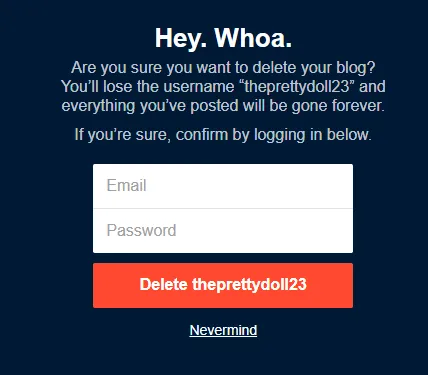
- Enter your Tumblr Email and Password and click on the Delete button. You will lose your username and all the posts that you have published on this blog.
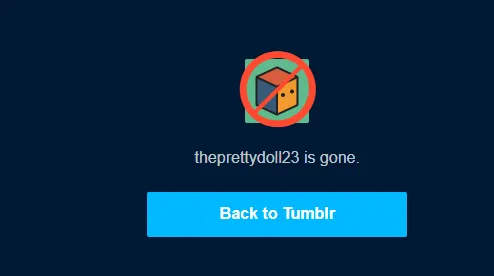
- Your secondary Tumblr blog will be deleted.
So it was all about understanding and customizing the Tumblr Account Settings. If you like this post then don’t forget to share with other people. Share your feedback in the comments section below.
Also Read



Leave a Reply