Do you want to add sitemap of your blog in Blogger and submit it in Google Search Console account? You’re in the right place.
In this tutorial, I will guide you step-by-step on How to add sitemap of your blog in Blogger and How to submit/add sitemap of your Blogger Blog in Google Search Console.
What is Sitemap? A sitemap is a simple XML file that contains and lists the URLs of a website which are available for crawling and indexing. It is a way of organizing a website, identifying the URLs and the data under each section.
What is Google Search Console? Google Search Console is a free web service and an incredible SEO-tool by Google, which allows website or blog owners to check indexing status of their website pages. It provides detail reports on analytics, performance, errors, warnings, coverage, sitemaps, mobile usability, core web vitals, and much more.
Following topics will be covered in this post:
- How To Add Sitemap in Blogger
- How To Submit Blogger Sitemap in Google Search Console
RELATED
- How To Redirect Blogspot To Custom Domain | Set Up A Third Party URL
- How To Migrate Custom Domain Blogger Blog To WordPress
01. How To Add Sitemap in Blogger
In Blogger your blog’s sitemap is added in Custom robots.txt file. The robots.txt file is used to give information about website to web-robots like which pages or sections of a website they can crawl and which they can’t.
Search engines such as Google, Bing, etc, use web-robots and crawlers to index the web content. Before visiting a website web-robots first go to Custom robots.txt and check which pages, folders or URLs are allowed to be crawled.
Both Sitemap and Custom robots.txt are used to optimize your blog for search engines.
Follow the steps to add Sitemap of your blog in Blogger:
- Login to your Blogger blog.
- Go to Sidebar and click on the Settings.
- On Settings scroll-down to Crawlers and indexing section.
- Turn-on the slider to activate the Enable custom robots.txt.
- Click on the Custom robots.txt.
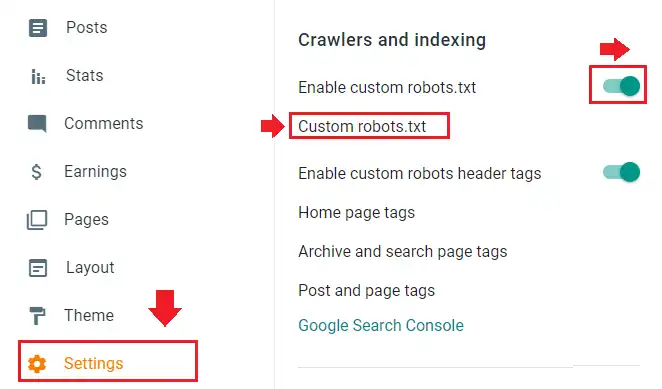
Now Copy and Paste the below code into Custom robots.txt, as shown in the next step. In Sitemap replace example with your Blogger blog’s domain name.
Information Related To Custom robots.txt:
- The User-agent: Mediapartners-Google & Disallow allows Google AdSense ads to display on any page of your blog. It will work only if your blog is monetized with Google AdSense.
- The “User-agent: *” means this section applies to all web-robots or crawlers.
- The Disallow: /search means ignore all those URLs having keyword /search/ like https://www.example.com/search/label/Blogger.
- The Allow: / instructs web-robots that they can crawl any Page/URL of website except disallowed.
- The Allow: /search/label instructs web-robots to not block the Blogger labels from crawling, as they are your categories and plays critical role in SERPs.
- This sitemap “https://example.blogspot.com/sitemap.xml“ is for blog posts, whereas this one “https://example.blogspot.com/sitemap-pages.xml“ is for static pages.
User-agent: Mediapartners-Google
Disallow:

User-agent: *
Disallow: /search
Allow: /
Allow: /search/label

Sitemap: https://example.blogspot.com/sitemap.xml
Sitemap: https://example.blogspot.com/sitemap-pages.xml- Paste the code in Custom robot.txt and click SAVE.
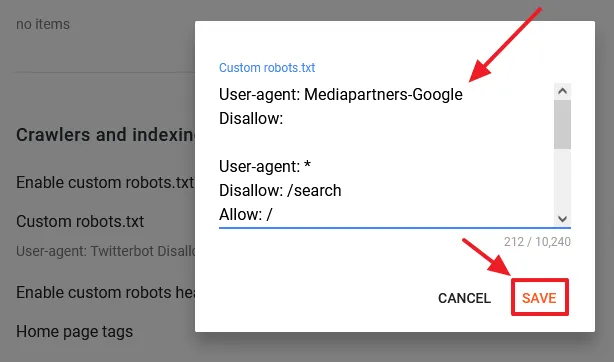
Test your Custom robots.txt to know whether it is working or not. You can also test and validate your Robots.txt using a Testing & Validator Tool.
- Open your browser. Add /robots.txt at the end of your Blogger blog’s URL and press the Enter. Your Custom robots.txt should be displayed on the browser.
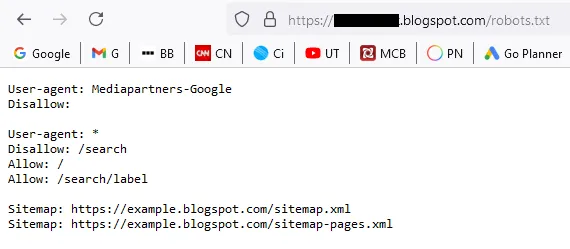
Now test your Sitemaps whether they discover your Blogger blog’s post and page URLs or not.
Test Sitemap for Blogger Posts:
- Add /sitemap.xml at the end of your Blogger blog’s URL. It will display your post URLs alongside Last Modified Date.
- If you have hundreds of thousands of blog posts then thier URLs are contained in different pages, like, “https://www.example.blogspot.com.com/sitemap.xml?page=1“. When you browse these URLs on your browser they display all the post URLs with Last Modified Date.

Test Sitemap for Blogger Static Pages:
- Add /sitemap-pages.xml at the end of your Blogger blog’s URL. It will display all your static page URLs alongside Last Modified Date.

02. Submit Blogger Sitemap in Google Search Console
In this section, you will learn about how to submit the sitemap of your Blogger blog in Google Search Console.
If you haven’t already connected your Blogger blog to Google Search Console, follow this tutorial:
Follow the steps to submit both sitemaps in Google Search Console.
- Go to your Google Search Console account.
- Click on the Sitemaps from sidebar.
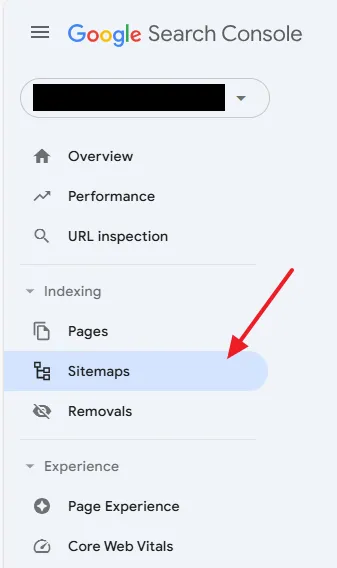
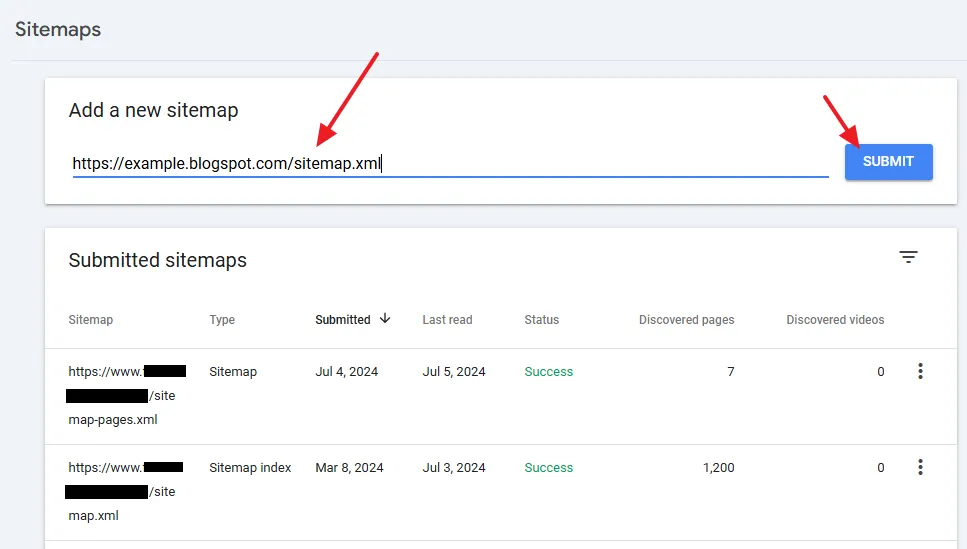
- In Add a new sitemap Paste the URL of the sitemap and click on the Submit button. Add both the sitemaps one by one.
- If it is submitted successfully you will see a Success status. The Discovered pages column shows number of page URLs each sitemap contains.
- Get access to all the Blogger Tutorials.
- If you like this post then don’t forget to share with other people. Share your feedback in the comments section below.

Also Read



Leave a Reply