Are you looking for creating your own professional WordPress website without anyone’s help? You’re in the right place, this guide helps anyone who wants to launch his own WordPress website having zero knowledge of web development and web designing.
Why You Need A Professional Website?
Whether you are a freelancer, business man, contractor, artist, celebrity, photographer, Amazon seller, sportsman, writer, musician, pets seller, etc, your online presence is crucial to your business or profession. Having a professional website allows you to market your business online, you are connected with the global audience.
Why WordPress?
WordPress is the most popular content management system, a robust and user-friendly tool to create and manage websites and blogs. According to an estimate 38% to 45% websites on the internet are powered by WordPress.
The two main reasons for immense popularity of WordPress are (1) There are thousands of pre-made themes and plugins for any type of website i.e personal, eCommerce, news & magazine, blog, portfolio, corporate, agency, company, etc (2) WordPress is free and open-source means you can customize anything in WordPress like code, functions, themes & plugins, according to your requirements.
What are WordPress plugins?
WordPress Plugins are programs made up of one or multiple functions that are installed in your WordPress website to enhance it with new features like contact form, online store, sliders, mega menus, gallery, online booking system, currency switcher, timetable, management systems, SEO tools, performance plugins, etc.
Plugins are added/deleted/uploaded/activated/deactivated in WordPress from the Plugins Section. Some plugins are free-to-use and some are paid. You can also download plugins from Code Canyon, that contains over 5000 WordPress plugins.
To launch a professional WordPress website you need three things (1) Domain (2) Web Hosting (3) Website Template/Theme.
Following topics will be covered in this post:
- What is Domain & Web Hosting
- How to Buy Domain & Web Hosting
- How to Install WordPress
- How To Install/Upload Custom WordPress Theme
- Things to Do After Launching Your Website
01. What Is Domain & Web Hosting
Domain is simply the address of your website that you type in URL bar to access your website. It locates your website on internet, like “www.meersworld.net“ is a domain.
Choosing a right domain name is very important for your website. Often people get confused when it comes to choosing a domain name. So for your help, here are some suggestions on how to choose a right domain name:
- It should be easy to pronounce and remember.
- It should be easy to type.
- It should be brandable, means a name that can be used as a brand.
- If you have a personal or portfolio website you can use your own name as well.
- You can also create a domain name from your “Name” and “Business Name”. Let’s say your name is “Smith” and you have a business of “glasses”, you can name it as “www.smithoptics.com“.
Web hosting is a space/location (web server) where you upload/install the content and files of your website. Once you upload/install your website on web hosting it becomes live and people can access your website via the domain of your website.
There are three types of web hosting i.e Shared Hosting, VPS Hosting & Dedicated Hosting.
In the Shared Hosting server resources like bandwidth, storage, RAM, CPU, etc, are shared among websites. It is the most affordable hosting used for normal websites.
The VPS Hosting & Dedicated Server Hosting provide a standalone dedicated server where all resources such as bandwidth, CPU, RAM, storage, etc, are dedicated to your website only. They are recommended for large e-commerce websites, high-traffic websites, corporate websites, online applications websites, gaming websites, etc.
Shared Hosting is the most cheapest one, VPS Hosting is neither too cheap nor too expensive, and Dedicated Hosting is the most expensive one.
02. How To Buy Domain & Web Hosting
In this section, I will guide you step-by-step on buying a domain and web hosting (shared hosting) from Namecheap, an ICANN accredited registrar offering services since 2000. It is one of the leading, sophisticated, and most affordable web hosting providers, hosting over 13 million+ domains worldwide.
- Go to Namecheap Shared Hosting page. If you’re planning to buy hosting on VPS Hosting or Dedicated Server Hosting, links are available in the above section.
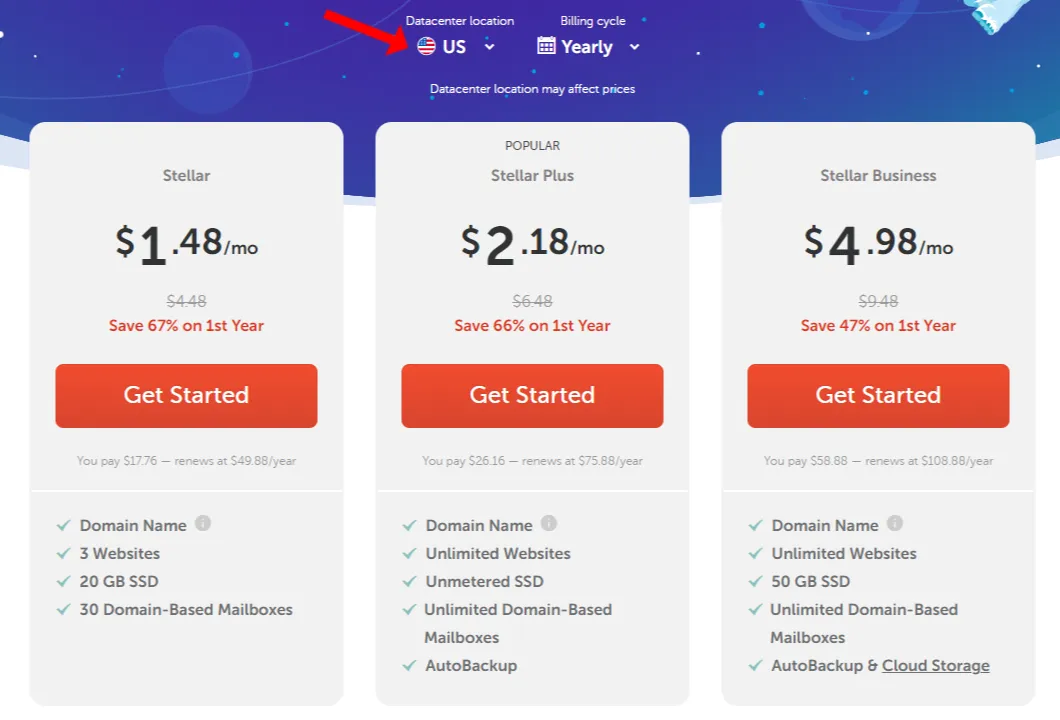
- First of all choose Datacenter location and Billing Cycle (Yearly is preferred). Namecheap offers 3 Datacenter locations i.e. United States, United Kingdom, and European Union.
- The Shared Hosting offers 3 Plans i.e. Stellar, Stellar Plus, and Stellar Business. Select a plan according to your website requirements. After deciding the Plan click its Get Started button.
A Datacenter is a location where your website host’s servers are physically located. Choose a datacenter location nearest to your main audience’s location. For example, your country is India, Pakistan, or Bangladesh, but your main traffic comes from America, the ideal datacenter location for your website would be US.
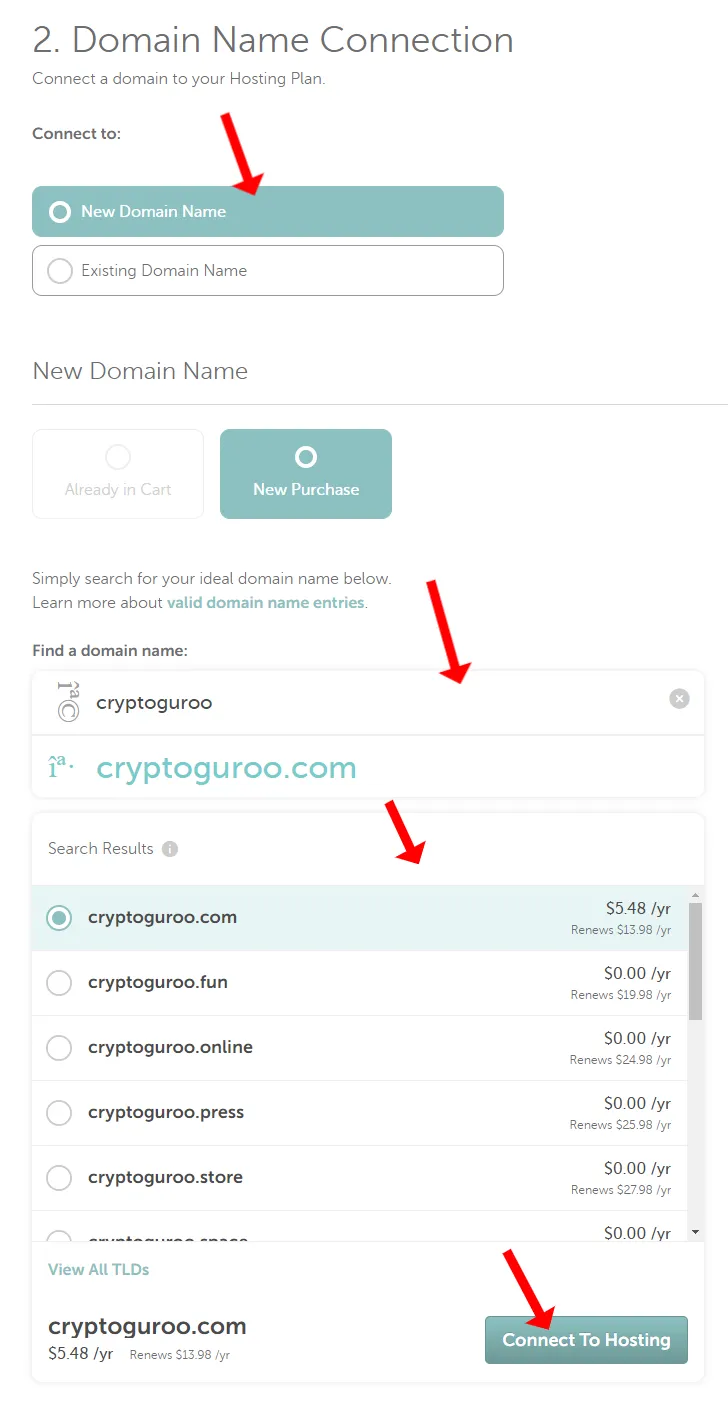
- Select New Domain Name option. The New Purchase option will already be selected.
- In Find a domain name textbox enter the name of your desired domain. It will show domain name with different extensions (“.com”, “.net”, “.online”, “.site”, “.store”, etc) and their corresponding prices. Every extension owns a different price, some extension worth less whereas some extensions worth high.
- If your entered domain is already taken by someone else it will suggest you relevant domains with different extensions.
- Once you’re done, click Connect to Hosting button.
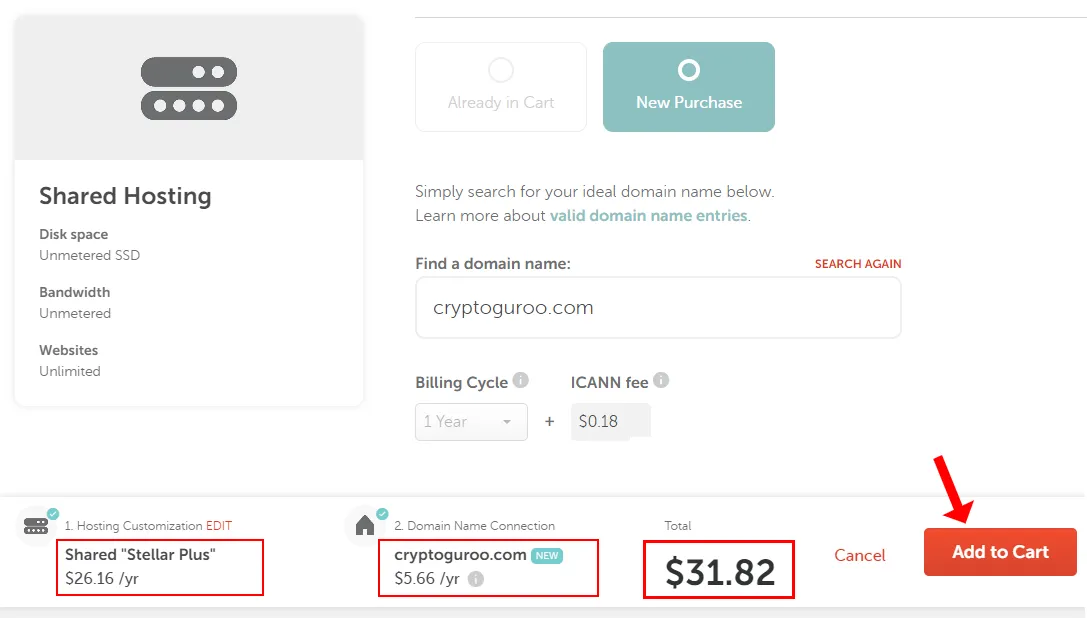
- Here you can see the combine cost of your domain and shared hosting plan.
- Click the Add to Cart button.
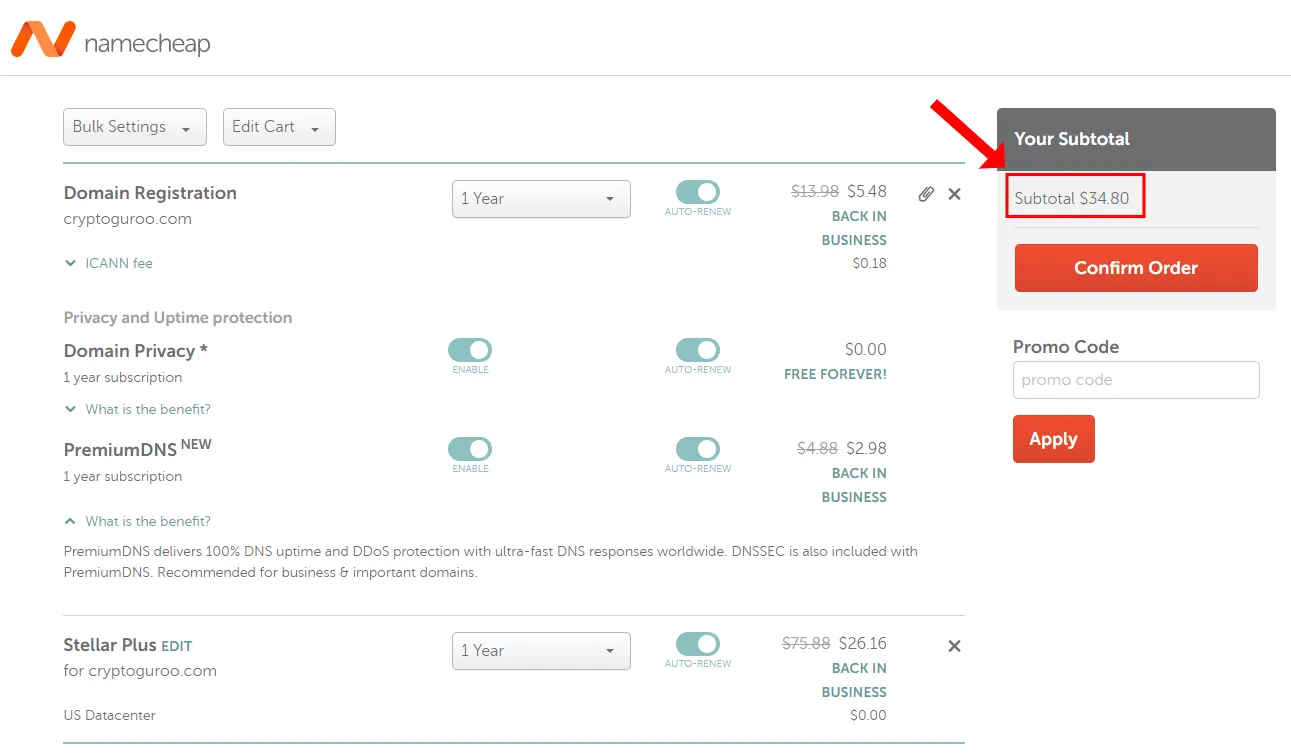
- Enable AUTO-RENEW for Domain Registration.
- Enable Domain Privacy* and also enable AUTO-RENEW. Namecheap offers Domain Privacy free for lifetime. The Domain Privacy protects your information such as Phone Number, Email ID, Address, etc, from unauthorized people in the WHOIS records (database).
- If you wish enable PremiumDNS. It is an advanced feature that delivers 100% DNS uptime and DDoS protection with ultra-fast DNS responses worldwide.
- Find the latest Namecheap Promo Codes and Deals. After adding the Promo Code click the Apply.
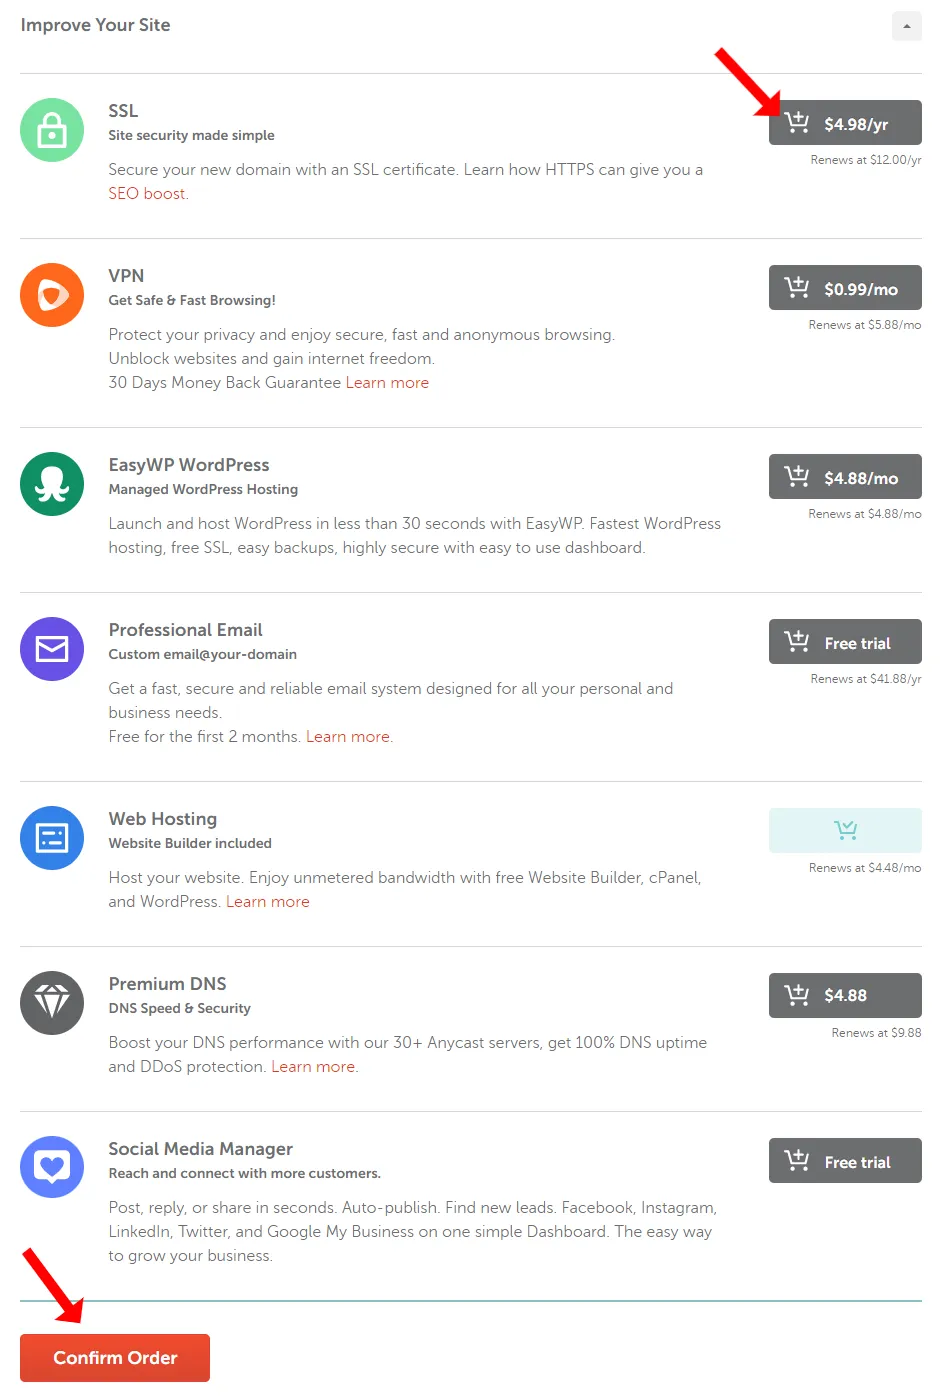
Scroll-down to add SSL add-on to your domain, which is mandatory for any website, as shown in the next step.
- Click the SSL Cart button to add the SSL certificate to your domain. SSL stands for Secure Socket Layer. It keeps internet connection secure and prevents your sensitive informations such as credit card details, passwords, etc, from theft when they are transferred over the network. Once SSL is active, you can see “s” at the end of “http” protocol like “https://www.example.com”.
- Click the Confirm Order at bottom.
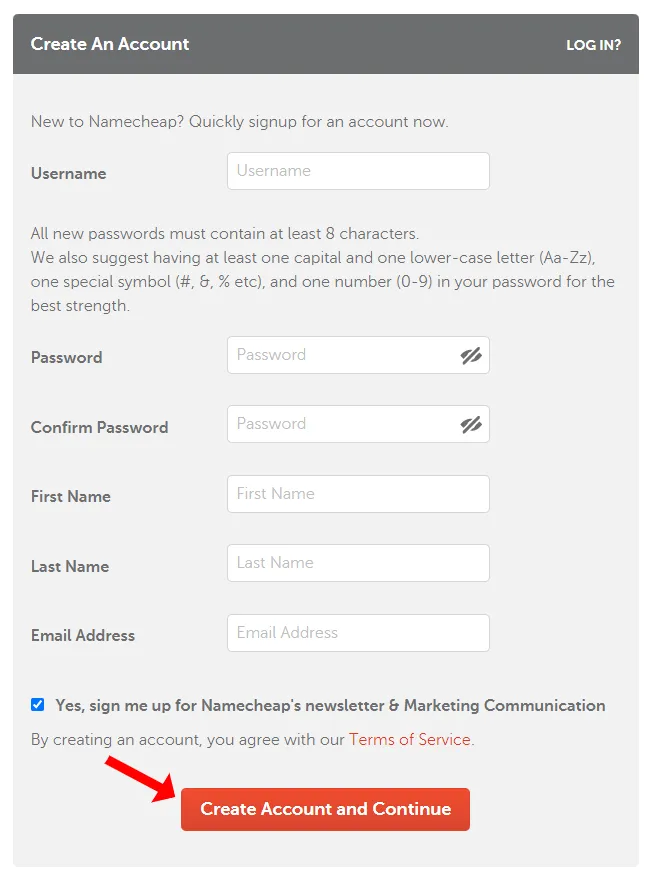
- Now create an account on Namecheap to complete the process of buying domain and web hosting. It requires Username, Password, First Name, Last Name, and Email Address.
- Once you fill the information, click Create Account and Continue button.
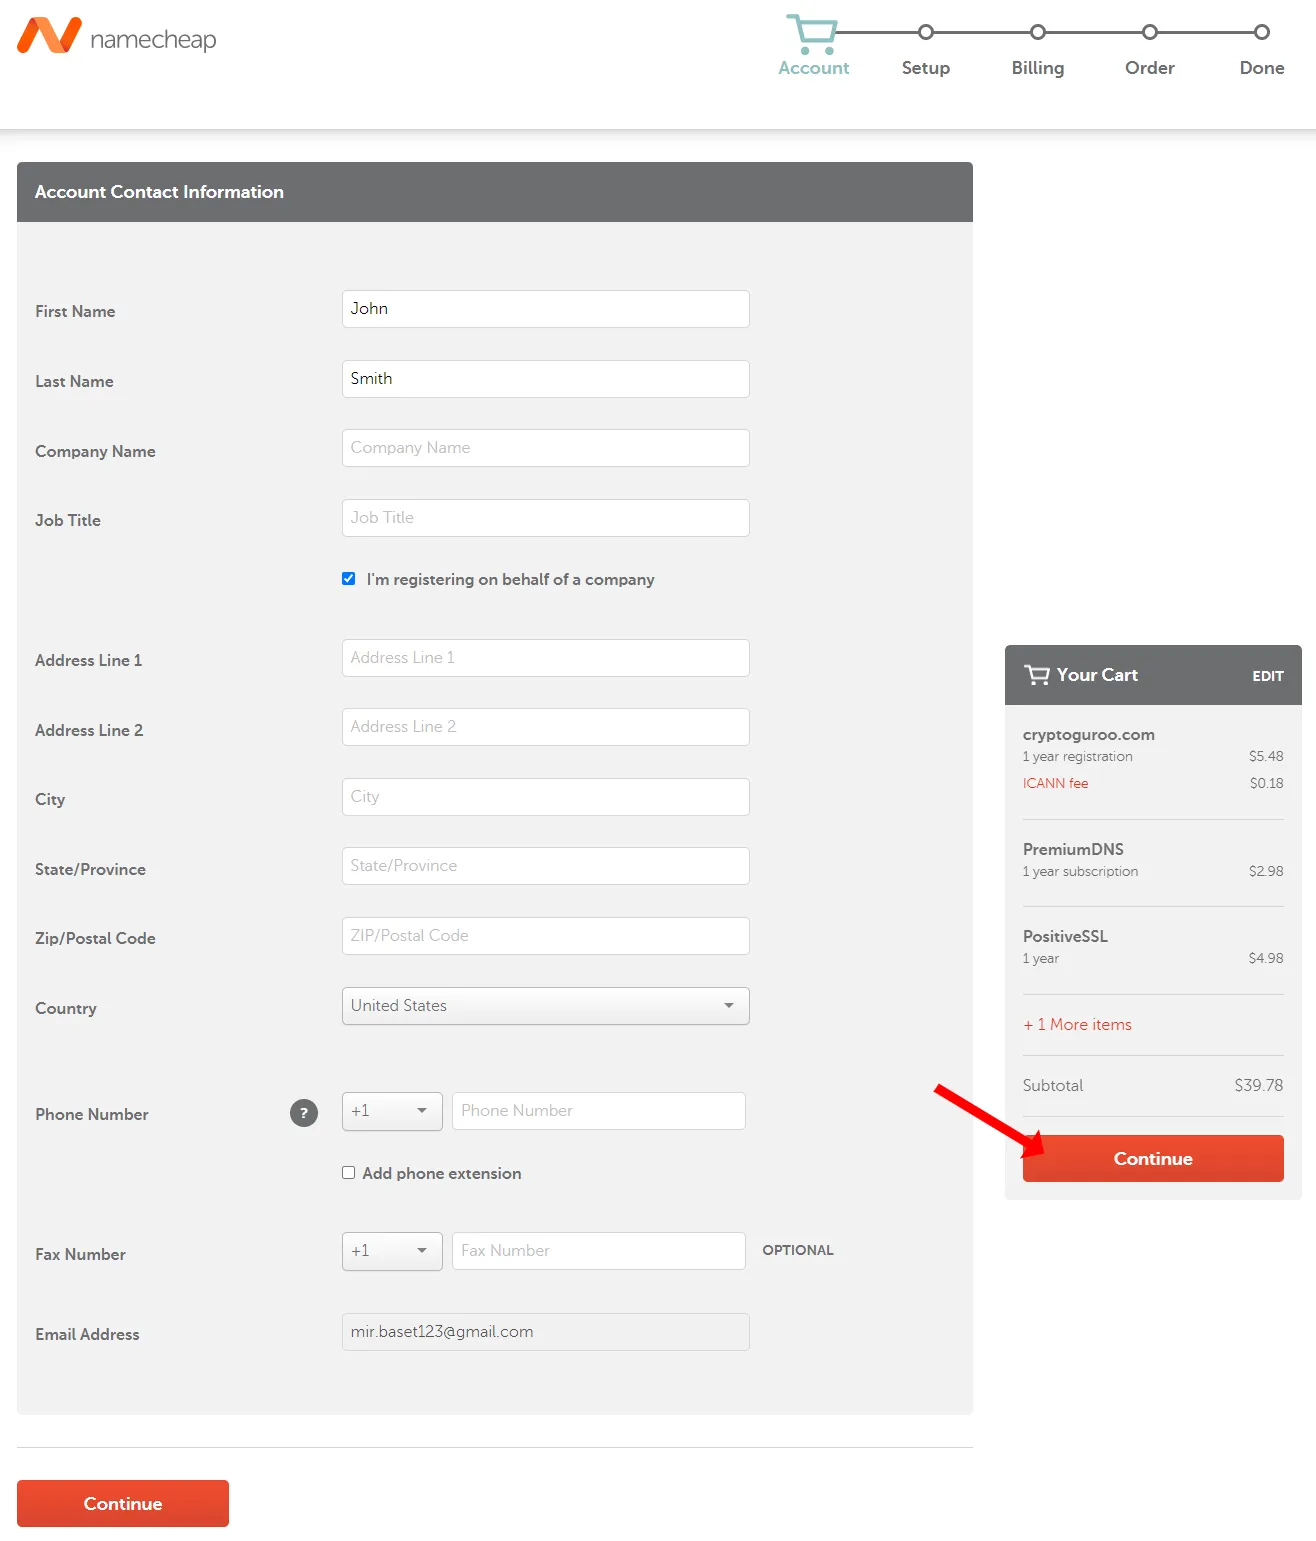
- Fill the Account Contact Information. The information should be original and correct. If you’re an individual not a company then uncheck the “I’m registering on behalf of a company“.
- After filling the form click the Continue button.
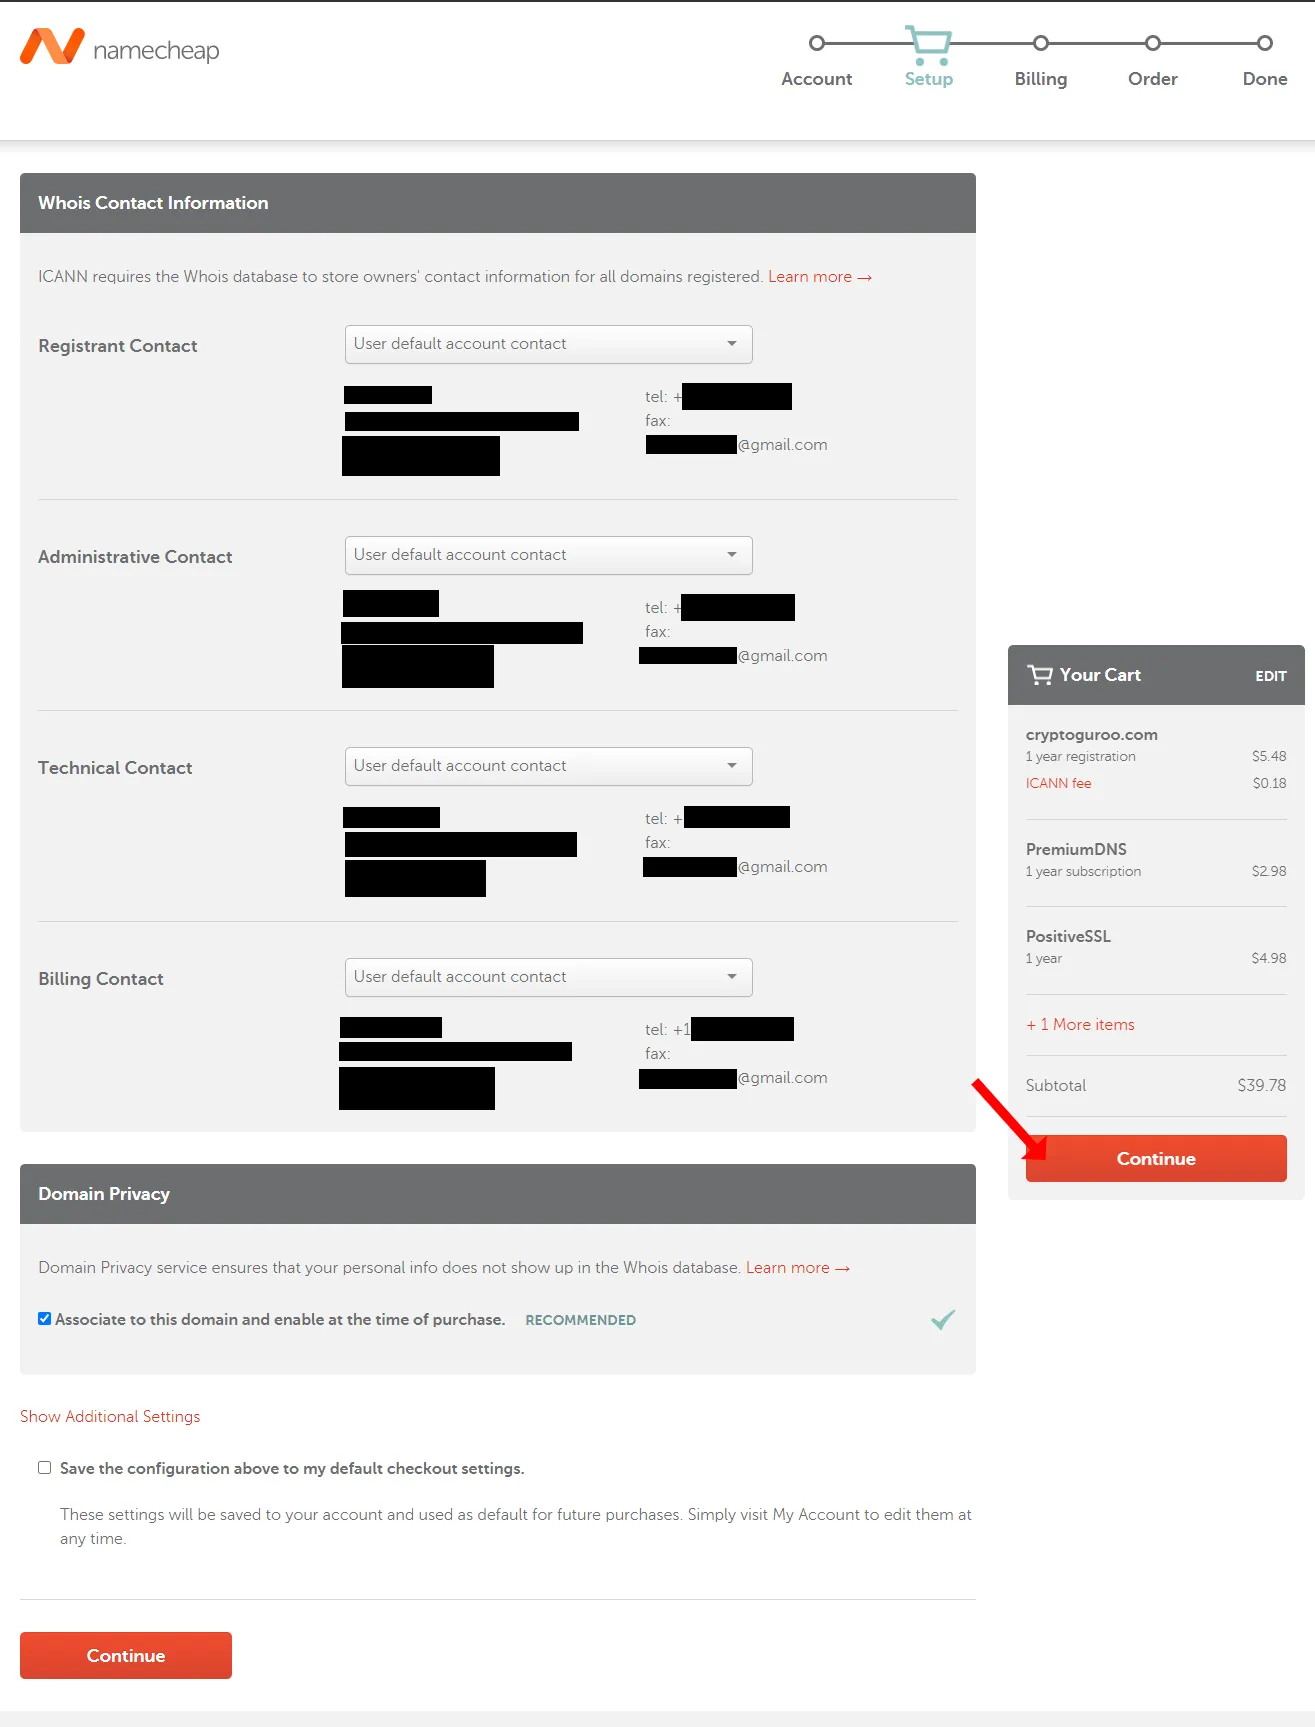
- It will show you the preview of your Account Contact Information. Have a look again.
- Click the Continue button.
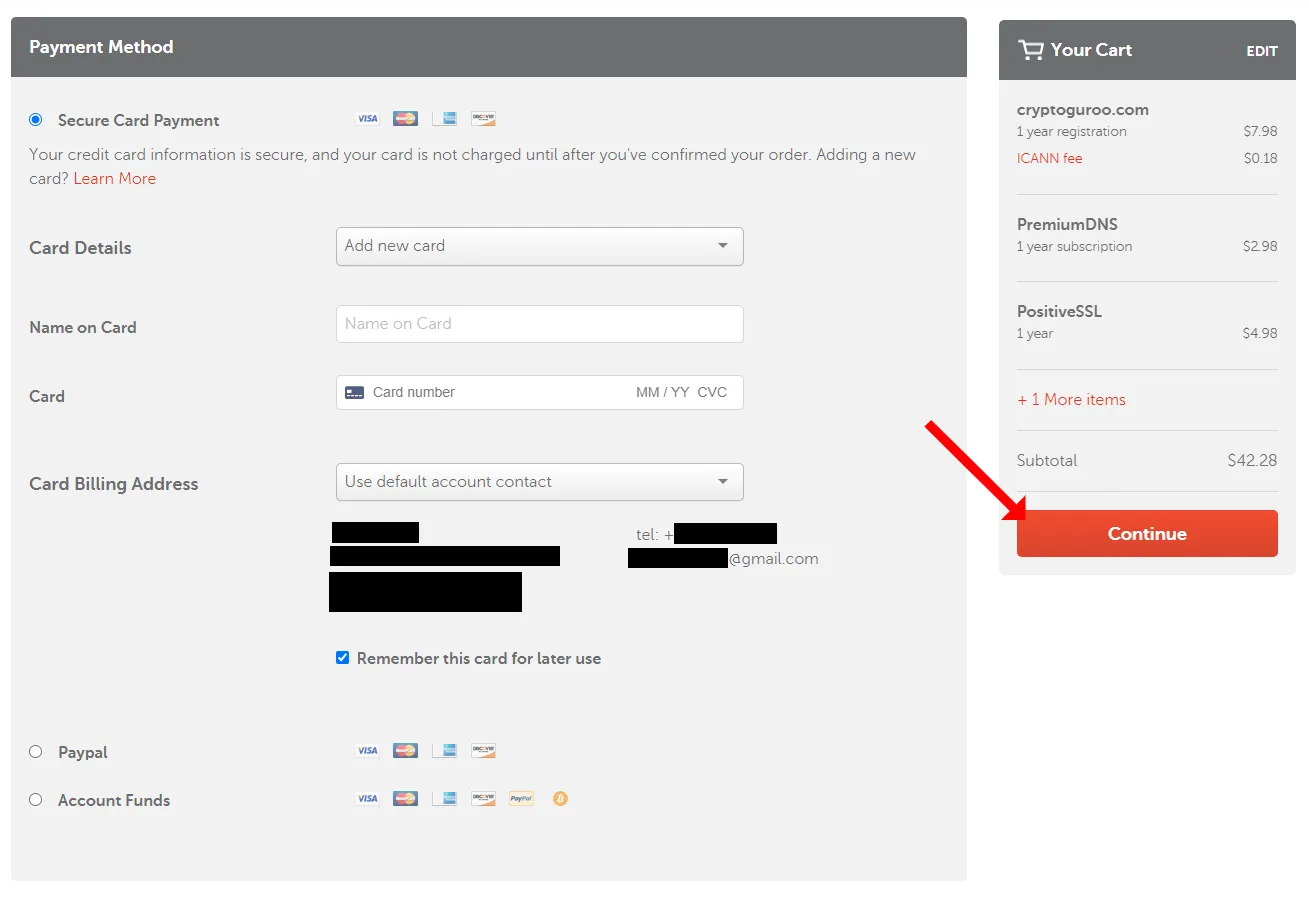
- Choose a Payment Method to purchase your domain and web hosting. Namecheap provides you three options (1) Secure Card Payment (2) PayPal (3) Account Funds.
- Once you fill the payment details, click the Continue button.
- Tick “I have read and agreed to all Namecheap’s Terms of Service and agreements”.
- Click the Pay Now button.

- Congratulations!!! You have successfully purchased your domain and hosting for your website from Namecheap. Normally within an hour or two a new domain and hosting are activated.
- You will also receive an email where you will have complete Hosting Package Details that also includes cPanel details, as shown in the next step.
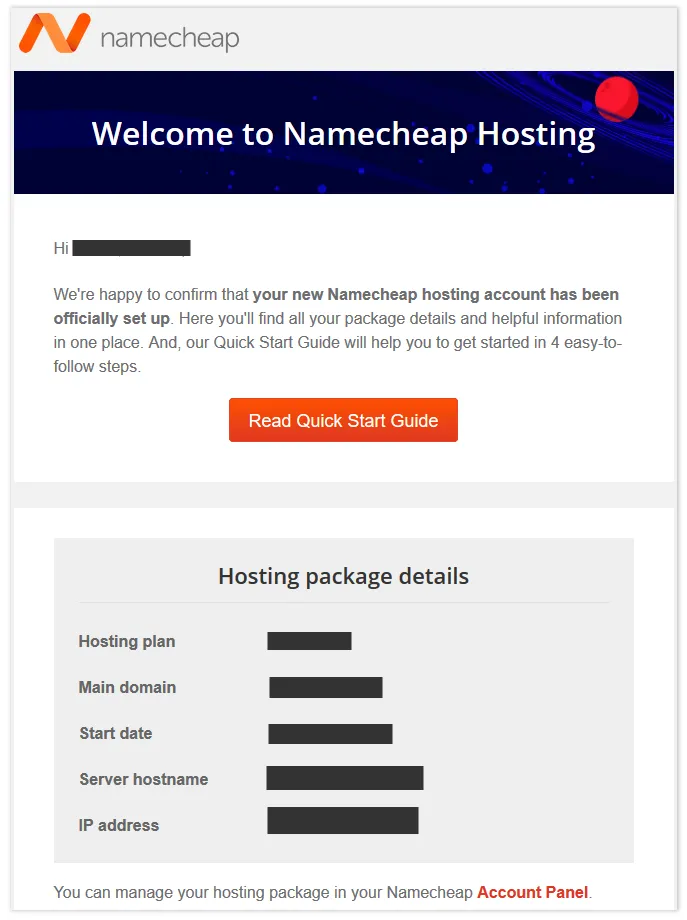
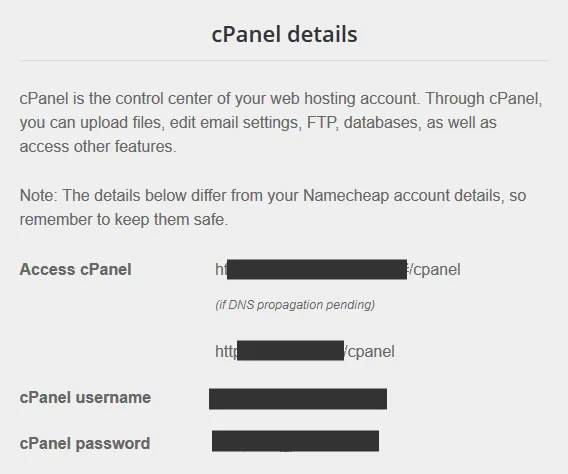
- CPanel (Control Panel) is the control center of your web hosting account where you can upload/edit/delete files, add email accounts, edit settings, manage database, take website backups, and much more.
- The cPanel details include: cPanel URL, Username, and Password. In the next section, you will be using these credentials to login to your cPanel account in order to install WordPress.
03. How To Install WordPress
In this section I will guide you step-by-step on how to quickly install WordPress & a free theme via your cPanel account using the Softaculous Installer.
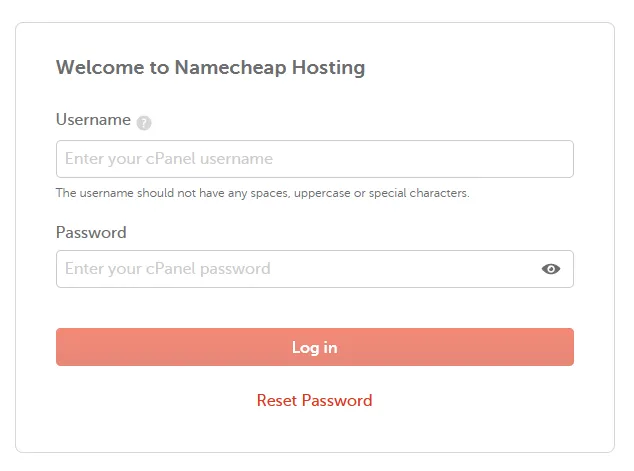
- Login to your Namecheap cPanel account using the cPanel URL provided to you via email. It will be something like, “https://server191.web-hosting.com/cpanel“, or “https://premium202.web-hosting.com:2083/“, depending on your hosting plan.
- Enter your cPanel Username and Password.
- Click the Log in button.
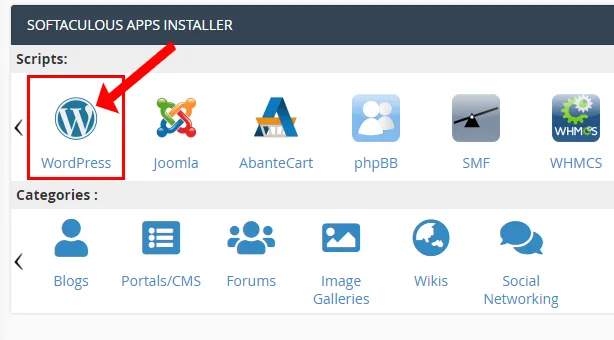
- Once you’re logged-in to your Namecheap cPanel account scroll-down to SOFTACULOUS APPS INSTALLER section. The Softaculous is an auto app-installer for installing commercial and open source web applications like WordPress, Joomla, SMF, Magento, AbanteCart, etc, on your web hosting account.
- Under the sub-section Scripts, click the WordPress icon.
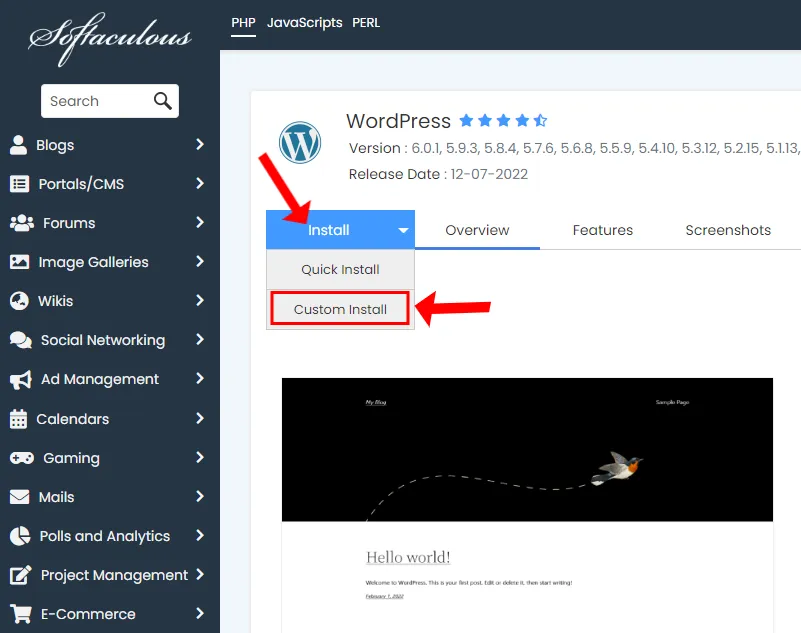
- You will be redirected to Softaculous page. Click on the Install tab and select Custom Install option.
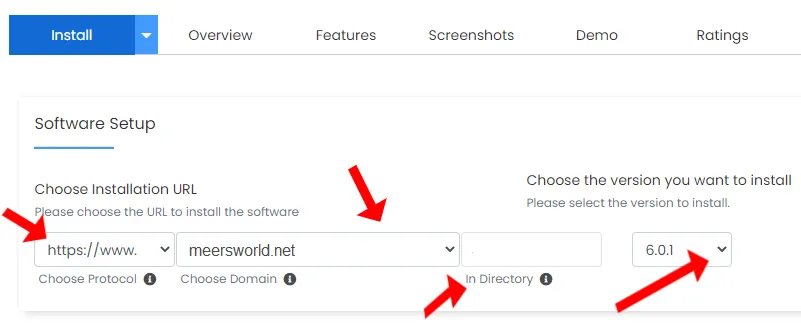
Choose Installation URL settings:
- In Choose Protocol select “https://www.”.
- In Choose Domain select your domain, like “meersworld.net“.
- Make the “In Directory” textbox empty by removing “wp“.
In “Choose the version you want to install” select the latest WordPress version. By default the latest version of WordPress is selected.
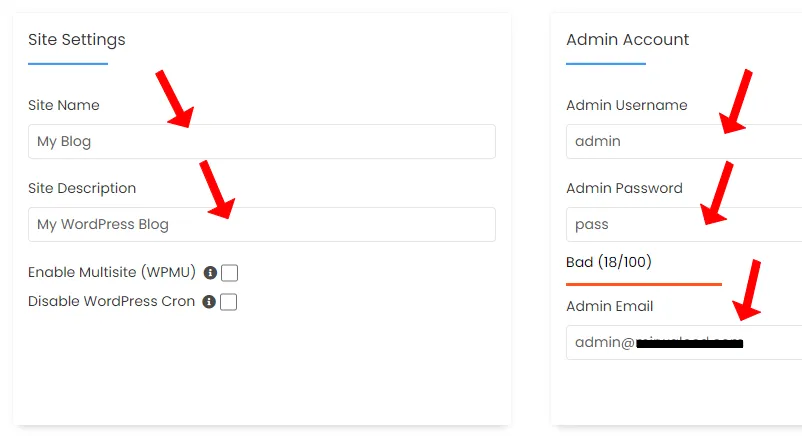
Fill the Site Settings:
- In the Site Name enter your website name.
- In the Site Description enter a short description that describes your website, business, company, etc.
Fill the Admin Account Settings:
- In the Admin Username enter a username. Don’t use “admin“, instead use something that others won’t be able to judge because you will be using this username to login to your WordPress Admin section.
- In the Admin Password enter a secure password that you can recall.
- In the Admin Email there will already be “admin@yourdomain“ email. Leave it as it is. You can change this later from the Users section.
- Choose a Language for your website.
- Leave the sections Select Plugin(s), and Advanced Options as it is. If you’re a tech-savvy you can customize these settings.
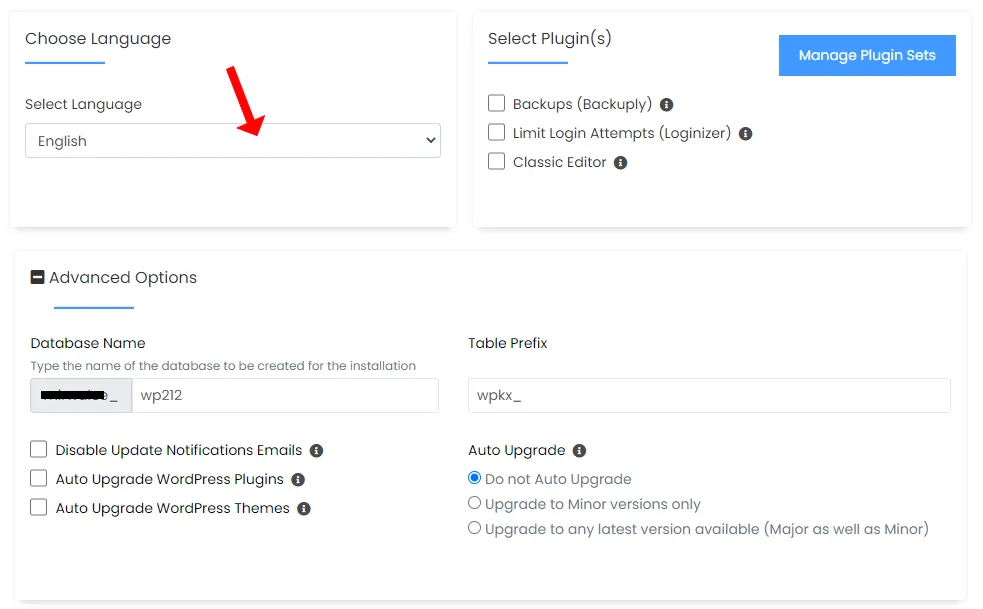
Now it is time to choose a WordPress theme for your website. If you don’t want to use these themes, ignore themes section, and click the Install button located at bottom of the page, as shown below after 3 steps.
- Softaculous will show you plenty of free WordPress themes for your website that are powered by PopularFX. Pick the one which is relevant to your website or the one that you feel is good for your website. If you’re confused then choose a random theme, you can change later. You can view the live demo once you select the theme, as shown in the next step
- The Navigation Arrows (< >) allow you to move the themes left and right. The Show All Themes lists you all the available themes.
- Here I will select Vogue theme.
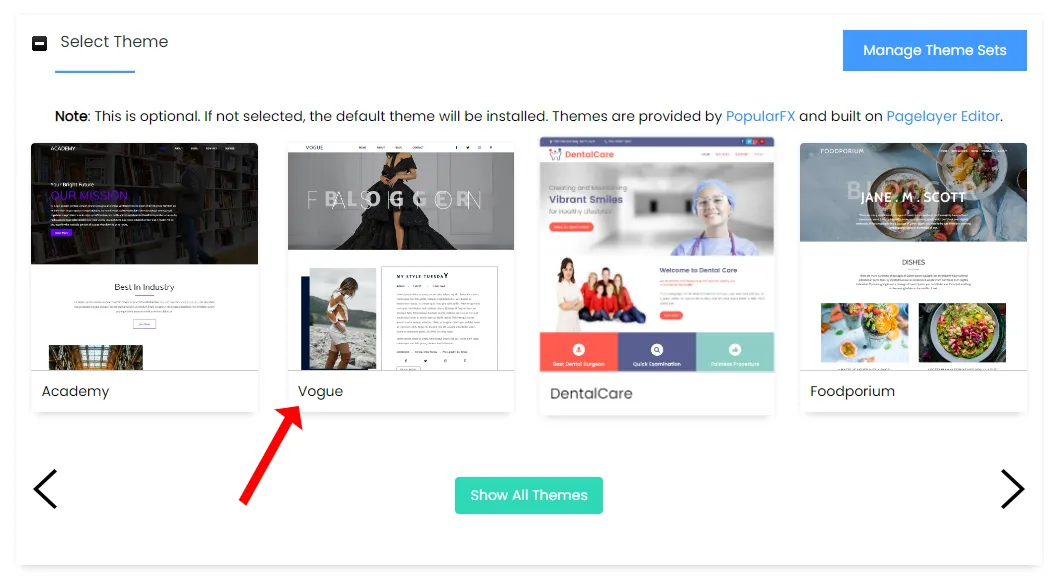
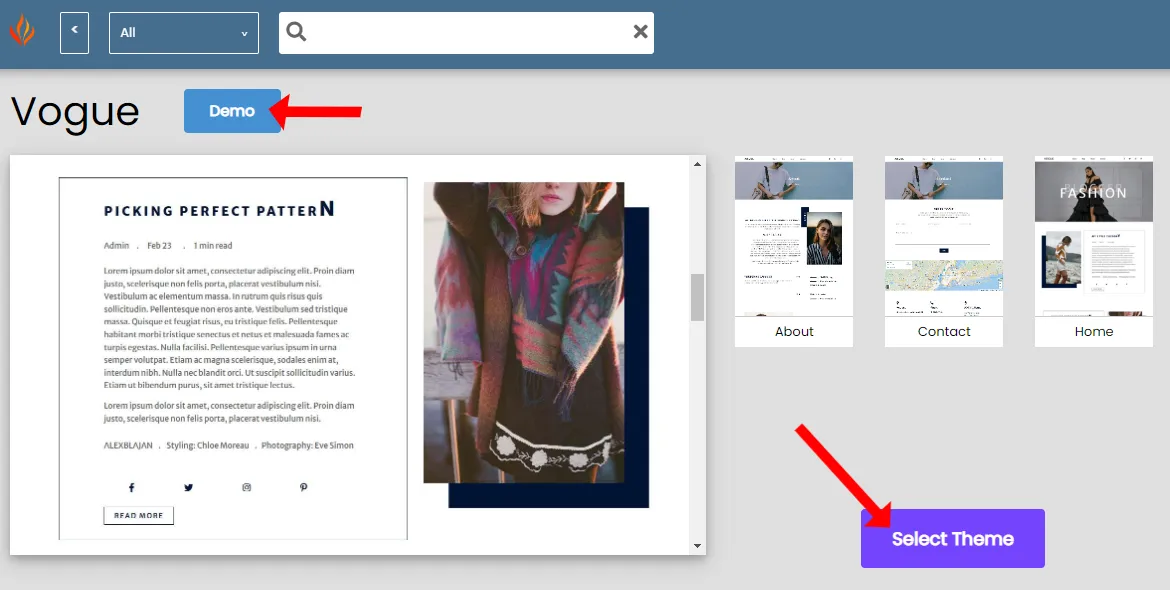
- Click the Demo button to watch the Live Preview of the theme.
- Click the Select Theme button to choose the theme.
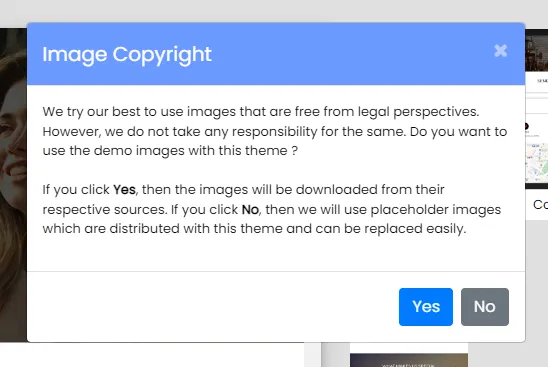
- An Image Copyright popup may ask you whether you want to use the demo images in the theme or not.
- Click Yes, if you want to use the demo images.
- Your theme will be selected.
- Now click the Install button located at bottom of the page to begin the WordPress installation.
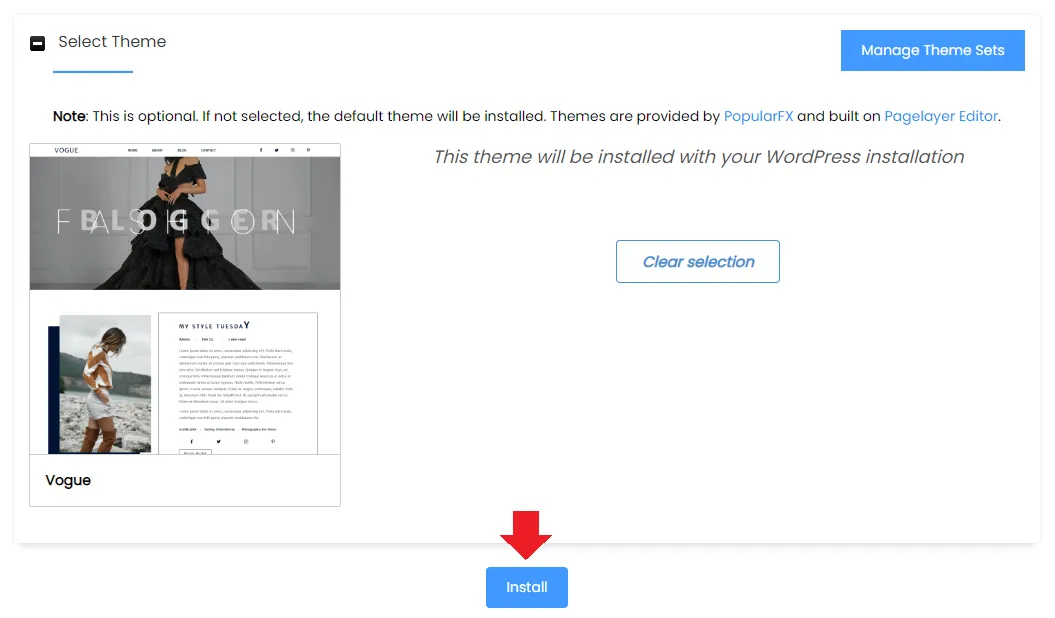
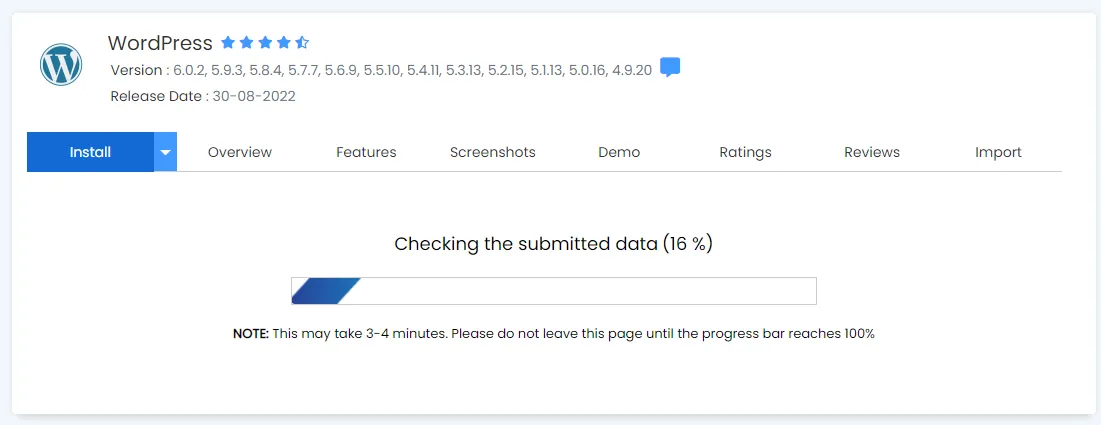
- The WordPress installation takes 3 to 4 minutes, so be patient and wait for it to finish.
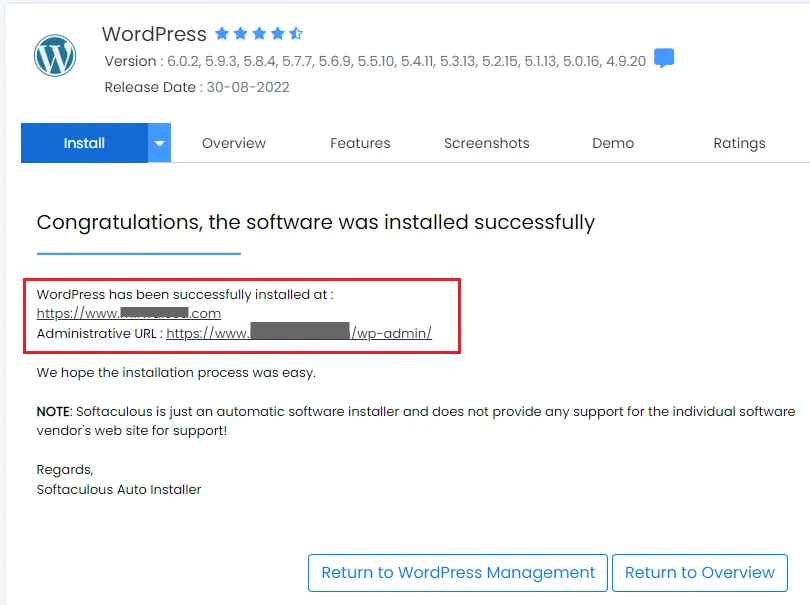
- Once the WordPress installation is completed successfully it will show you a message, “Congratulations, the software was installed successfully“.
- Softaculous will also show your website’s Homepage and Admin Section URLs. The Admin Section URL will be similar to this “https://www.example.com/wp-admin/”.
Now login to your WordPress Admin section, as shown in the next step.
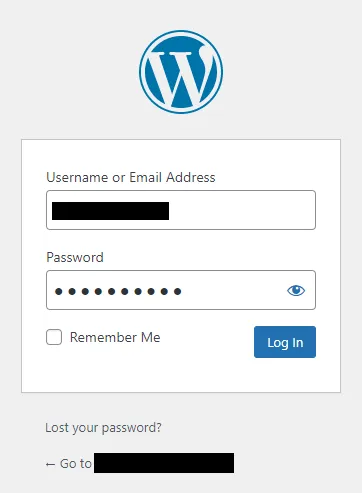
Login to your WordPress Admin:
- Browse your WordPress Admin URL, like “https://www.your_domain/wp-admin/“.
- Enter your Username or admin Email Address and Password.
- Click the Log In button.
- This is how your WordPress Admin Section looks like.
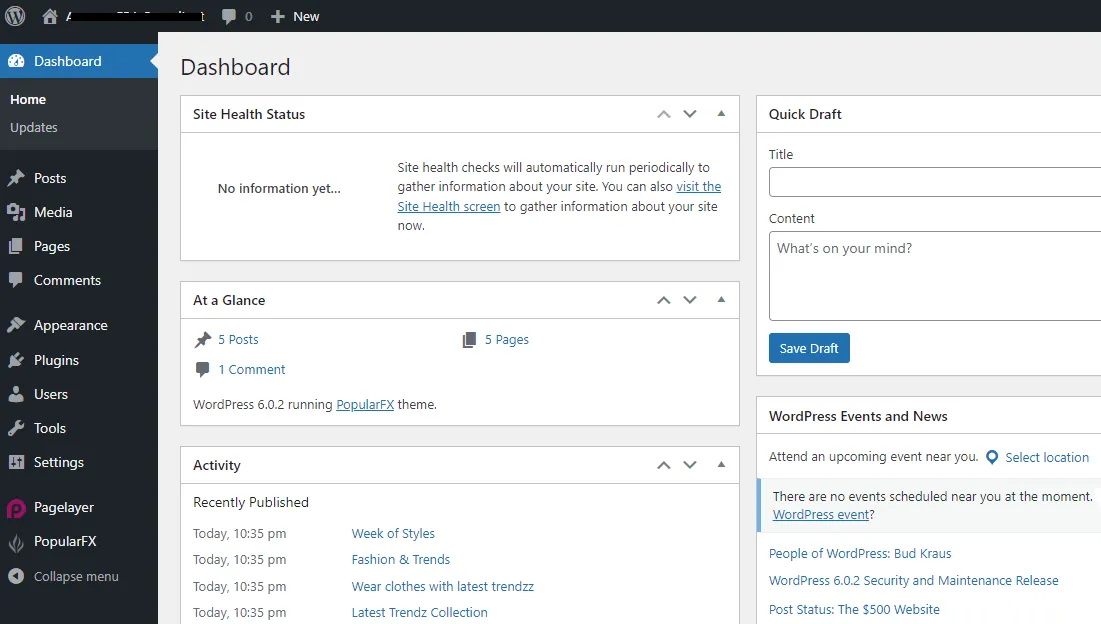
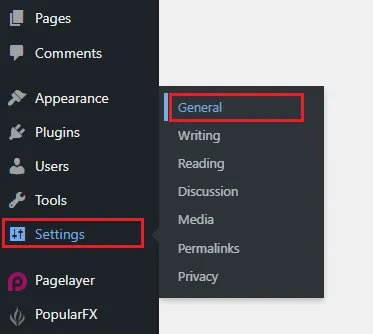
- To update the General Settings of your website go to Settings from sidebar.
- Click General.
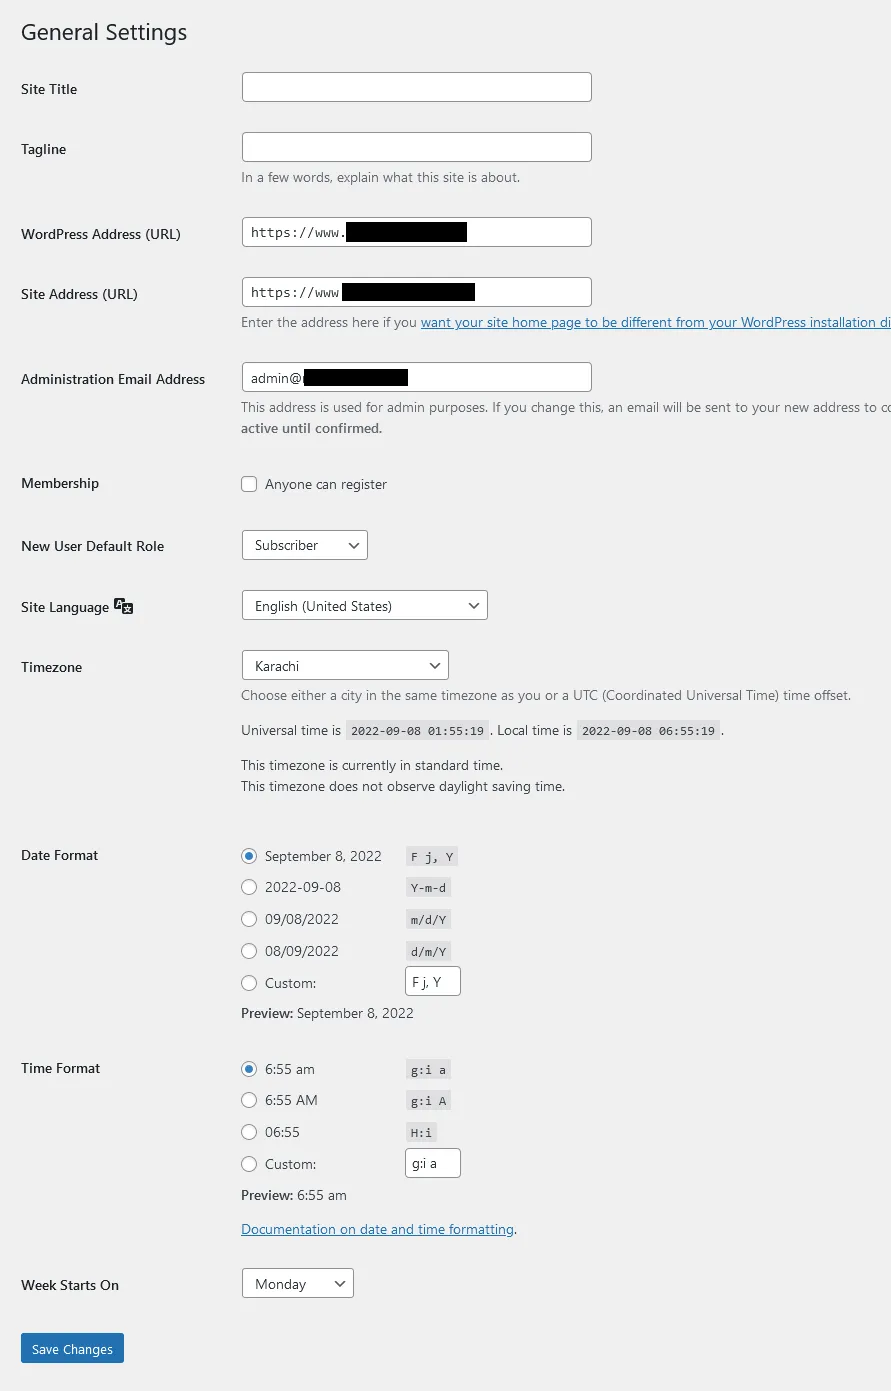
Edit/Update the General Settings of your website:
- In the Site Title enter the name of your website like my site name is Meer’s World.
- In the Tagline provide a brief description about your website.
- In the WordPress Address (URL) enter your domain address like “https://www.example.com”.
- In the Site Address (URL) enter your domain address again.
- In the Administration Email Address enter your email address. You can use either your private email address or your public email address such as Gmail’s, Yahoo’s, etc. Private email address is the one with your domain address such as “info@example.com“, “admin@example.com“, etc. Learn: How To Create Email Account In Namecheap cPanel | Access Webmail
- Also update Site Language, Timezone, Date Format, City, etc. Once you are done, click Save Changes at bottom.
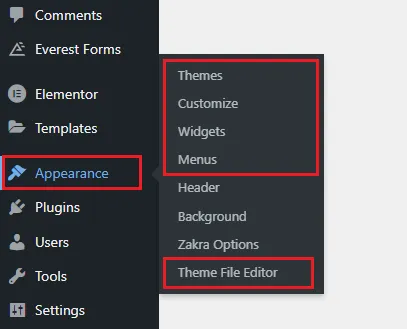
The Appearance section allows you to Upload/Delete/Activate/Change theme, Customize theme, Add/Remove Widgets on Sidebar, Add/Remove Menu items, and Edit/Update code files in Theme File Editor.
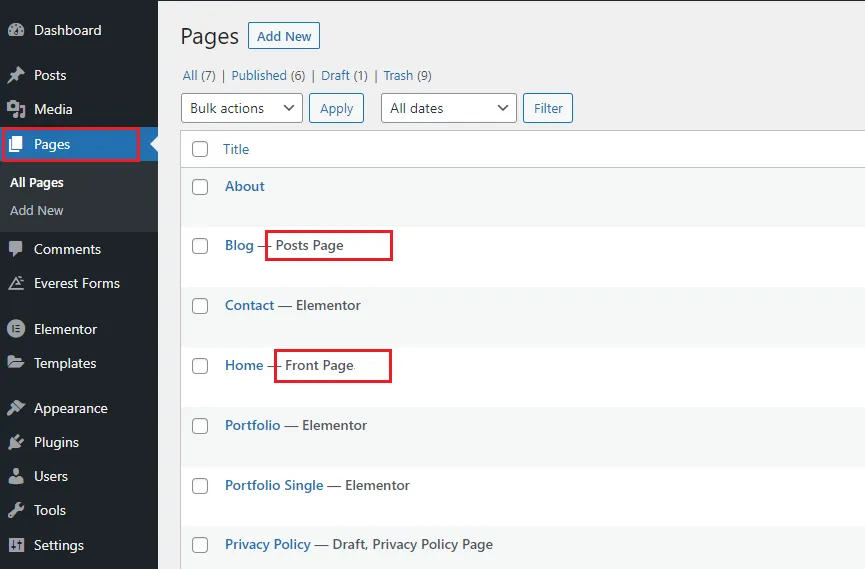
The Pages Section allows you to Add/Edit/Delete pages. Some theme makers develop themes in pages. You can identify the Homepage of theme by Front Page tag, and Itempage (detail page) by Post Page tag. Itempage is the one that shows the content of pages and posts.
You can Edit/Delete/Update Homepage’s text, images, sections, headers, footers, etc. It can be modified using the WordPress builtin Editor as well as using third-party Page Builders like Elementor, WP Page Bakery, etc, on which they are designed.
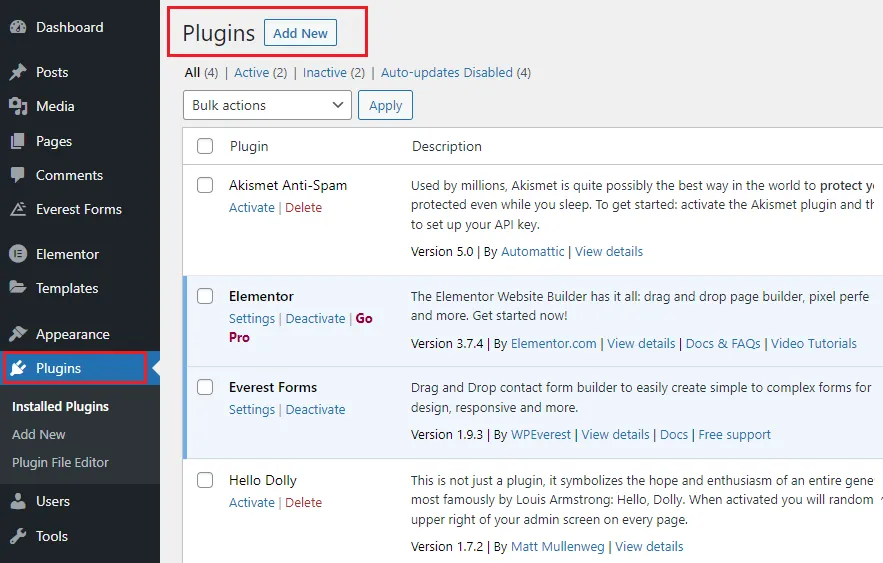
The Plugins Section allows you to Add/Upload/Activate/Deactivate/Delete/Edit/Update/Search WordPress plugins.
04. How to Install & Upload Custom WordPress Theme
In this section I will guide you on how you can upload and install a custom WordPress theme from a zip file.
Most of the builtin WordPress themes come with basic features and design that do not fulfill the requirements of a professional website. That’s why people use pre-made custom WordPress themes for professional websites.
You can find thousands of WordPress themes for any type of website on Themeforest, like eCommerce, Real Estate, Non-Profit, Corporate, Business, Agency, Directory & Listing, Education, Retail, Wedding, Technology, etc. Read: How to Buy a Theme on Themeforest & Download.
If you don’t find a theme of your choice, you can hire a WordPress Developer on Fiverr to design a new website theme or edit existing theme, according to your requirements.
Follow the steps to install a WordPress theme from zip file. When you download a WordPress theme don’t forget to read the Documentation that provides you information on each and everything related to your theme like Installation Guide, Theme Update Guide, Plugins Information, Theme Features, etc.
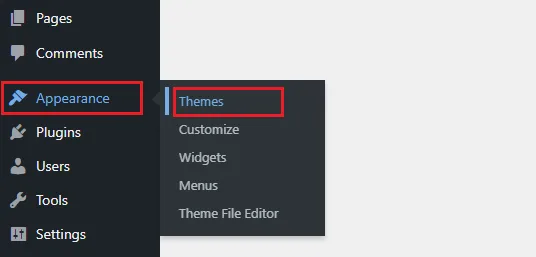
- Go to Appearance from the sidebar.
- Click Themes.
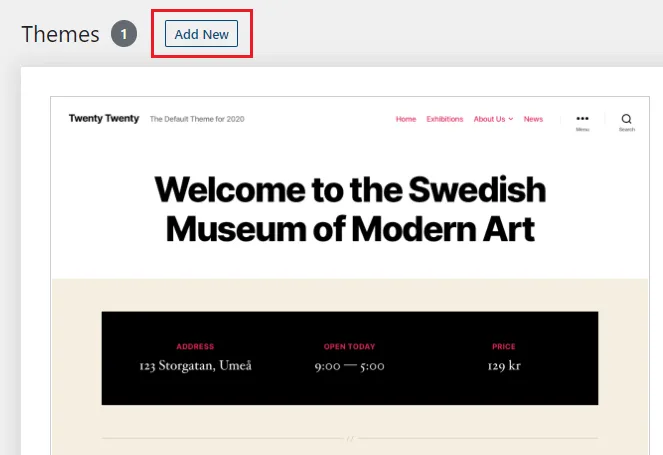
- Click Add New button.
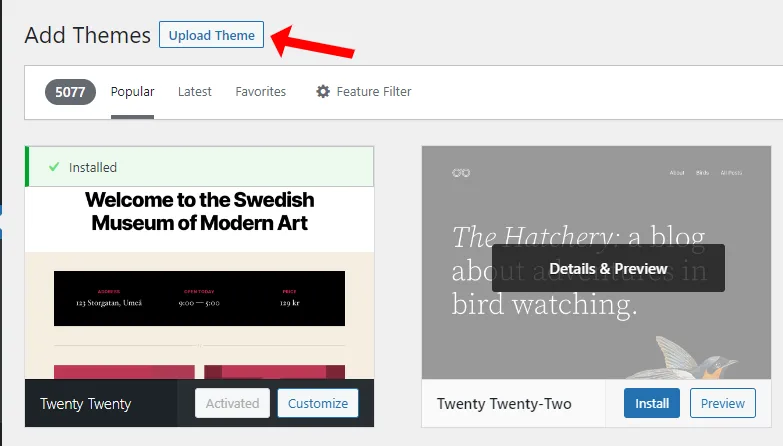
- Click Upload Theme.
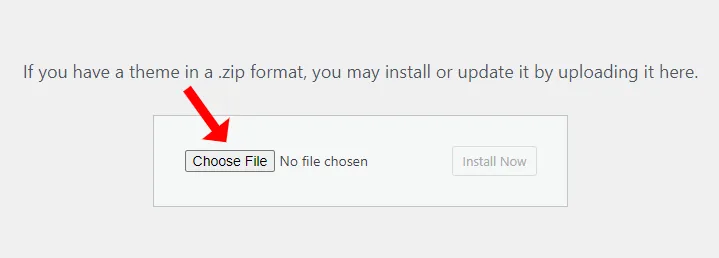
- Click the Choose File button.
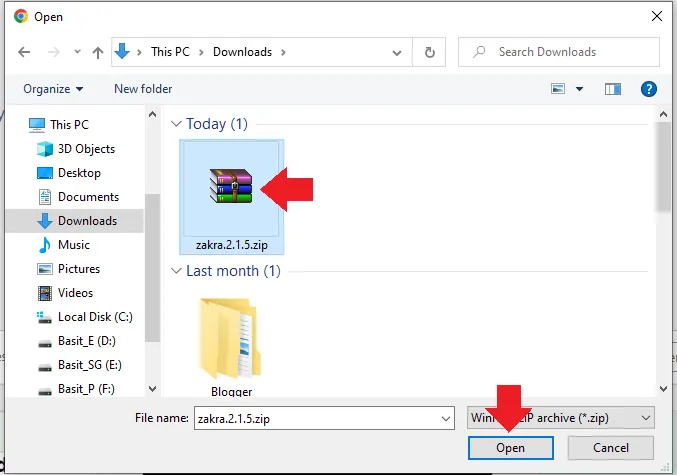
- Select the zip file and click the Open button.
Note: Some themes are stored in sub-zip files inside the main zip file. In that case if you upload the main zip file directly you may get errors. That’s why always read the documentation of the theme before you install. You can also get support from your theme’s Support Team.
- Click the Install Now button.

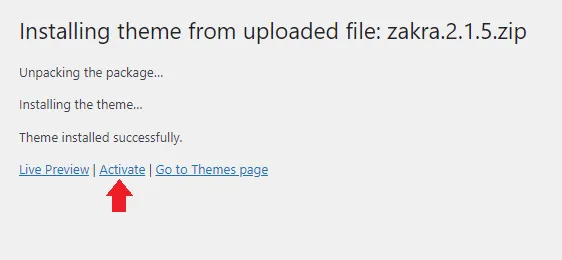
- Once the theme is installed successfully click the Activate link. It will be set as the current theme of your website. If the theme contains plugins, also activate them.
After your theme is activated you might be asked to Import Demo Data. The Demo Data is used to view and test a fully-functional theme. Once you set up your website delete the Demo Data.
The theme can be customized from Appearance or Pages section, as I have already guided you in the Section 3 earlier.
05. Things to Do After Launching Your Website
Till this point you’re done with the launching your own professional WordPress website. Now it is time to set up important things like Website SEO, Creating Google Search Console & Analytics accounts, Contact Us Page, Spam Protection, etc.
Go through our below post to learn about the 5 free essential WordPress plugins that covers:
- Site Kit by Google (Create Google Search Console & Google Analytics accounts for your website and show traffic stats on your WordPress Dashboard using Site Kit by Google plugin).
- Yoast SEO (One of the most widely used and leading SEO WordPress Plugin. It optimizes your WordPress website to perform better in the SERPs.
- LiteSpeed Cache (Improves your website performance and loading speed and also helps it to pass the Google Core Web Vitals assessment).
- WP User Avatar (This plugin allows you to easily upload avatars for your website users. You don’t need to register for Gravatar).
- Contact Form 7 (Contact Form 7 is one of the most installed and popular free WordPress plugin for creating and managing contacts form in your website). If your theme contains a a contact form or page you don’t need to install this plugin.
Read This: 5 Essential WordPress Plugins That A New Website Needs

Final Thoughts
So it was all about launching/creating a professional WordPress website without anyone’s help. Hope my guide would have helped you. Initially you may find WordPress a bit difficult or strange, but as you will spend time on it you will love it.
If you like this post then don’t forget to share with other people. Share your feedback in the comments section below.


Leave a Reply