Do you want to set up PHP on IIS in Widows to run PHP applications and websites? You’re in the right place. In this tutorial, I will guide you step-by-step on how to install IIS in Windows, Download PHP, Configure PHP.ini, Configure the environment variables, Configure IIS for PHP, Test the PHP version, and Run a PHP file on IIS.
IIS (Internet Information Server) is one of the most powerful web servers from Microsoft that is used to host your Web applications. It provides localhost environment primarily to run (host) dynamic websites & web applications powered by ASP.NET & PHP.
PHP (Hypertext Preprocessor) is one of the most popular and widely used open-source server scripting languages used for creating dynamic websites and applications.
Following topics will be covered in this post:
- How to Install IIS on Windows
- How to Download & Extract PHP
- How to Configure PHP.ini File
- How to Configure the Environment Variables for PHP
- How to Configure IIS for PHP
- How to Test the PHP Version
- How to Run a PHP File on IIS
RELATED
- How to Download & Install WampServer on Windows
- How to Buy Domain & Hosting – Step by Step
- How to Install WordPress on XAMPP | Beginner’s Guide
01. How to Install IIS on Windows
In this section, I will guide you step-by-step on how to install IIS on Windows.
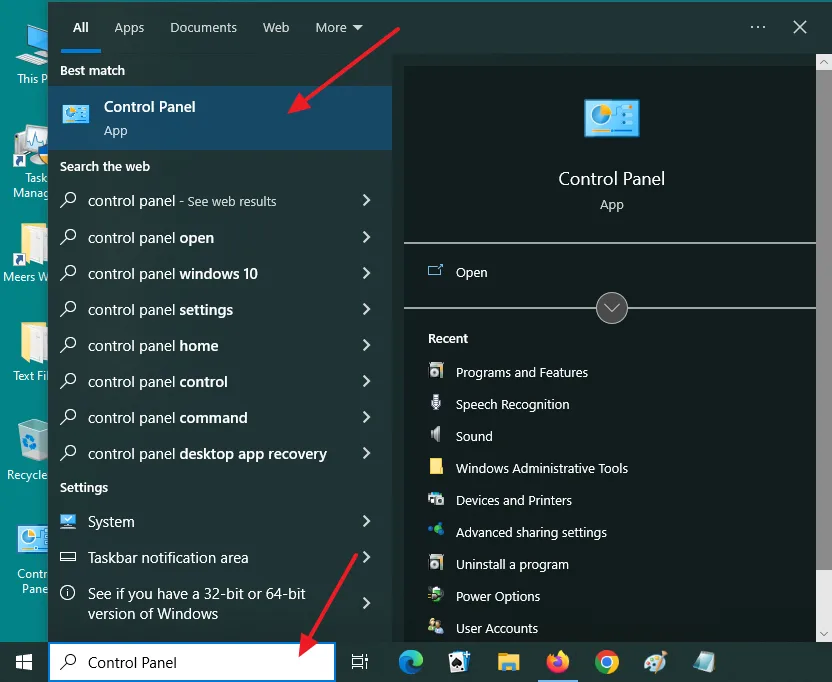
- Go to Windows Search Bar, located at your bottom-left corner.
- Type Control Panel.
- Click on the Control Panel from the search results.
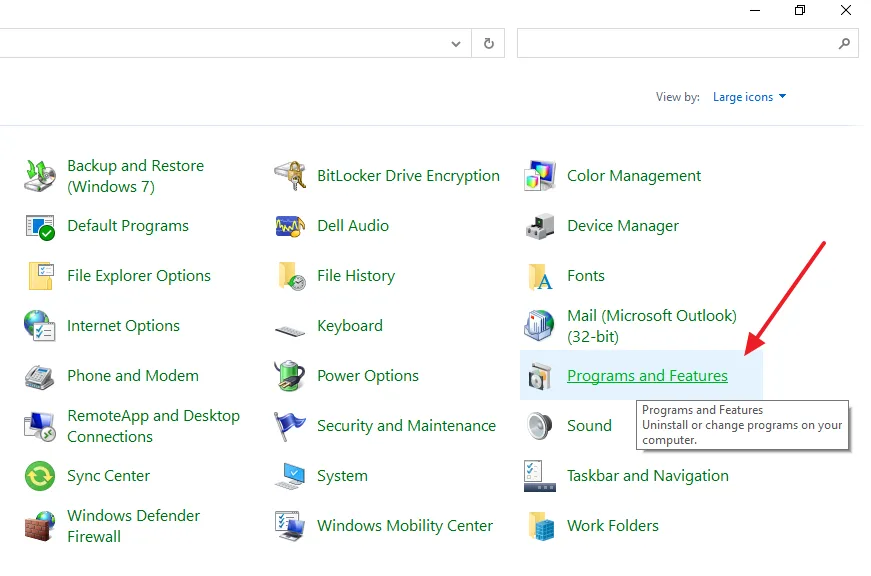
- Click on the Programs and Features.
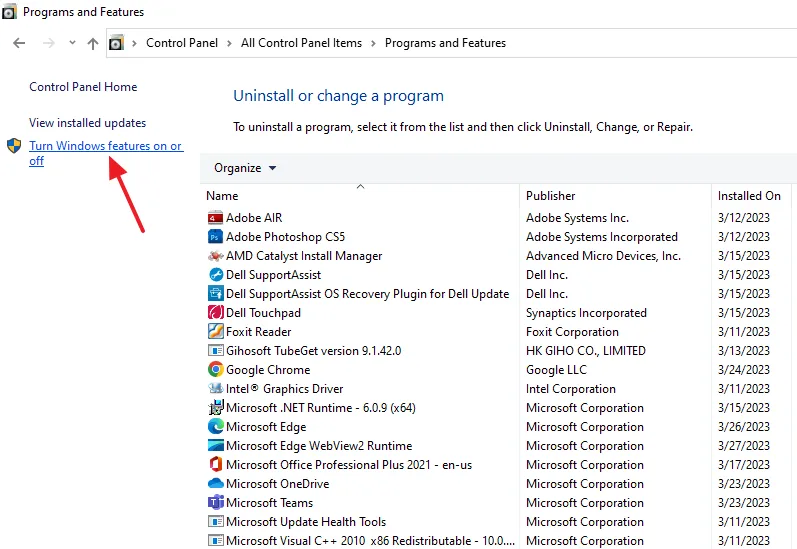
- Click on the Turn Windows features on or off link, located at your left side.
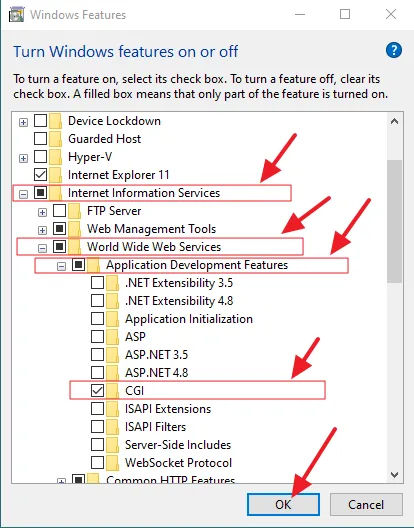
- Expand the Internet Information Services.
- Expand the World Wide Web Services.
- Expand the Application Development Features.
- Tick on the CGI.
- Click on the OK button.
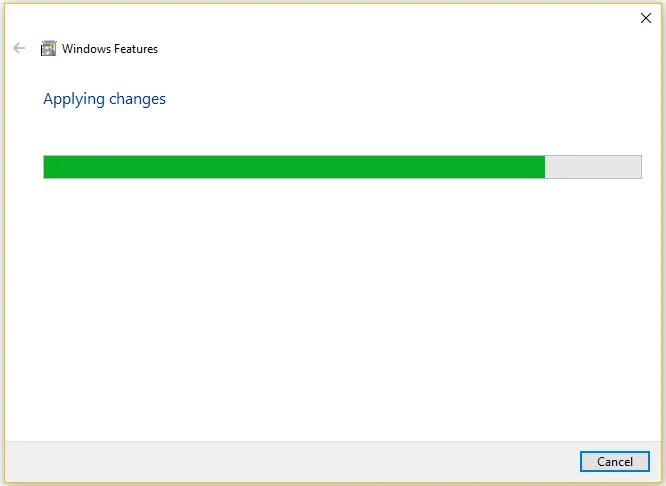
- Wait for the changes to be applied.
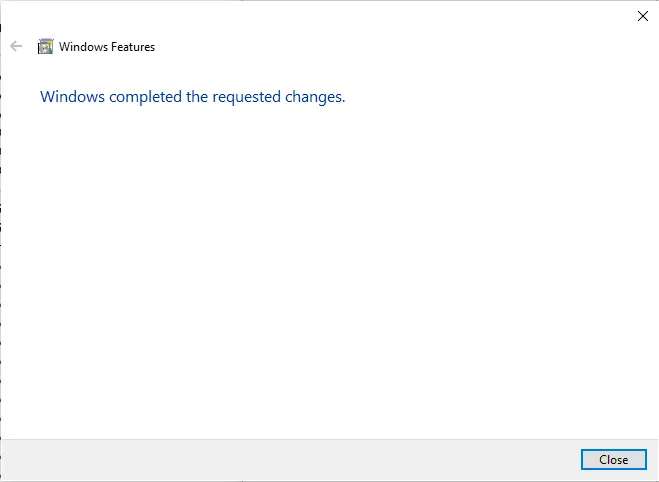
- Once the changes are applied successfully you can see the message, “Windows completed the requested changes“.
02. How to Download & Extract PHP
In this section, I will guide you on how to download & extract the PHP.
- Go to PHP Official Website.
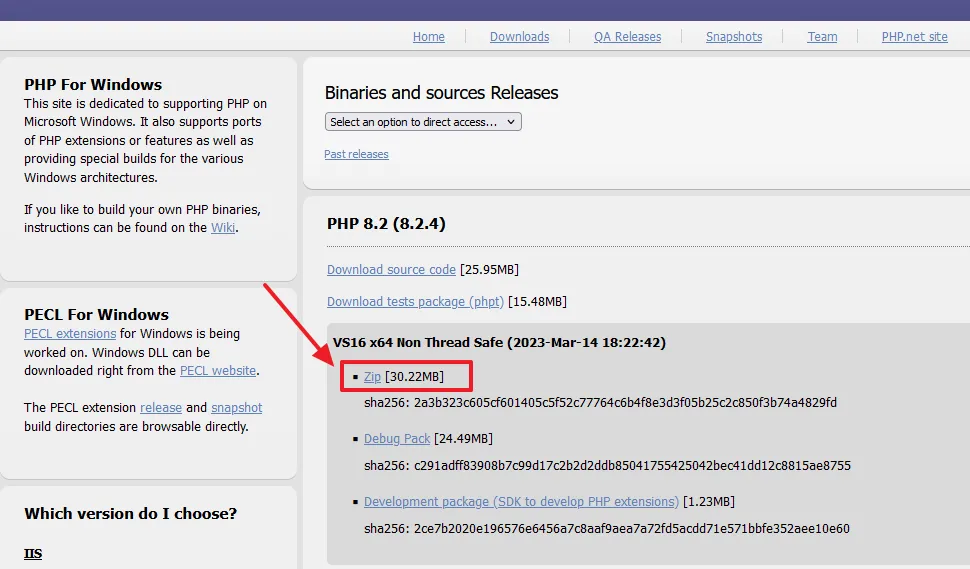
- Below the Binaries and sources Releases you can see the latest version of PHP. The PHP should be 64 bit version and Non Thread Safe, because it is recommended for IIS.
- Click on the Zip link, located below the VS16 x64 Non Thread Safe to download the PHP.
- Copy the Zip file to your C:\ Drive.
- Right-click on the Zip file and click on the Extract to php-version...
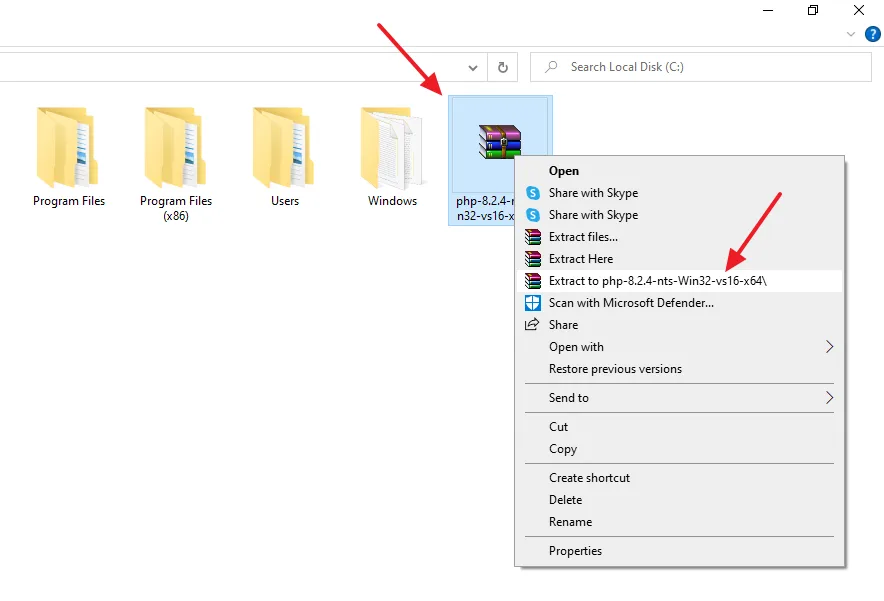
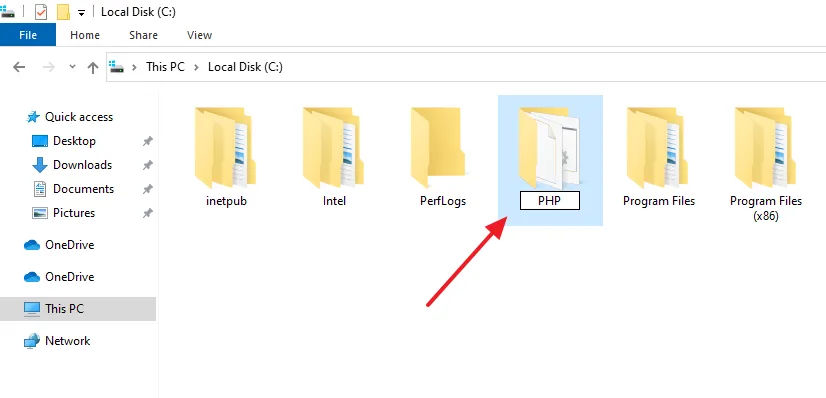
- Rename the extracted folder to PHP.
03. How to Configure PHP.ini File
In this section, I will guide you step-by-step on how to configure the PHP.ini file for IIS.
A PHP.ini is a simple text file that allows you to adjust PHP settings. It is the default configuration file for running the PHP-based applications.
- Open the PHP folder that you had extracted to C:\ Drive.
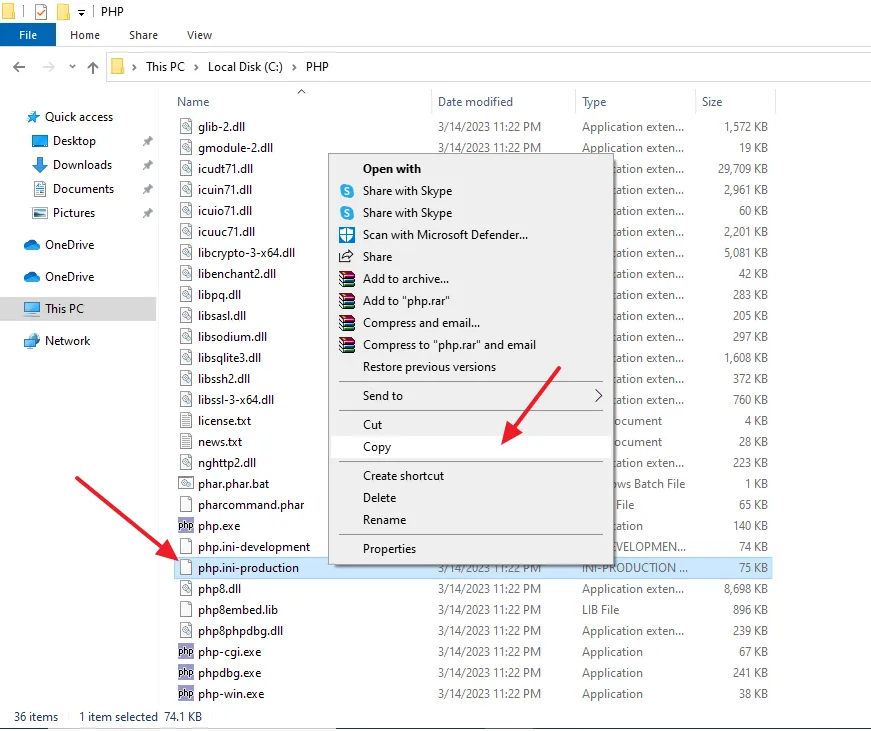
- Copy the php.ini-production file & Paste in the same folder(place).
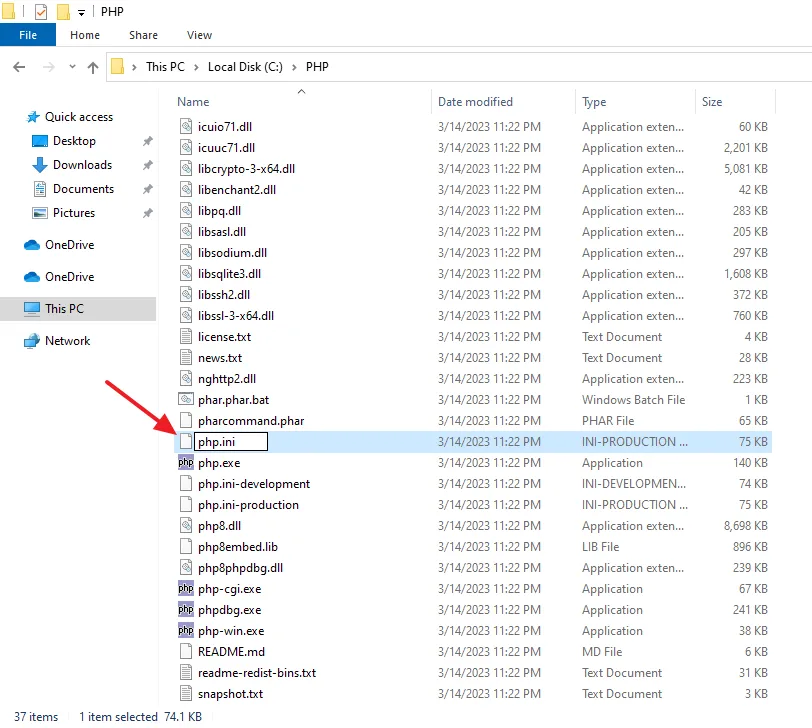
- Rename the copied file to php.ini.
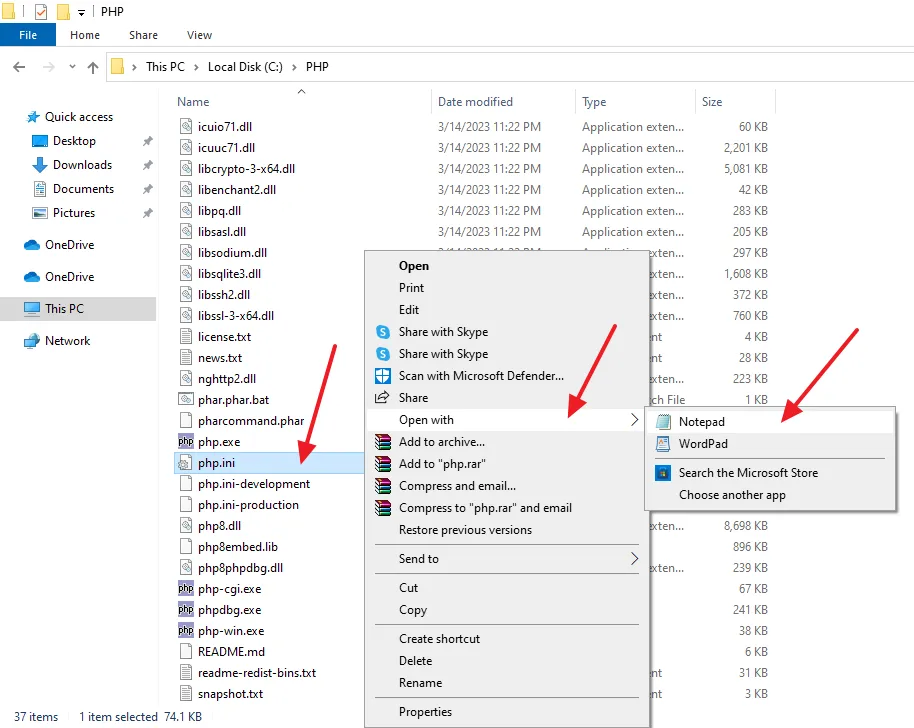
- Right click on the php.ini file.
- Go to Open With.
- Click on the Notepad.
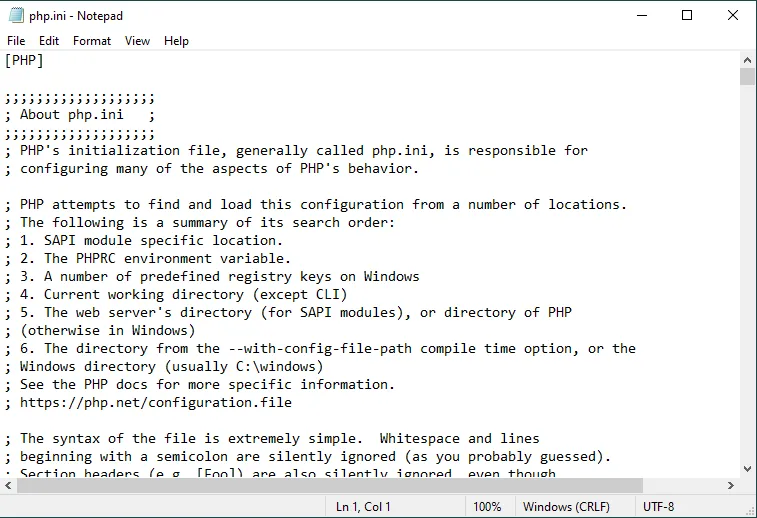
- This is how your PHP.ini file looks like. The “;” is a comment symbol. The lines followed by “;” are not executed.
- Now you have to do two things (1) Make changes to lines listed below (2) Remove the “;” symbol from lines, listed below.
- Press Ctrl + F5 to open the Search Box.
- Find the below lines in your php.ini. Remove the “;” symbol and make the changes, which I have made.
- Save the changes.
Find extension_dir = "./"   Replace with  extension_dir = "C:PHPext"
Find fastcgi.impersonate=0  Replace with  fastcgi.impersonate=1
Find cgi.fix_pathinfo=0     Replace with  cgi.fix_pathinfo=0
Find cgi.force_redirect=1   Replace with  cgi.force_redirect=0
Find error_log = php_errors.log and remove ";"- Find the below lines in the php.ini file and remove only “;” from their beginning.
- Save the changes.
extension=curl
extension=gd
extension=mbstring
extension=mysqli
extension=pdo_mysql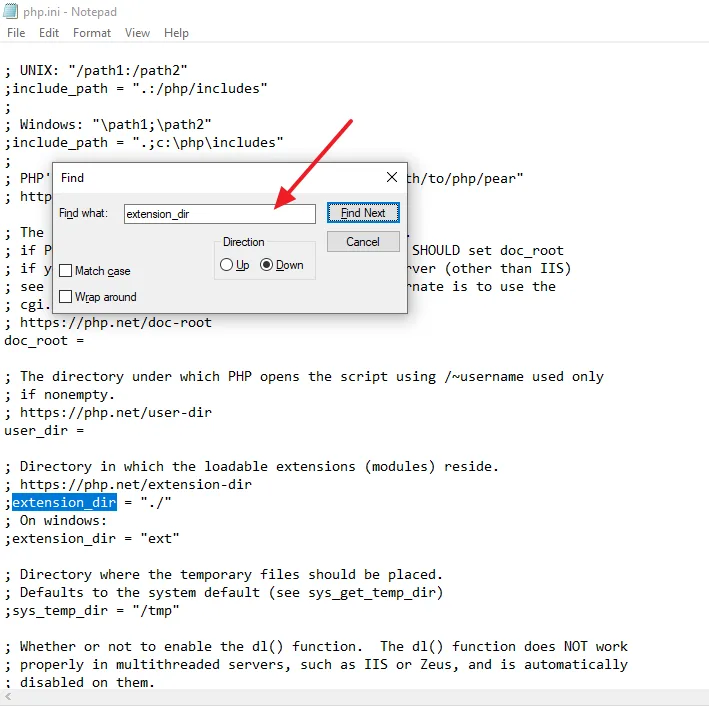
04. How to Configure the Environment Variables for PHP
In this section, I will guide you step-by-step on how to configure the Environment Variables for PHP in Windows.
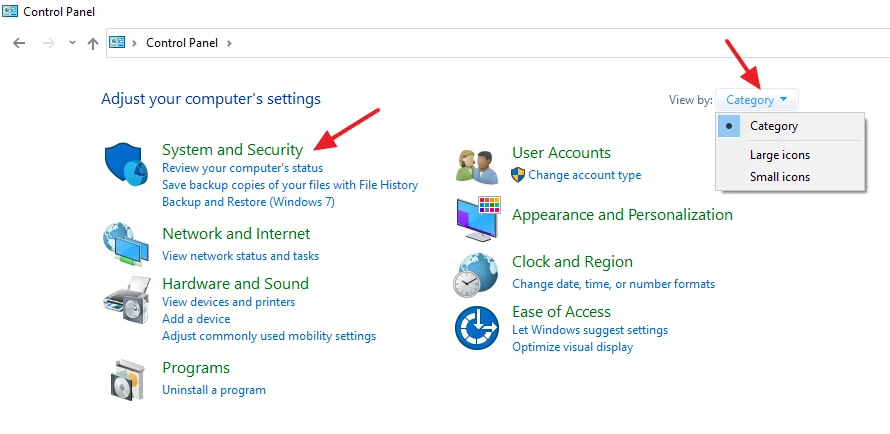
- Open the Control Panel.
- From View by: choose Category.
- Click on the System and Security.
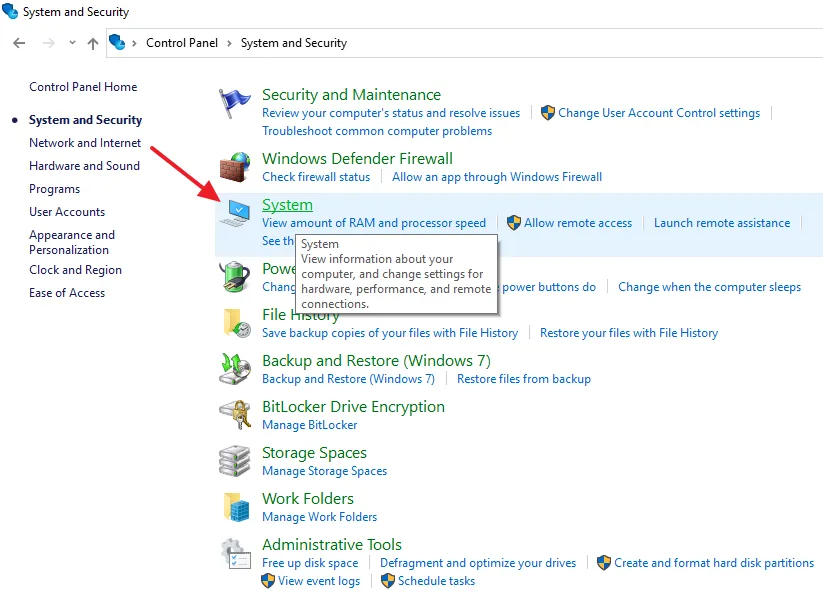
- Click on the System.
- Click on the Advanced system settings link, located under the Related settings.
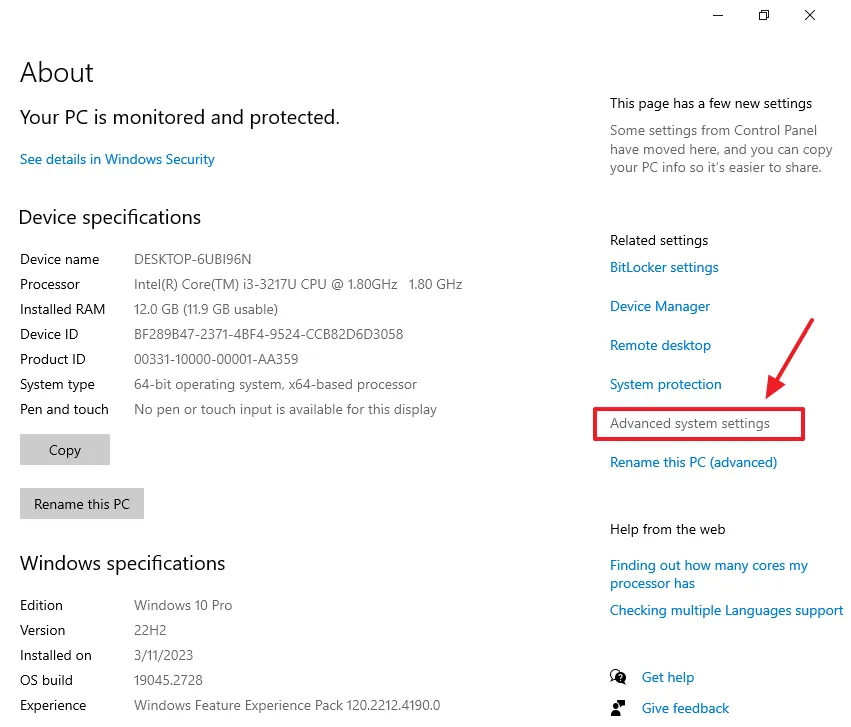
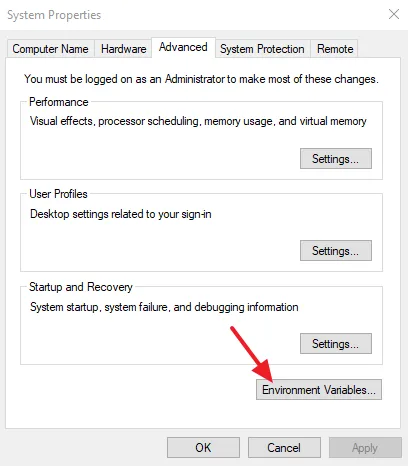
- Click on the Environmental Variables… button.
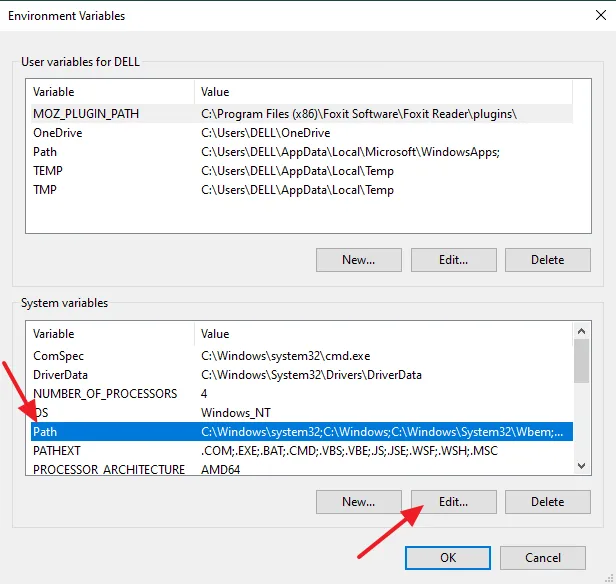
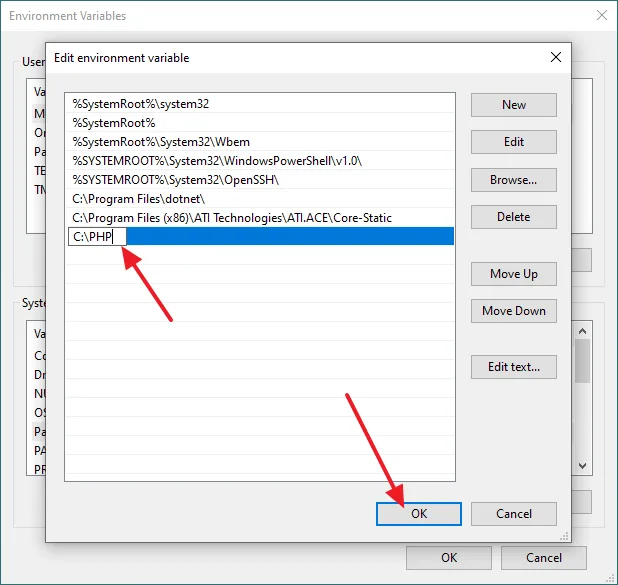
- Under the System variables, select Path & click on the Edit… button.
- Click on the New button.
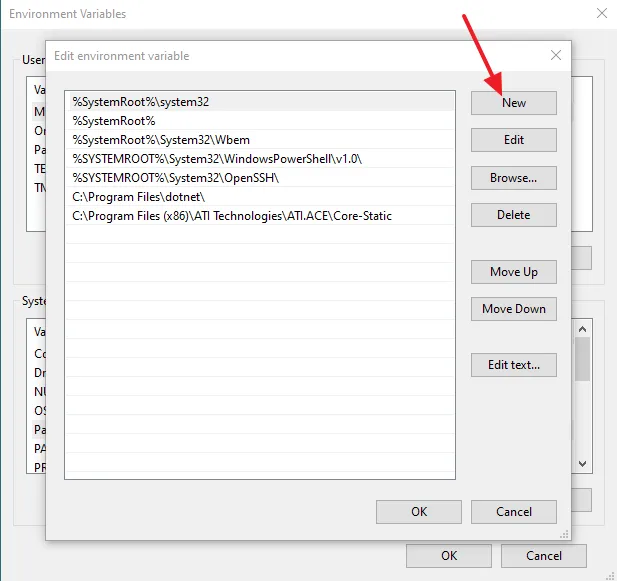
- Type C:\PHP.
- Click on the OK button.
05. How to Configure IIS for PHP
In this section, I will guide you step-by-step on how to configure IIS for PHP in Windows.
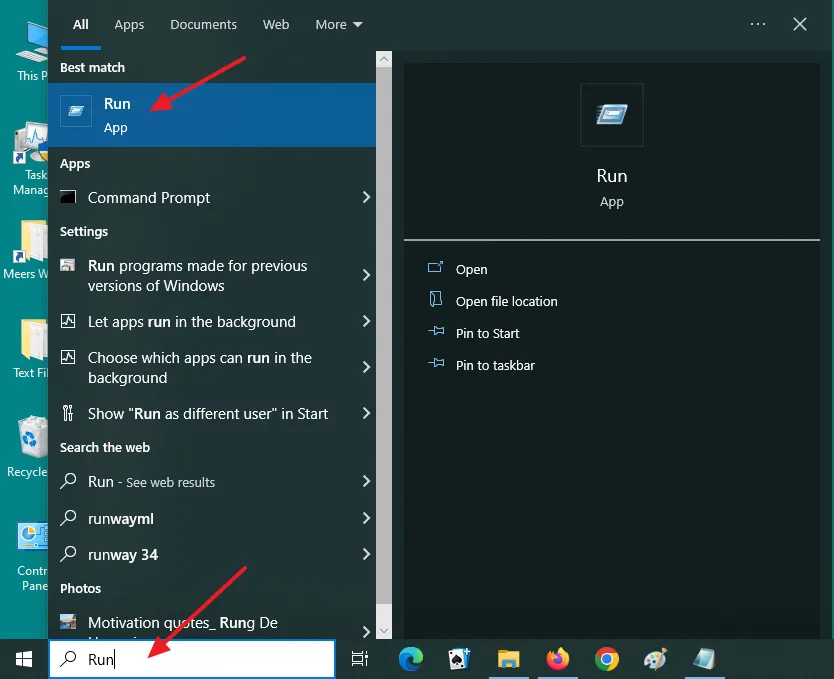
- Type Run in the Windows Search Bar.
- Click on the Run from the search results.
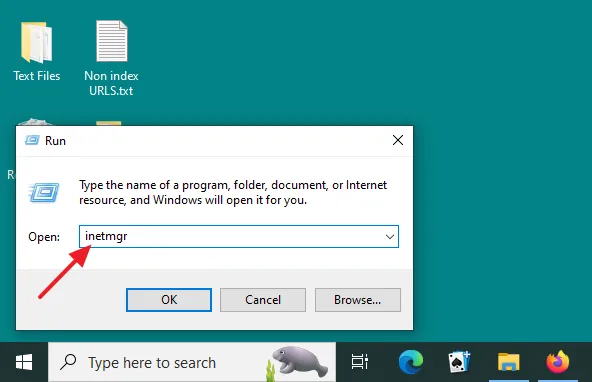
- Type inetmgr in the Open: field.
- Click on the OK button or press Enter.
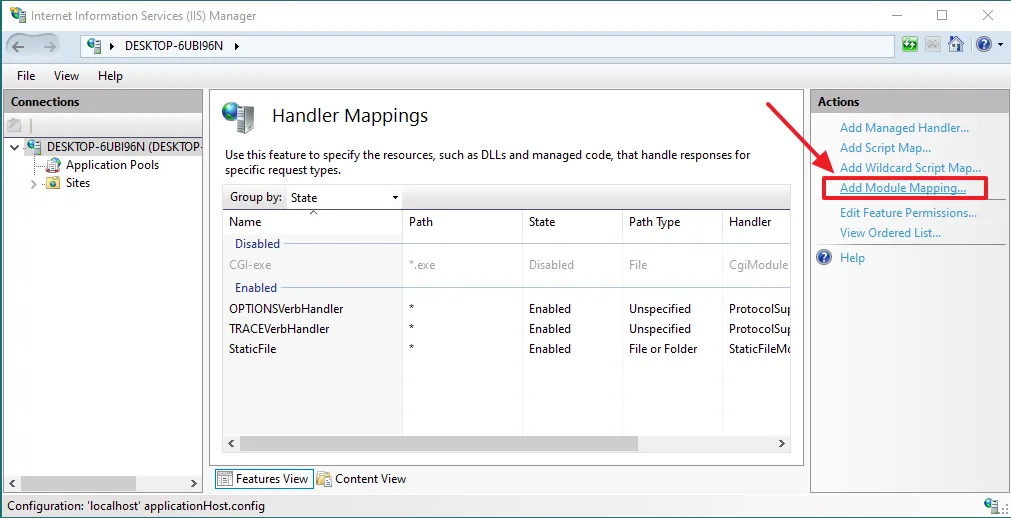
- Click on the Handler Mappings.
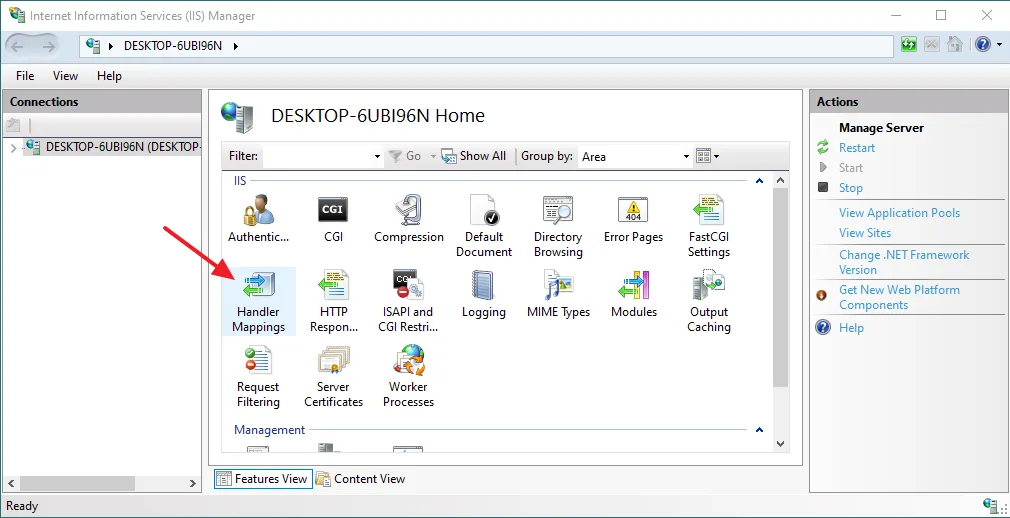
- Click on the Add Module Mapping.. link located under the Actions.
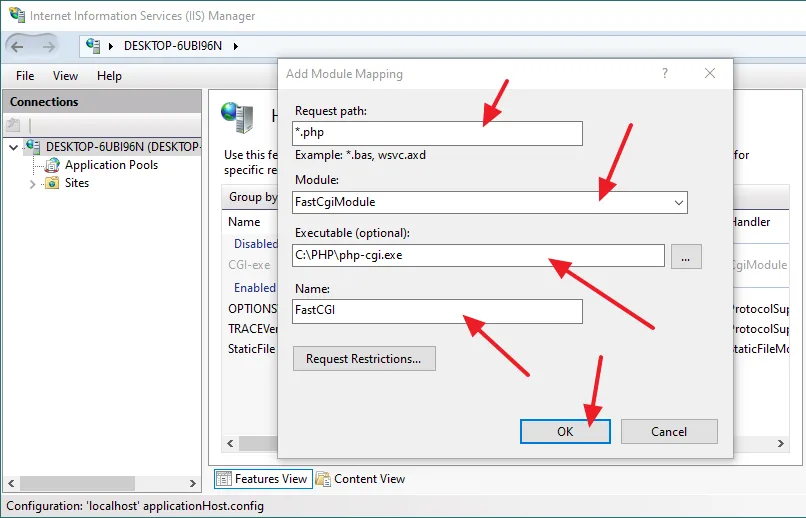
- In Request path: type *.php.
- In Module: select FastCgiModule from the dropdown list.
- In Executable (optional), type C:\PHP\php-cgi.exe. You can also add this .exe file using the Browse (…) button.
- In the Name type a name like FastCGI.
- Click on the OK button.
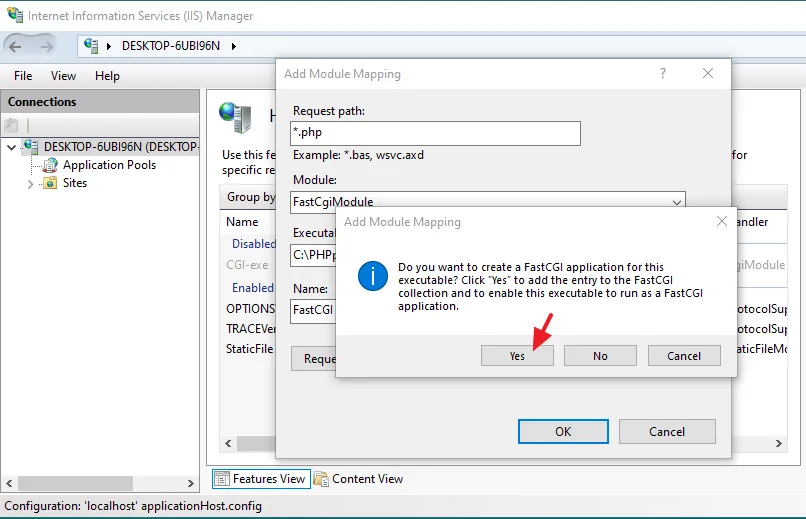
- It will prompt your permission to create a module mapping application for this executable. Click on the Yes button.
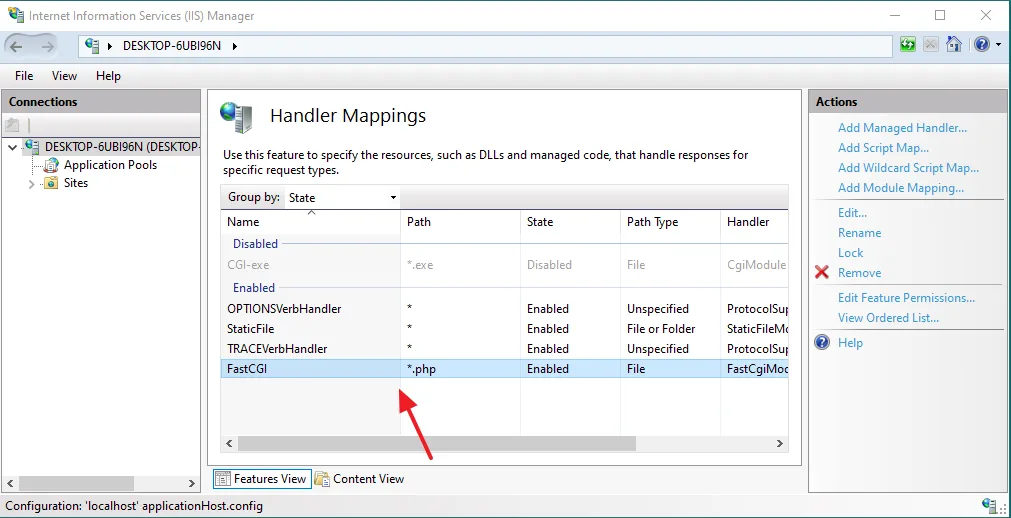
- You can see that the Module Mapping is created and enabled.
06. How to Test the PHP Version
In this section, I will guide you on how to test the PHP version in Windows to know whether it is fully-functional or not.
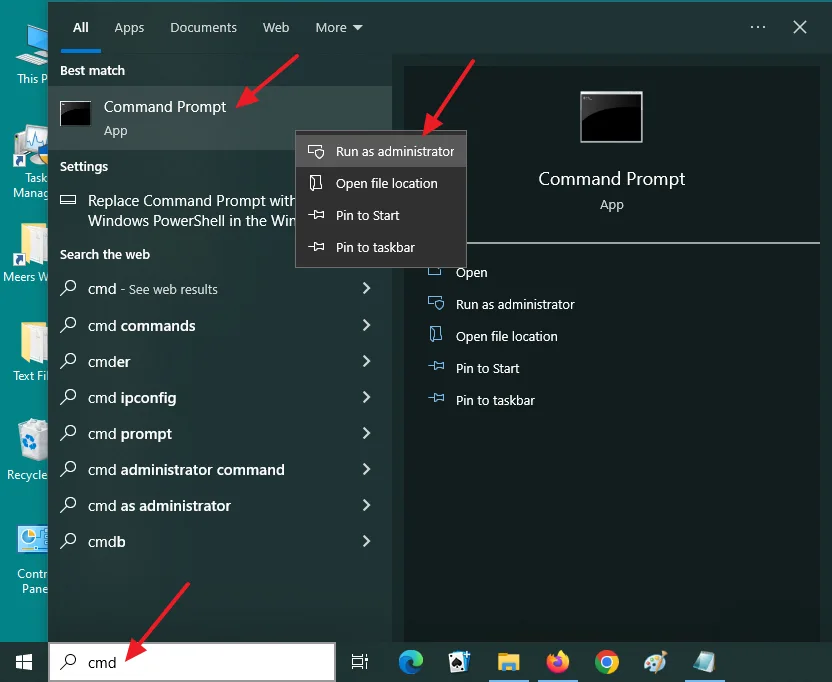
- On Windows Search Bar type CMD.
- Right click on CMD and select Run as administrator.
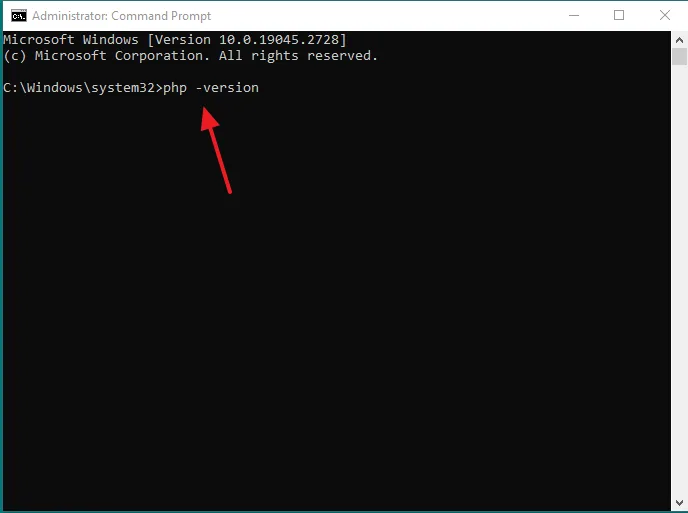
- Type php -version.
- Press the Enter button.
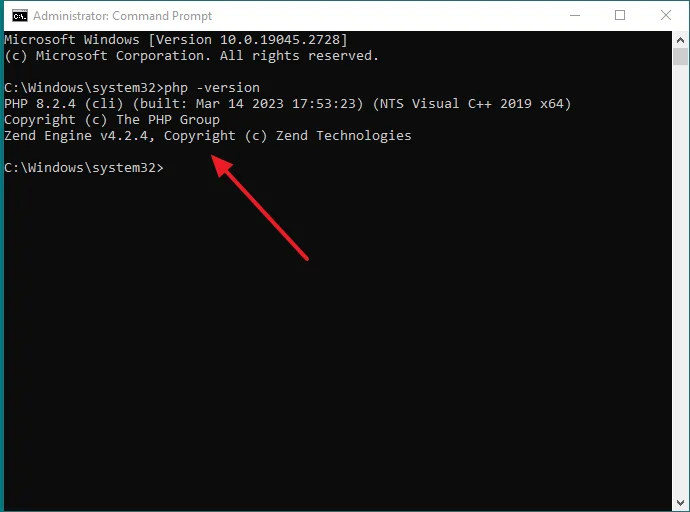
- You can see that it is showing the information about PHP version and Visual C++ Redistributable package’s version which is NTS Visual C++ 2019 x64.
If Visual C++ Redistributable Package is not installed on your computer, you may receive the error, “The code execution cannot proceed because VCRUNTIME140.dll was not found. Reinstalling the program may fix this problem“.
You can download Visual C++ Redistributable Packages from Microsoft.
07. How to Run a PHP File on IIS
Everything required to run PHP on IIS in Windows is set up, now it is time to run a PHP file.
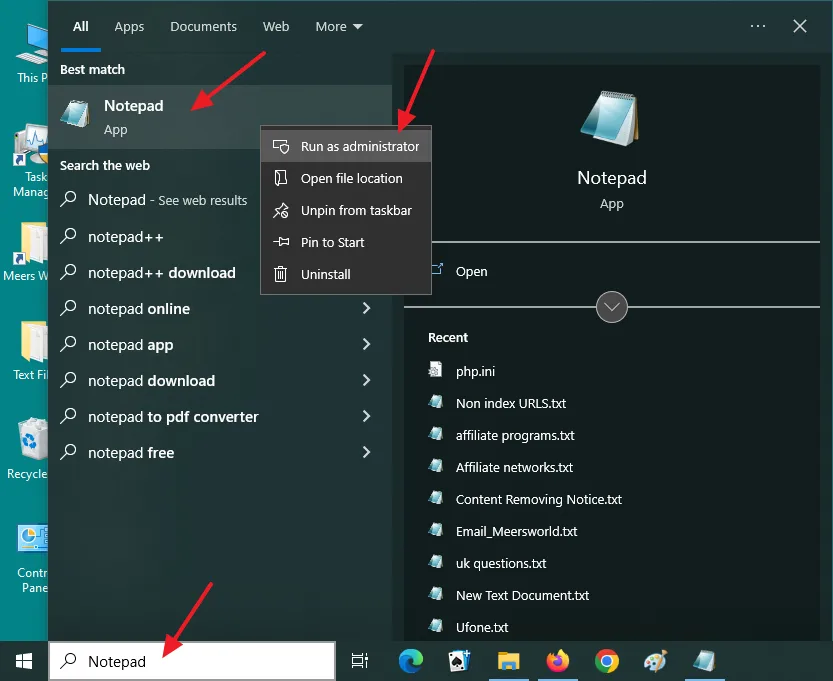
- Right-click on the Notepad.
- Click on the Run as administrator.
- Copy and Paste this code in your Notepad file.
<html>
<head>
<title>PHP Test</title>
</head>
<body>
<?php echo "<h2>Thanks Meer's World for helping me to set up PHP on IIS </h2>"; ?>
</body>
</html>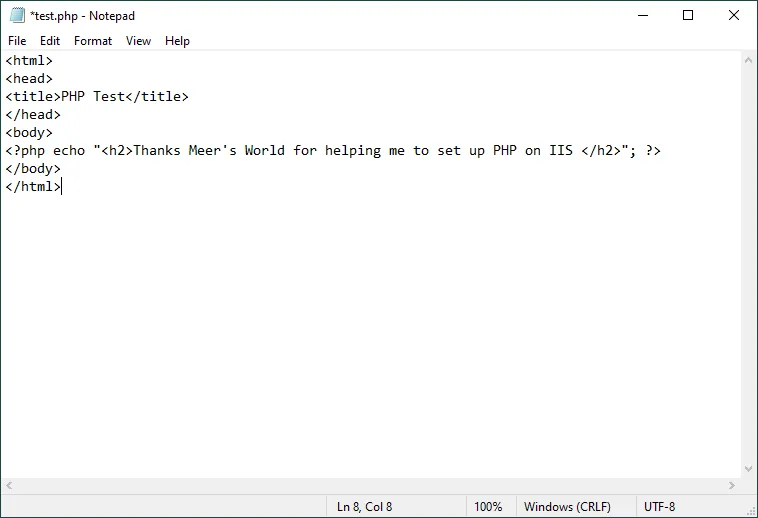
- Go to File and click Save As…
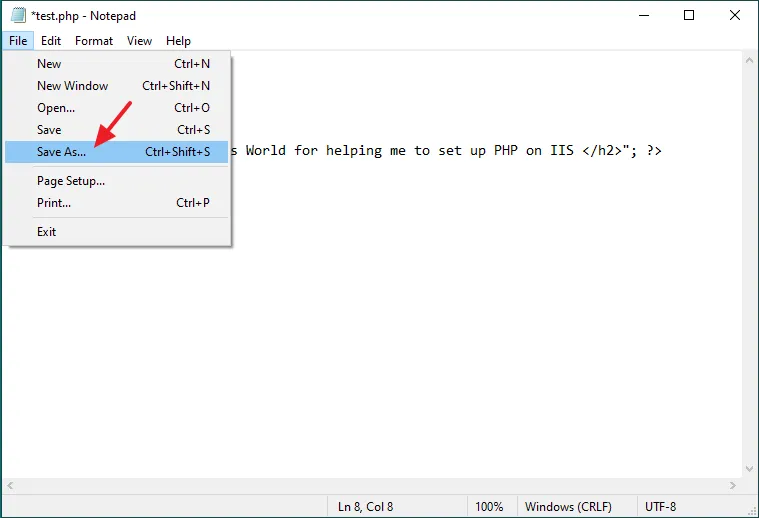
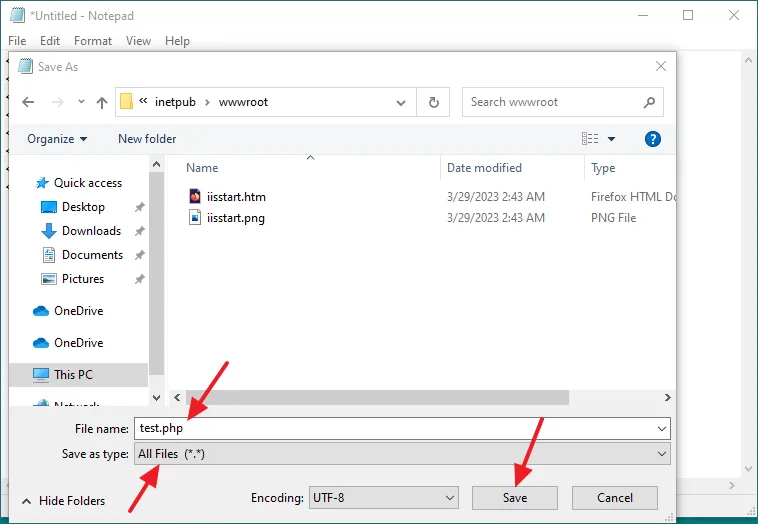
- Browse the wwwroot directory on C:\ Drive. This is the complete path: C:\inetpub\wwwroot.
- Info: The inetpub is the default folder for IIS. It is the folder that contains website content and web apps. The wwwroot is the root directory of IIS. IIS executes the projects, apps, and websites deployed (placed) in the wwwroot.
- In the Filename type test.php.
- In Save as type select All Files (*.*).
- Click on the Save button.
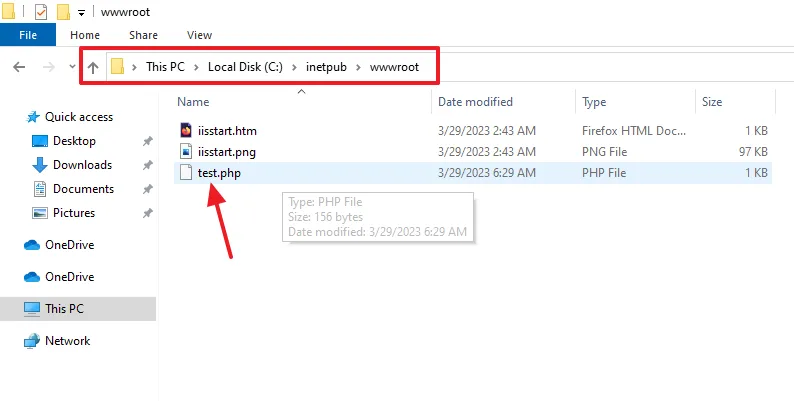
- You can see that the test.php is saved to wwwroot directory.
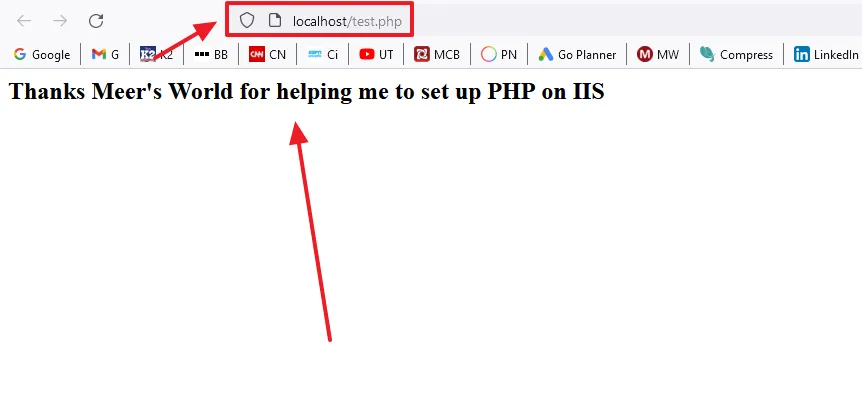
- Open your browser and type http://localhost/folder or file name. For test.php file, I will type this: http://localhost/test.php.
- You can see that the test.php is run without any error. It means that I have successfully set up PHP on IIS in Windows.
If you like this post, don’t forget to share with other people. Share your feedback in the comments section below.
Also Read
- How To Install & Configure XAMPP On Windows 10 – Step By Step | For Beginners
- How To Change The XAMPP Server Port In Windows 10 | XAMPP Apache Server Port | Fix Apache Port Error
- How To Install MAMP On Windows 10 Step By Step | How To Change The MAMP Server Ports
- How To Install WordPress On MAMP Server In Windows 10 – Step By Step | Install WordPress On Localhost



Leave a Reply