Don’t you want to know what is the purpose of Custom Robots.txt and how to set up it on Blogger? You’re in the right place.
In this article, you will learn what is Custom Robot.txt, How to set up a perfect Custom Robots.txt in Blogger, and How to add sitemap in Blogger using Custom robot.txt.
What is Custom robots.txt? Website owners use the Custom robots.txt file to inform web-robots which URLs, directories, and pages of the website to be crawled.
Web Robots are also known as Spiders or Crawlers, are programs that traverse/crawls the web automatically. Search engines such as Google, Bing, etc, use them to index the web content.
When a web-robot visits your website it goes to custom robots.txt and checks which pages, directories, folders or URLs are allowed to be crawled because sometimes we don’t want robots to crawl unnecessary pages or non-public folders and directories like admin side URLs or directories.
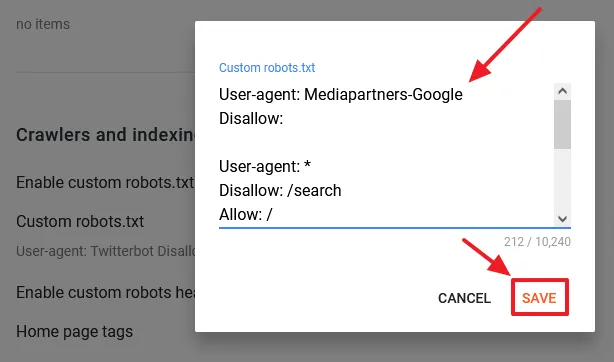
Below is the Custom Robot.txt code for your Blogger blog. You have to Copy this code and Paste into Custom Robots.txt, as shown below in How To Set Up Custom Robots Txt In Blogger.
In Sitemap replace “example” with your Blogger subdomain name like “https://techguroo.blogspot.com”.
User-agent: Mediapartners-Google
Disallow:

User-agent: *
Disallow: /search
Allow: /
Allow: /search/label

Sitemap: https://example.blogspot.com/sitemap.xml
Sitemap: https://example.blogspot.com/sitemap-pages.xml- The “User-agent: *” means this section applies to all robots.
- The User-agent: Mediapartners-Google & Disallow allows Google AdSense ads to display on any page of your blog.
- The Disallow: /search means ignore all those URLs having keyword /search/, for example, https://www./example.blogspot.com/search?q=phone+case. The “phone case” is a search query. Such URLs are created/generated when someone searches your blog or when a Label is opened, for example, https://www.example.com/search/label/Blogger.
- The allow directive is used to override disallow directives in the same robots.txt file. Here Allow:/ instructs web-robots that they can crawl any Page/URL of website except disallowed.
- The Disallow: /search also blocks Blogger Labels from being crawled. The Allow: /search/label instructs web-robots to not block the Blogger labels from crawling. Labels are your categories and it is not a good SEO practice to stop them from indexing. They can be the source of organic traffic to your site.
- A Sitemap is an XML file that lists your blog’s posts and pages, making sure Google and other search engines can find and crawl them all. This sitemap “https://example.blogspot.com/sitemap.xml“ is for blog posts whereas this sitemap “https://example.blogspot.com/sitemap-pages.xml“ is for static pages.
RELATED
- How to Set Up Blogger Settings | A to Z
- How to Pick a Right Blogger Template?
- Introduction to Theme Customize Settings in Blogger
How To Set Up Custom Robots Txt In Blogger?
In this section, I will guide you on how to set up Custom robot.txt on Blogger.
- Sign in to your Blogger account.
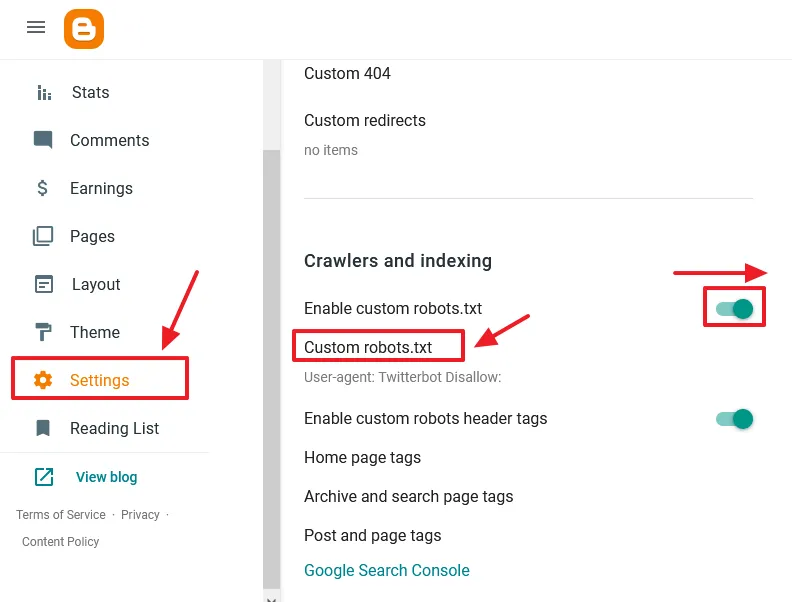
- Go to Sidebar and click on the Settings.
- Scroll down to Crawlers and Indexing Section.
- Turn on the Enable custom robots.txt by dragging the slider towards right.
- Click on the “Custom robots.txt“.

- Now Copy & Paste the Custom Robot.txt code here.
- Click on the Save.

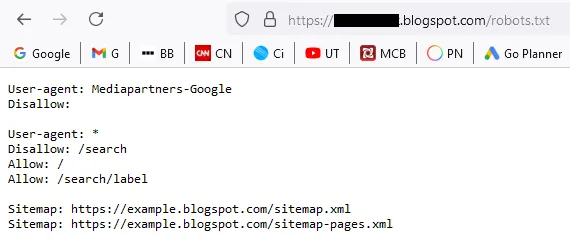
Now it is time to test your Custom robots.txt file. Add /robots.txt at the end of your blog URL and press enter, like:
- https://www.example.blogspot.com/robots.txt
It will show you the same code that you had added in the Custom robots.txt.

- Get access to all our Blogger Tutorials.
- If you like this post then don’t forget to share with your friends. Share your feedback in the comments section below.

Also Read


Leave a Reply