Don’t you like your Blogger URL ending with “.blogspot.com” and want to redirect it to a custom domain? You are in the right place.
In this tutorial, I will guide you step-by-step on how to redirect your blogspot domain to a custom domain.
There are two main reasons for having a custom domain (1) Blog with a custom domain always look good and more professional (2) You can apply for affiliate programs to earn money via your blog.
If you have already bought a domain then directly jump to Step 4 (How to redirect your “.blogspot” URL to custom domain).
Following topics will be covered in this tutorial:
- A Brief Introduction
- How to choose a domain name
- How to buy a domain for Blogger on Namecheap
- How to redirect your “.blogspot” URL to custom domain
- How to redirect naked domain to “www”
RELATED
- How to Set Up Blogger Settings | A to Z
- How to Pick a Right Blogger Template?
- Introduction to Theme Customize Settings in Blogger
01. A Brief Introduction
Advertisers and affiliate platforms in most cases do not accept applications of those websites with non-standard URLs like “.blogspot.com”, “.wordpress.org”, etc. Your domain must have a standard A Class URL extension like .com, .org, .net, etc, in order to get approved.
In the “Redirect to Custom Domain” process you have to do two things (1) Redirect your Blogger blog to custom domain (2) Redirect your naked domain to “www” domain.
The domain without “www” is called naked domain like “example.com”, “http://example.com”, “https://example.com”. I have discussed naked domain in detail in Step 5 (How to redirect naked domain to “www” section).
02. How To Choose A Domain Name
Choosing a right domain name is very very important. Often it gets trickier to choose a domain name for your blog or website, so here are some suggestions for you to choose a domain name before you buy it:
- It should be easy to remember.
- It should be easy to pronounce.
- It should be easy to type.
- It should be brandable.
- Its length should not be greater than 10 to 12 characters.
- From SEO point-of-view it is best if your domain name contains a keyword relevant to your website. Let’s say you have a website about Blogger tutorials. You can use the keyword “Blogger” in your domain like “bloggertips.com” or “bloggerhelp.com” etc. If your desired domain is not available with your desired keyword, no problem you can choose some other name.
- If you have a personal blog or portfolio blog you can use your own name as well.
- You can also create a domain name from your “Name” and “Business Name”. Let’s say your name is Smith and you have a business of glasses, you can name it “www.smithoptics.com”.

03. How To Buy a Domain for Blogger on Namecheap
If you have bought a domain already then skip this step and go to next steps. If you haven’t bought a new domain yet then follow the steps below to learn how to buy a domain for your Blogger blog from Namecheap web hosting, one of the leading domain and hosting providers.
- Go to Namecheap Official Page.
- Enter your domain name in the Search Box.
- Click on the Search Icon.
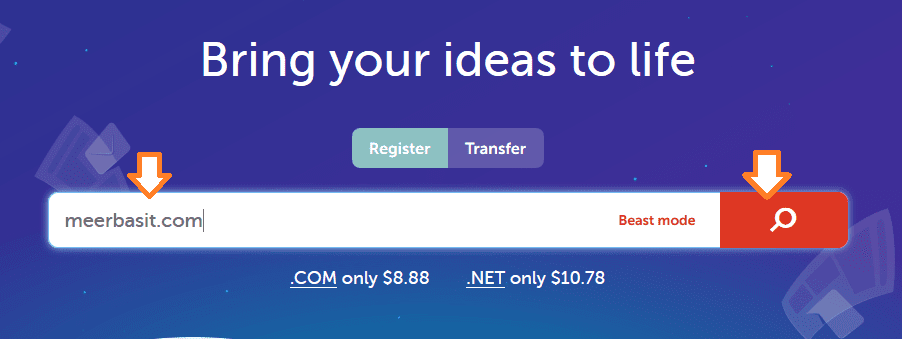
- It will show you all the available domain name options with different extension like “.com”, “.net”, etc, with their rates.
- Click on the “Add to cart” button corresponding to a domain name that you want to buy.
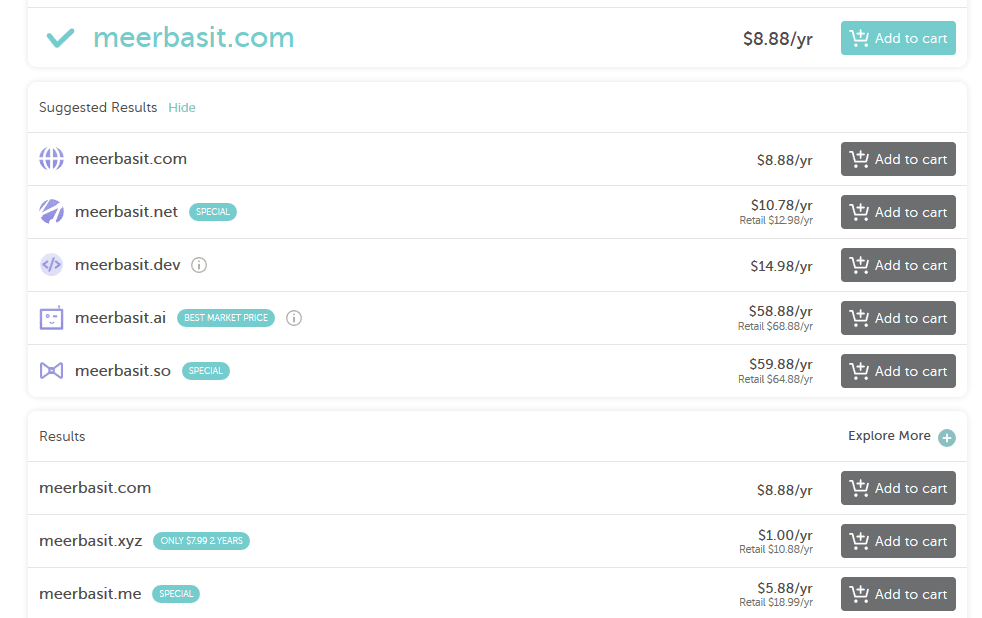
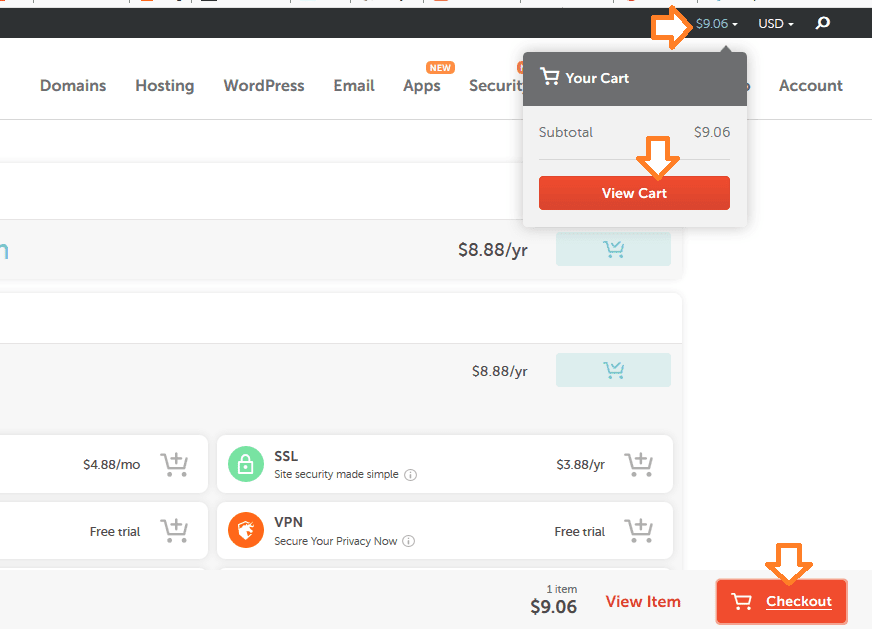
- Click on the “View Cart” or “Checkout” button at bottom to move to next step.
NOTE: You don’t need to purchase the SSL certificate for your domain, as Google provides free SSL certificate for Blogger-connected domains.
- Click on the “Confirm Order“.
- Namecheap provides “WhoisGuard” service for free. It is a privacy protection service that hides your personal info in the public “Whois” database. It keeps your data safe and helps to avoid spam.
- Find the latest Namecheap Promo Codes and Deals. After adding the Promo Code click on the Apply.
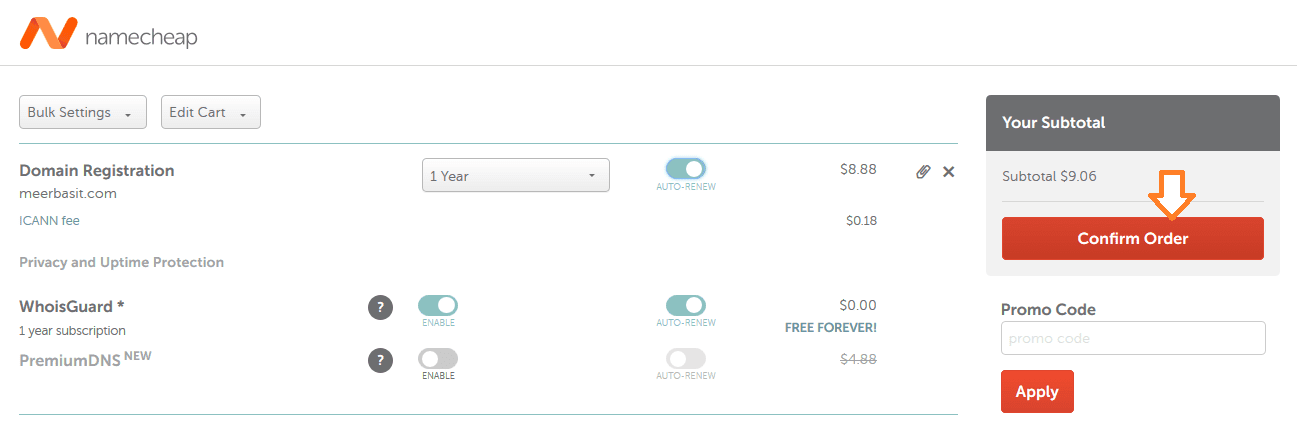
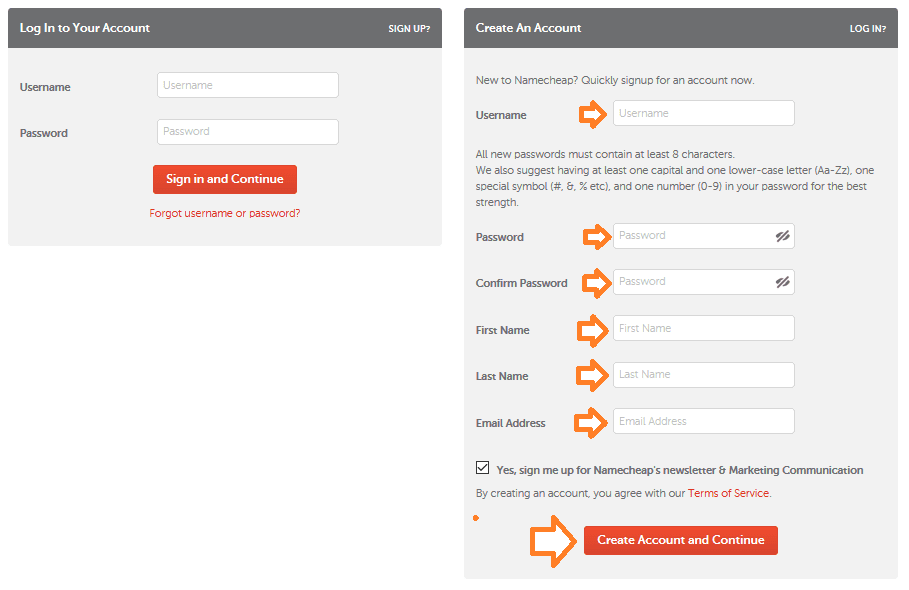
- Create your account on Namecheap to buy the domain. Once you successfully create the account pay your domain charges via given methods.
- After you buy the domain you will get details of your domain hosting by email, so that you can access you Namecheap Dashboard.
04. How to Redirect .blogspot to Custom Domain
In this section, I will guide you step-by-step on how to redirect your Blogger’s .blogspot domain to a custom domain.
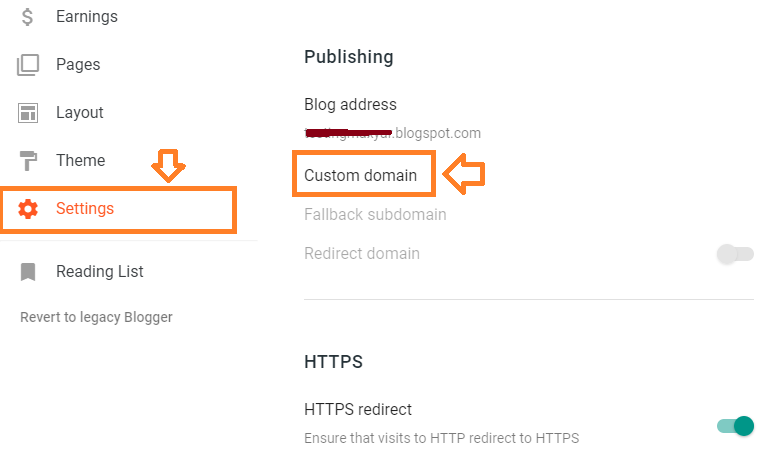
- On Blogger, go to Settings.
- Under the Publishing section, click on the “Custom domain“.
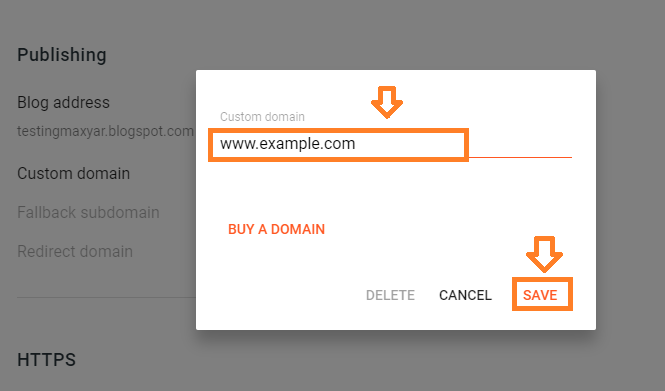
- Type your custom domain name like “www.example.com”.
- Click on the “SAVE“. It will return you 2 CNAME Records, as shown in the next step.
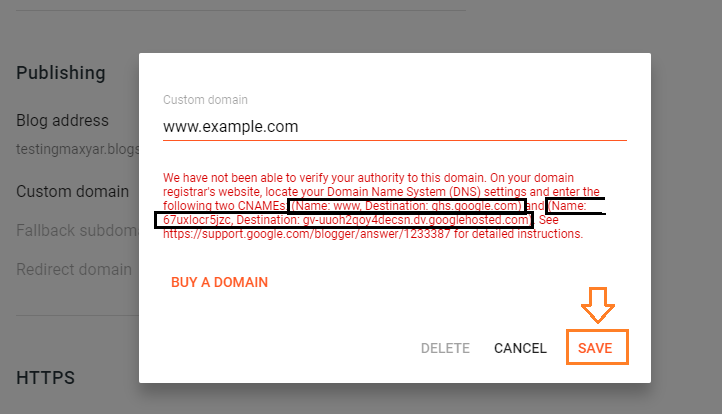
To redirect your “.blogspot” domain to custom domain Blogger provides you two CNAME Records to add in your domain’s DNS Settings or DNS Zone File.
The basic purpose of adding these CNAME Records to your domain’s DNS Hosting is that Blogger verifies that you are the real owner of the domain and to map one domain name to other. CNAME stands for Canonical Name.
- A Name is the Host i.e. “www” and Destination is the URL i.e. “ghs.google.com”. I have highlighted the two CNAME records separately. The Second CNAME record is different for everyone.
- Don’t click “SAVE” here unless until you don’t enter the 2 CNAME records in your domain’s DNS Settings. Let it remain open & follow the below steps to learn how to add CNAME records in your domain’s DNS Settings.
All those who don’t have Namecheap domain follow these 4 steps to add CNAME Records:
- Login to your domain hosting account(cPanel) where your domain is hosted.
- Find DNS Settings or DNS Zone File icon.
- Click “MANAGE” button to add the CNAME Records.
- Click “+ ADD RECORD” to add CNAME Records one by one.
Below I have shown how to add CNAME Records in Namecheap’s DNS Hosting.
- Go to Namecheap website and Sign-In to your account.
- Click on the “Domain List” tab.
- Click on the “Manage” button OR Home icon under the Products label.

- Click the “Advanced DNS” tab.

- Click the “+ ADD NEW RECORD” link.
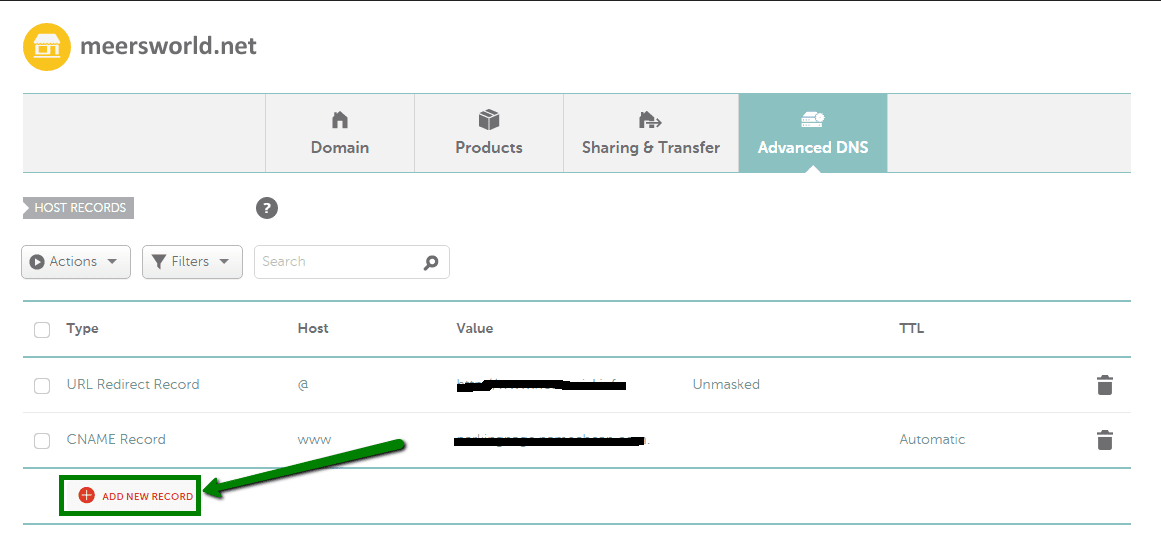
- Choose the “CNAME Record” from dropdown list.

- Add the two CNAME records one by one.
- In the first record “www” is Host and “ghs.google.com” is the Value(Destination URL). “60 min” is the TTL. The TTL stands for Time-To-Live.
- Click on the Tick icon to save the record.
- Similarly add the second CNAME Record. Set 60 minutes TTL for it.

- Here you can see that the two CNAME Records have been added successfully.

- Once you add CNAME Records successfully to your domain’s DNS Settings, go back to Blogger and click on the Save.

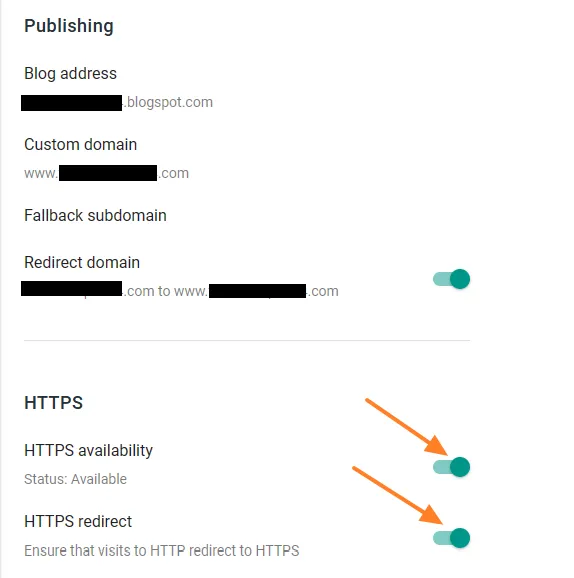
- On Publishing section you can see that your “.blogspot” URL will have been redirected to your custom domain.
- Scroll-down to HTTPS section and enable the HTTPS availability and HTTPS redirect for your custom domain. Google provides free SSL certificate to Blogger-connected domains.
- To test whether your subdomain(.blogspot) is redirected to your new domain or not, open it on your browser.
05. How To Redirect Naked Domain To “www”
The domain without “www” is called naked domain like “example.com”, “http://example.com”, “https://example.com”. Most of the Blogger users after redirecting their “.blogspot” domain to custom domain forget to redirect their naked domain to “www ” domain.
There are 2 reasons why it is important to redirect your naked domain to “www”:
- One, most of the people type your domain name without “www” like “example.com”. If your naked domain is not redirected to “www”, browser will show error to website visitors like “website not found” etc.
- Second, if your website is monetized with Google Adsense you will see a warning from Google Adsense that “Earnings at risk – One or more of your sites does not have an ads.txt file. Fix this now to avoid severe impact to your revenue.”.
To redirect your naked domain to “www” you have to add “4 A Records” in your domain’s DNS Settings or DNS Zone File, as I have shown below.
Before you add 4 “A Records” in your domain’s DNS Settings, enable the “Redirect domain” feature in Blogger.
- Go to Blogger Settings.
- Under the Publishing section, turn on the “Redirect domain” option.
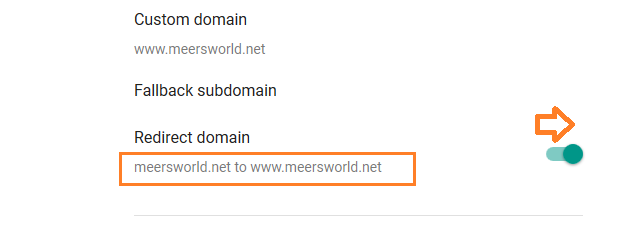
Now go to your domain’s DNS Settings and add these 4 A Records one by one:
- @ 3600 In A 216.239.32.21
- @ 3600 In A 216.239.34.21
- @ 3600 In A 216.239.36.21
- @ 3600 In A 216.239.38.21
For your understanding:
- “@” means root site. It is HOST. @ points to your website.
- “3600” is the TTL for each record. TTL stands for Time-To-Live. 3600 means 60 minutes.
- There are 4 Google IP addresses which are called VALUE.
On Namecheap account you have to add 4 A Records in the same location where you had added 2 CNAME records. This time you have to choose “A Record” instead of “CNAME” record.
- Go to Namecheap website and Sign-In to your account.
- Click on the “Domain List” section from the sidebar.
- Click on the “Manage” button OR Home icon under the Products label.

- Click the “Advanced DNS” tab.

- Click the “ADD NEW RECORD” link.
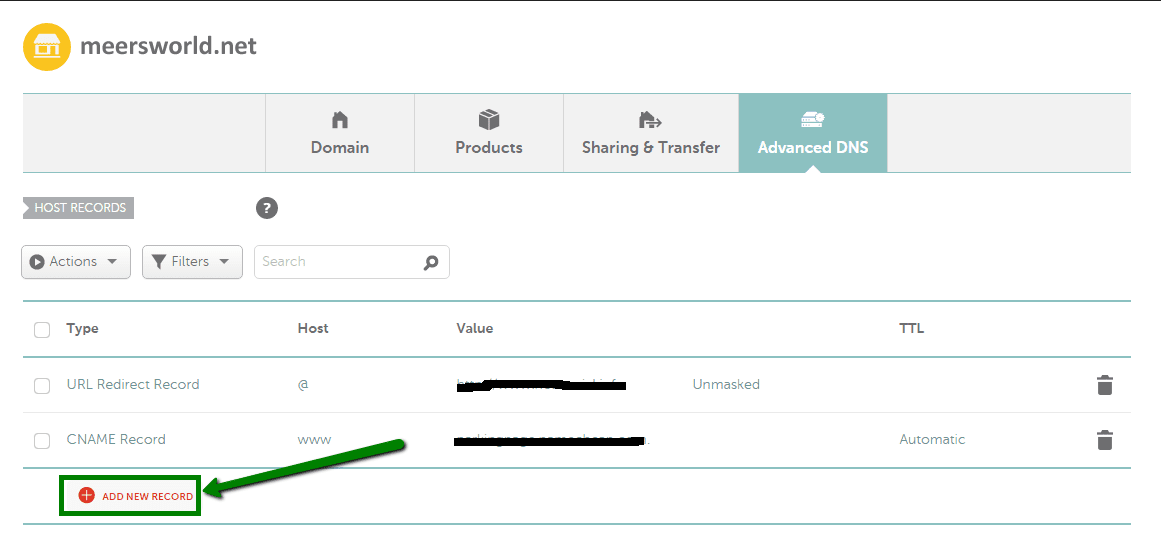
- Choose “A Record” option from dropdown list.
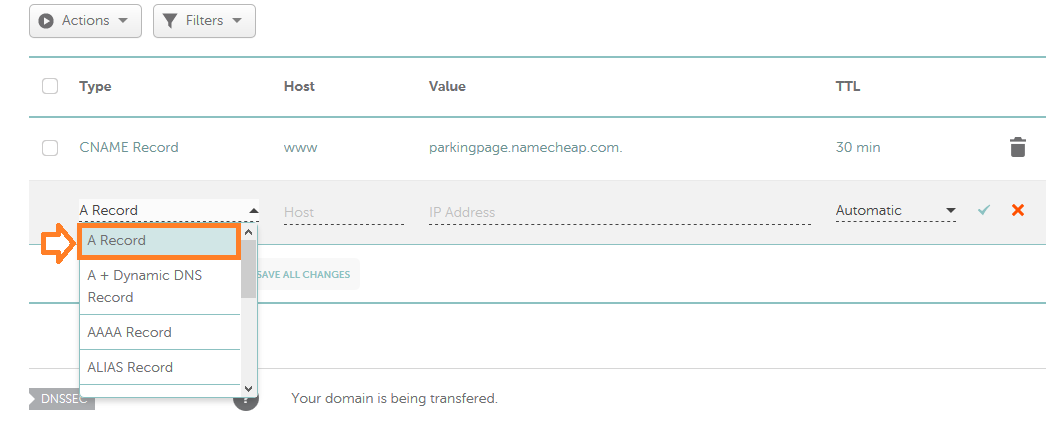
- Add the 4 “A Records” one by one.
- Click on the Tick icon to save the record.

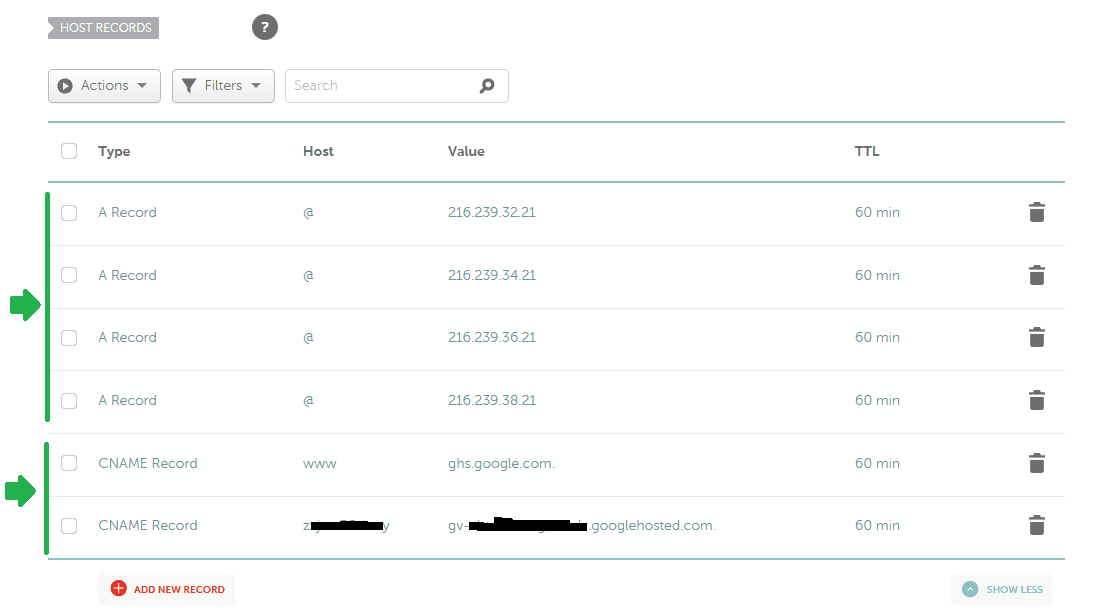
- The four A Records have been successfully added.

- Here you can see the 4 A Records and 2 CNAME Records.
- Now test your domain in three different ways like: “example.com”, “http://example.com”, and “https://example.com”.
- All these naked domains must redirect to “https://www.example.com”. If they redirect to “www” means you have setup naked redirect successfully.
Some of the domain hostings do not provide DNS Settings. In that case you can use third-party FreeDNS hosting services to redirect your naked domain to www. Read our step-by-step tutorial:
Get access to all the Blogger Tutorials. If you like this post then don’t forget to share with other people. Share your feedback in the comments section below.
Also Read
- How To Configure Google Search Console On Blogger | Add Sitemap | Inspect URL
- How To Add & Test Custom Robots Txt On Blogger/Blogspot | Blogger SEO
- How To Configure/Set The Custom Robots Header Tags On Blogger | Blogger SEO
- How To Fix Valuable Inventory: No Content Google Adsense Error | Google Adsense Approval
- How To Display Google Ads On Blogger – Step By Step | Monetize A Blogger Blog


Leave a Reply