Do you want to know how to turn on/off Windows Defender in Windows 10? You’re in the right place. In this tutorial, I will guide you step-by-step on how to turn on/off Windows Defender in Windows 10.
Windows 10 has a builtin antivirus and anti-malware software called Windows Defender or Windows 10 antivirus. It is ranked as one of the best antivirus software that gives you real-time protection from virus and threats.
At times you want to turn off the Windows Defender to stop real-time protection because it does not allow you to install software activators, unknown software, or to create files like .bat, etc. Most of the anti-virus software stop such software to install on your computer because they consider them potentially vulnerable and could damage Windows and your personal files.
How to Turn On/Off Windows Defender
Follow the steps to turn on/off Windows Defender in Windows 10.
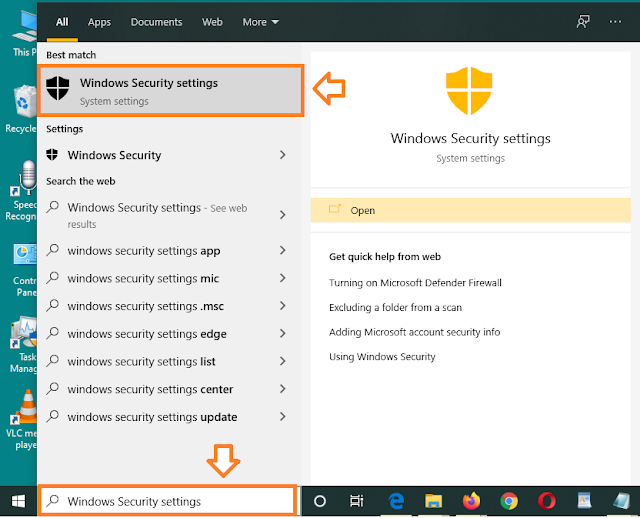
- Enter “windows security settings” in the Windows Search Bar, located at your bottom-left corner.
- Click on the “Windows Security settings“.

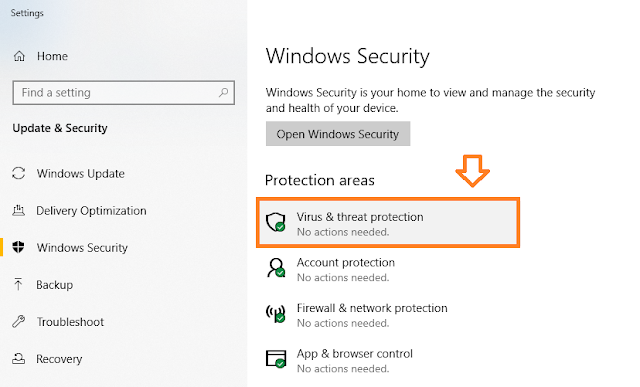
- Click on the “Virus & threat protection“.

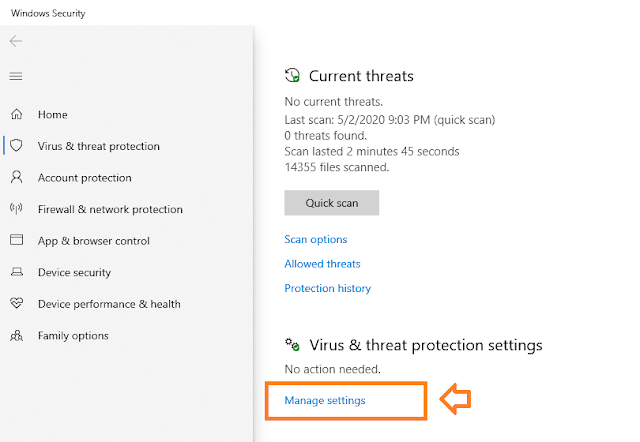
- Scroll down to “Virus & threat protection settings” section.
- Click on the “Manage settings“.

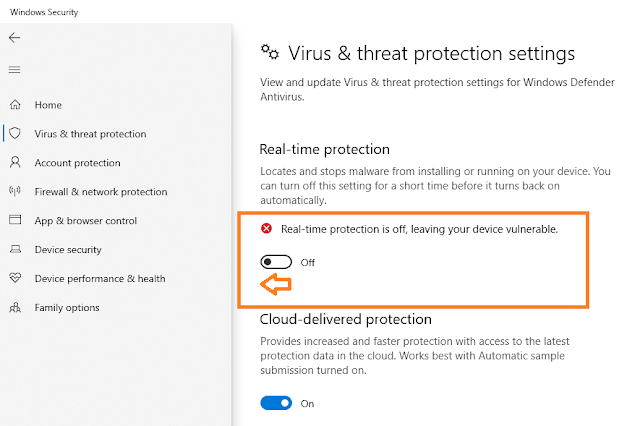
- Under the “Real-time protection” turn on or turn off the real-time protection.

If you have turned-off Windows Defender for installing a software don’t forget to turn on the Windows Defender after the installation, as it is very critical for the security of your Windows.
If you like this post then don’t forget to share with other people. Share your feedback in the comments section below.

Also Read
- How To Fix Laptop Makes Loud Terrible Noise | Silence Your Laptop Fan
- How To Turn-Off Recent Items & Frequent Places From Quick Access In Windows 10
- How To Run Windows 10 In Safe Mode – Troubleshoot | Reset, Restore, Recovery, UEFI Settings
- How To Install Windows 10 From USB Flash Drive For Beginners – Step-By-Step | Change Boot Order In BIOS


Leave a Reply