Are you looking for the best and easily customizable Related Posts widget for your Blogger blog? You are in the right place.
Related Posts widget is also called “You Might Also Like” widget that displays the most relevant posts to the current article at the bottom of every post. The widget uses the post’s Labels to show the related posts linked with them.
It helps visitors to explore the content of your blog relevant to the current post that ultimately decreases the bounce rate and improves your website ranking on Google.
For your ease, I have customized this widget. You don’t need to add any extra CSS or HTML. It will look good with any website, but if you want you can customize. The widget is also fully responsive, means it adjusts its size according to the size of the device.
Step 1: Add CSS
In this section, I will guide you on how to add CSS for the Related Posts widget.
- Copy this code and Paste in the Add CSS section. Follow the steps below to learn how to add.
/* Related Posts Widget */ .post-related { display: inline-block; background: #fff; padding: 10px; width:100%; margin-top: -38px; } .post-box .heading { margin-bottom: 21px; text-align: center; margin-top: 10px; position: relative; } .post-box h4 { font-size: 46px !important; } .post-box .heading:after { content: “” ; position: absolute; top: 100%; left: 50%; margin-left: -11px; width: 21px; height: 1px; margin-top: 2px; background: #b565a7; } @media screen and (max-width: 600px) { .post-box h4 { font-size:28px !important; } } .item-related { width: 30.6%; display: block; float: left; margin-right: 10px; height: 100%; padding-left: 10px; } @media screen and (max-width: 600px) { .item-related { width:unset !important; padding-left:unset !important; height:unset !important; } } .item-related:last-child { margin: 0!important; } .item-related .link { display: block; margin: -1px; margin-bottom: 0; } .item-related img { margin-left: 0px !important; display: block; opacity: 1; width: 100%; height: 100%; object-fit: cover; box-shadow: none !important; } @media screen and (max-width: 600px) { .item-related img{ height:100% !important; } } .item-related h3 { line-height: 20px; margin-top: 8px; height:111px !important; } .item-related h3 a { color: black !important; font-size: 18px !important; font-family: sans-serif !important; } img.noops-smly { padding: 0 !important; margin-top: -2px !important; width: 19px; display: inline; } @media (max-width: 520px) .item-related { width: 100%!important; }- Login to you Blogger dashboard.
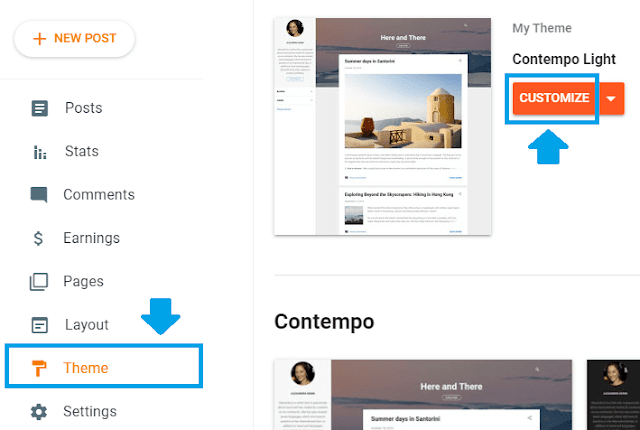
- Go to Themes from the sidebar.
- Click the CUSTOMIZE button.
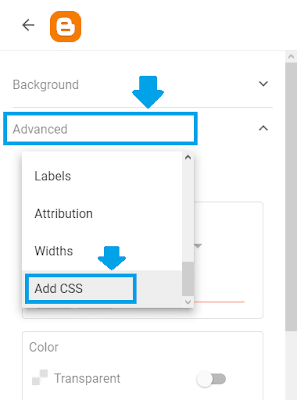
- Expand the “Advanced” section.
- Click the “Add CSS” option.
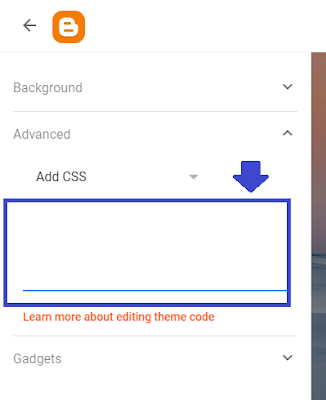
- Paste the CSS code that you have copied above in the text area.
- Click Save.
Step 2: Add Libraries
In this section, I will guide you on how to add the required libraries for Related Posts widget in your Blogger theme.
- Copy these 2 libraries in the Header section of your Blogger theme. Follow the steps below to learn how to add.
<link href="//netdna.bootstrapcdn.com/font-awesome/4.7.0/css/font-awesome.css" rel="stylesheet"/>
<script src="https://ajax.googleapis.com/ajax/libs/jquery/3.1.0/jquery.min.js"></script>- Go to Theme from the sidebar.
- Click the “Downward arrow” attached to CUSTOMIZE button.
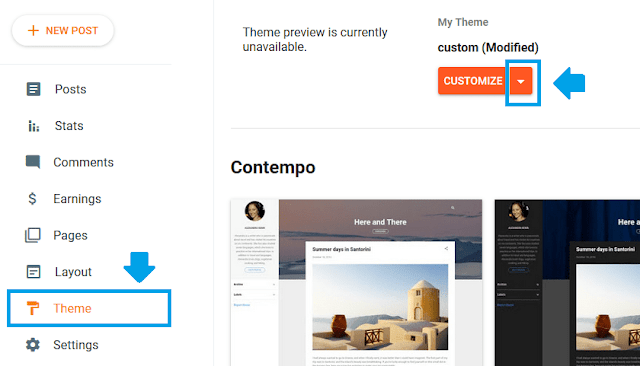
- Click the Edit HTML.
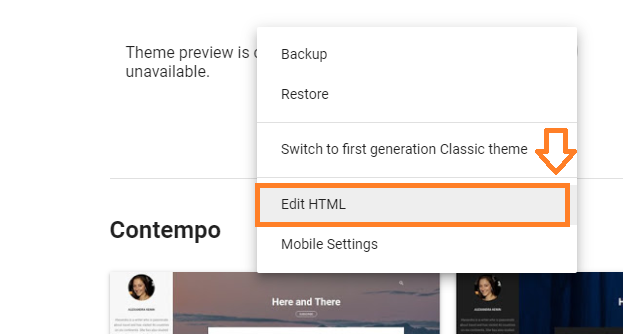
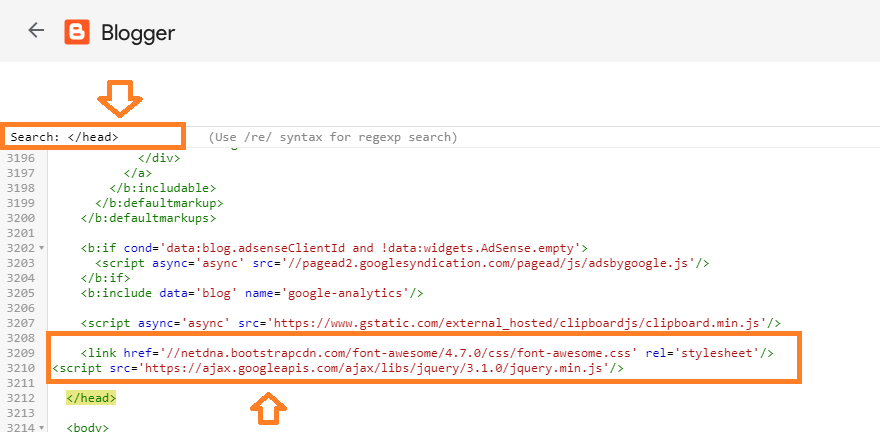
- Press “CTRL + F” to open the Theme Editor’s search bar. Type </head> and press the Enter.
- Now Paste the 2 libraries just above the </head> tag, as I have shown below.
Step 3: Add HTML/Javascript Code
In this section, I will guide you on how to add the HTML/JavaScript code of Related Posts widget in the Blogger theme.
- Copy the HTML/Javascript code from the Notepad file and follow the steps below to insert in your theme.
<b:if cond='data:blog.pageType == "item"'>
<div class='post-bottom'>
<div class='post-footer'>
<!-- Footer bylines -->
<b:include name='footerBylines'/>
</div>
<!-- <b:include cond='data:view.isSingleItem and data:widget.type == "Blog"' data='{ shareButtonClass: "post-share-buttons-bottom", overridden: true }' name='maybeAddShareButtons'/> -->
<b:include cond='data:view.isMultipleItems or data:widget.type == "PopularPosts"' data='post' name='postJumpLink'/>
</div>
<script id='related-posts' type='text/javascript'> /*<![CDATA[*/ var relatedTitles = new Array(); var relatedTitlesNum = 0; var relatedUrls = new Array(); var thumburl = new Array(); function related_results_labels_thumbs(json) { for (var i = 0; i < json.feed.entry.length; i++) { var entry = json.feed.entry[i]; relatedTitles[relatedTitlesNum] = entry.title.$t; try {thumburl[relatedTitlesNum]=entry.media$thumbnail.url;} catch (error){ s=entry.content.$t;a=s.indexOf("<img");b=s.indexOf("src=\"",a);c=s.indexOf("\"",b+5);d=s.substr(b+5,c-b-5); if((a!=-1)&&(b!=-1)&&(c!=-1)&&(d!="")) {thumburl[relatedTitlesNum]=d;} else {if(typeof(defaultnoimage) !== 'undefined') thumburl[relatedTitlesNum]=defaultnoimage; else thumburl[relatedTitlesNum]="http://4.bp.blogspot.com/-ZoL4BRpPhkw/U6wnup4_6gI/AAAAAAAAACA/sKpM61pmJPo/s1600/no_pic_available.jpg";} } if(relatedTitles[relatedTitlesNum].length>100) relatedTitles[relatedTitlesNum]=relatedTitles[relatedTitlesNum].substring(0, 100)+"..."; for (var k = 0; k < entry.link.length; k++) { if (entry.link[k].rel == 'alternate') { relatedUrls[relatedTitlesNum] = entry.link[k].href; relatedTitlesNum++; } } } } function removeRelatedDuplicates_thumbs() { var tmp = new Array(0); var tmp2 = new Array(0); var tmp3 = new Array(0); for(var i = 0; i < relatedUrls.length; i++) { if(!contains_thumbs(tmp, relatedUrls[i])) { tmp.length += 1; tmp[tmp.length - 1] = relatedUrls[i]; tmp2.length += 1; tmp3.length += 1; tmp2[tmp2.length - 1] = relatedTitles[i]; tmp3[tmp3.length - 1] = thumburl[i]; } } relatedTitles = tmp2; relatedUrls = tmp; thumburl=tmp3; } function contains_thumbs(a, e) { for(var j = 0; j < a.length; j++) if (a[j]==e) return true; return false; } function printRelatedLabels_thumbs(current) { for(var i = 0; i < relatedUrls.length; i++) { if((relatedUrls[i]==current)||(!relatedTitles[i])) { relatedUrls.splice(i,1); relatedTitles.splice(i,1); thumburl.splice(i,1); i--; } } var r = Math.floor((relatedTitles.length - 1) * Math.random()); var i = 0; while (i < relatedTitles.length && i < 20 && i<maxresults) { tmb = thumburl[r].replace('s72-c/','s300-c/'); document.write('<div class="item-related"><a href="' + relatedUrls[r] + '" class="link"><img width="150" height="100" src="'+tmb+'"/></a><h3><a href="' + relatedUrls[r] + '">'+relatedTitles[r]+'</a></h3></div>');i++; if (r < relatedTitles.length - 1) { r++; } else { r = 0; } } relatedUrls.splice(0,relatedUrls.length); thumburl.splice(0,thumburl.length); relatedTitles.splice(0,relatedTitles.length); } function removeHtmlTag(strx, chop) { var s = strx.split("<"); for (var i = 0; i < s.length; i++) { if (s[i].indexOf(">") != -1) { s[i] = s[i].substring(s[i].indexOf(">") + 1, s[i].length) } } s = s.join(""); s = s.substring(0, chop - 1); return s } /*]]>*/ </script>
<div class='post-related'>
<div class='post-box'>
<h4 class='heading common-heading'> <i aria-hidden='true' class='fa fa-th-list'/> Related Posts</h4>
</div>
<b:loop values='data:post.labels' var='label'>
<script expr:src='"/feeds/posts/default/-/" + data:label.name + "?alt=json-in-script&callback=related_results_labels_thumbs&max-results=6"' type='text/javascript'/>
</b:loop>
<script type='text/javascript'>
var defaultnoimage="http://1.bp.blogspot.com/_u4gySN2ZgqE/SosvnavWq0I/AAAAAAAAArk/yL95WlyTqr0/s400/noimage.png";
var maxresults=6; // Number Of Posts
removeRelatedDuplicates_thumbs();
printRelatedLabels_thumbs("<data:post.url/>");
</script>
</div>
</b:if>- Press CTRL + F to open theme’s search bar, type <data:post.body/> and press the Enter.
- Now paste the HTML/Javascript code under the line <data:post.body/>, as I have shown below.
- The widget code starts from the line:
<b:if cond='data:blog.pageType == "item"'>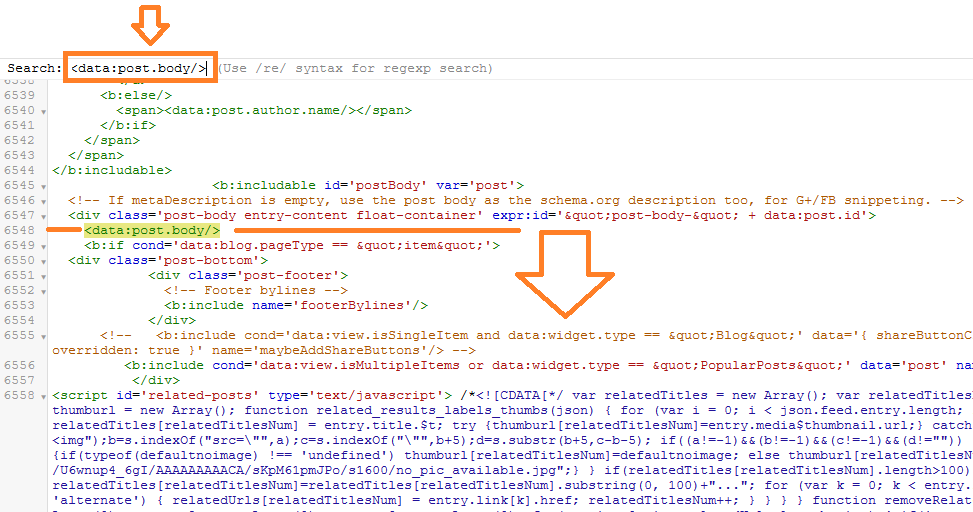
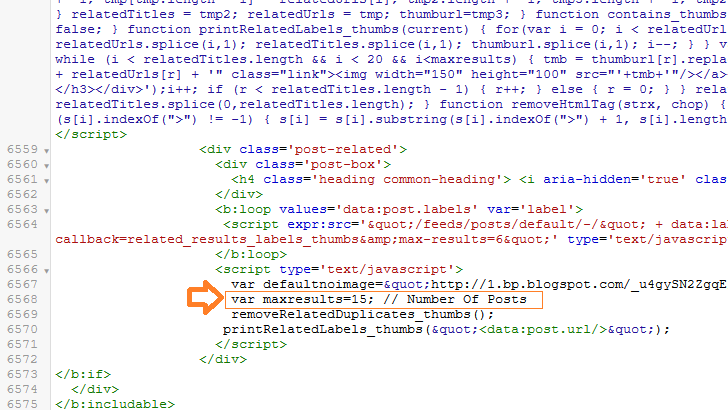
- Once you Paste the code, scroll down slowly to find the line Var maxresults=
- You can set the number of related posts that you want to show. In the code, I have set 6 posts. You can change.
- Now Save your Theme.
- Open one of your blog post and check whether you have integrated the Related Posts widget successfully or not.
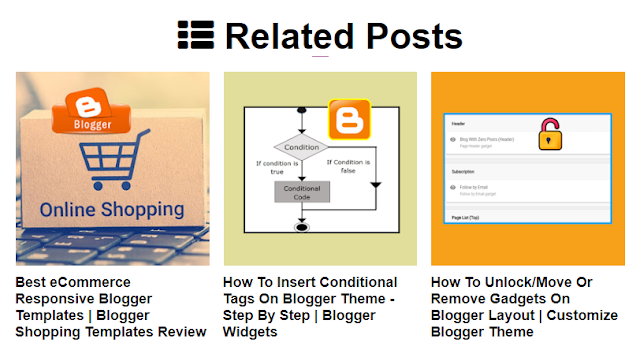
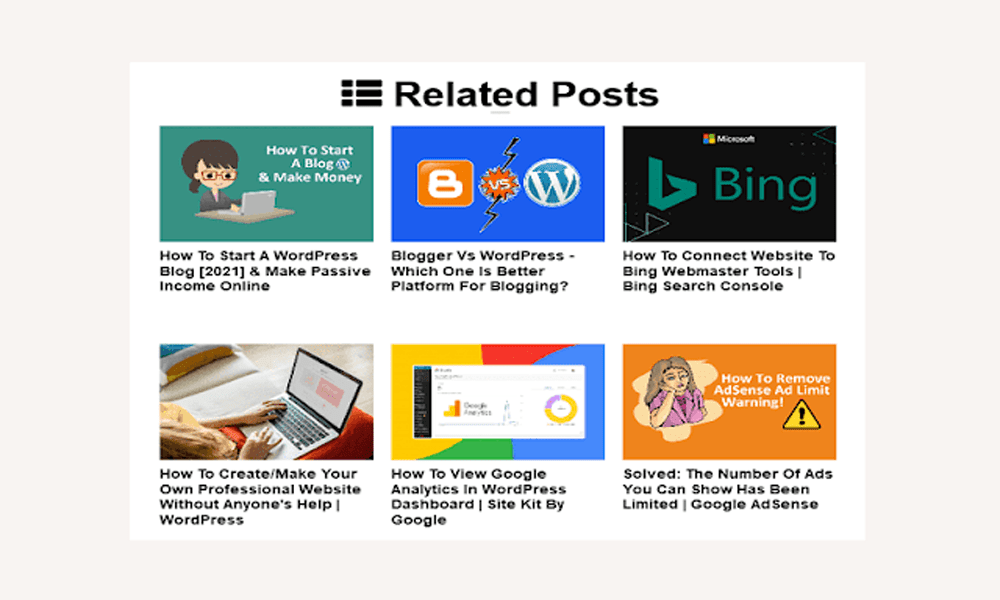
- Your Related Posts widget will be similar to this.
Note: If your blog is monetized with Google AdSense Blogger might not allow you to save your theme after you make changes in your theme, because of AdSense widgets. If you find this error read our tutorial:
- Read our step-by-step Blogger Tutorials.
- If you want to earn-online read our Earn-Online Tutorials.
- If you like this post then don’t forget to share with your friends. Share your feedback in the comments section below.



Leave a Reply