Do you want to monetize your WordPress website with Google AdSense? You’re in the right place. In this tutorial, I will guide you step-by-step on how to sign up and create a new Google AdSense account, link your WordPress website, and request review.
Google AdSense is the most popular free online earning program that pays you money for every genuine click depending on the location and CPC (Cost-Per-Click) of keywords.
Once you application is submitted to Google AdSense it reviews your website/blog and sends you an email within a week or two whether your website is approved or not. If your website is rejected you can apply to Google AdSense again by making the necessary changes to your website.
Following topics will be covered in this post:
- How to Sign Up for Google AdSense & Link WordPress
- How to Fix Approval Status Needs Attention | Resubmit Review
- Things to Do After Your WordPress Site is Approved
01. How to Sign Up for Google AdSense & Link WordPress
Follow the steps in the sequence to create a new Google AdSense account, link your WordPress site, and request review.
- Login to your Gmail account.
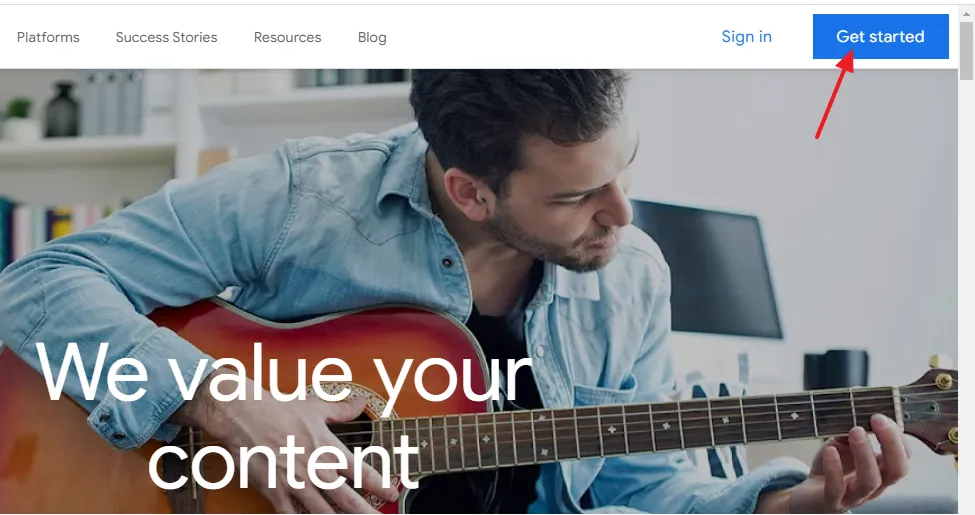
- Go to the official website of Google AdSense.
- Click on the Get started button.
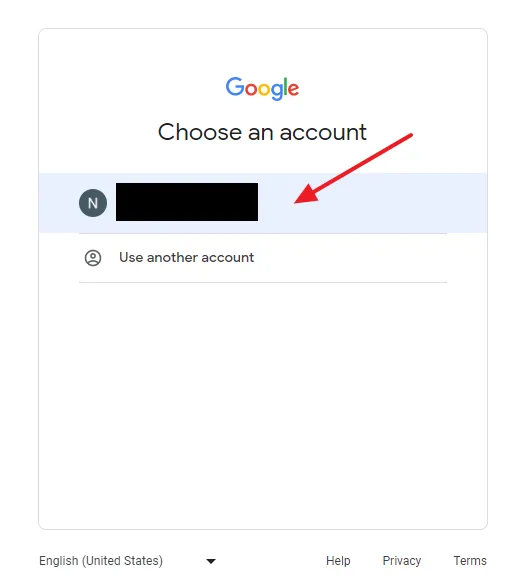
- Choose your Gmail account.
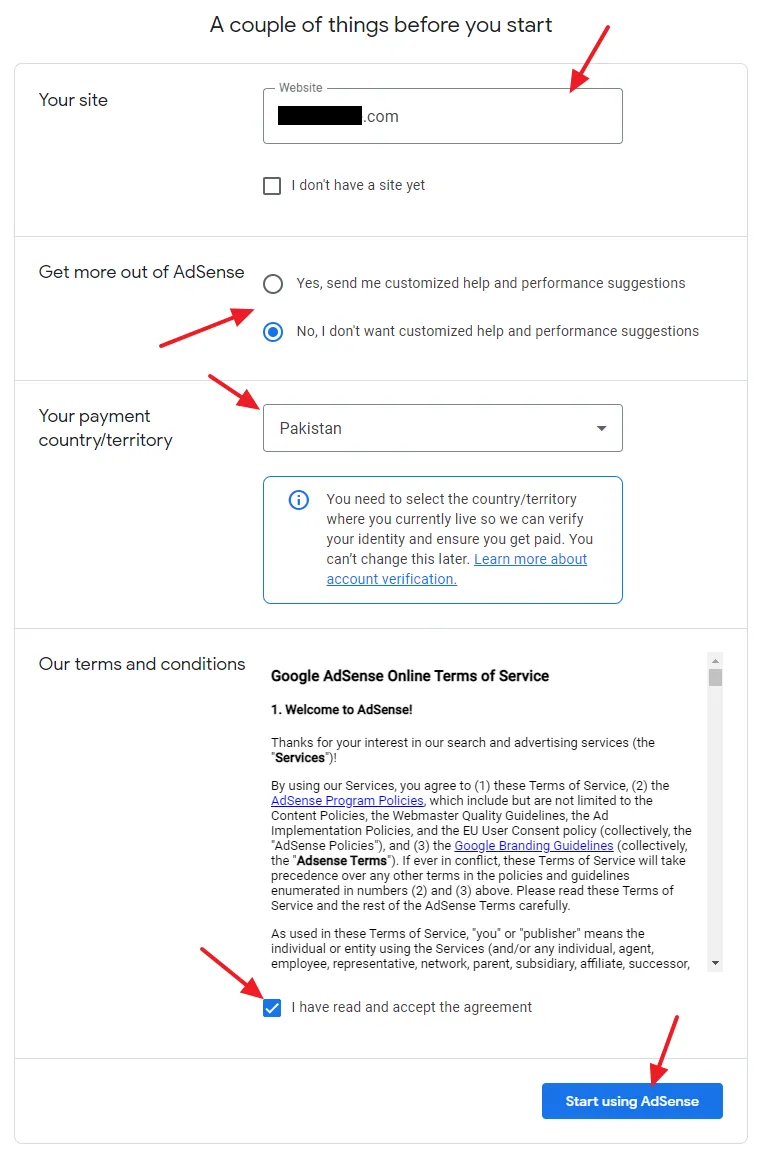
- Enter your domain in the Your site without “https://” and “www” like “example.com”.
- Select your country on Your payment country/territory.
- Tick the checkbox that says, “Yes, I have read and accept the agreement” to accept Terms and Conditions.
- Click on the Start using AdSense button.
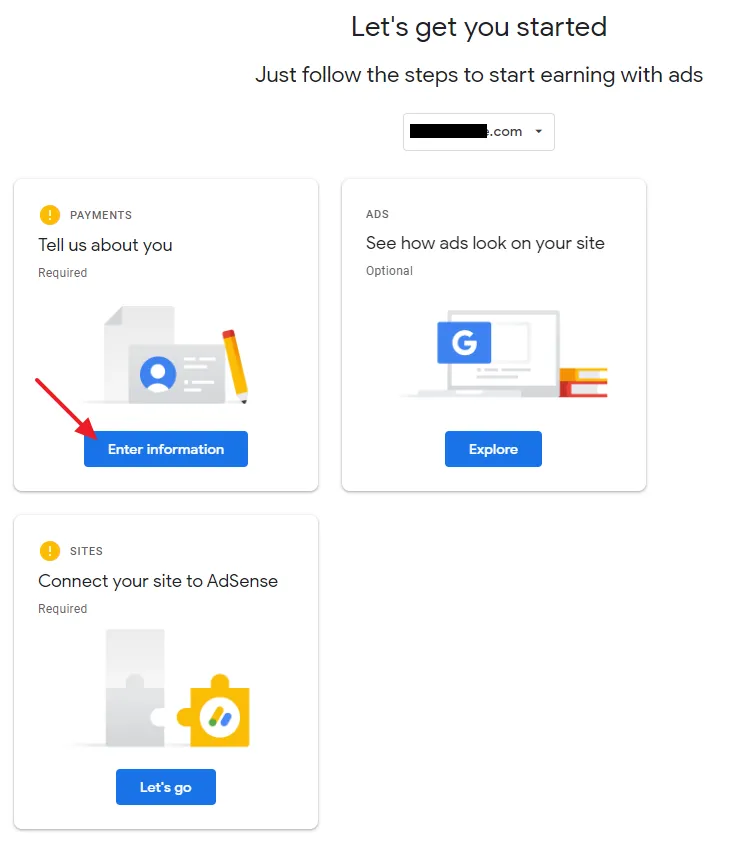
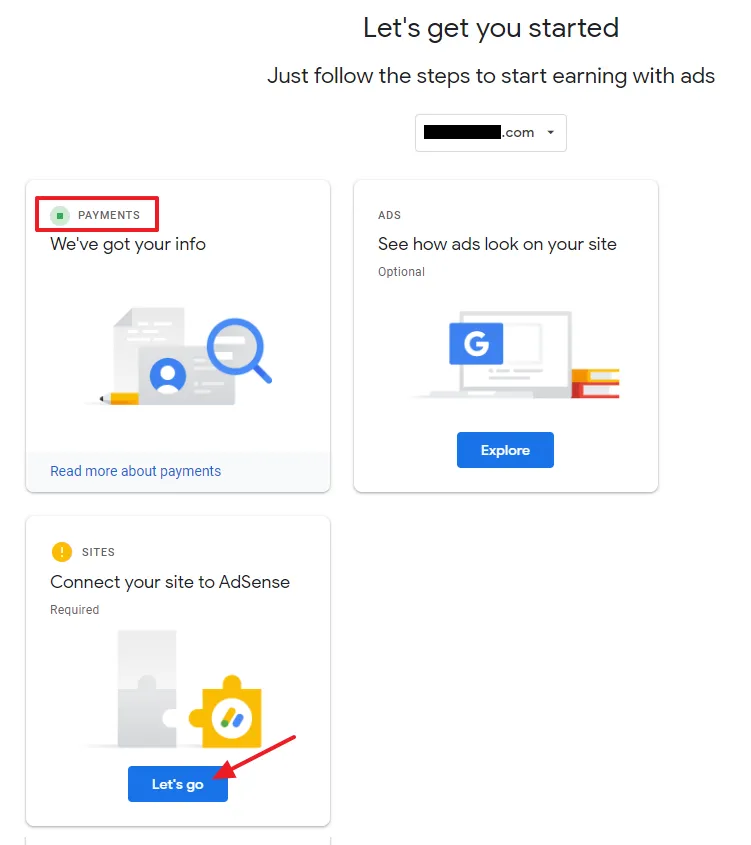
Your Google AdSense account has been created successfully, now you have to complete the two sections here (1) Payments (Customer Information) (2) Sites (Connect your site to AdSense).
01. Payments
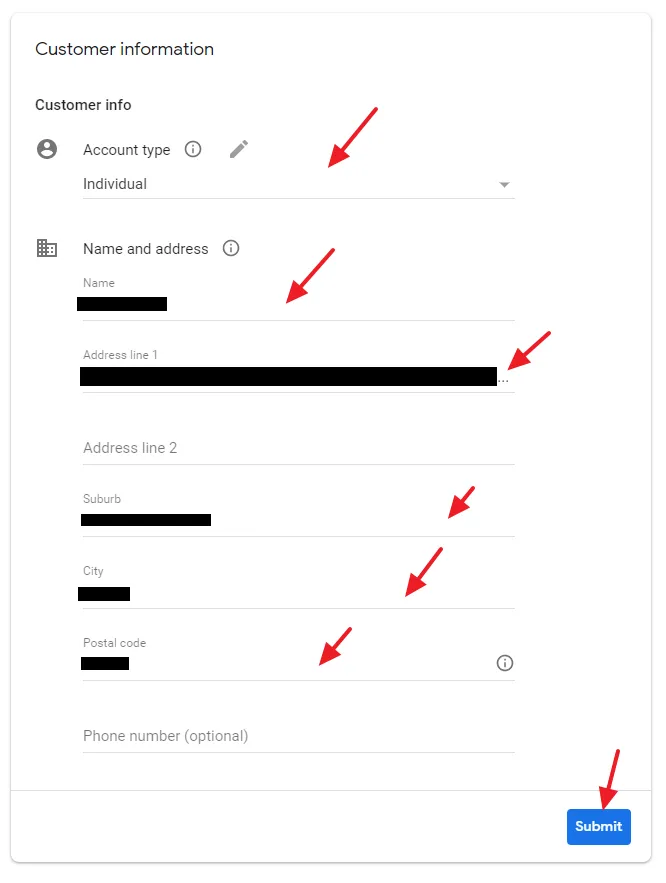
Go to PAYMENTS (Tell us about you) section and click on the Enter information button.
- In the Account type, choose Individual.
- Enter your Name and address, Suburb (Outer area of a town/city), City, and Postal Code.
- Click on the Submit button.
Make sure to provide the correct (real) address i.e. City/town, Street No, House No, etc. Once your Google Adsense account is approved they might mail a Verification Pin to your address. After receiving the Pin at your mailing address you have to add it in Google AdSense account.
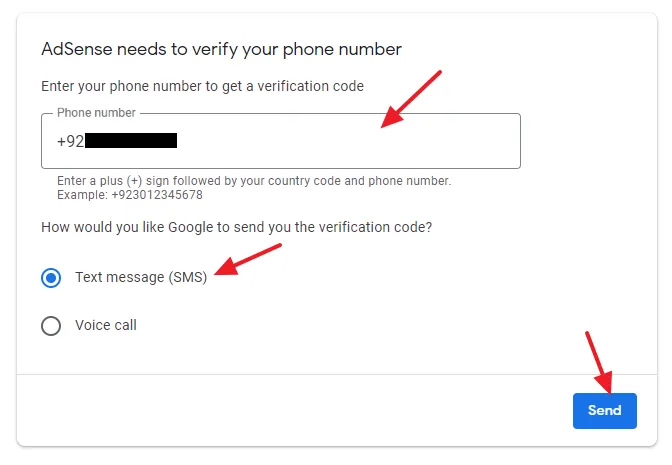
- Enter your Phone number where you can receive the verification code. Enter a Plus Sign (+) followed by your Country Code and Phone Number like this: +923132568786.
- You have two options to receive verification code in your phone i.e. Text message and Voice call.
- Choose Text message.
- Click on the Send button.
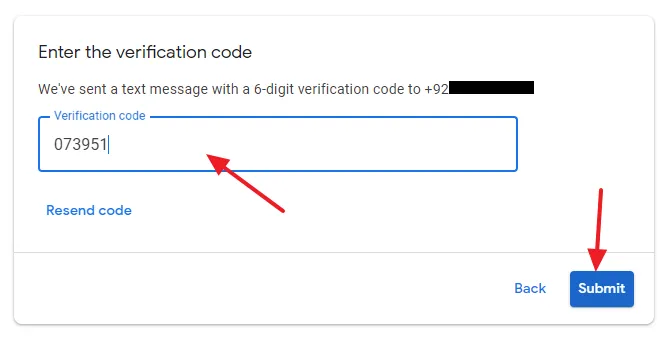
- Enter the Verification code that you will receive on your phone.
- Click on the Submit button.
- The PAYMENTS (Customer Info) is completed, now go to SITES (Connect your site AdSense) and click on the Let’s Go button.
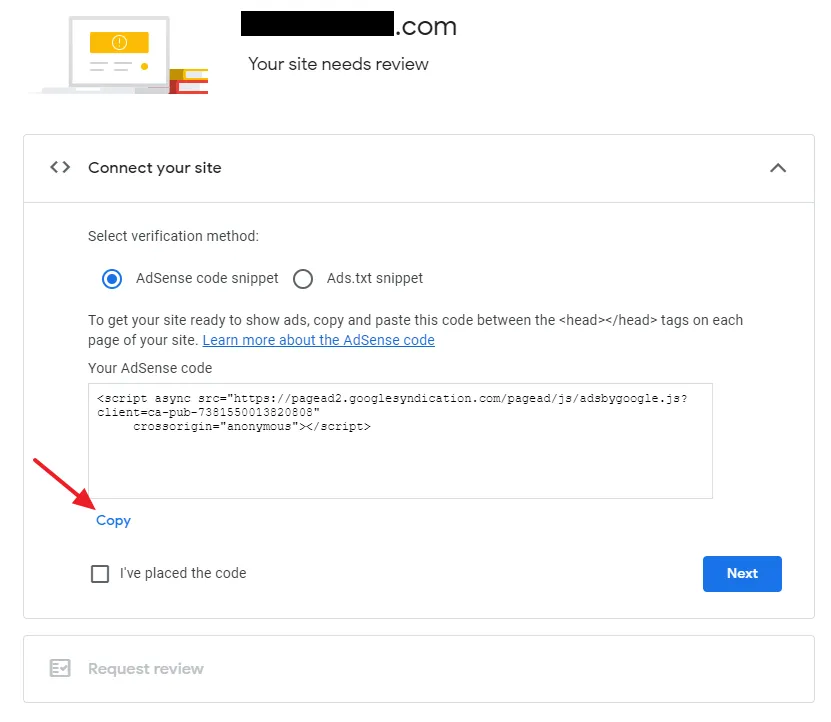
Select the verification method through which you want to connect your WordPress site to Google AdSense account. There are two options (1) AdSense code snippet (2) Ads.txt snippet.
- Select the AdSense code snippet.
- Click on the Copy icon to copy this code (script). You have to paste this code between the <head></head> tags of your WordPress theme.
- Don’t click on the Next button, as you have to comeback here after pasting the code in your theme.
In the below steps, I will guide you on how to paste this code in your WordPress theme using the plugin Insert Headers & Footers.
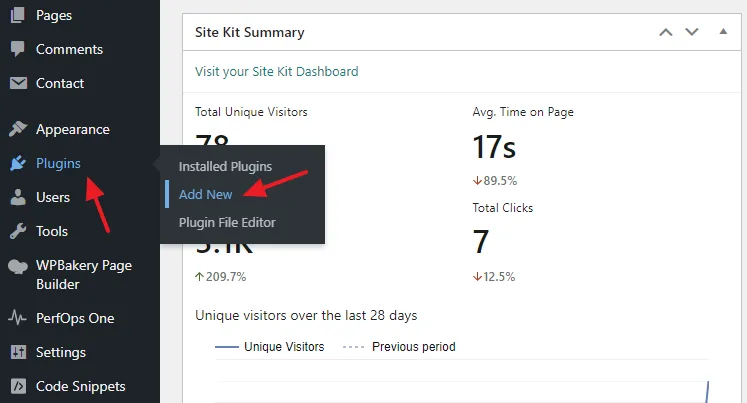
- Open your WordPress Admin section.
- Go to Plugins from your Sidebar and click on the Add New.
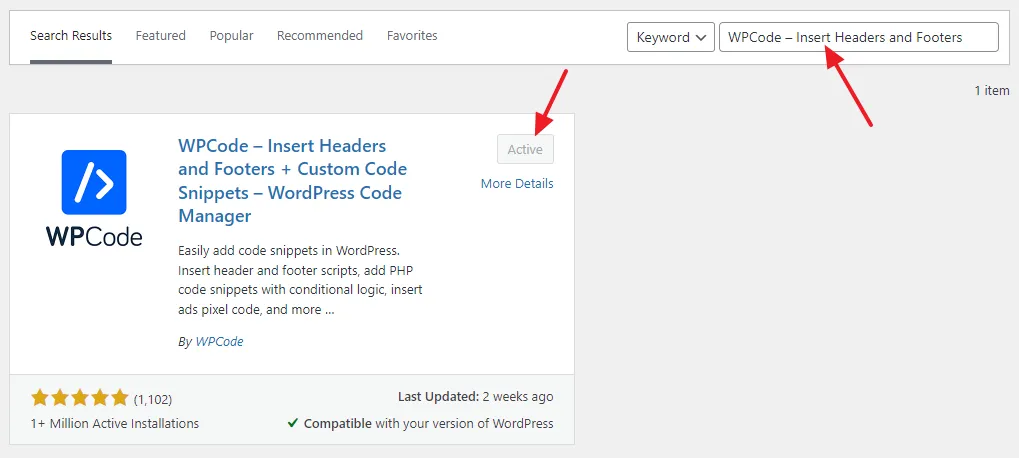
- In the Plugins Search Bar enter WPCode – Insert Headers and Footers. It will be listed in the search results.
- Click on the Install Now button. Once it is installed click on the Activate button.
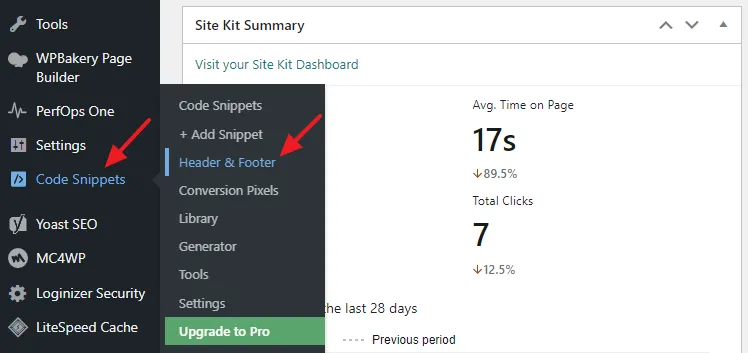
- Go to Code Snippets from the Sidebar and click on the Header & Footer.
- In the Header section, paste the AdSense Code that you had copied.
- Click on the Save Changes button. It will paste code somewhere between <head</head> tags of your WordPress theme.
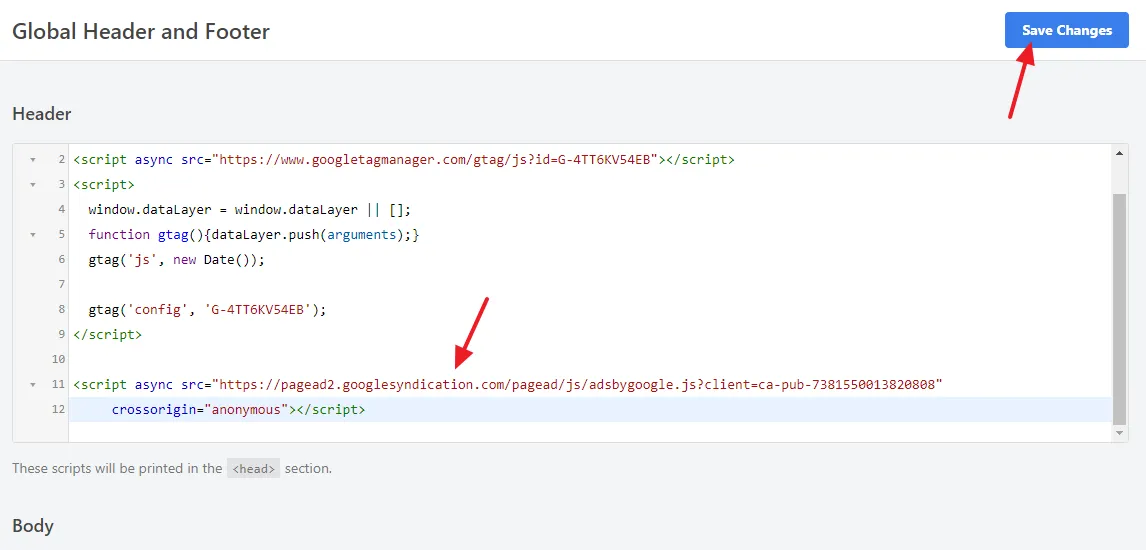
- Now go back to AdSense’s Select Verification Method page and Tick (Check mark) on the I’ve placed the code.
- Click on the Next button.
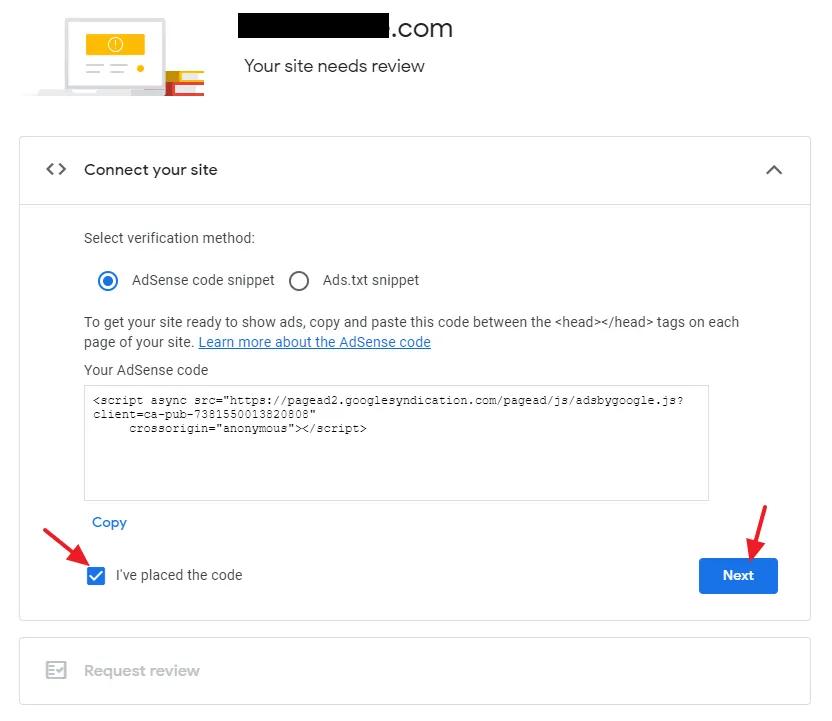
- Your WordPress site is successfully connected/linked to your Google AdSense account.
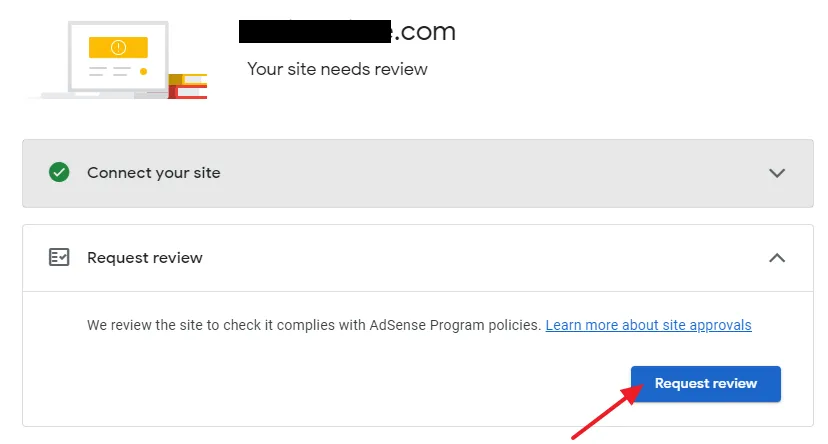
- Expand the Request review and click on the Request review button to apply for Google AdSense monetization with your WordPress website.
- Normally it takes few days, but in some cases it can take up to 2 weeks . You will be notified by email whether your website is approved or not.
- You can sign into your AdSense account to check the status.
Google AdSense can take up to 2 weeks to review and approve/reject your website. You will be notified by email whether your website is approved or not.
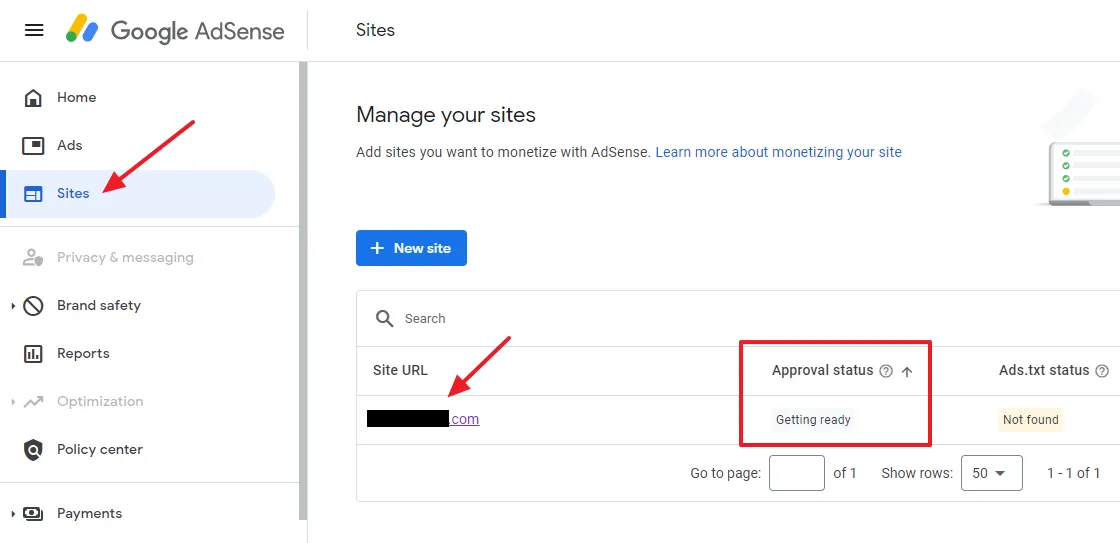
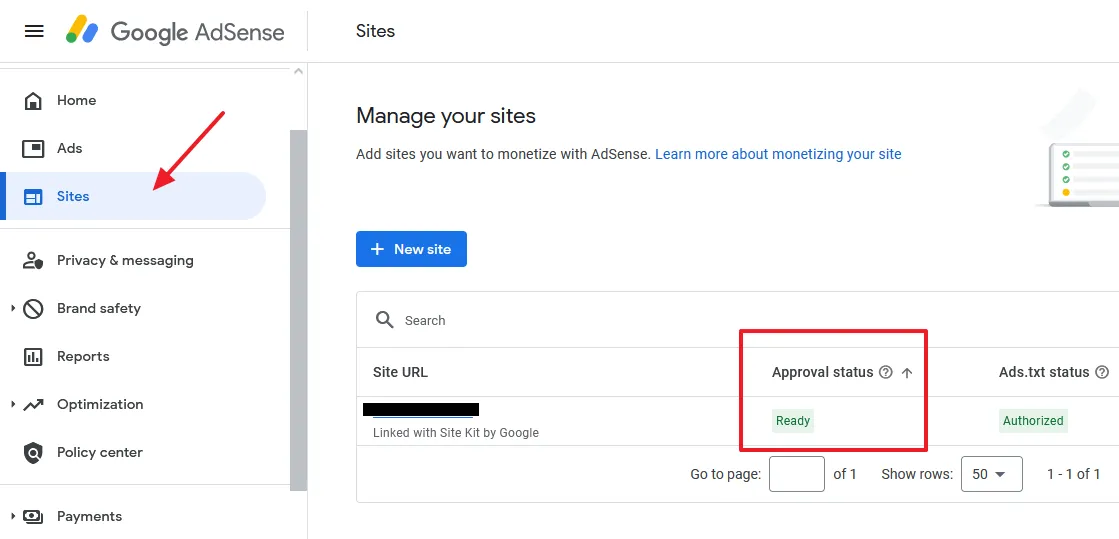
In your Google AdSense account go to Sites to check the Approval status of your WordPress site. Here you can see that the Approval Status is Getting ready that means it is still under the review. If a site is approved for AdSense monetization the Approval status is ready, as shown in the next step.
Below are the different Approval statuses that you can find for your site in AdSense:
- Ready: This site is ready to show ads.
- Not reviewed: Your site hasn’t been checked yet. Click Request review to start the review process.
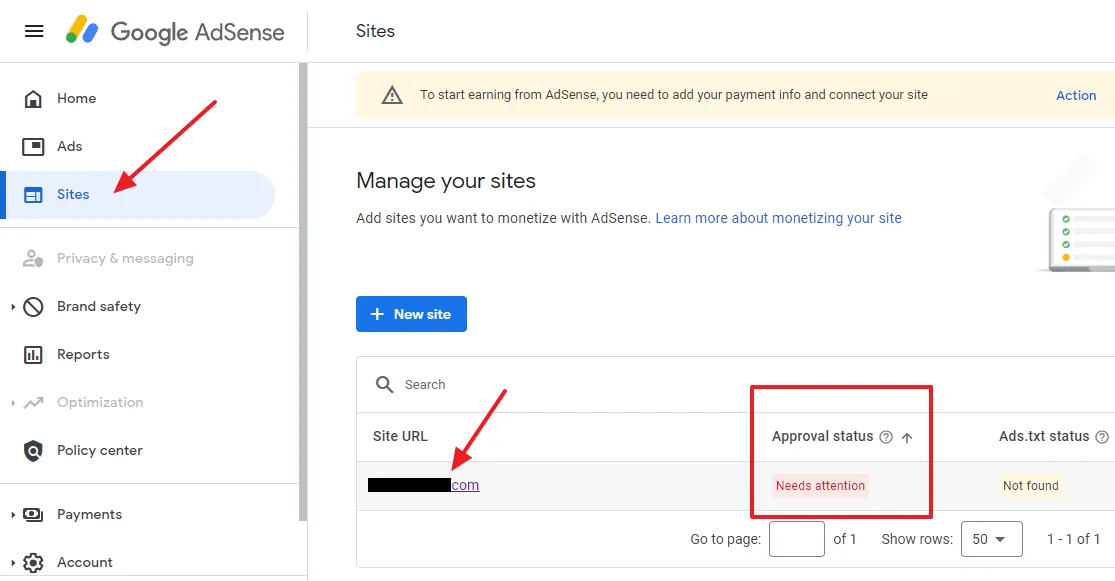
- Needs attention: You need to fix some issues before your site is ready to show ads.
- Requires review: Your site is inactive and needs another review.
- Getting ready: Your site is still under the review.
- Here you can see that the Approval status is Ready. The site is ready to show Google AdSense ads.
02. Fix Approval Status Needs attention | Resubmit Review
In this section, I will guide you on how to fix “Approval status” Needs attention and resubmit your site for review.
When your site is rejected by Google AdSense you get an email that says, “The team has reviewed it but unfortunately your site isn’t ready to show ads at this time. There are some issues which need fixing before your site is ready to show ads.”.
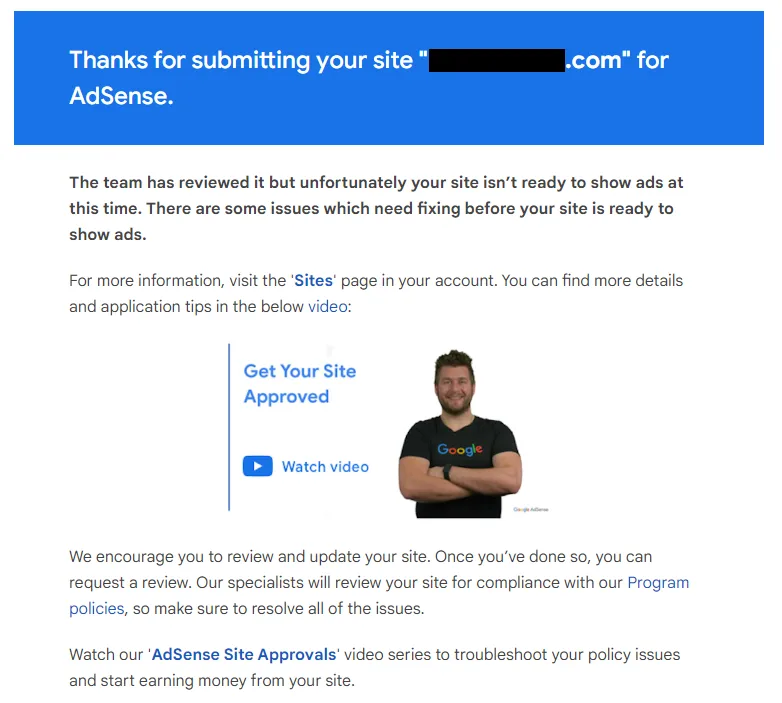
- Go to Sites in your Google AdSense account to know about the reason of the rejection.
- Here it is showing you the “Approval status” Needs attention. Click on your domain located under the Site URL to expand the details.
Google AdSense is showing you the reason, “We found some policy violations“. There are three main reasons for Google AdSense policy violations:
- Low Value Content: Make Sure your content is original and valuable to your users. Create a content that impress your visitors. There should be enough unique content that AdSense will be able to identify your niche. Make sure your content is compliant to Spam Policies for Web Search. Don’t use cloaking, doorway pages, avoid creating pages with little content, etc.
- Replicated Content: Make sure that your content is unique and not repetitive on different pages of your site or on other sites. Don’t copy and republish content from other sites. Don’t recreate content using rephrasing and AI tools.
- Deceptive Site Navigation: Visitors should be able to easily navigate your site. Your site should have a menu that should contain main categories and pages. It must not redirect your visitors to spammy sites.
After you fix the violation you can request a review of your site by clicking on the Request review button.
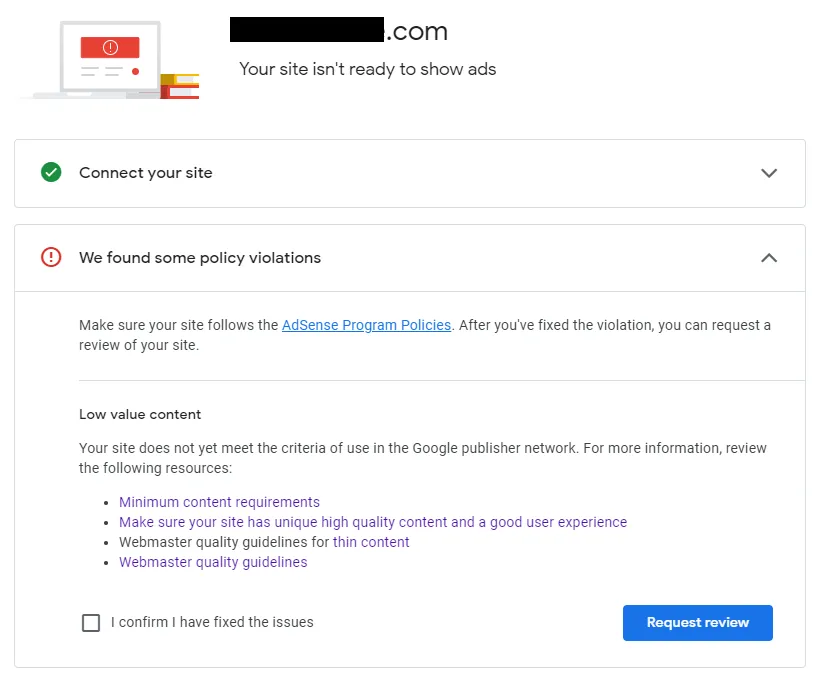
Read these articles carefully and prepare your content accordingly, so that your site will be approved for Google AdSense monetization.
- Google Publisher Policies
- Google AdSense content and user experience
- Manual Actions report
- Spam policies for Google web search
- What to do when your site is not ready to show ads
03. Things to Do After Your WordPress Site is Approved
Once your website is approved you will have a full access to your Google AdSense account where you can see and mange your ads, account settings, reports, payment settings, etc.
The first thing that you have to do is, create Ads.txt and add AdSense code. Go through this tutorial to learn more about Ads.txt, its purpose and how to create ads.txt for WordPress site.
In order to display AdSense auto ads on you WordPress site, install Site Kit by Google plugin. It connects your WordPress site to your Google AdSense account and display auto ads on posts, pages, and suitable positions.
If you like this post then don’t forget to share with other people. Share your feedback in the comments section below.

Also Read
- How To Fix Valuable Inventory: No Content Google AdSense Error
- How To Increase Google AdSense Revenue – 8 Tips | Understand RPM, CTR & CPC
- Affiliate Marketing Vs Google AdSense: Which One Is Best & Profitable?
- How To Sign Up & Use Free Google Keyword Planner | Google Keyword Research
- Foreign Taxpayer Identification Number (TIN) On Form W-8BEN
- How to Create Sitemap in WordPress & Submit on GSC
- Monetization Options for Bloggers Beyond AdSense


Leave a Reply