Do you want to connect your WordPress website with Google AdSense and show auto ads on it? You are in the right place.
In this tutorial, I will guide you step-by-step on how to connect your Google AdSense account to your WordPress site using Site Kit by Google plugin, and display Google auto ads on it.
As you know that by default WordPress does not provide you the feature to directly connect AdSense from your dashboard, so in order to display auto Google ads on your website and view AdSense stats like earnings, ad clicks, RPM, CPC, etc, on your dashboard, you need to install a plugin.
Site Kit is a powerful and secure free WordPress plugin for connecting services such as Google Search Console, Google Analytics, PageSpeed Insights, Google AdSense, Optimize(For Creating A/B Tests) and Tag Manager, to WordPress.
Following topics will be covered in this post:
- How To Install Site Kit by Google
- How To SignUp/Apply For Google AdSense
- How to Enable Auto Ads on AdSense
- How To Connect Site Kit To AdSense
- How To Insert AdSense Ad Units In WordPress
01. How To Install Site Kit
I have created a separate tutorial to guide you on how to install and activate Site Kit plugin in WordPress. In addition you can also learn how to connect Google Search Console & Google Analytics to your WordPress site using Site Kit.
Read this tutorial:
02. How To SignUp/Apply For AdSense
Before you go through this tutorial you must have a Google AdSense account linked to your website. It does not matter whether your website is approved for monetization or not, if you have added your website in your AdSense account you can still connect AdSense to Site Kit.
If you don’t have an AdSense account OR If you don’t know how to signup/apply for Google AdSense then read this step-by-step tutorial:

03. How to Enable Auto Ads on AdSense
Before you connect AdSense account to Site Kit enable the the Auto Ads on you Google AdSense account.
- Open your Google AdSense account.
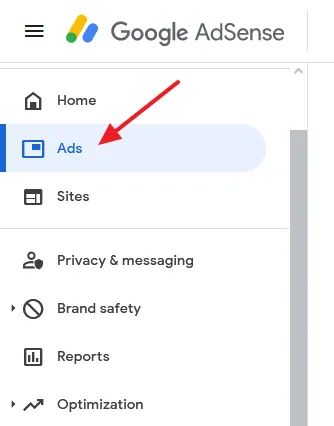
- Click on the Ads tab.
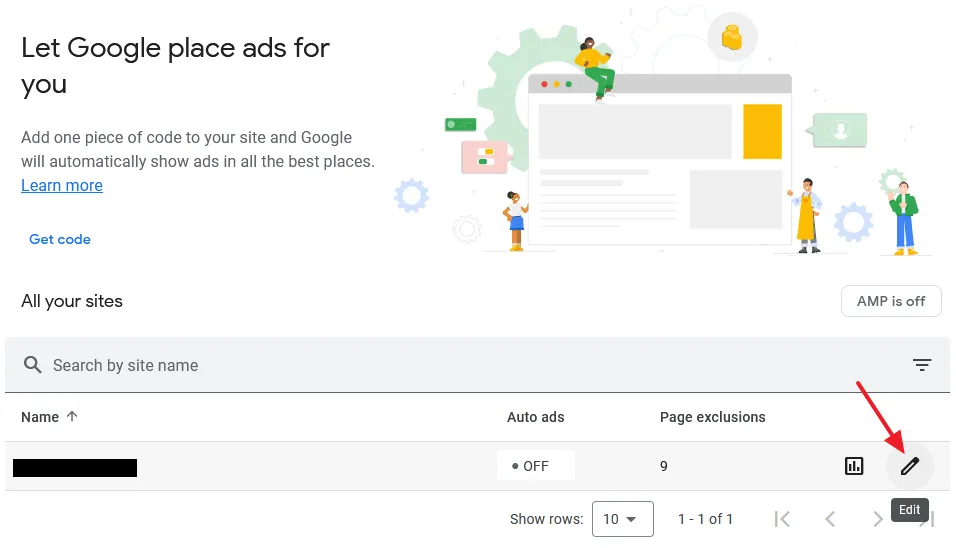
- Go to All your sites section and click on the Edit icon. You can see that status of Auto ads, they are turned-off.
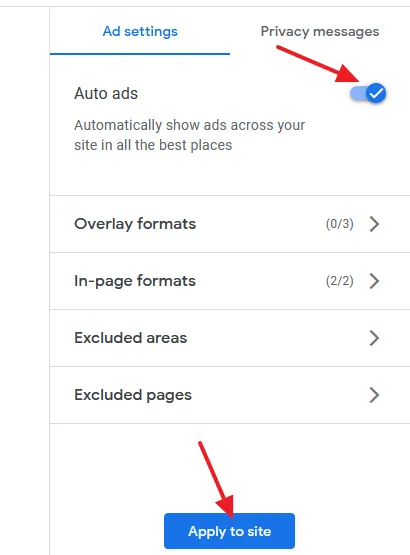
- Go to Ad settings tab and turn-on the Auto ads. There are 5 types of Auto Ads that you can manually enable or disable. You can find them under Overlay formats and In-page formats.
- Click on the Apply to site button.
04. How To Connect Site Kit To AdSense
Before you start make sure to sign-in to your Gmail account with the ID that you use for Google AdSense, so that Site Kit plugin will directly access your AdSense account.
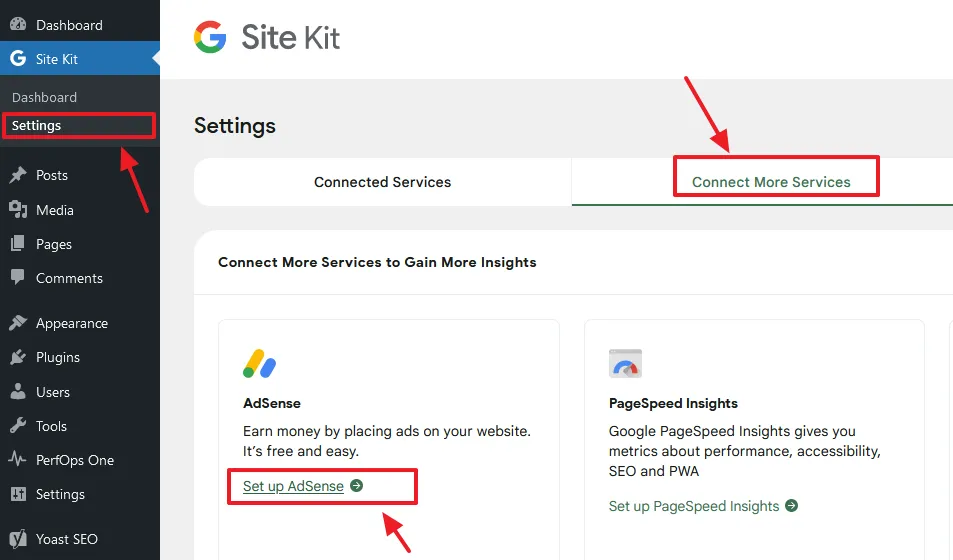
- Go to Site Kit and click on the Settings.
- Click on the Connect More Services tab.
- Click on the Set up AdSense link.
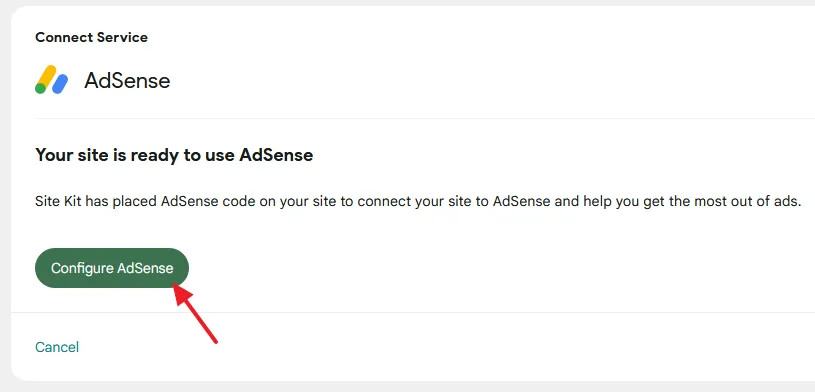
- Click on the Configure AdSense button.
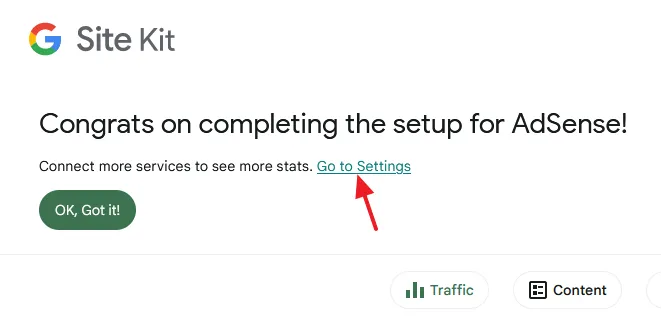
- The setup for AdSense is completed. Click on the Go to Settings link.
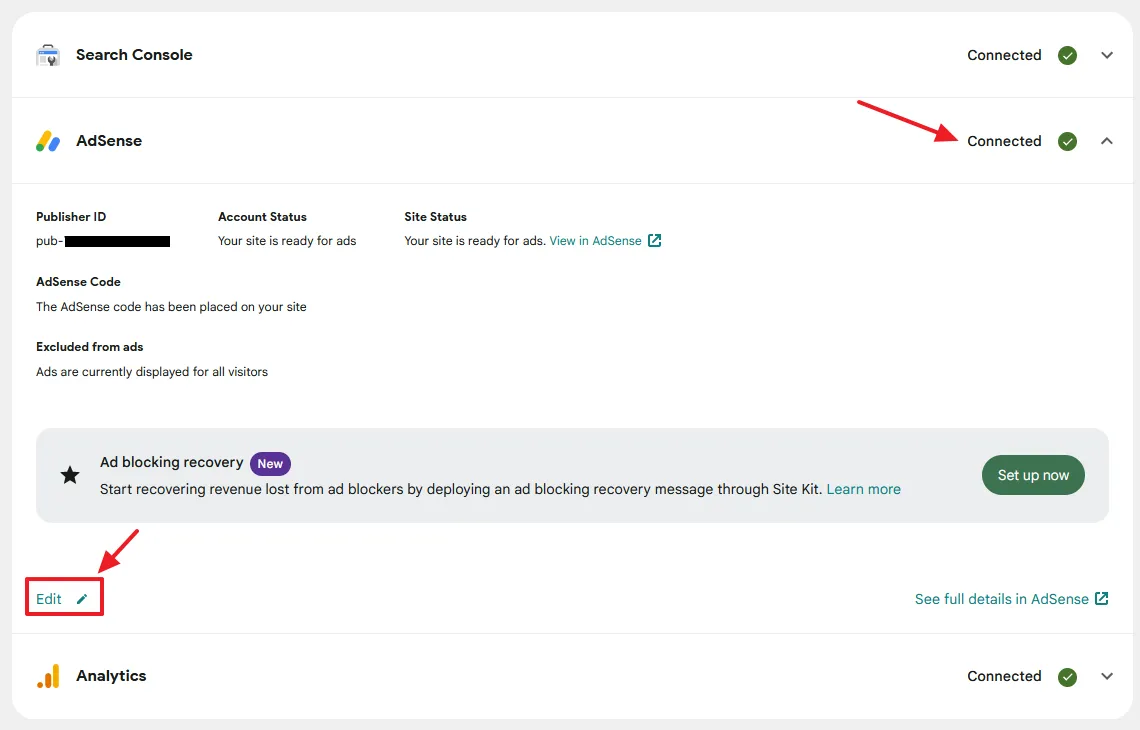
- Click on the AdSense to expand the details.
- Click on the Edit link.
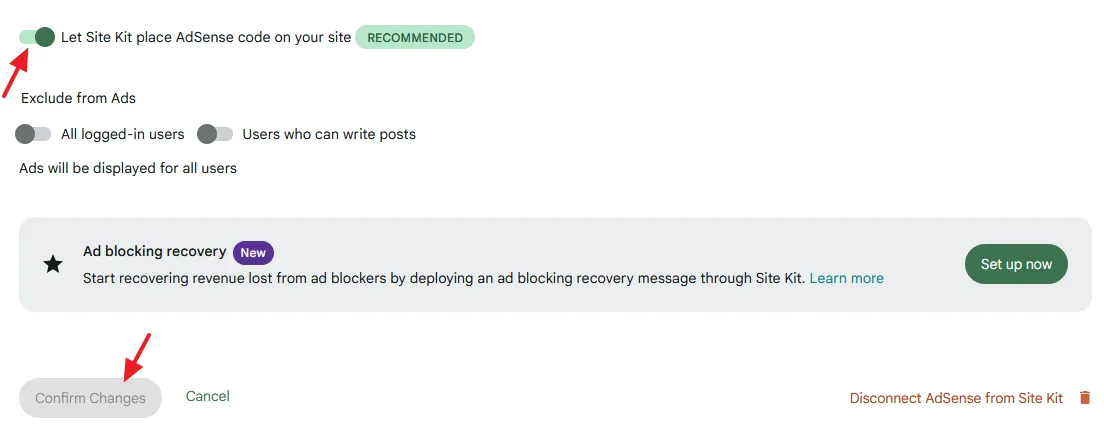
- Turn on Let Site Kit place AdSense code on your site.
- Click on the Confirm Changes button.
Go to Site Kit dashboard to view the AdSense statistics.
05. How to Insert AdSense Ad Units
Above you have just learned about how to connect AdSense and Site Kit for displaying Auto Google ads on your website, here you will learn about how to insert individual AdSense ad units on your website.
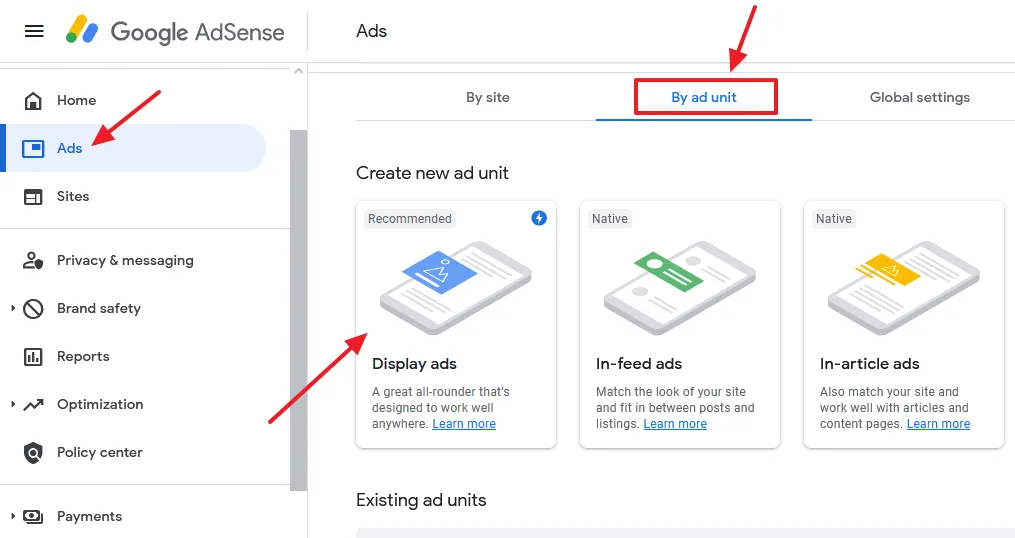
- Go to your AdSense account.
- Click on the Ads from the sidebar.
- Click on the By ad unit tab.
- Click on the Display ads.
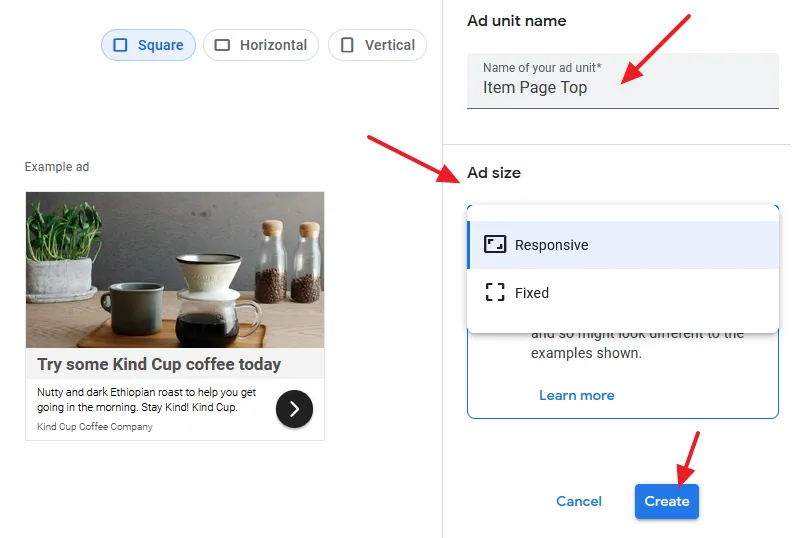
- Enter a meaningful name for your Ad Unit.
- There are three types of ads i.e. Square, Horizontal, and Vertical. Choose the type according to the position where you want to display the ad.
- There are two Ad Sizes (1) Responsive (2) Fixed. The Responsive Ads auto adjust their size according to given space. For Fixed Ads you have to provide width and height. Though Responsive Ads are better, but they affect the Core Web Vitals metric CLS (Cumulative layout Shift) score. That’s why I will recommend you to create Fixed Ads.
- Click on the Create button to generate the code of the ad unit. Similarly you can create more ad units for your website.
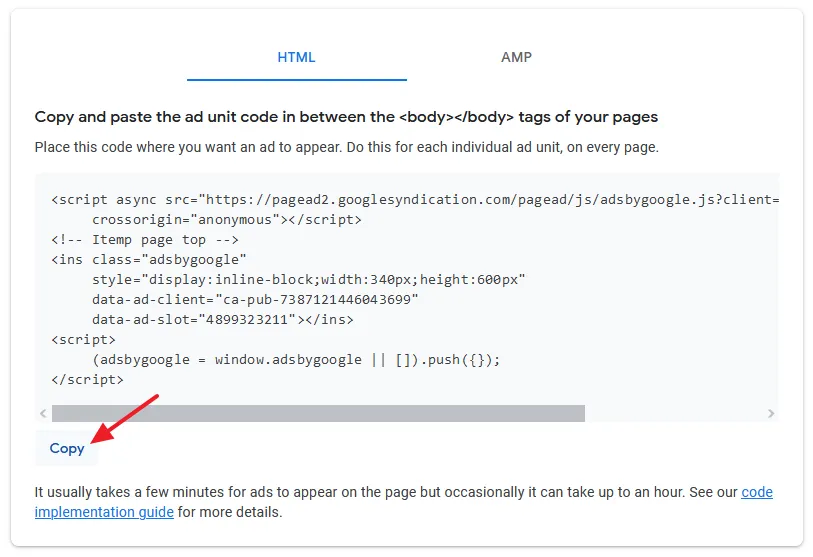
- Click on the HTML. If AMP is enabled on your site then click on the AMP tab.
- Click on the Copy to copy the code.
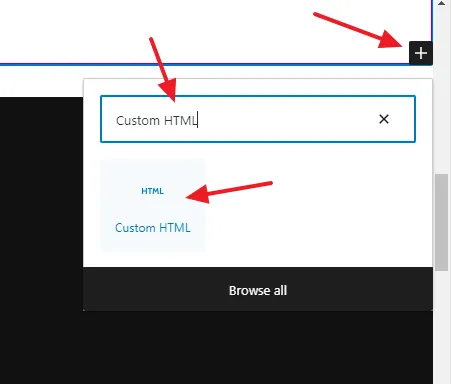
Now add Custom HTML block on your WordPress Header, Footer, Sidebar or wherever you want to display the AdSense ad.
- Click on the + icon to add a block.
- Search for Custom HTML.
- Click on the Custom HTML block.
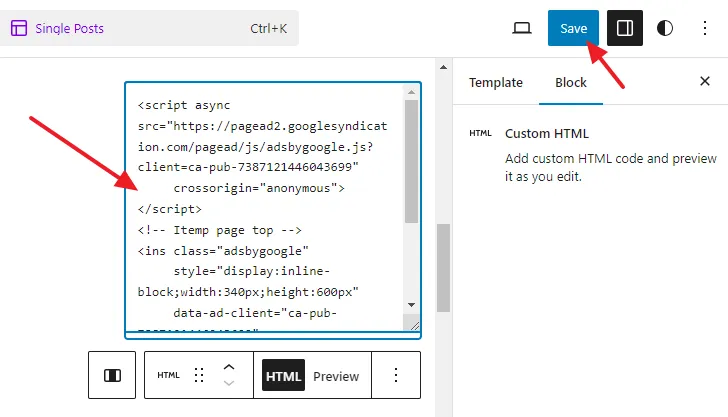
- After adding the Custom HTML block paste the AdSense Ad Code on it and Save.
- Go to your website and refresh to preview the ad.
If you like this post then don’t forget to share with other people. Share your feedback in the comments section below.
Also Read
- How to Fix AdSense Ads Break Page Layout on Block Theme
- How To Increase Google AdSense Revenue – 8 Tips | Understand RPM, CTR & CPC
- Affiliate Marketing Vs Google AdSense: Which One Is Best & Profitable?
- How To SignUp & Use Free Google Keyword Planner | Google Keyword Research
- How to Setup WP MAIL SMTP on WordPress to Send Emails
- Monetization Options for Bloggers Beyond AdSense


Leave a Reply