Do you want to know how to sign up and use Impact Radius affiliate network? You’re in the right place.
In this tutorial, first I will guide you on how to sign up and create an account on Impact Radius, and then how to complete the marketplace profile that includes verifying email address, completing tax information, and verifying media properties. Subsequently, I will guide you on how to set up payment method, create affiliate links, apply to affiliate programs (brand), get banners & links, request promo code, and view reports.
The Impact Radius is one of the most popular and emerging free-to-join affiliate networks. It provides great opportunity to content creators, publishers, bloggers, influencers, etc, to link with the global brands and make money online.
It does not matter around which niche you are creating content because brands from all industries are advertising with Impact Radius such as Fashion, Apps, Art, Entertainment, Auto, B2B, Office Supplies, Baby, Kids, Toys, Computers, Electronics, Education, Home & Garden, Finance, Internet Services, Web Hosting, Pets, Pharmacy, Travel, Sports, Pharmacy, and many more..
Impact Radius supports both PayPal & Wire Transfer payment methods. It means that anyone from any part of the world can join this affiliate network. If PayPal is not available in your country you can receive the payments via Wire Transfer means through your local bank account.
Following topics will be covered in this post:
- How To Sign Up For Impact Radius
- How To Complete Marketplace Profile
- How To Configure Payment Methods
- How To Submit Tax Document
- How To Use Impact Radius
01. How To Sign-up For Impact Radius
Follow the steps to sign up for Impact Radius and create a publisher account.
- Go to Impact Radius Sign up and start earnings page.
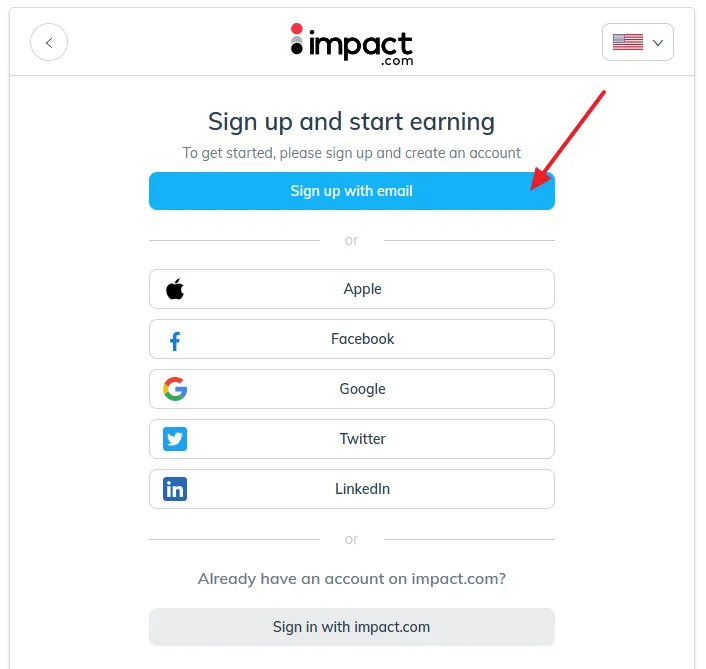
- Click on the Sign up with email button. You can also sign up with Apple, Facebook, Google, Twitter, and LinkedIn account.
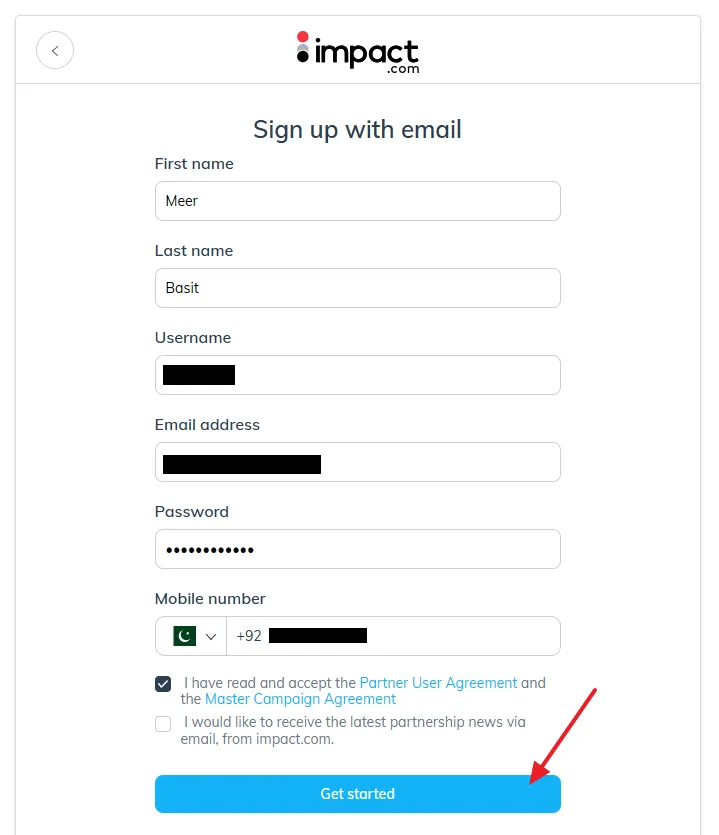
- Enter your First Name and Last Name.
- Enter a unique Username.
- Enter your Email Address and set a Password for it.
- Select your Country Code and enter your Mobile Number.
- Check I have read and Accept the Partner User Agreement and the Master Campaign Agreement.
- Click on the Get Started button.
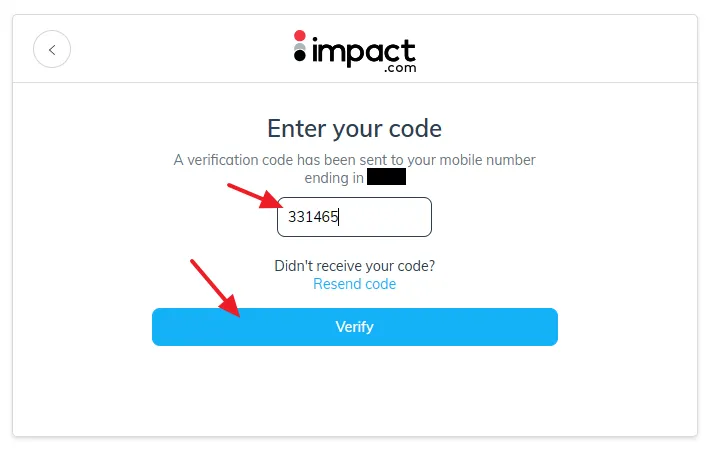
- Enter the verification code that you will receive on your phone.
- Click on the Verify button.
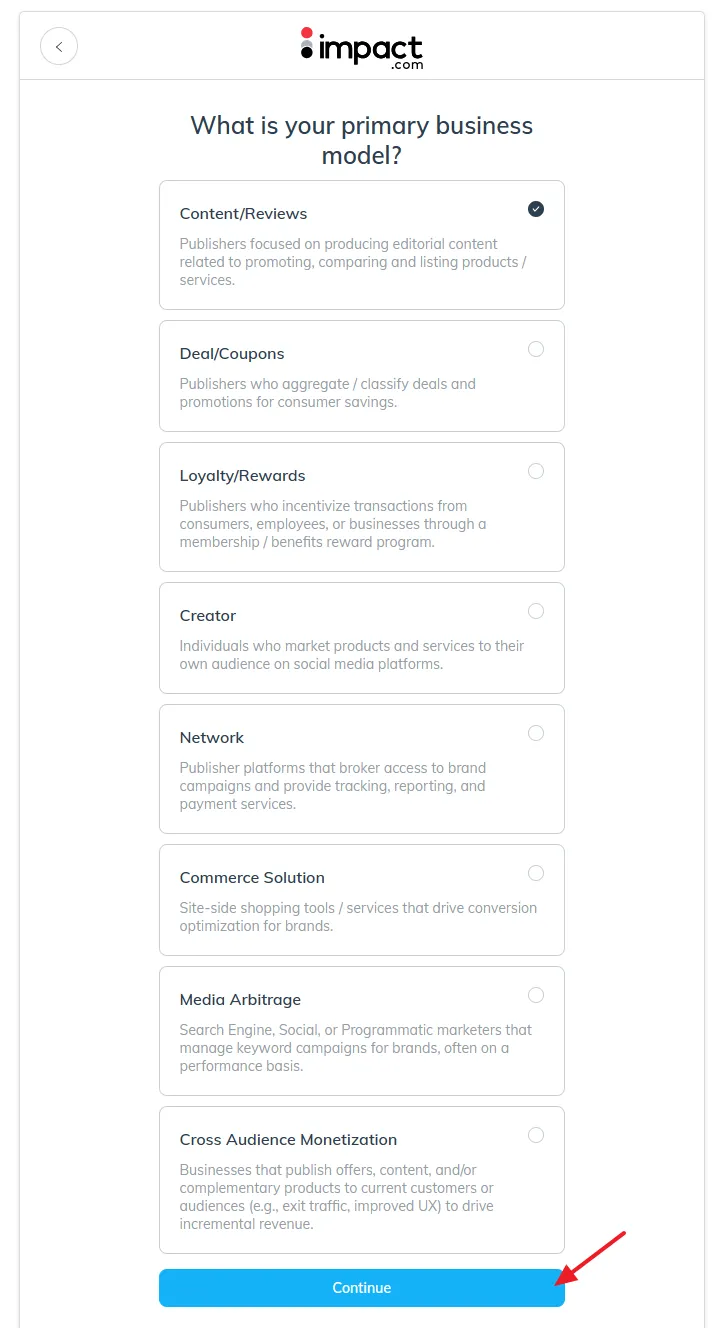
- Choose your Primary Business Model. There are different models such as Content/Reviews, Deal/Coupons, Loyalty/Rewards, Creator, Network, Commerce Solution, Media Arbitrage, and Cross Audience Monetization.
- Click on the Continue button.
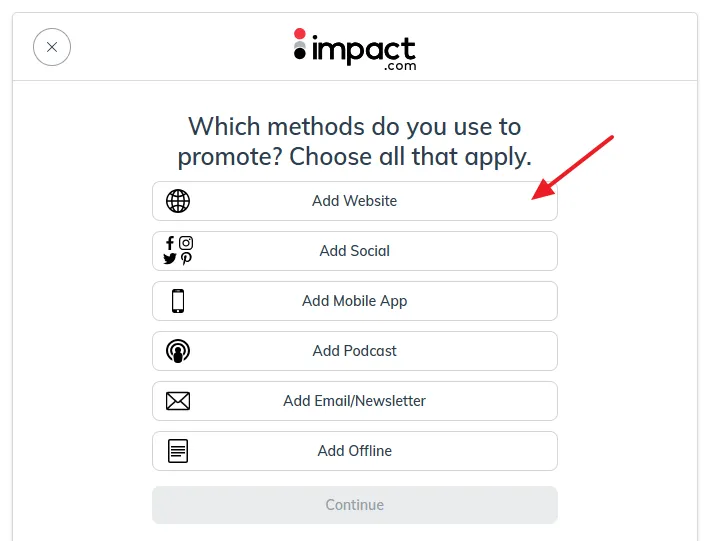
- Choose the methods that you use to promote. You can add them one by one. Here I am only guiding you on how to add your website.
- Click on the Add Website.
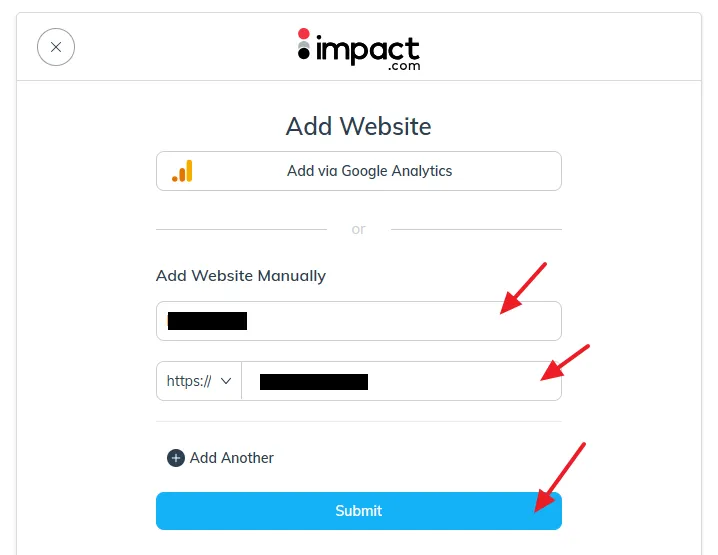
- You have two options to add website (1) Add Via Google Analytics (2) Add Website Manually. I will use the second method i.e. Add Website Manually.
- Enter the Name of your website.
- Choose the security protocol https:// or https://www and enter the name of your domain. If the subdomain www is not enabled for your domain choose https://.
- Click on the Submit button.
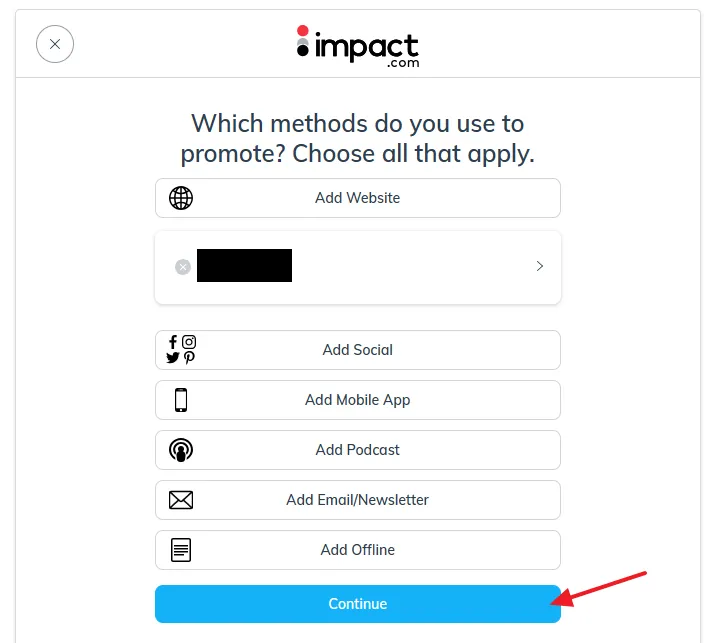
- Your website is added. Click on the Continue button.
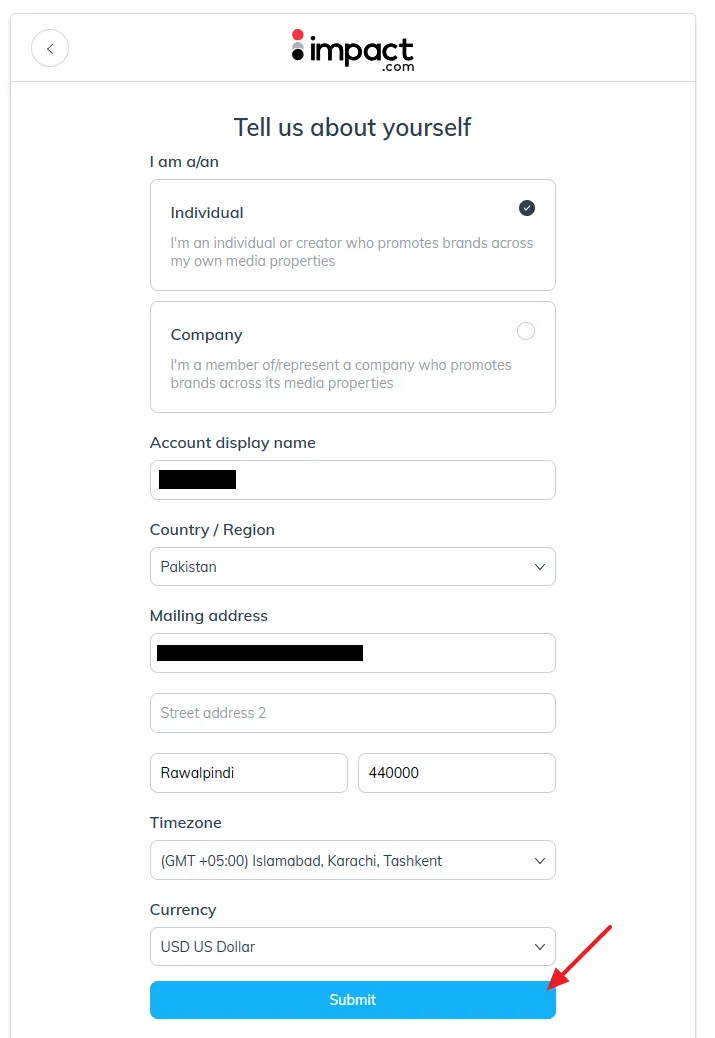
- Choose whether you’re an Individual or a Company.
- Enter an Account Display Name.
- Choose your Country / Region.
- Enter your Mailing Address.
- Select your Timezone and Currency.
- Click on the Submit button.
- You have successfully created the Impact Radius account. In the next section, I will guide you on completing your Marketplace Profile.
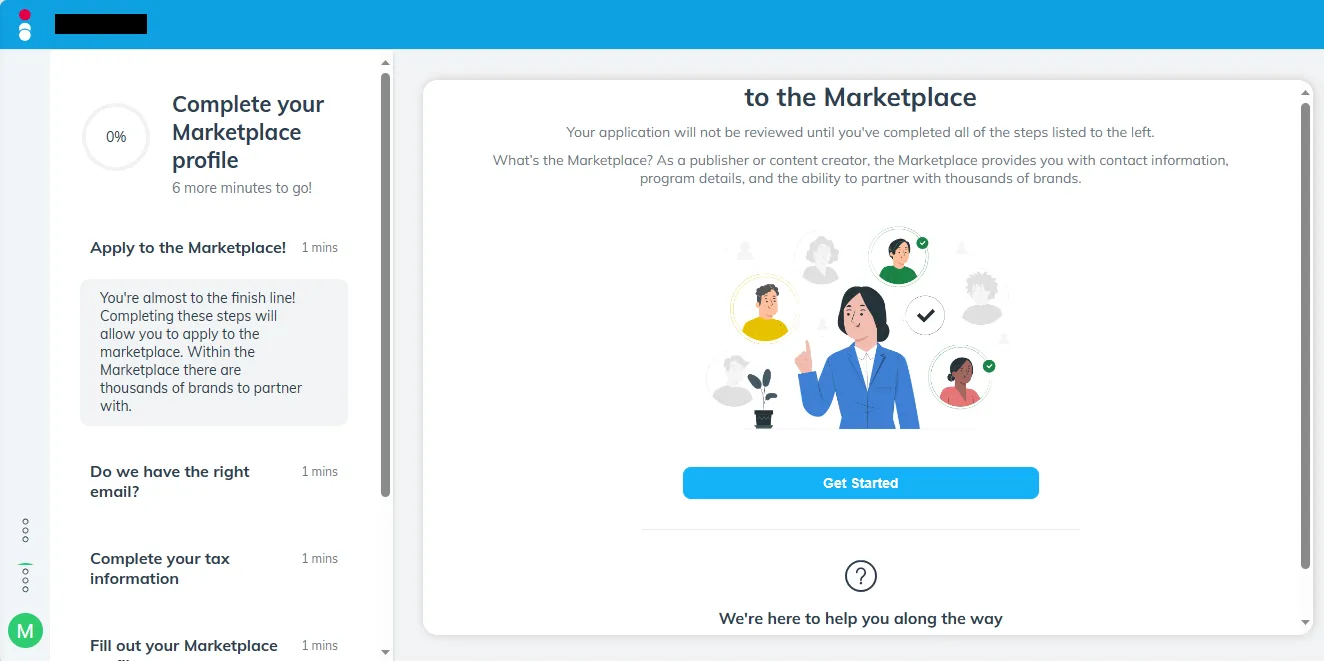
02. How to Complete Marketplace Profile
In this section, I will guide you on completing your Impact Radius Marketplace Profile so that you will be eligible for applying to brands (affiliate programs).
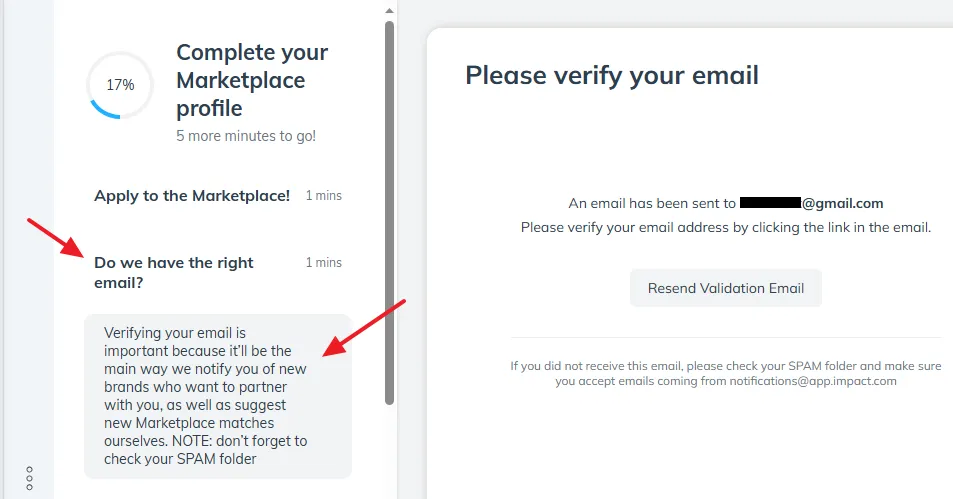
- Click on the Do we have the right email?
- Click on the Verifying your email is important because it’ll be the main way….
- At your right side you can see the message, “An email has been sent to email_address. Please verify your email address by clicking the link in the email“.
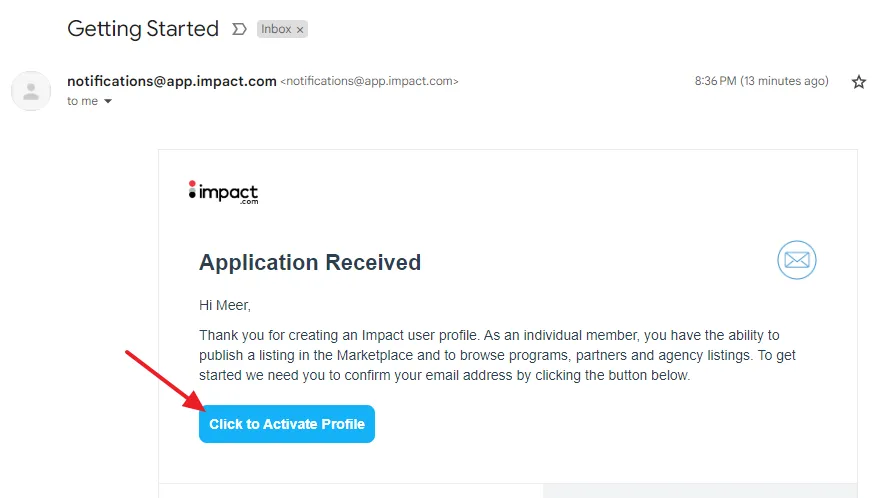
- Go to your Email Account and open the email sent from the Impact Radius to open Profile Activation link, as shown in the next step.
- Click on the Click to Activate Profile link. Your Impact Radius profile will be activated.
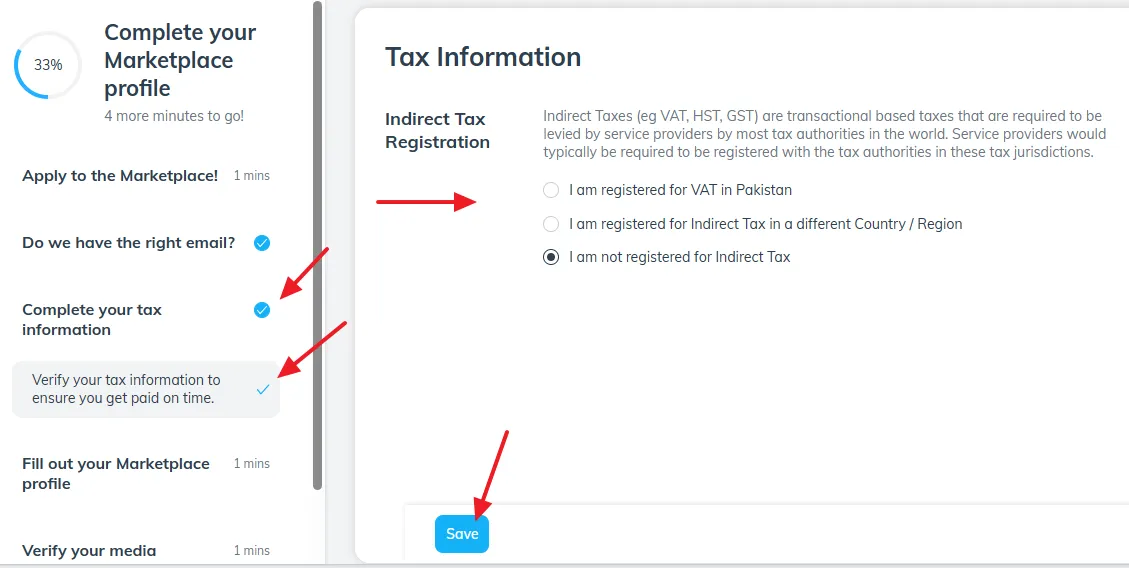
- Click on the Complete your tax information.
- Click on the Verify your tax information to ensure you get paid on time.
- There are three options (1) I am registered for VAT in Country_Name (2) I am registered for Indirect Tax in a different Country / Region (3) I am not registered for Indirect Tax.
- If you’re registered for VAT in your country, choose the First Option and provide the VAT (Value-Added Tax) number. Otherwise choose the Third Option. In the section How To Submit Tax Document, I have guided you on how to submit W8-BEN form to avoid US taxes.
- Click on the Save button.
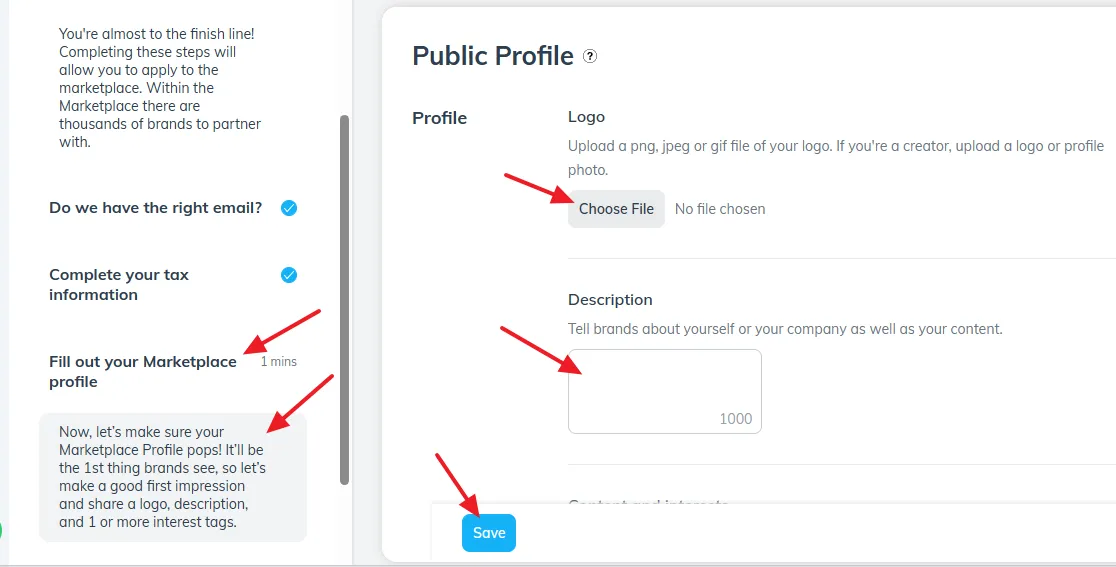
- Click on the Fill out your Marketplace profile.
- Click on the Now, Let’s make sure your Marketplace Profile pops! It’ll…
- Upload your Profile Logo and enter a brief Description about yourself, your company, and about your content.
- Click on the Save button.
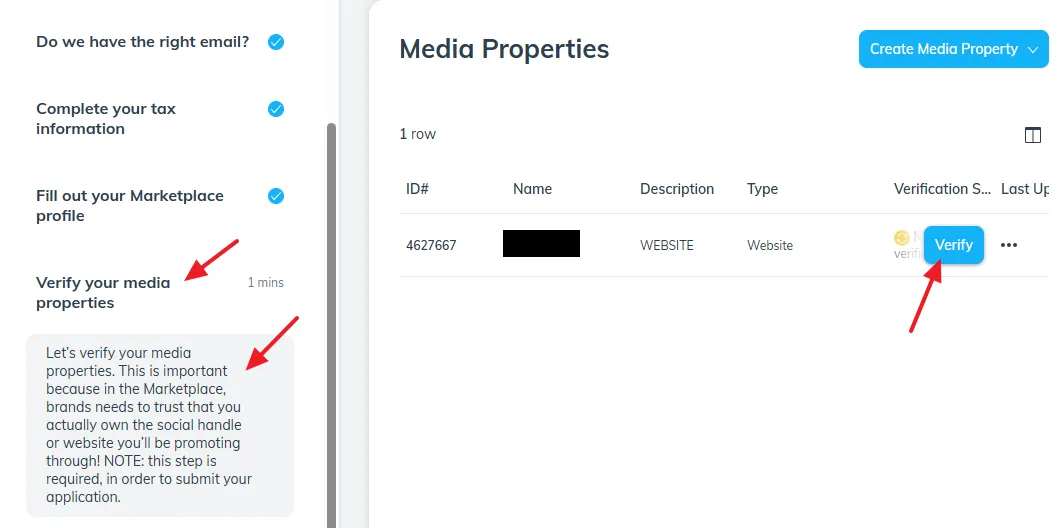
- Click on the Verify your media properties.
- Click on the Let’s verify your media properties. This is important because…
- You can see a website in the Media Properties. When you hover over the row the Verify button appears.
- Click on the Verify button.
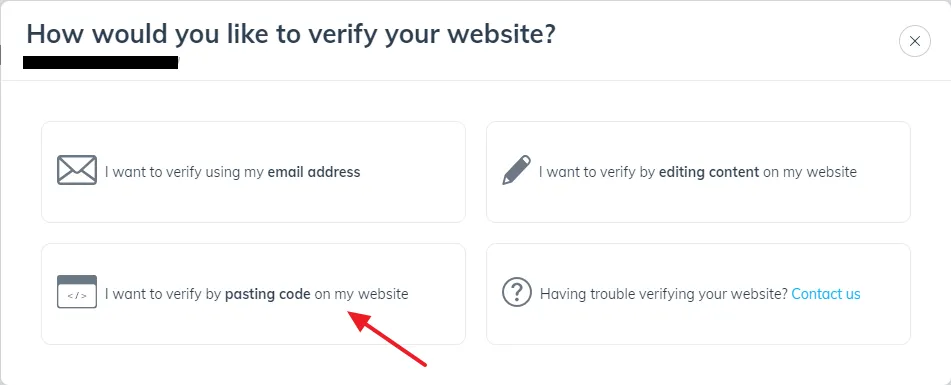
- There are three options to verify your website (1) I want to verify using my email address (2) I want to verify by editing content on my website (3) I want to verify by pasting code on my website.
- I will use I want to verify by pasting code on my website.
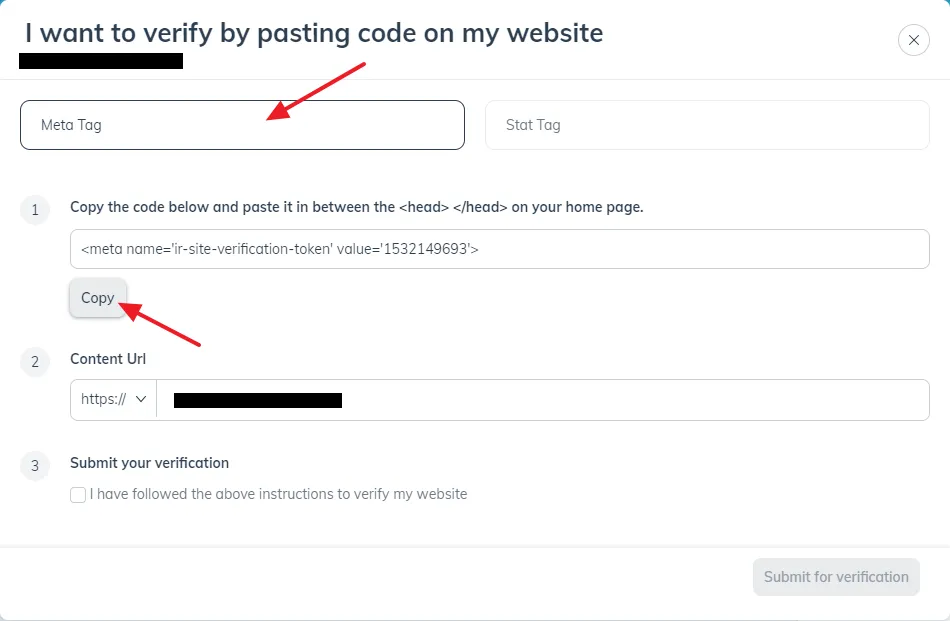
- There are two options (1) Meta Tag (2) Stat Tag.
- Click on the Meta Tag.
- Click on the Copy button to copy the Meta Tag.
- Now Paste this code in between the <head> </head> of your website theme.
In the below steps, I have guided you on how to add the Meta Tag on WordPress theme using WPCode Lite plugin without editing the theme. If you have a Blogger website, open this tutorial: How to Claim Blogger Blog on Pinterest, go through the Add HTML Tag section to learn about how to paste the HTML Tag in between <head></head>.
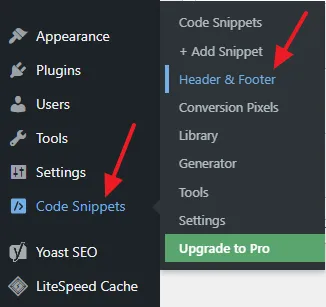
- If you have not installed WPCode Lite plugin, install it. Once it is installed and activated, appears on the Sidebar of your WordPress Admin section with the name Code Snippets.
- Click on the Code Snippets.
- Click on the Headers & Footer.
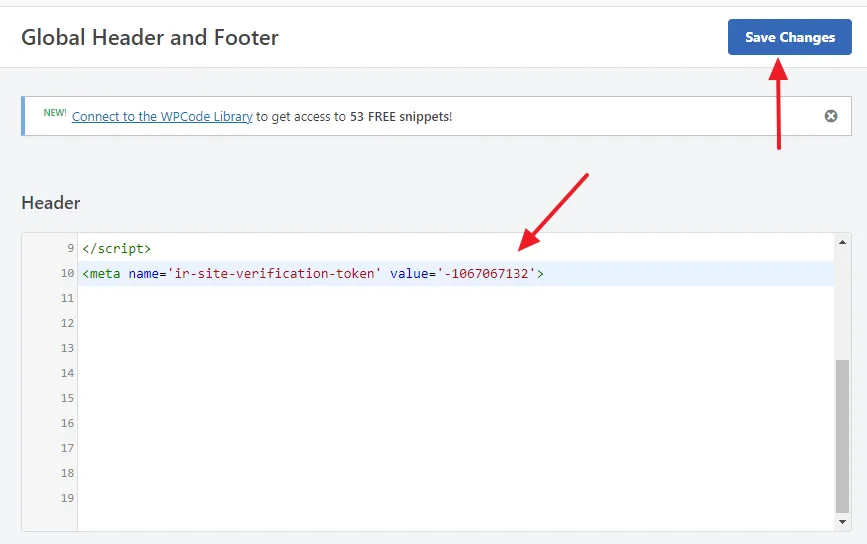
- Paste the Meta Tag under the Header, as I have shown. It will be inserted in between the <head> </head> of your WordPress theme.
- Click on the Save Changes button.
- Go back to Impact Radius website verification page, and follow the next step.
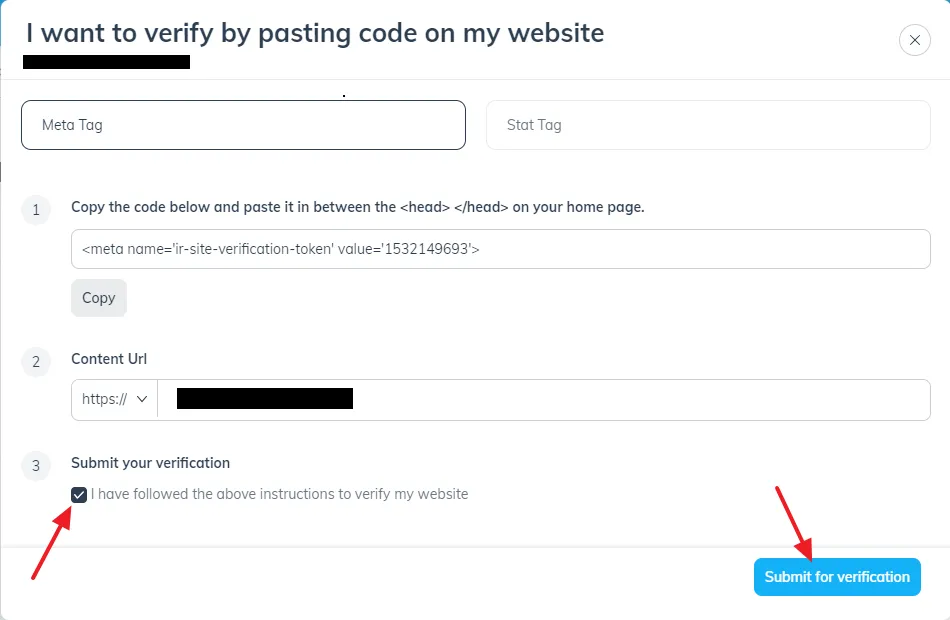
- The Content URL will be your website URL.
- Check I have followed the above instructions to verify my website.
- Click on the Submit for verification.
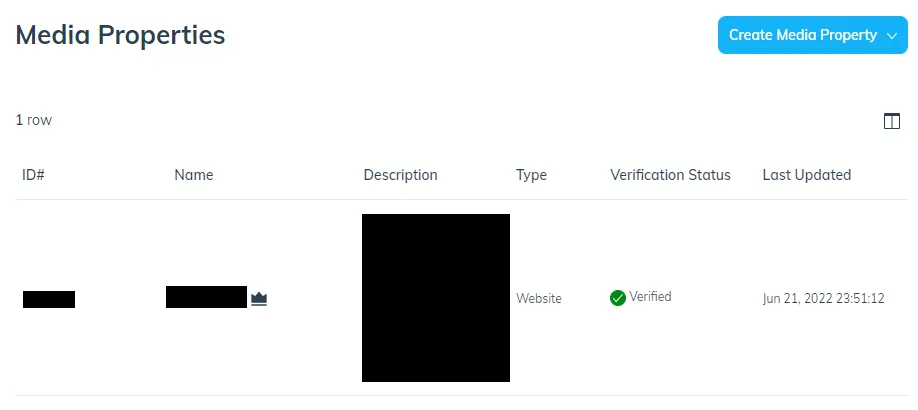
- You can see the Verification Status of website, it is Verified.
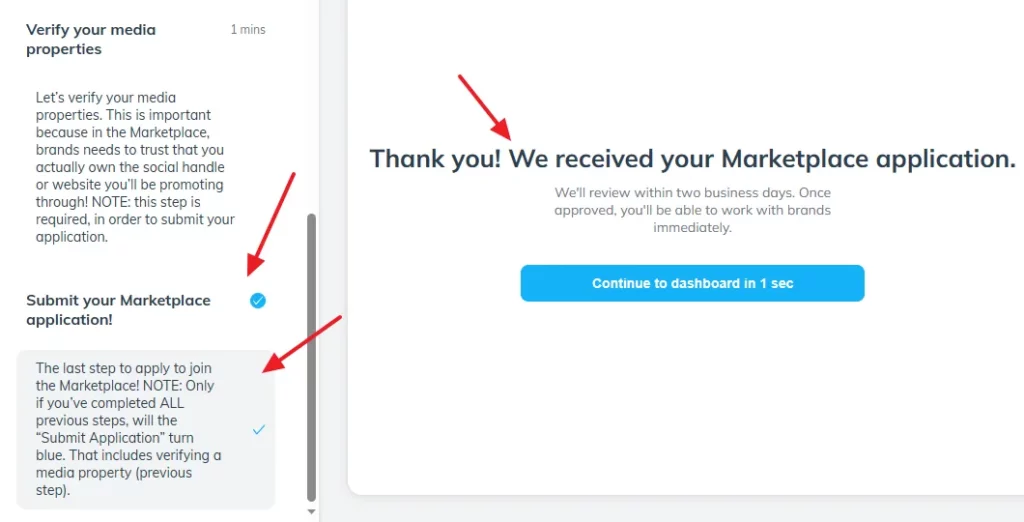
- Your Marketplace Profile is completed. Now you can submit your Marketplace application.
- Click on the Submit your Marketplace application!
- Click on the The last step to apply to join the Marketplace! NOTE: Only if……
- Your Marketplace application has been submitted. Impact Radius team will review withing two business days. Once approved, you’ll be able to work with brands (affiliate programs) immediately.
03. How To Configure Payment Methods
In this section, I will guide you on how to configure Payment methods on Impact Radius.
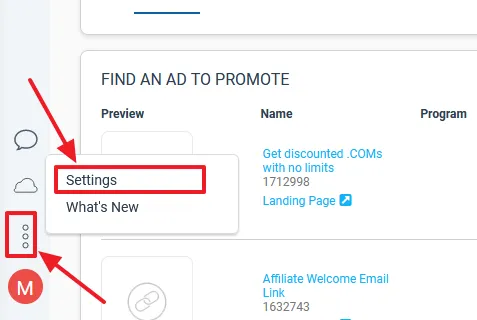
- Click on the Three Vertical Dots icon, located just above the profile icon.
- Click on the Settings.
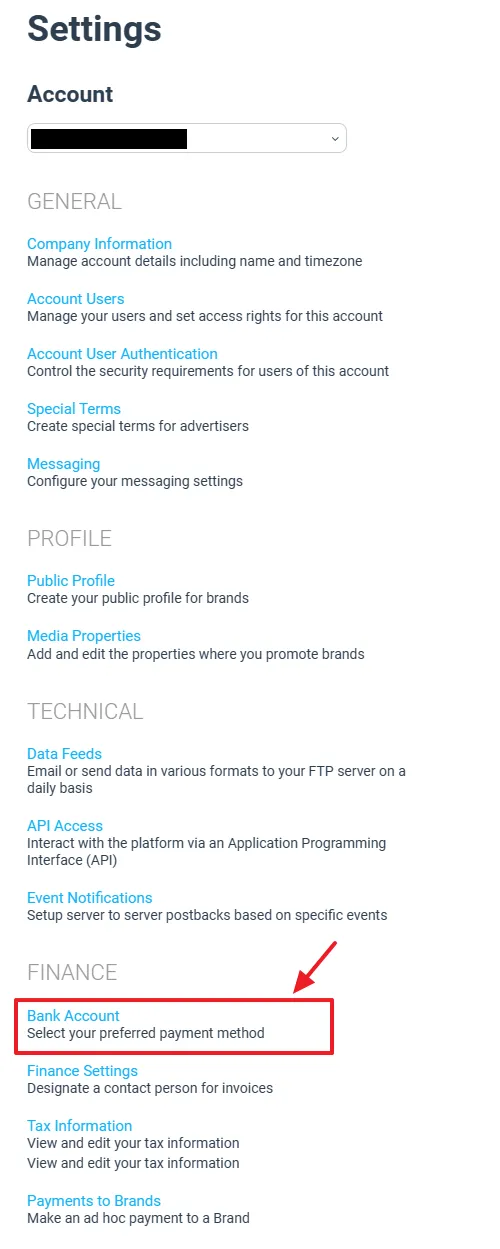
- Scroll-down to Finance section and click on the Bank Account.
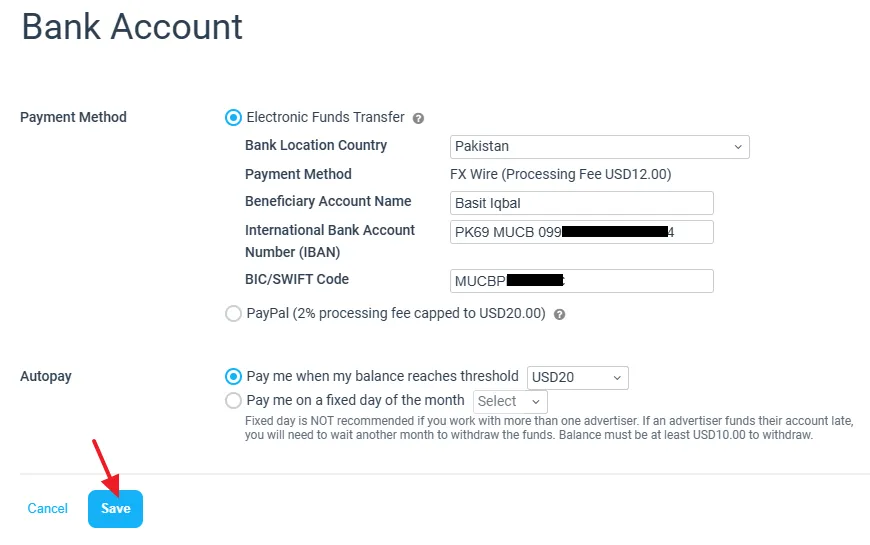
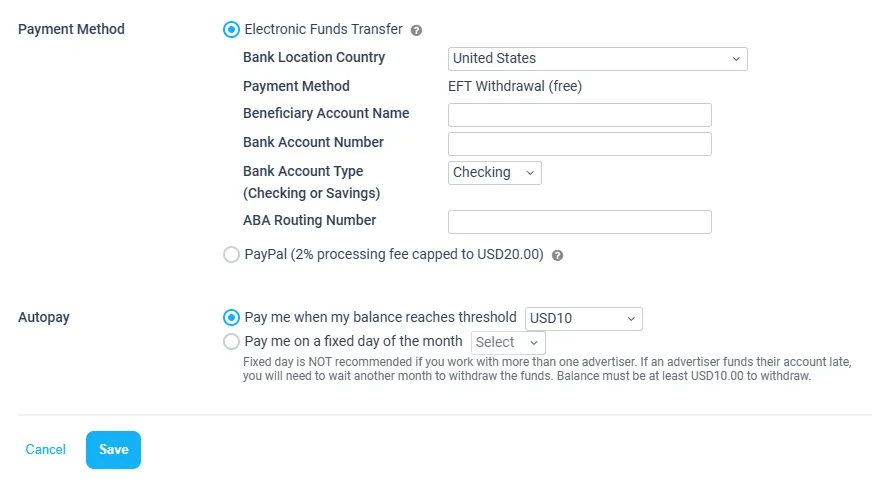
- Impact Radius offers two payment methods i.e. PayPal and Electronic Funds Transfer. If the Bank Location Country is United States there is no withdrawal or processing fee, for all other countries the processing fee is $12 USD. It means that whenever Impact Radius will send money to your bank account it will deduct $12.
- If you choose PayPal you have to provide PayPal Email ID or your PayPal ID.
Electronic Funds Transfer (For Non US):
- Choose your Bank Location Country.
- In the Beneficiary Account Name enter your bank account title, also written on top of your ATM Card.
- In the International Bank Account Number (IBAN) enter your IBAN Number. If you don’t know your IBAN Number you can ask from your bank. In IBAN some characters are added to your local bank account number to make it international. Example: PK36 SCBL 0000 0021 2545 6702.
- In the BIC/SWIFT Code enter you banks SWIFT Code. Swift Code uniquely identifies the country, bank and branch where your account is registered.
- In the Autopay choose whether you want to receive your earnings on a fixed day of the month or when it reaches threshold. Impact Radius recommends the first option. If you choose the first options select a threshold value as well.
- Click on the Save button.
Electronic Funds Transfer (For US):
- There is no EFT Withdrawal or processing fee.
- Enter Beneficiary Account Name and Bank Account Number.
- The Bank Account Type is is either Checking or Saving.
- Enter the ABA Routing Number. It contains nine numeric characters used by banks to identify specific financial institutions within the United States.
- Choose the Autopay method.
- Click on the Save button.
04. How To Submit Tax Document
In this section, I will guide you on how to submit the W8-BEN tax document on Impact Radius. The Form W8-BEN (“Certificate of Foreign Status of Beneficial Owner for United States Tax Withholding and Reporting”) is required to submit by foreign persons such as investors, freelancers, affiliate marketers, etc, who receive money from the United States.
Most of the top affiliate networks are located in the United States, Impact Radius is one of them. It is mandatory for every US citizen to submit the tax documents involving in any business in the United States.
The non-US publishers who are working from outside United States are not liable to pay taxes. When you submit the tax document, Impact Radius does not deduct or withhold money from your earnings.
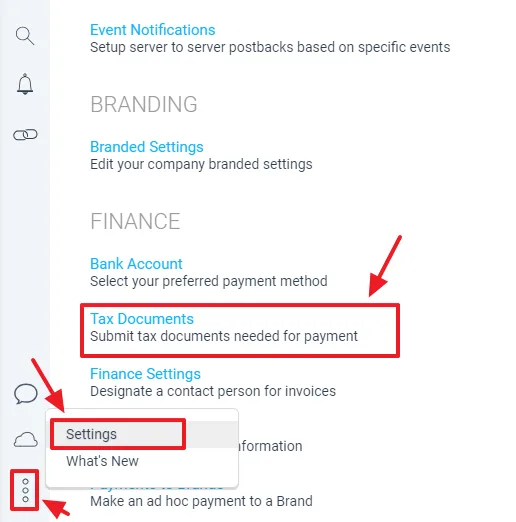
- Click on the Three Vertical Dots icon, located just above the profile icon.
- Click on the Settings.
- Scroll-down to Finance section and click on Tax Documents.
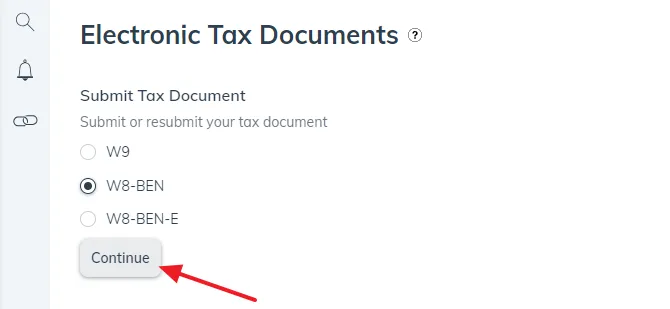
- There are three types of tax documents i.e. W9, W8-BEN, and W8-BEN-E.
- Choose the W8-BEN.
- Click on the Continue button.
- Click the CONTINUE button.
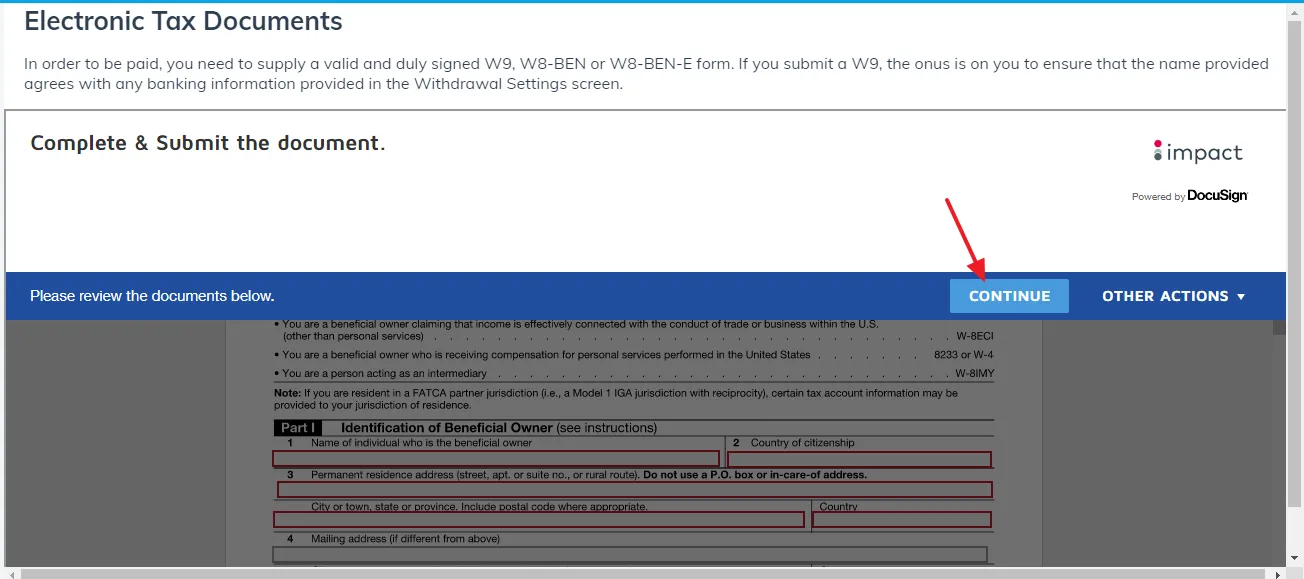
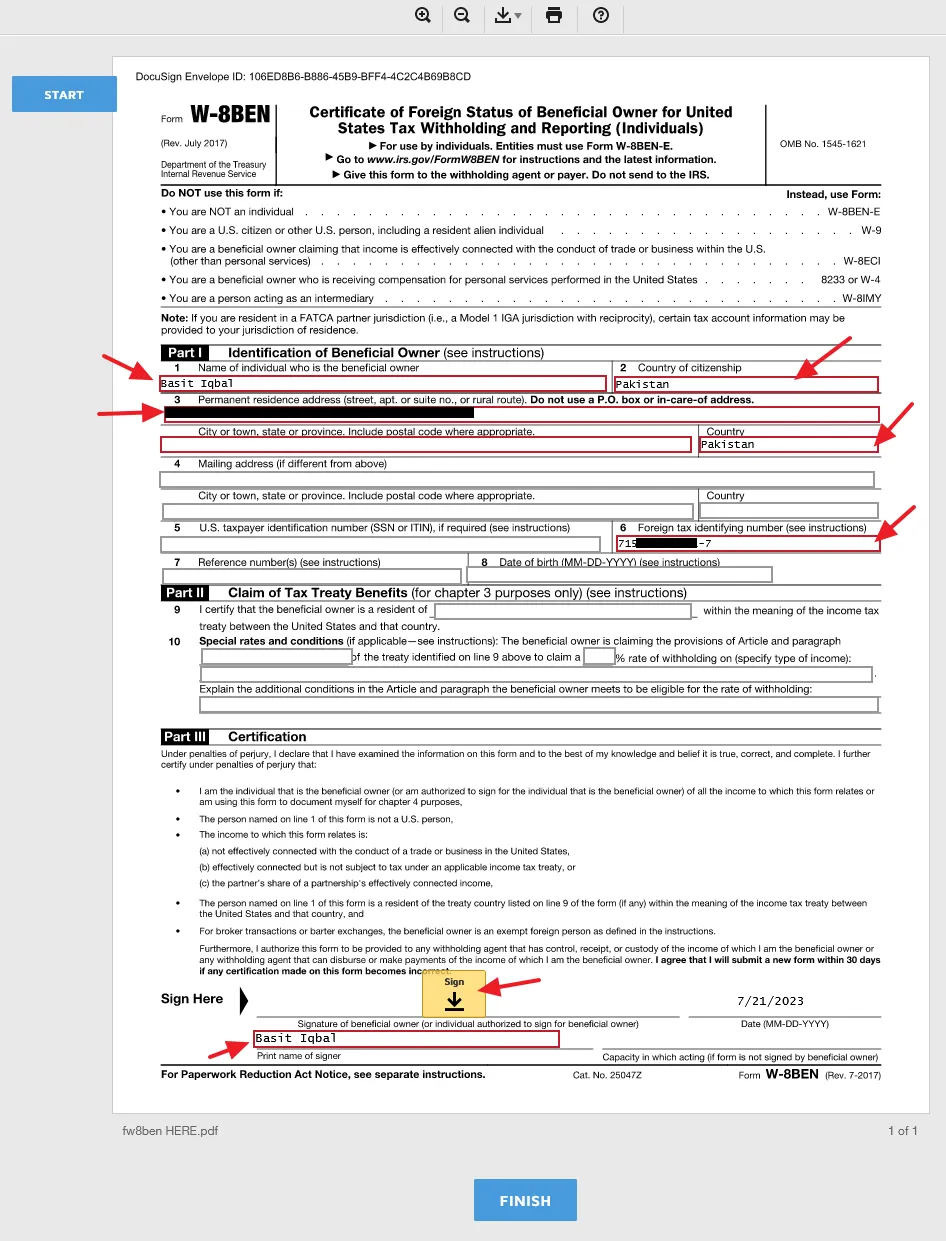
- 01. In the Name of individual who is the beneficial owner enter your Full Name.
- 02. In the Country of citizenship enter the name of the country of which you are the citizen.
- 03. In Permanent residence address enter your complete Permanent Address. In City or town, state or province enter your City or Town name, Province or State name, and Postal Code of your City. In the Country enter the name of your Country.
- 06. In the Foreign tax payer identification number enter your National Identity Card Number issued by government, which makes you the citizen of your country. For example, 71593-45345234-4. It is the alternate for TIN or SSN on the Form W8-BEN.
- Once you fill above fields scroll down to Part III Certification section and enter your full name under the Signature of beneficial owner.
- Once you enter the name, click on the Sign box. It will generate digital signature from your name, as shown in the next step.
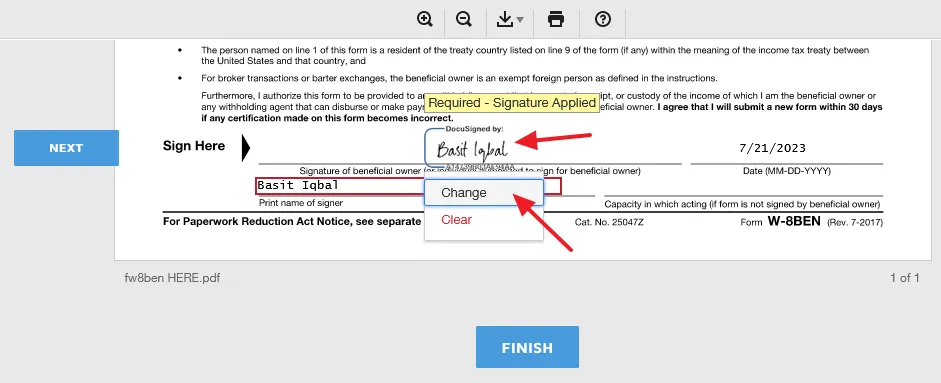
- You can see that it has created the signature from the name. If you want to change, click on the Signature and then click on the Change.
- Click on the Edit link.

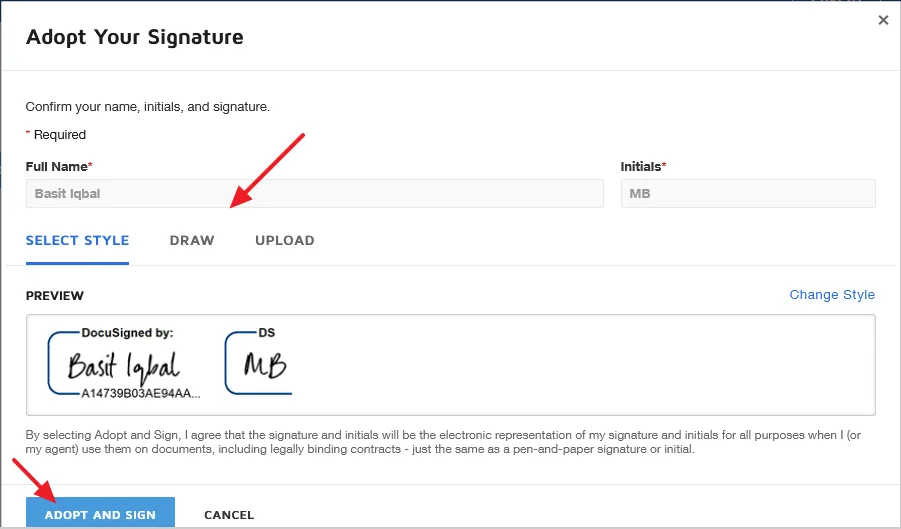
- You can change the Style of the your signature, your can Draw your signature, and you can Upload your signature.
- Click on the Adopt and Sign button.
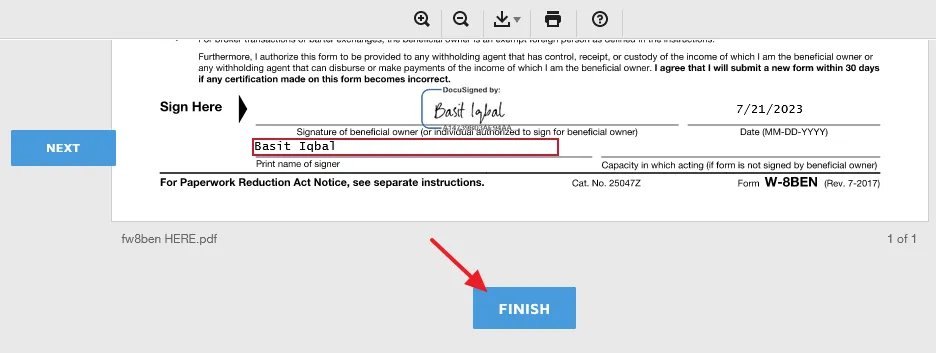
- Click on the Finish button to submit the W8-BEN form.
05. How To Use Impact Radius
There are plenty of features and options that you can explore on Impact Radius, but below are some important things that you must learn:
- How To Apply For Affiliate Programs (Brands)
- How To Create Affiliate Links
- Ads & Links
- How To Request Promo Code
- Understand Reports
01. How To Apply For Affiliate Programs
In this section, I will guide you on how to apply for affiliate program on Impact Radius. Remember that if your Impact Radius Market Profile is not approved you cannot apply directly to any brand (affiliate program). Once it is approved you can apply to any affiliate program.
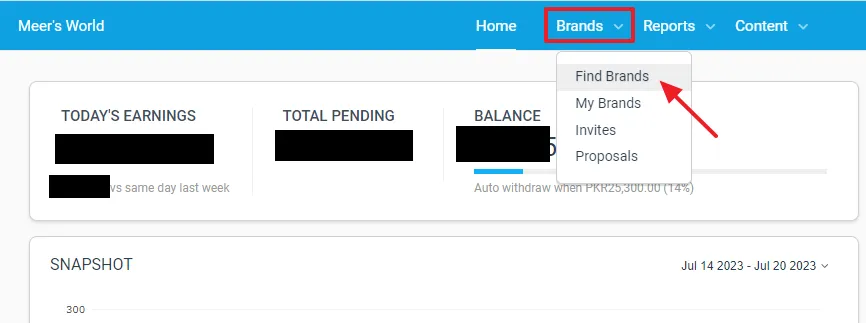
- Go to Brands from the Navigation.
- Click on the Find Brands.
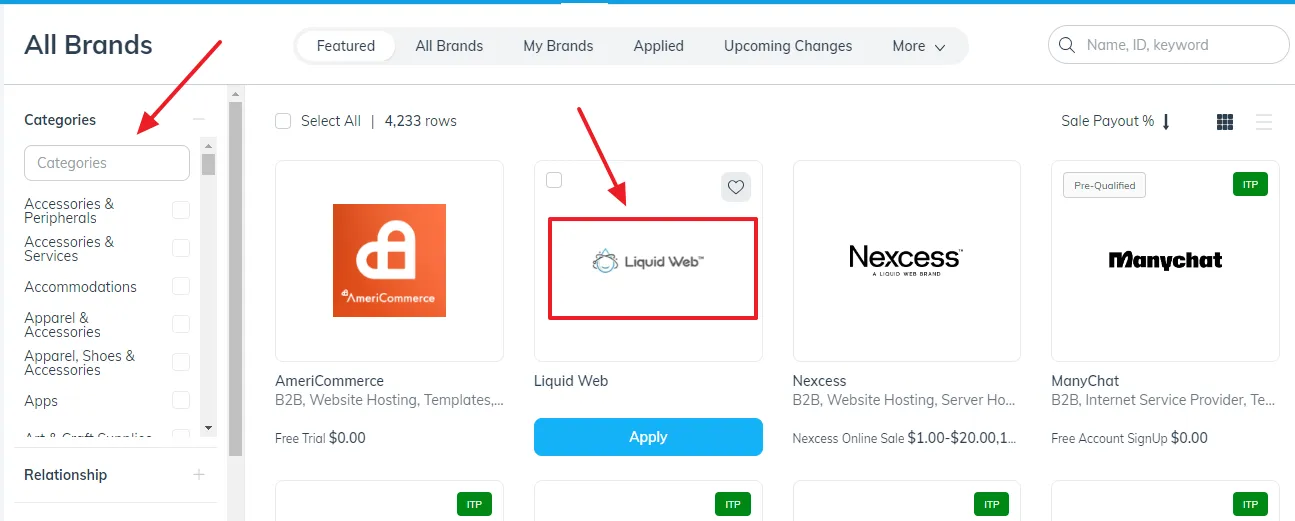
- On MY BRANDS you can see all those brands who have accepted your request.
- On APPLIED you can see all those brands for which you have applied, but haven’t got response.
- On INVITES you can see all those brands who have requested you to join their affiliate program.
- At your left side you can see the list of all the major categories such as Apparel, Apps & Download, Art & Entertainment, Computer & Electronics, etc. When you click on the Category from the list it expands the Sub-Categories. The Categories help you to filter affiliate programs. You can easily and quickly find the relevant affiliate programs.
- You can also search brands by Name, ID, and Keyword.
- Click on the Affiliate Program to open the details.
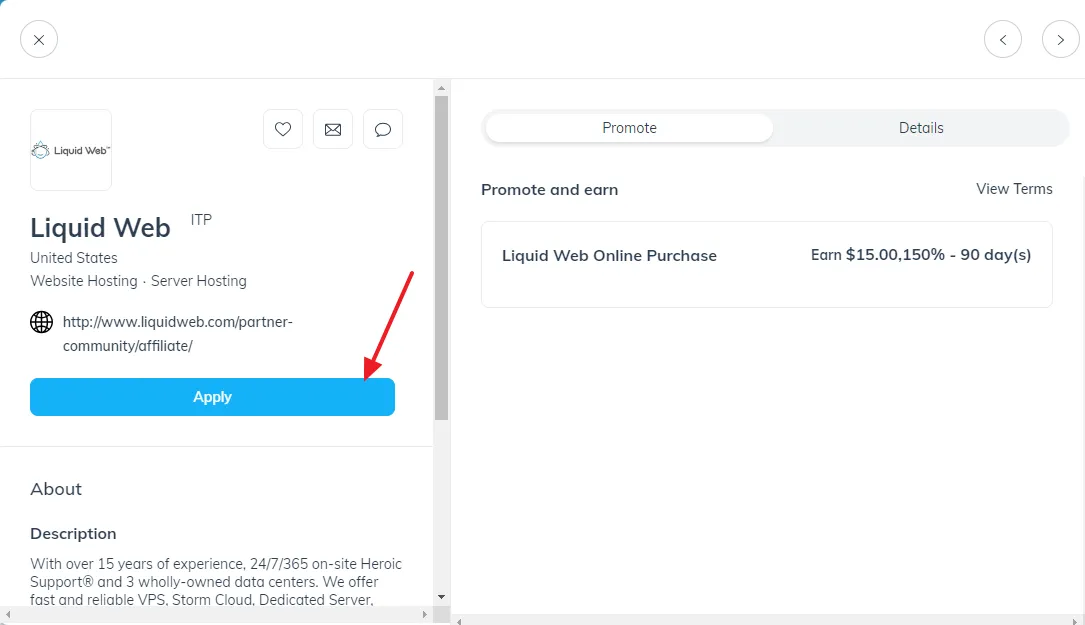
- Online Sale/Pay Per Sale/Sale/Online Purchase/Commission/Earn, etc, tell you the commission percentage or fixed amount that you will earn for producing a single sale.
- 15 days, 30 days, 60 days, 1 month, 90 days, etc, are Cookie Period or Referral Period.
- Acceptance means the percentage of requests that a brand accepts, send by affiliates registered on Impact Radius.
- Serviceable areas are those countries whose customers can buy the product or services of the brand.
- Click on the Apply button to apply for the affiliate program of the brand. Some brands accept without review your application whereas some brands accept/reject your application after reviewing. Impact Radius notifies you via email whether your request to join the affiliate program is accepted or not.
02. How To Create Affiliate Links on Impact Radius
Once a brand approves your request to join its affiliate program on Impact Radius you can create the affiliate links of its homepage and individual product pages. When people visit advertiser’s website via your affiliate links and purchase something you get certain amount of commission.
You can create two types of affiliate links for an advertiser (1) Default affiliate link, which redirects visitors to default or home page (2) Affiliate links for individual product pages or services.
First of all I will guide you on how to create a default link for a brand.
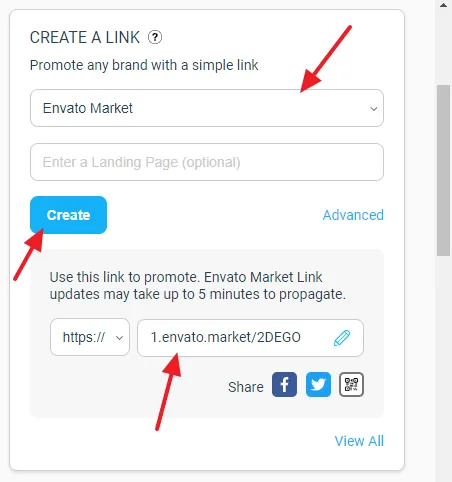
- On your Impact Radius Dashboard go to CREATE A LINK section.
- Choose the advertiser (brand) from the dropdown list for which you want to create your default affiliate link.
- Click on the Create button.
- The default affiliate link will be generated below. You can copy this link.
Now I will guide you on how to create an affiliate link for a specific page of a brand’s website.
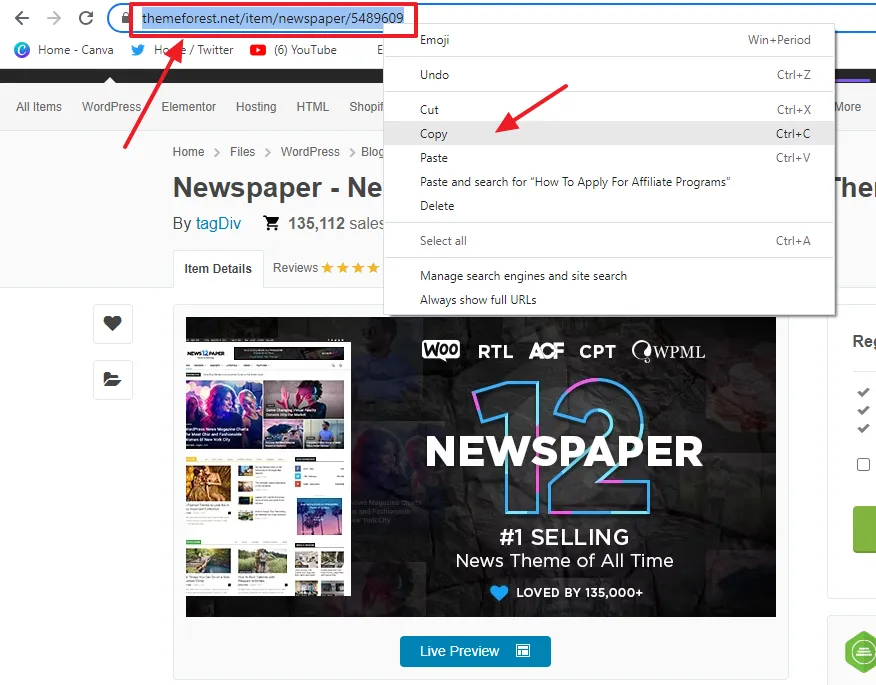
- Go to website of the brand and open the page for which you want to create affiliate link.
- Copy the URL of the page.
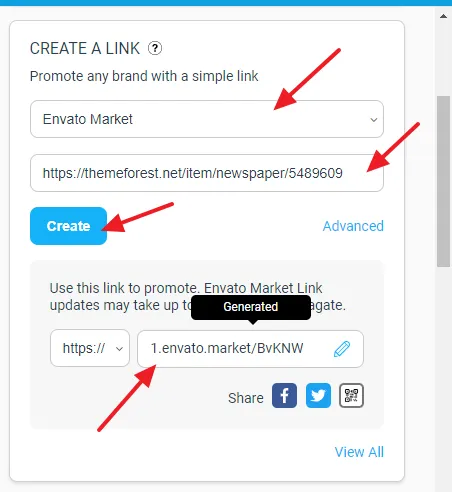
- Go to CREATE A LINK section.
- Choose the advertiser (brand) from the dropdown list.
- Paste the Copied URL into the Enter a Landing Page (optional) text field.
- Click on the Create button.
- The affiliate link will be generated below. Click on the link to copy. Similarly you can create affiliate links for other pages.
03. Banners & Links
In this section, I will guide you on how to get the code of banners, text links, etc, to display on your website. If you don’t find suitable ads or want a custom ad, you can request your advertiser to provide the ad for you, as I have shown here.
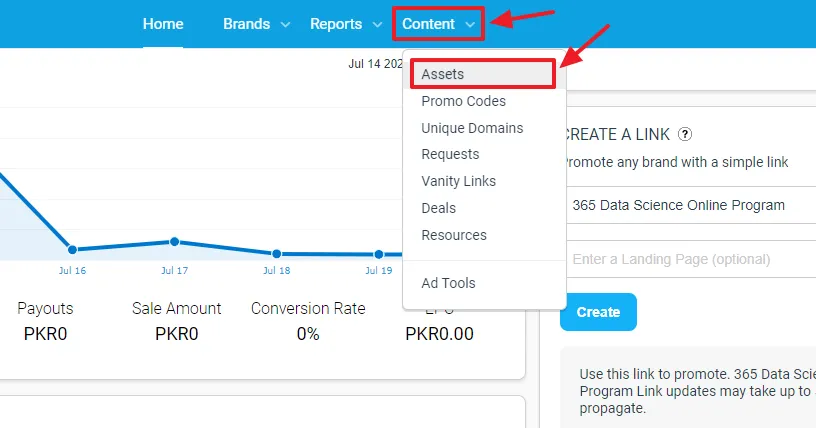
- On your Impact Radius account’s Dashboard go to Content.
- Click on the Assets.
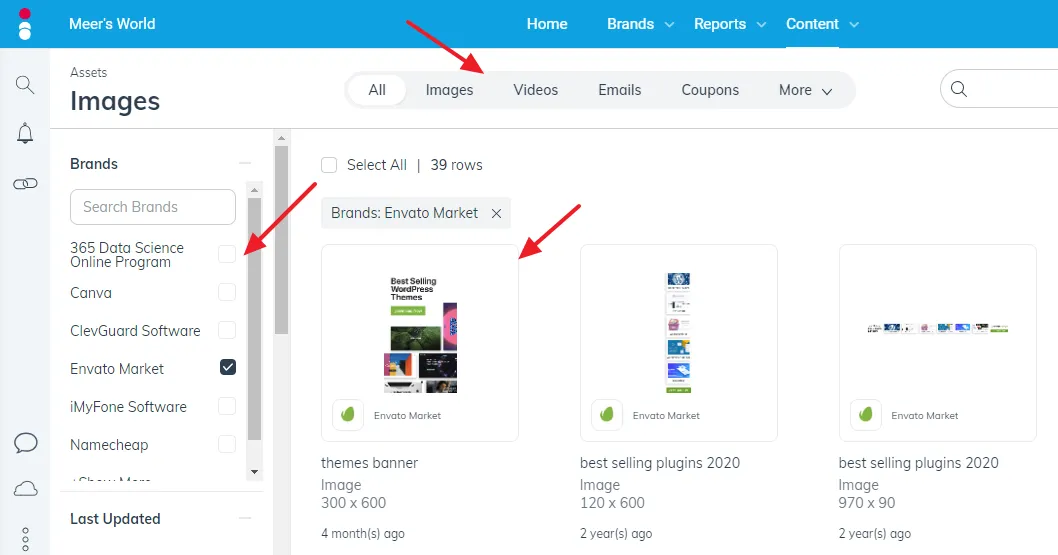
- Impact Radius displays the ads of all of your advertisers (brands). In order to filter the ads choose your desired advertiser from the Brand, located at your left sidebar.
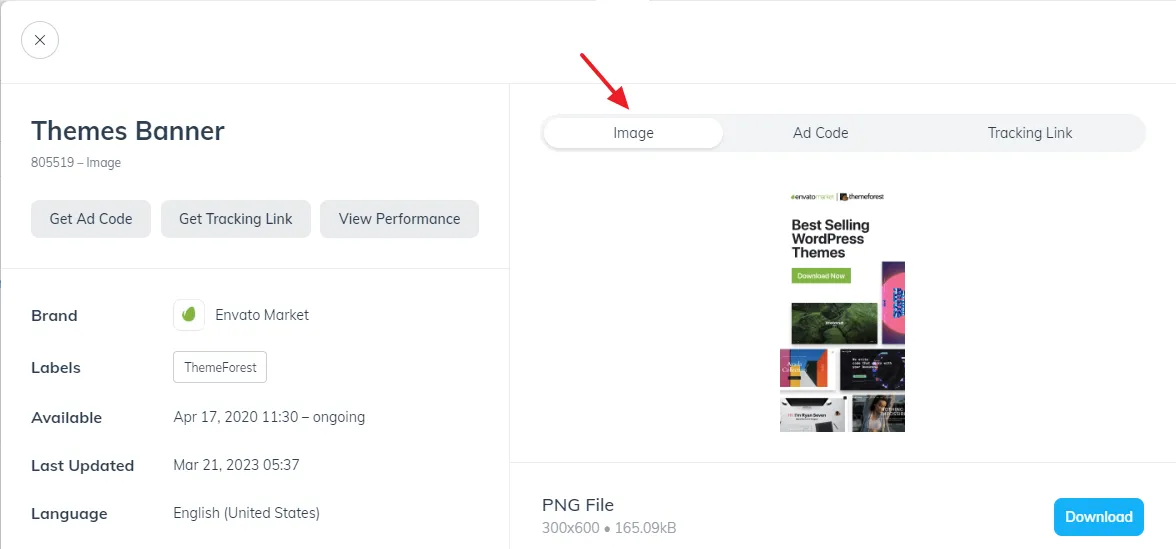
- Click on the banner that you want to download or get the code and link.
- Go to Image tab if you want to download only banner of the image. Click on the Download button. You can create your affiliate link and link this image to it on your website.
- Go to Ad Code if you want to copy the code of the banner and paste on your website. The code contains the Banner Code and Tracking Link.
- Click on the Tracking Link tab to open your affiliate link of the landing page.
If you don’t find an appropriate asset you can request the brand to provide you a new one.
- Go to Content.
- Click on the Requests.
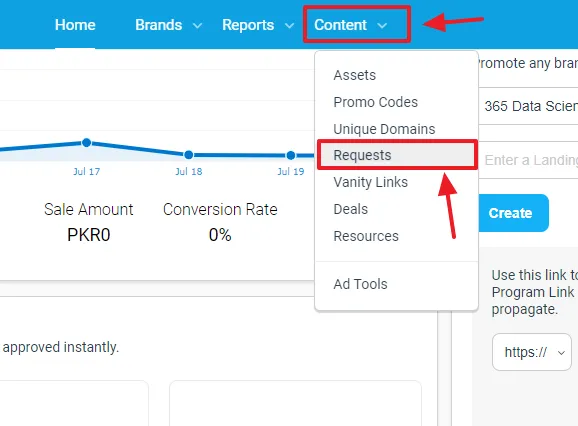
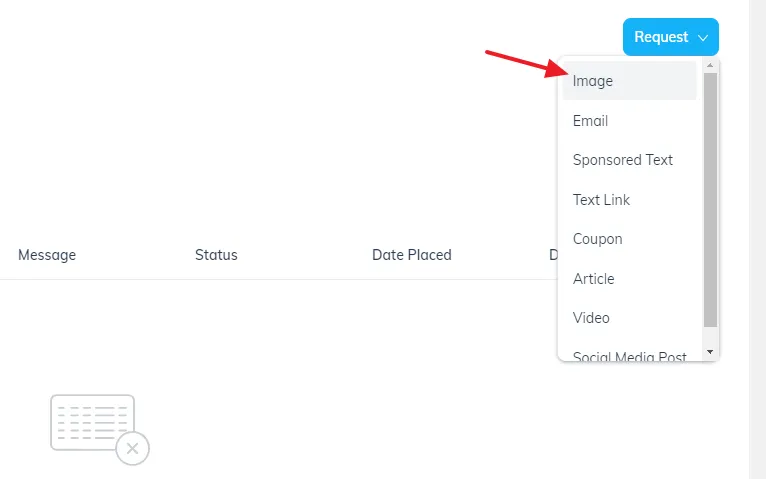
- There are different types of assets such as Image, Email, Sponsored Text, Text Link, etc, that you can request
- Select an Asset.
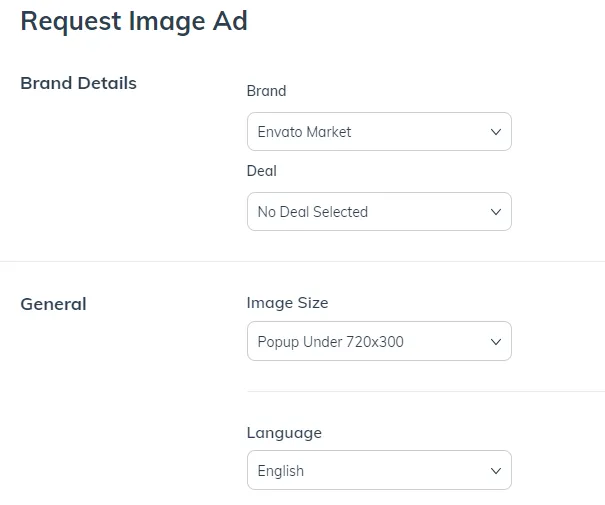
- Select the Brand to which you want to send the request.
- Select the Deal. Not all brands offer Deal.
- Select the Image Size and Language.
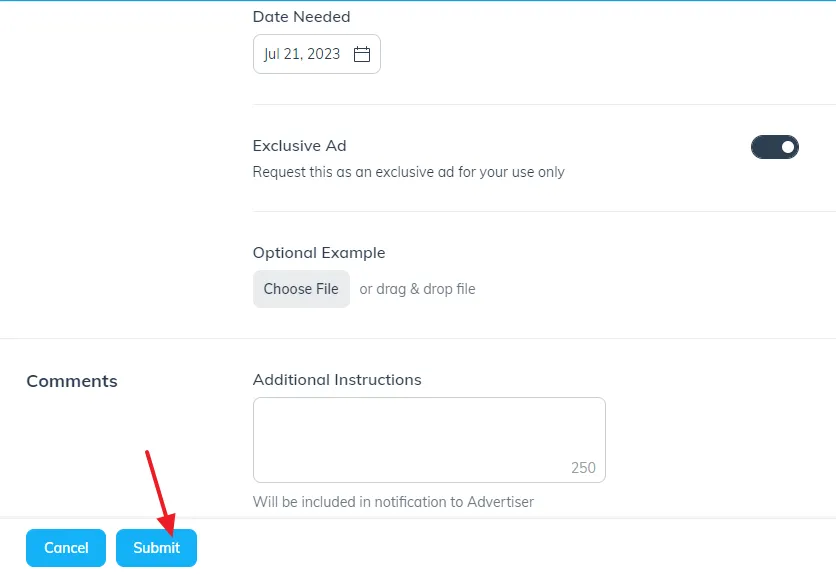
- Select the Date Needed.
- If you want to request this as an exclusive ad for your use only, turn-on the slider.
- On Optional Example you can upload a sample of your ad to guide your advertiser that you want similar type of ad.
- In the Addition Instructions you can elaborate the ad design, what do you want, etc.
- Click on the Submit button.
04. How To Request Promo Code on Impact Radius
The promo codes are discount coupons which are integrated with your affiliate links. When a visitor opens your affiliate link and uses the promo code he gets discount.
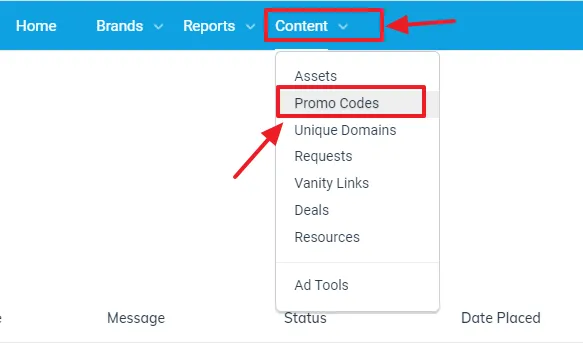
- Go to Content.
- Click on the Promo Codes.
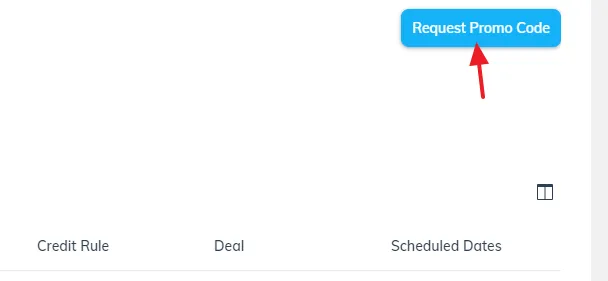
- Click on the Request Promo Code button.
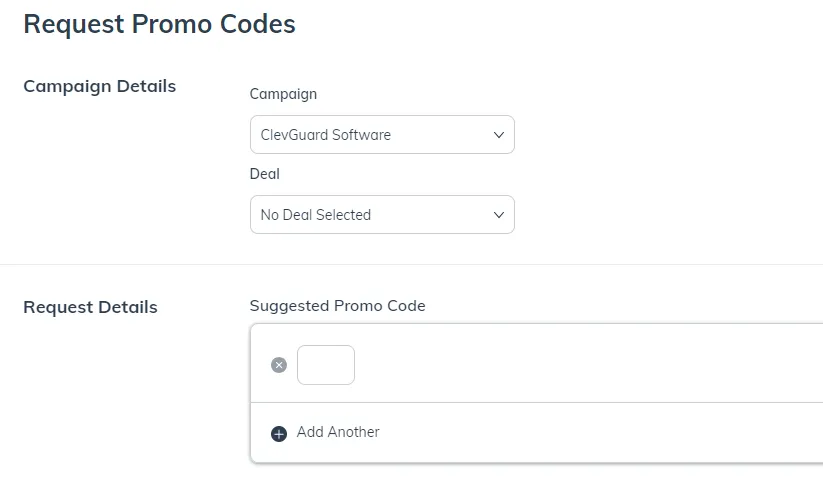
- Choose a Campaign, means advertiser/brand. Remember that not every advertiser offers promo code. The advertisers who offer will be listed in the dropdown list.
- Choose the Deal for which you want to offer promo code. Some advertisers offer deal whereas some advertisers don’t offer deal.
- Enter a Promo Code of your choice. You can use this format: BRANDFEB21.
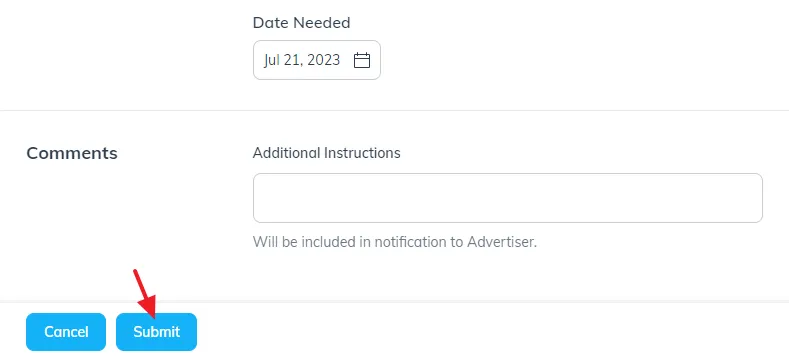
- Select the Date Needed.
- Add Additional Instructions if needed.
- Click on the Submit button.
05. Understand Reports
Impact Radius offers different types of reports to evaluate the performance of your brands and earnings like Overview Report, Performance By Brand Report, Performance By Day Report, Action Listing Report, etc.
Here I am showing you the purpose of Action Listing report, you can explore other report types by yourself.
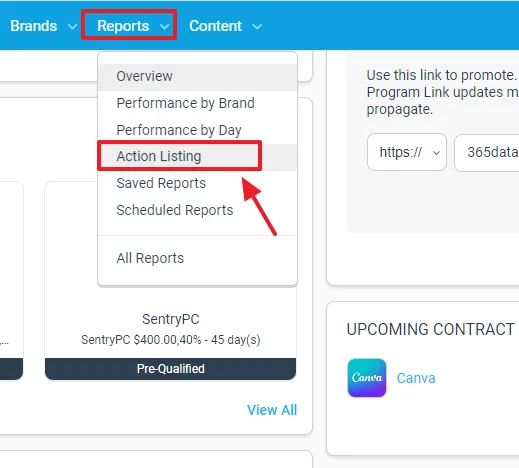
- Go to Reports tab.
- Click on the Action Listing.
- The ACTION ID is the IP Address of the person who did action like Signed Up, Purchased, via your affiliate link.
- The Brand is your advertiser for whose product/service conversion is made.
- The EVENT TYPE tells you whether visitor has purchased the item or just signed up.
- The STATUS tells you whether the payment is approved or not.
- The SALE AMOUNT is the original cost of the product/service.
- The Action Earnings is your commission which is also called Payout.
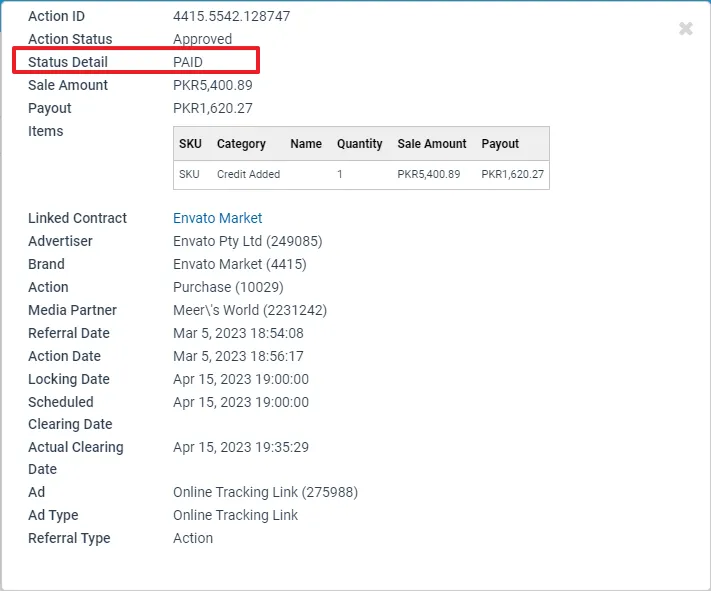
- In order to check the details about an action click on the Action ID (IP Address).

- You can see plenty of information like Status Detail, Payout, Action Date, Referral Date, etc.
- Sometimes it shows the Referring URL and the Item Name as well. Referral URL means the URL of the page on which visitor clicked the affiliate link and purchased the item. Here it is not showing the Referral URL and Purchased Items, but normally it shows.
If you like this post then don’t forget to share with other people. Share your feedback in the comments section below.
Read all our Affiliate Programs.

Also Read
- How To Start A WordPress Blog & Make Passive Income Online
- How To Earn Money From Refer A Friend Payoneer Affiliate Program
- Fiverr: Best Affiliate Program | Complete Introduction To Fiverr Affiliate Program
- How To SignUp For Rakuten LinkShare | Configure Payments…
- How To Join Amazon Affiliate Program From Pakistan Or Anywhere


Leave a Reply