Do you want to buy a domain & web hosting to set up a professional website? You’re in the right place. In this tutorial, I will guide you step-by-step on How to buy a domain and web hosting on Namecheap.
Namecheap, an ICANN accredited registrar, is one of the best, secure, reliable, and most affordable web hosting providers in the world, offering services since 2000. It is managing over 13 million+ domains worldwide.
Following topics will be covered in this post:
- What is Domain?
- What is Web Hosting?
- How To Buy Domain & Web Hosting on Namecheap
01. What is Domain?
A domain is the URL of your website like “meersworld.net”. Every domain ends with an extension such as “.com”, “.net”, “.com.uk”, “.org”, “.com.au”, etc.
The country codes such as “.au”,”.pk”, “.us”, etc, is added in the domain to target the audience of a specific country. It is also called ccTLDs (Country Code Top-Level Domains). Namecheap is one of those hosting providers that offer ccTLDs. Do remember that not every hosting service provides ccTLDs!
Here are some tips to choose a right domain name:
- Your domain should be easy to pronounce & remember
- Your domain should be easy to type and shouldn’t be too long
- Your domain should be brandable, which may be marketed under another brand
- Avoid hyphens and numbers in your domain
- Consider using a keyword that reflects your website. Let’s say, you want to create website for a product called garlic press. Your domain could be “garlickpress.com”.
- If you want to create a personal blog/website you can use your own name as well.
02. What is Web Hosting?
Web Hosting is the home of your website where it lives. It is a powerful computer server, a network infrastructure that keeps your website available across the internet. You can upload/download/edit/delete/install/uninstall/create files and folders of your website. All the activites and tasks related to a website are manged from your web hosting account.
Namecheap offers different types of web hostings such as Shared Hosting, VPS Hosting, & Dedicating Server Hosting.
Shared Hosting is the most affordable and cheapest web hosting among all other hosting types. In Shared Hosting, the web server’s resources such as bandwidth, storage, RAM, CPU, etc, are shared among websites.
The VPS Hosting and Dedicated Server Hosting provide a standalone dedicated server where all resources such as bandwidth, CPU, RAM, storage, etc, are dedicated to a one website. They are recommended for high-traffic websites such as corporate websites, large businesses, eCommerce websites, business applications, podcasting, storage, game servers, content streaming, etc.
Dedicated Server Hosting is more expensive as compared to other hosting types. The VPS Hosting is an alternate hosting for those who can’t afford expensive Dedicated Server Hosting.
03. How To Buy Domain & Web Hosting on Namecheap
In this section, I will guide you step-by-step on how to purchase a domain and web hosting on Namecheap.
- Go to Namecheap Shared Hosting page. If you’re planning to buy hosting on VPS Hosting or Dedicated Server Hosting, links are available in the above section. Buying procedure is same for all.
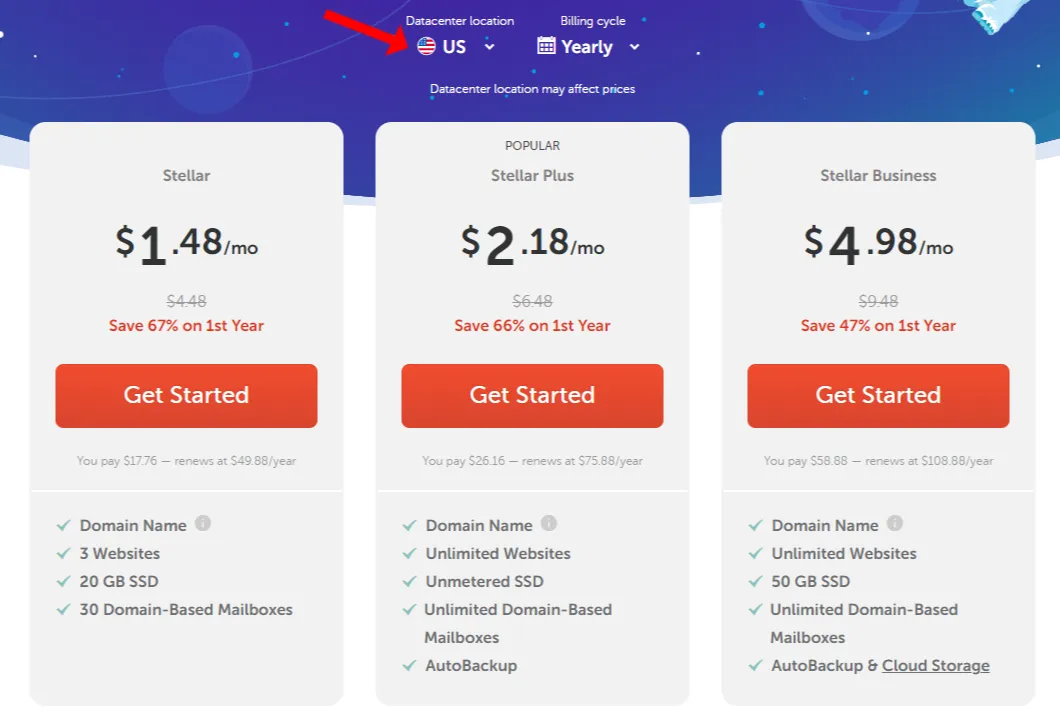
- First of all choose a Datacenter location and Billing Cycle (Yearly is preferred). Namecheap offers 3 Datacenter locations i.e. US, UK, and EU (European Union).
- The Namecheap Shared Hosting offers 3 Plans i.e. Stellar, Stellar Plus, and Stellar Business. Select a plan according to your website requirements. After deciding the Plan click its Get Started button.
A Datacenter is a location where your website host’s servers are physically located. Choose a datacenter location nearest to your main audience’s location. For example, your country is India, Pakistan, Bangladesh, or Indonesia, but your main traffic comes from America, the ideal datacenter location for your website would be US.
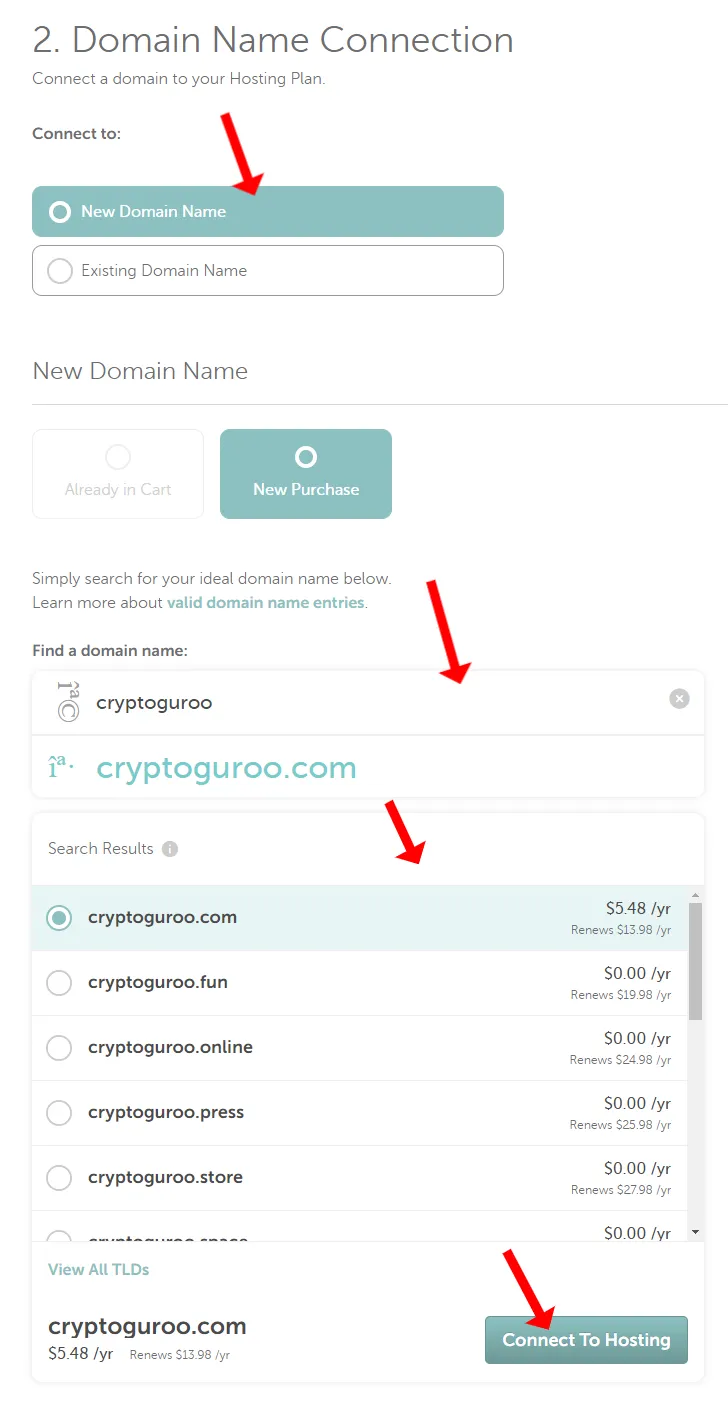
- Select New Domain Name option. The New Purchase option will already be selected.
- In Find a domain name textbox enter the name of your desired domain. It will show domain name with different extensions (“.com”, “.net”, “.online”, “.site”, “.store”, etc) and their corresponding prices. Every extension owns a different price, some extension worth less whereas some extensions worth high.
- If your entered domain is already taken by someone else it will suggest you relevant domains with different extensions.
- Once you’re done, click Connect to Hosting button.
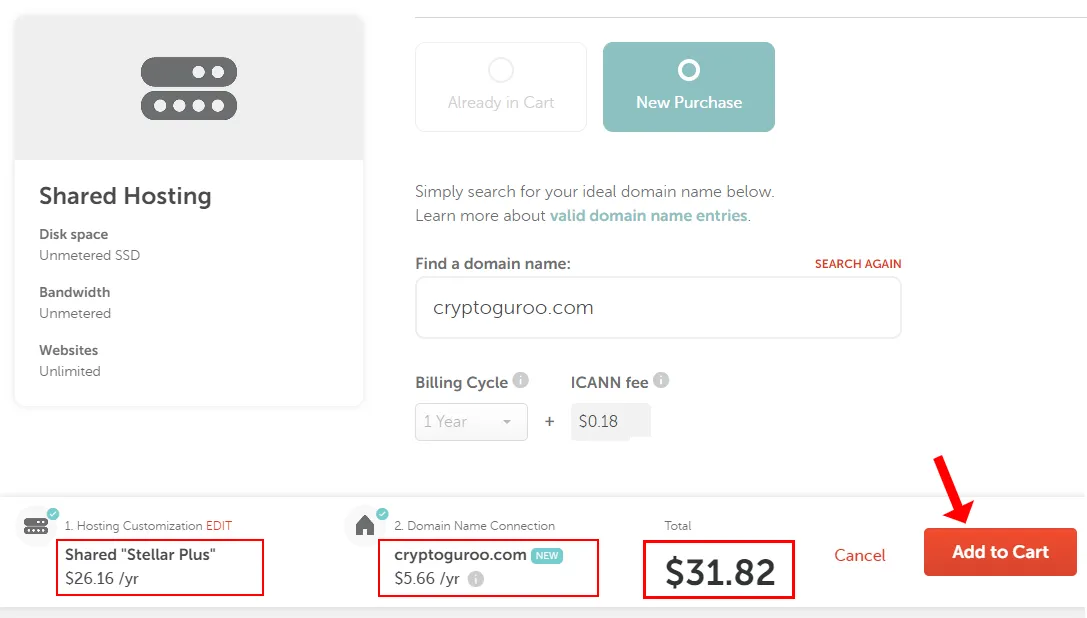
- Here you can see the combine cost of your domain and shared hosting plan.
- Click the Add to Cart button.
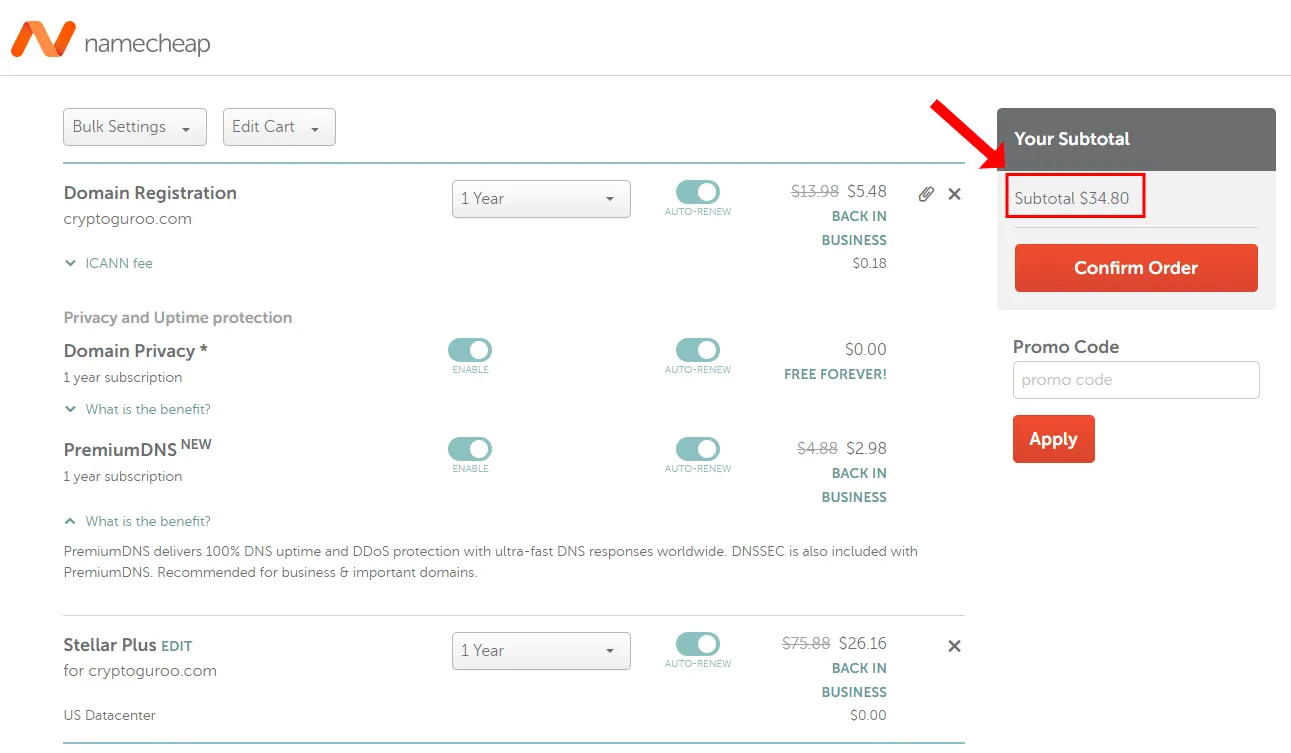
- Enable AUTO-RENEW for Domain Registration.
- Enable Domain Privacy* and also enable AUTO-RENEW. Namecheap offers Domain Privacy free for lifetime. The Domain Privacy protects your information such as Phone Number, Email ID, Address, etc, from unauthorized people in the WHOIS records (database).
- If you wish enable PremiumDNS. It is an advanced feature that delivers 100% DNS uptime and DDoS protection with ultra-fast DNS responses worldwide.
- Find the latest Namecheap Promo Codes and Deals. After adding the Promo Code click the Apply.
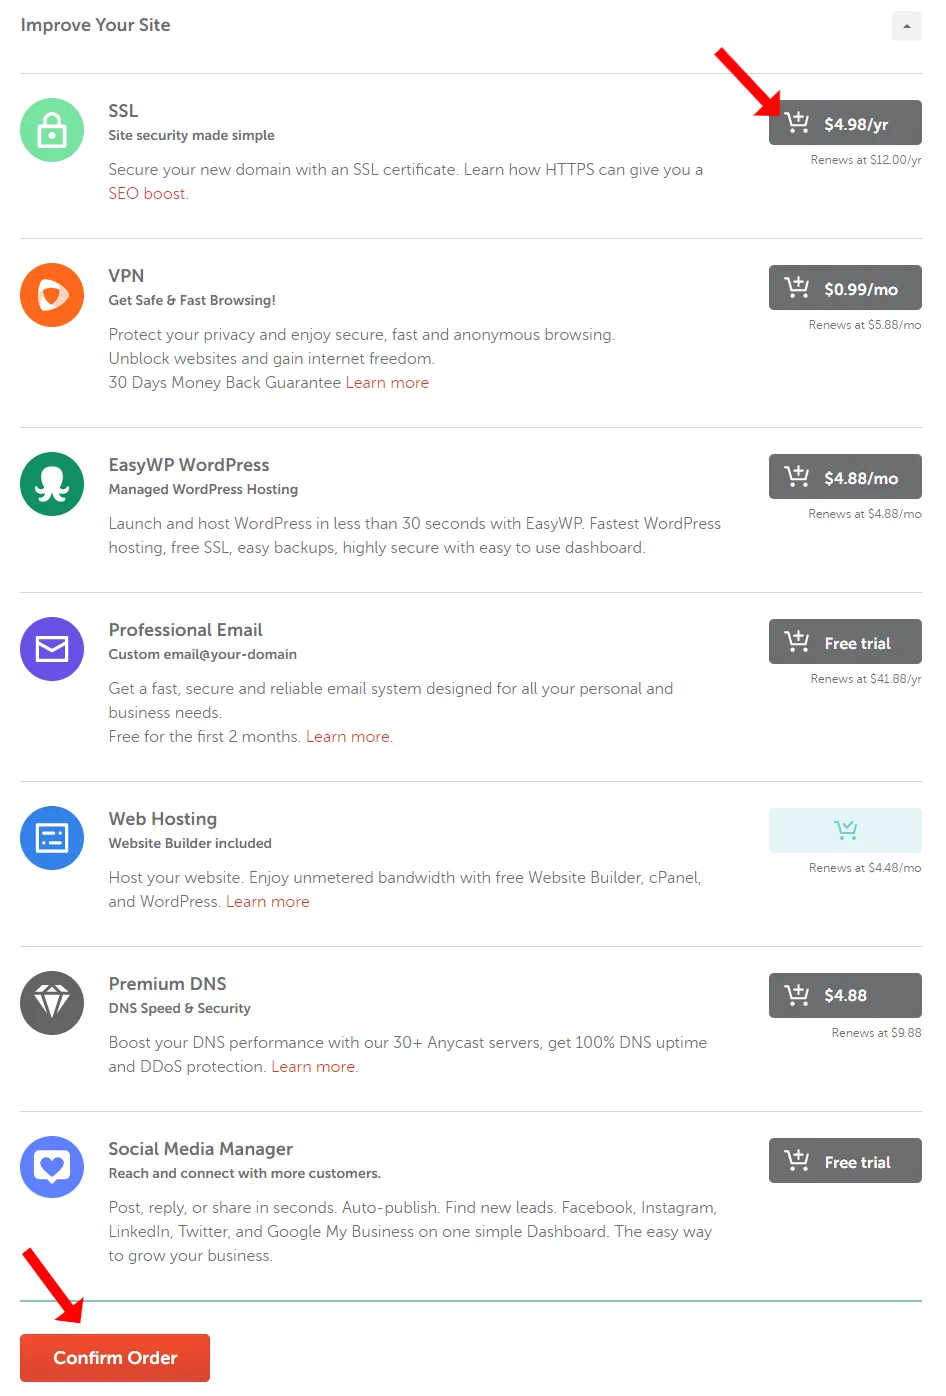
Scroll-down to add SSL add-on to your domain, which is mandatory for any website, as shown in the next step.
- Click the SSL Cart button to add the SSL certificate to your domain. SSL stands for Secure Socket Layer. It keeps internet connection secure and prevents your sensitive informations such as credit card details, passwords, etc, from theft when they are transferred over the network. Once SSL is active, you can see “s” at the end of “http” protocol like “https://www.example.com”.
- Click the Confirm Order at bottom.
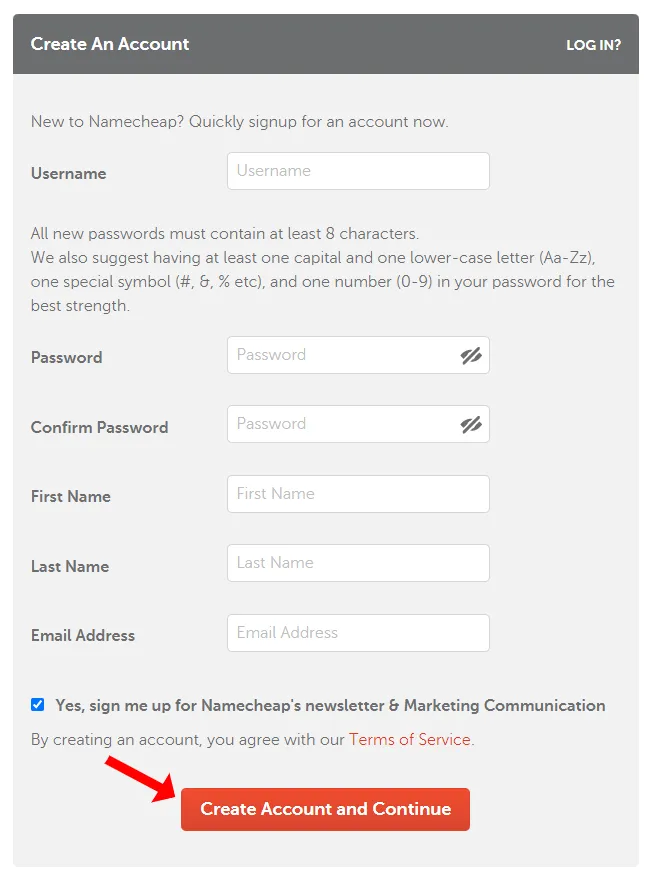
- Now create an account on Namecheap to complete the process of buying domain and web hosting. It requires Username, Password, First Name, Last Name, and Email Address.
- Once you fill the information, click Create Account and Continue button.
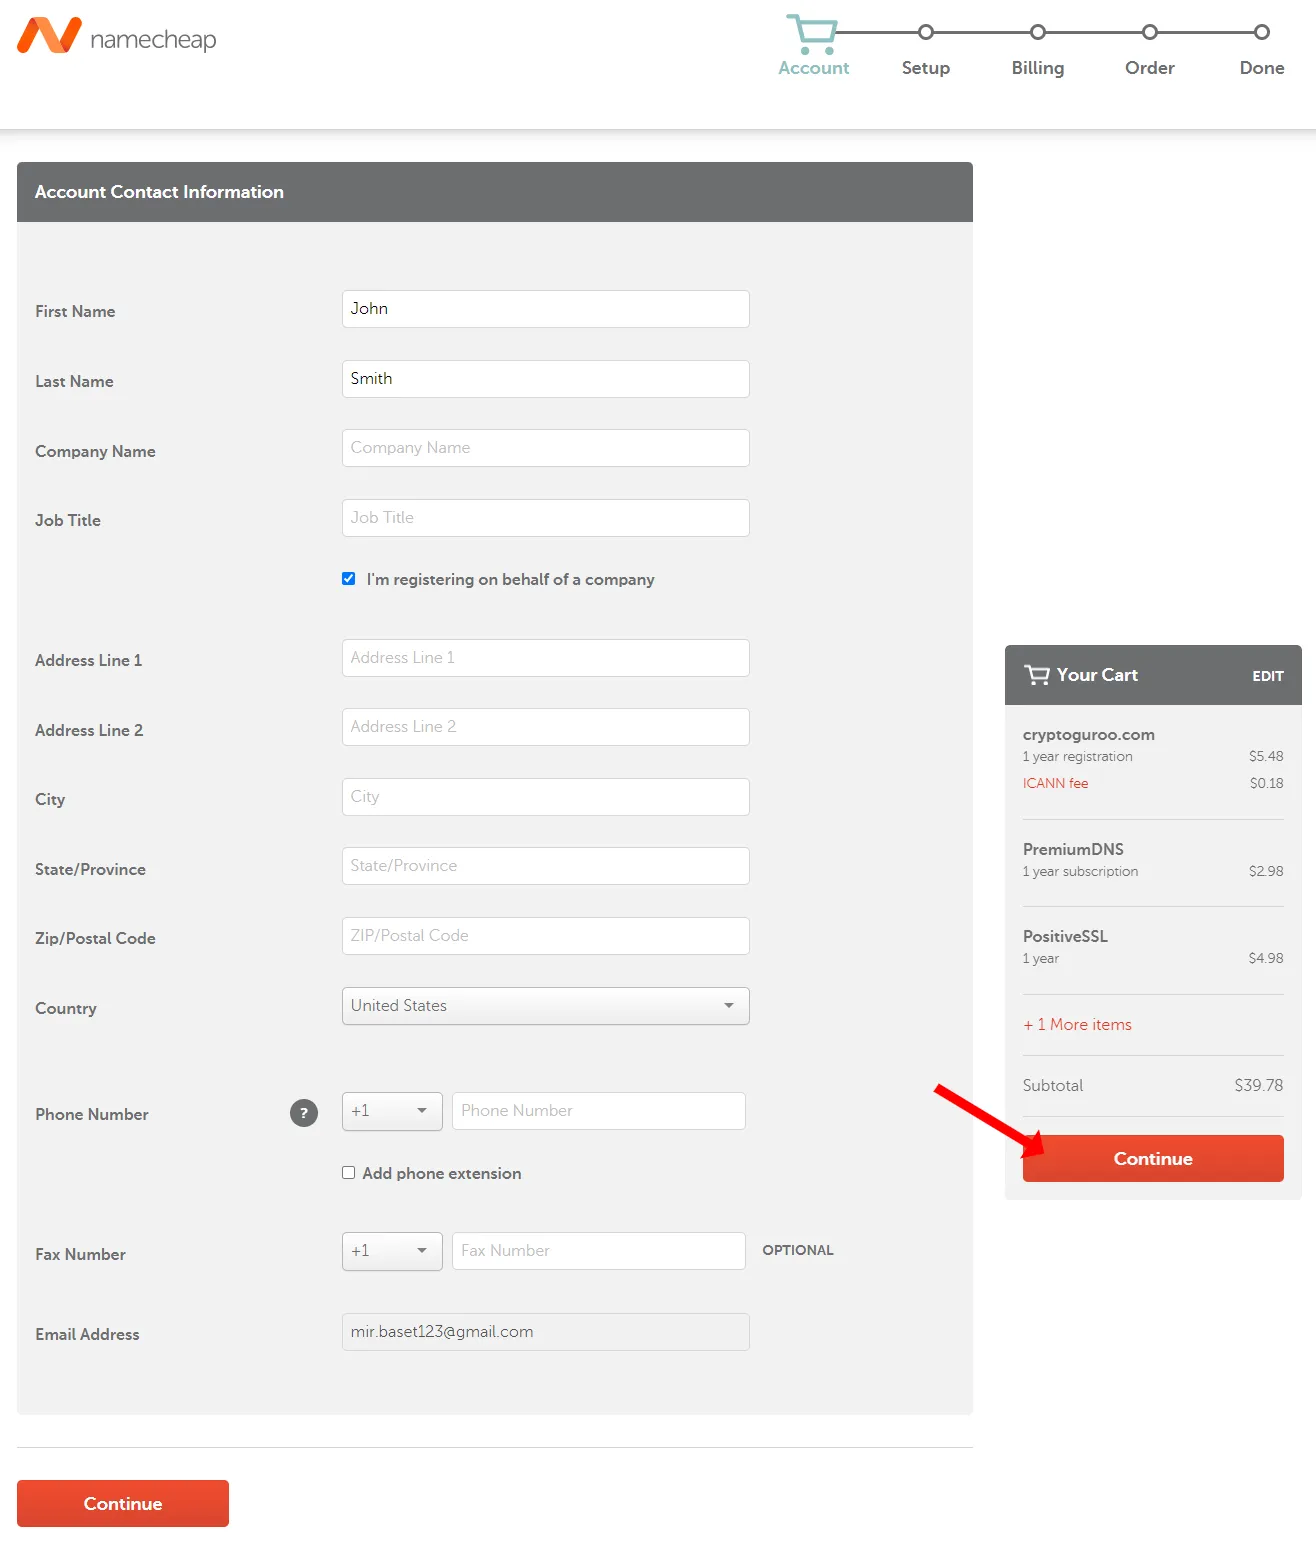
- Fill the Account Contact Information. The information should be original and correct. If you’re an individual not a company then uncheck the “I’m registering on behalf of a company“.
- After filling the form click the Continue button.
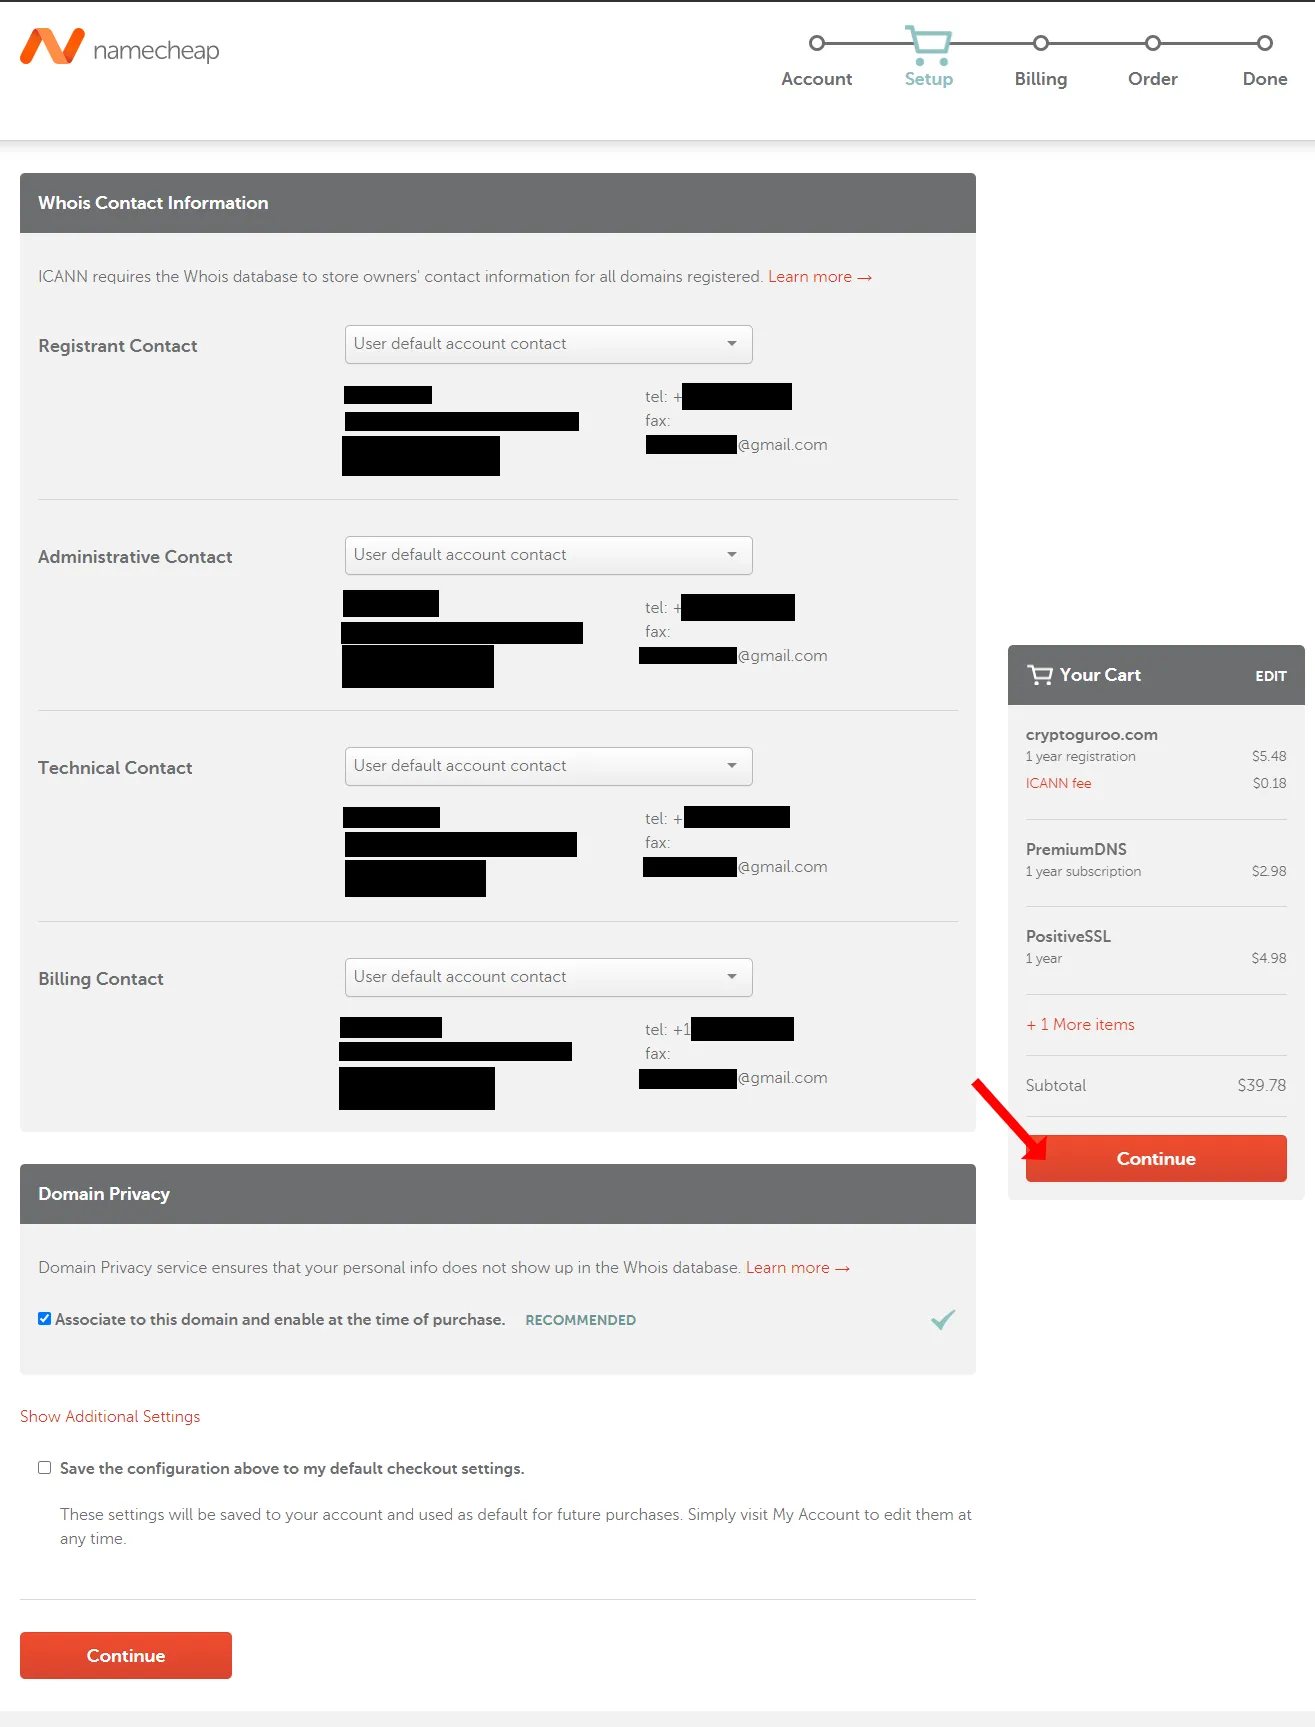
- It will show you the preview of your Account Contact Information. Have a look again. It will also be used as your Whois Contact Information.
- Click the Continue button.
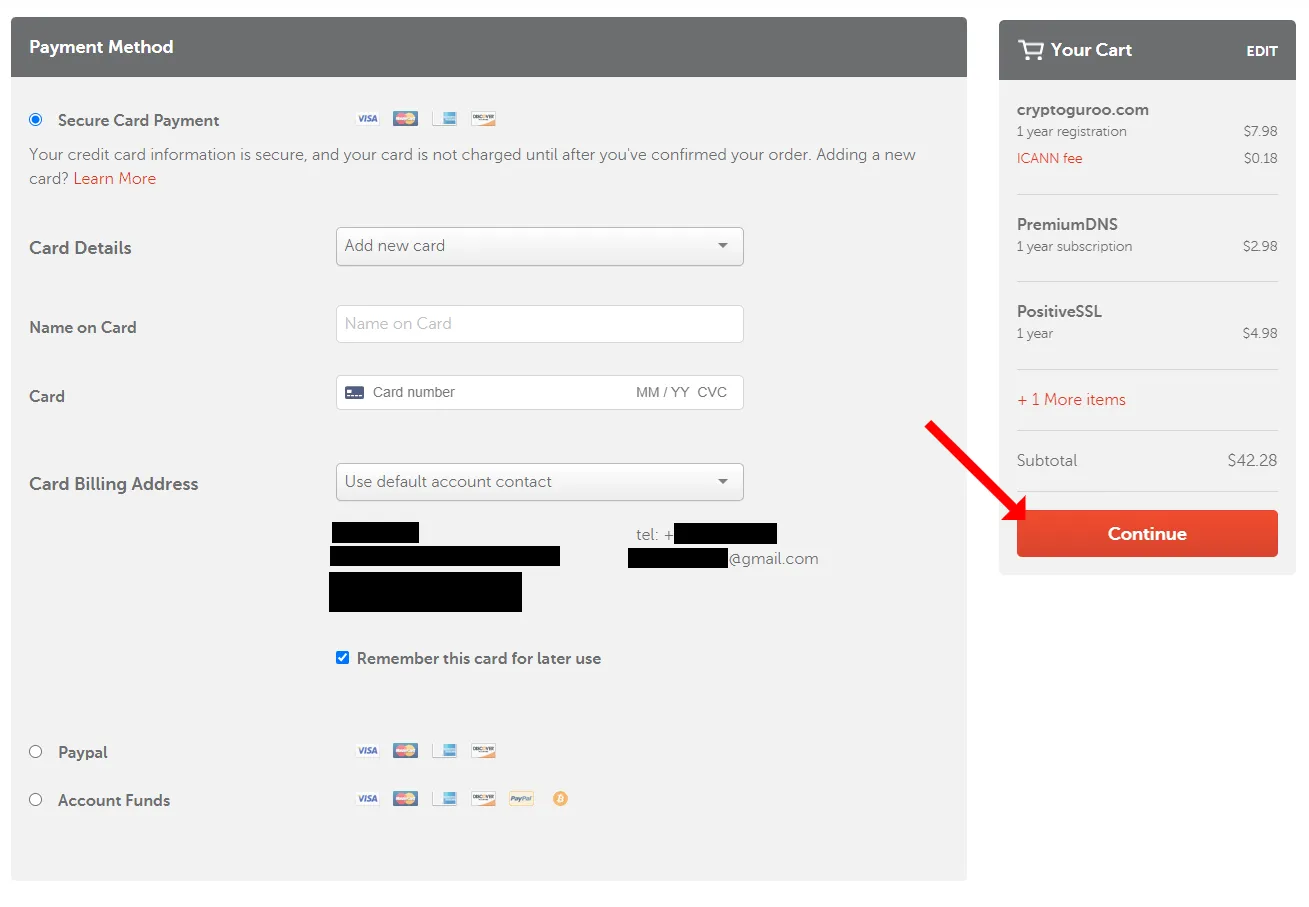
- Choose a Payment Method to purchase your domain and web hosting. Namecheap provides you three payment options (1) Secure Card Payment (2) PayPal (3) Account Funds.
- Once you fill the payment details, click the Continue button.
- Tick “I have read and agreed to all Namecheap’s Terms of Service and agreements“.
- Click the Pay Now button.

- Congratulations!!! You have successfully purchased your domain and hosting for your website from Namecheap. Normally within an hour or two a new domain and hosting are activated.
- You will also receive an email where you will have complete Hosting Package Details that also includes cPanel details, as shown in the next step.
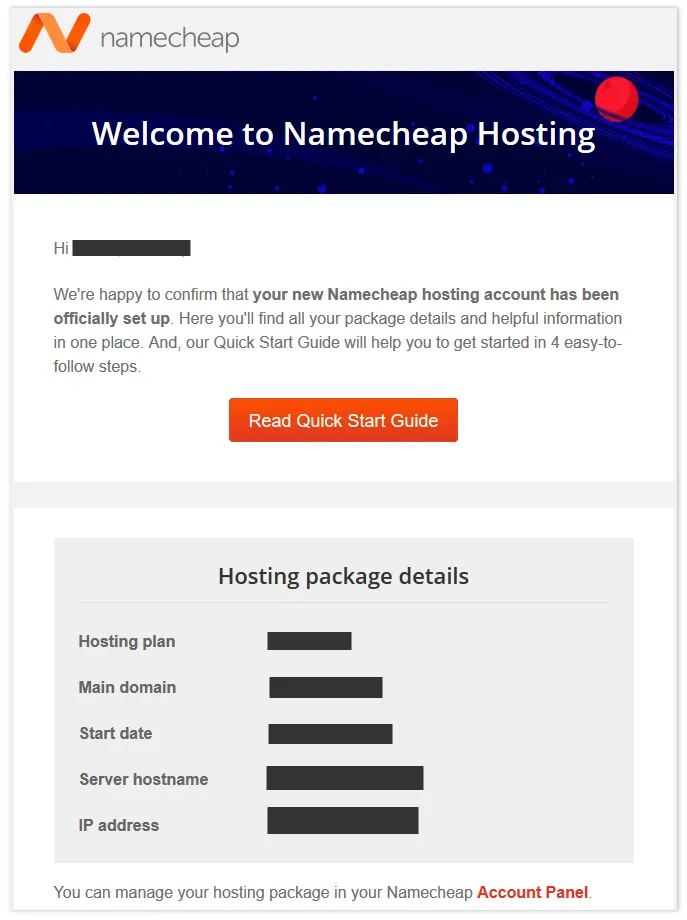
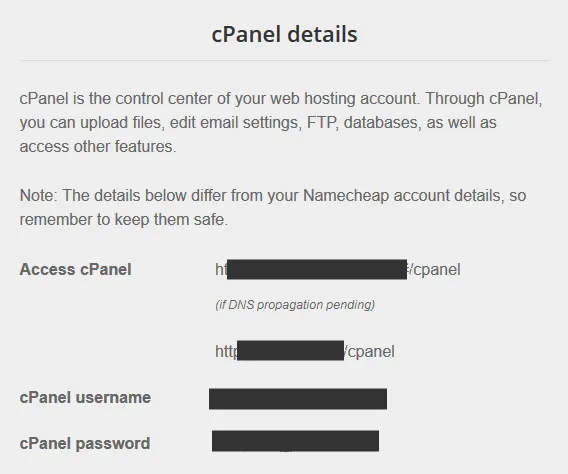
- CPanel (Control Panel) is the control center of your web hosting account where you can upload/edit/delete files, add email accounts, edit settings, manage database, take website backups, and much more.
- The cPanel details include: cPanel URL, Username, and Password.
It was all about buying a domain and web hosting on Namecheap. I hope that this guide would have helped you. If you like this post then don’t forget to share with other people. Share your feedback in the comments section below.





Leave a Reply