Have you finally decided to create Amazon Seller Account from Pakistan? You’re in the right place.
In order to sell products on amazon from Pakistan you need to create an Amazon Seller Account. In this post I will guide you step-by-step on how to signup and create your seller account on Amazon Seller Central from Pakistan.
Amazon is the largest online eCommerce marketplace in the world providing opportunities to sellers from all over the world to make money online by selling their products. Though Amazon services are not available in Pakistan, but you are still eligible to register from Pakistan and sell your products on the Amazon marketplaces like US, UK, Japan, Germany, UAE, etc.
It is an incredible business opportunity for Pakistanis to earn millions of dollars from this amazing platform.
Besides creating an Amazon Seller Account from Pakistan I have also covered topics and terms which are very important for you to understand. Do remember that most of the applications are rejected by Amazon because of user mistakes during the signup and verification process.
Following topics will be covered in this post:
- Requirements For Creating Amazon Seller Account From Pakistan
- Things To Care About During Verification Process
- Business Types On Amazon
- What is Listing On Amazon?
- Fulfillment Methods: FBA vs FBM
- What Is Private Label?
- Selling On Daraz Vs Amazon
- Why You Need A Virtual Assistant?
- How To Create Amazon Seller Account
01. Requirements For Creating Seller Account From Pakistan
Here are some of the requirements that you should have before you signup for Amazon Seller Account from Pakistan.
- You must have an active Credit Card that could do global payments.
- You must have CNIC(Computerized National Identity Card Number) or Passport, whichever you want to use. They are used for Proof of Identity.
- You must have scanned copy of both sides of your Computerized National Identity Card. If you want to use your Passport Number for your identity then you must have a scanned copy of your Passport.
- You must have a scanned copy of your Bank Statement or Credit Card Statement, whichever you want to provide.
- You must have an active Phone Number and Email Account where you can receive OTP(One Time Password) and One Time Pin for verification. They are also used for Sign-In to your Amazon Account.
02. Things To Care About During Verification Process
Verification is the last step of Creating Amazon Seller Account. Most of the Pakistanis sign-up for Amazon Seller Account by thinking that they are signing up for Facebook or Twitter.
Remember that it is not so simple to get your Amazon Seller Account approved, you have to take care of lot of things in order to avoid rejection.
Amazon still charges you $39.99 USD Subscription Fee even if your application to Create Amazon Seller Account is NOT approved.
Have a look on these important points:
- Make sure that the scanned copies of your documents such as CNIC, Passport, Bank Statement, etc, are of good quality, shouldn’t be vague or blur. Information should be clearly visible.
- All your required verification documents should also support English Language as well.
- You should provide the complete Address of your location where you are living. After the signup process Amazon also sends a postcard to your given address in order to validate it.
- Your Name should be same throughout the sign-up process. Use the name which is written on your CNIC.
- Your Date of the Birth should be the one which is mentioned on your CNIC.
- Few days after the submission of your Amazon Seller Account application/form Amazon might ask you to submit your Utility Bills. Make sure that the scanned copies are not blur and support English language. Some people mistakenly send their utility bills made in Urdu Language.
| Helium 10 Special Discount! 30% Off the First 12 Months. Get 20% OFF Your First 6 Months and 10% OFF Every Month for Life. Visit Our Helium 10 Page To Avail the Offers Using The Coupons MEERSWORLD20 and MEERSWORLD10. |
| Helium 10 Mega Discount! 58% Discount On Annual Plans for Customers in Pakistan, India, and Turkey (1) Platinum Annual (2) Diamond Annual. The discount coupons are included in our links. |

03. Business Types On Amazon
During the signup process Amazon asks you to choose the Business Type. The options list contains 5 options:
- State-owned Business
- Publicly-listed Business
- Privately-owned Business
- Charity
- None, I am an individual
01. State-owned Business
State-owned Business is also called State-owned Enterprise. It is a legal entity that undertakes on behalf of the government. They are established to take part in the commercial activities and affairs.
Pakistan State Oil, Bank Of Punjab, National Bank Of Pakistan, National Development Finance Corporation, Pakistan Railways, Pakistan Steel Mills, Pakistan International Airlines, are some of the examples of State-owned Business.
02. Publicly-listed Business
A Publicly-listed Business is also called Public Limited Company and Publicly Traded Company. It is a company whose stocks and shares are intended to be freely traded on the stock exchange.
Allied Bank Limited, Amreli Steels, Askari Bank, Atlas Honda, Engro Fertilizers, Fauji Fertilizer Company, Gul Ahmed, Nestlé Pakistan, are some of the examples of Publicly-listed Business. They all are listed on Pakistan Stock Exchange.
03. Privately-owned Business
Privately-owned Business is a company which does not offer its stocks(shares) to the general public on the stock exchange market instead trade privately.
Small and Medium-sized businesses, Sole Proprietorships, and Family-owned Businesses are some of the examples of Privately-owned Business.
04. Charity
Charity or Charity Organization is a company whose primary focus is philanthropy or to raise funds for those who need help. You must have heard of MTJ clothing brand launched by Maulana Tariq Jameel. Its primary focus is to generate revenue for supporting his institutions where children from poor families are enrolled or studying.
05. None, I am an individual
From its name it is quite obvious that this business type represents a business/brand or store owned or run by an individual.
There are good number of individual sellers on Amazon who sell products that they don’t make or manufacture. They pay a third-party to create products and put their brand name on them. Such products are called Private Label products, as I have discussed in Section 06 below.
04. What is Listing On Amazon
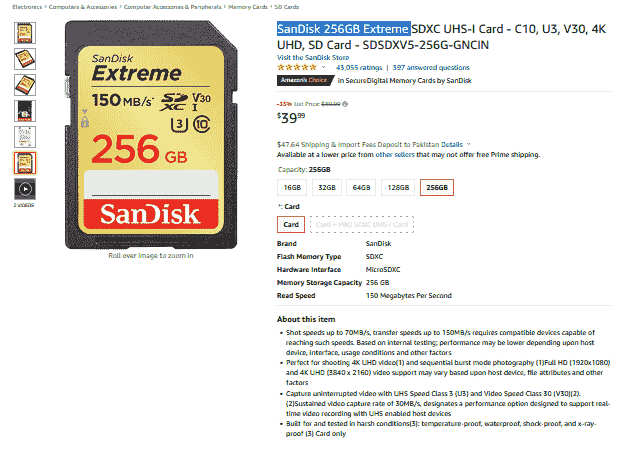
A Product Page or Product Information Page for an item that you create on your Amazon Seller Account is called Listing. It includes Name, Description, Price, Pictures, Color, Specification, Reviews, etc.
This is the product listing of SanDisk 256GB Extreme on Amazon. Take it as an example.
05. Fulfillment Methods: FBA vs FBM
FBA stands for Fulfillment By Amazon whereas FBM stands for Fulfillment By Merchant.
In FBA, a seller sends all his inventory to Amazon warehouses where it is stored and shipped directly to the customer. You don’t have to worry about shipping and storing your inventory, Amazon does for you. Majority of Amazon Sellers use FBA. There is also a monthly fee for storing you inventory in Amazon warehouses.
In FBM, a seller himself manages all his inventory and shipping instead Amazon.
There are pros and cons of both FBA and FBM. To find more about them and which one is better for your products read this useful article: Amazon FBA vs FBM Comparison Guide.
06. What Is Private Label?
A Private Label is also called PL. It is a product which is created by a third-party and sold under retailer’s brand name.
On Amazon, most of the individual investors or sellers find Chinese Suppliers on Alibaba and pay them to manufacture product for them at lower rates. Once the product is ready manufacturer labels it with their brand.

07. Selling On Daraz Vs Amazon
- Daraz is the largest eCommerce marketplace in Pakistan and also providing its services to few South Asian countries like Nepal, Sri Lanka, Bangladesh, etc, Whereas Amazon is the largest marketplace providing services globally.
- People trust on Amazon whereas Daraz is still struggling to build a trust. For Amazon a customer is the most important entity.
- You can earn way more money on Amazon as compared to Daraz.
- You can flip listings or assets on Amazon at millions of dollars that helps you to create wealth.
- If you don’t have Credit Card payment method you can’t become an Amazon Seller whereas Daraz supports plenty of local payment methods.
- Amazon is a competitive market you need good amount of advertising budget to promote or sell your products whereas Daraz is not as competitive as Amazon because there is plenty of space for new sellers. Advertising fee on Daraz is also very low.
- Amazon is expensive as compared to Daraz like the tax rates, seller fees, ppc cost, etc, are higher than the Daraz.
08. Why You Need A Virtual Assistant?
Only creating Amazon Seller account is not enough to grow on Amazon. An eCommerce business involves lot of things which are important for its success, scalability and sustainability.
Do you know that almost 80% to 90% new Amazon sellers struggle to produce sales because they don’t know how to pick winning products, trademark registry, brand registry, how to run PPC, optimize listing, store management, etc.
A dedicated professional virtual assistant who will be spending few hours per day on your Amazon products would have potential to bring a massive growth and revenue to your Amazon business.

09. How To Create Amazon Seller Account
Follow the steps to create Amazon Seller Account.
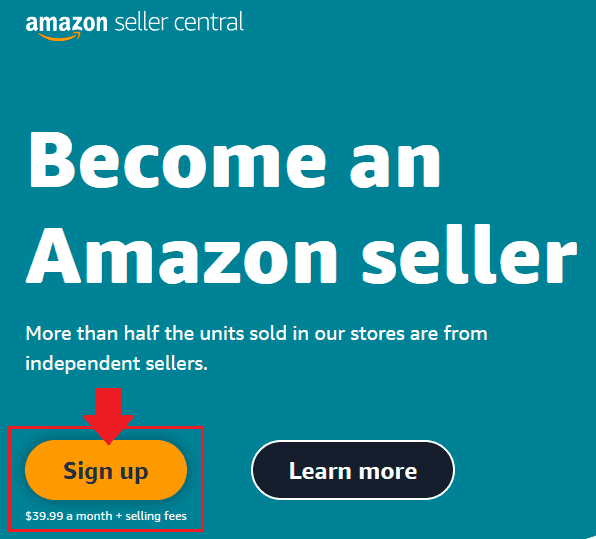
- Go to Amazon Seller Central Page.
- Click the “Sign up” button.
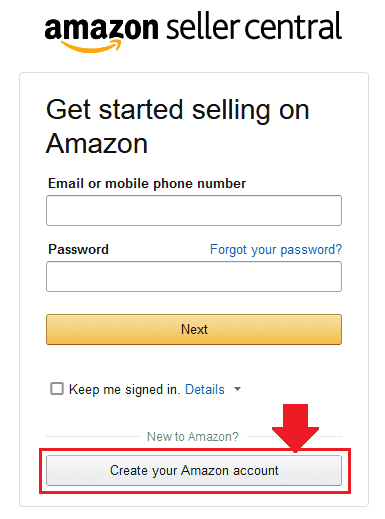
- Click “Create your Amazon account” located at bottom of the form.
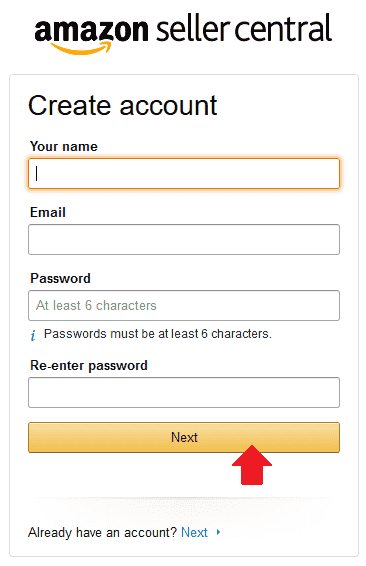
- Enter your Name. Make sure to write your official name i.e the name written on your CNIC.
- Enter your Email ID.
- Enter a secure Password for your Amazon account.
- Click “Next”.
When you click the “Next” button it often shows a Puzzle or Security Captcha. Solve them to continue to the next steps.
- To verify the ownership of your email that you entered above, it will send you an OTP(One Time Password) code to that email address.
- Login to your email account and copy the code, as shown in the next step.
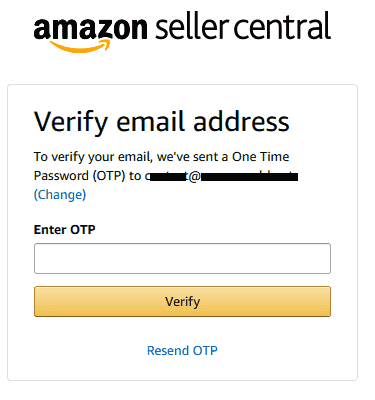
- Copy your OTP code from the email and Paste in the above form, as shown in the next step.
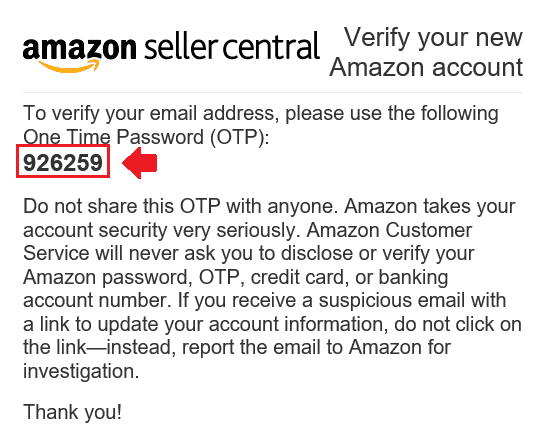
- Enter or Paste your OTP and click the “Verify” button.
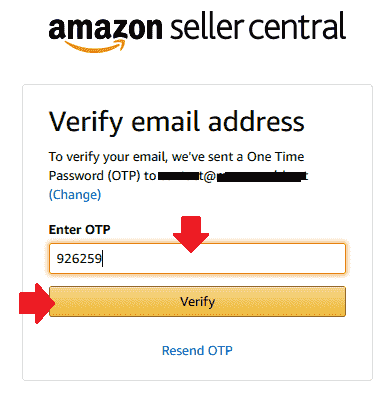
- After the verification of your Email Address now it will verify your Phone Number.
- Choose Pakistan’s Country Code i.e “+92” and enter your Mobile Phone Number.
- Click “Add mobile number” button.
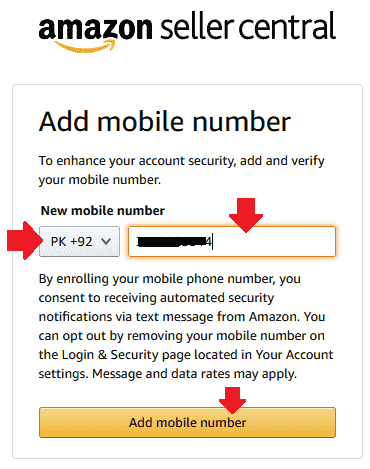
- It will send an OTP code to your mobile phone.
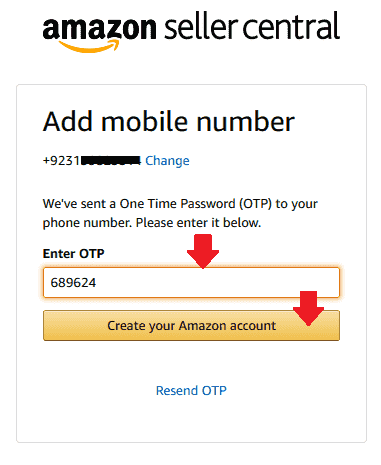
- In the “Enter OTP” enter the OTP code that you have received.
- Click “Create you Amazon account”.
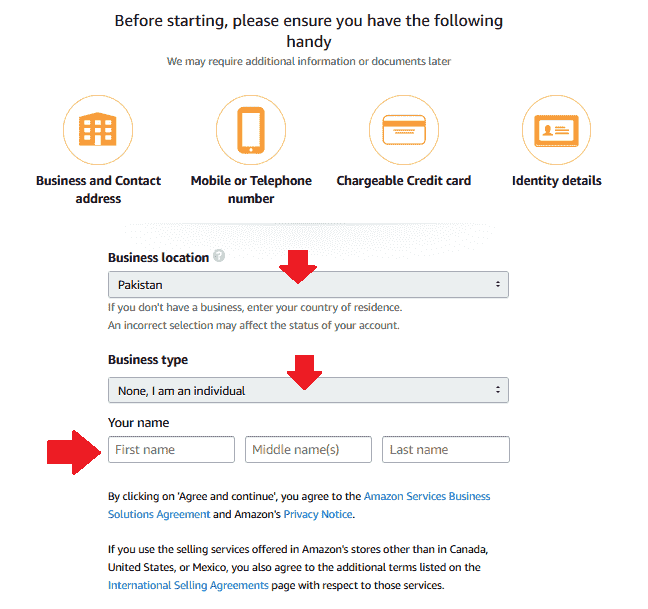
- In the “Business location” choose the name of the country where your business is located. If you don’t have a business location enter the country where you are living. Since you’re creating seller account from Pakistan so you will choose “Pakistan”.
- In “Business type” choose your Business Type. The Business Types have already been discussed in the Section 3 above. If you’re an individual choose “None, I am an individual“.
- In “Your name” enter your official name written on CNIC. If your name contains 2 words like Shahid Afridi, leave the Middle Name textbox empty. Shahid will be the First Name and Afridi will be the Last Name.
- Click “Agree and Continue” button, located at bottom of the form, not visible here.
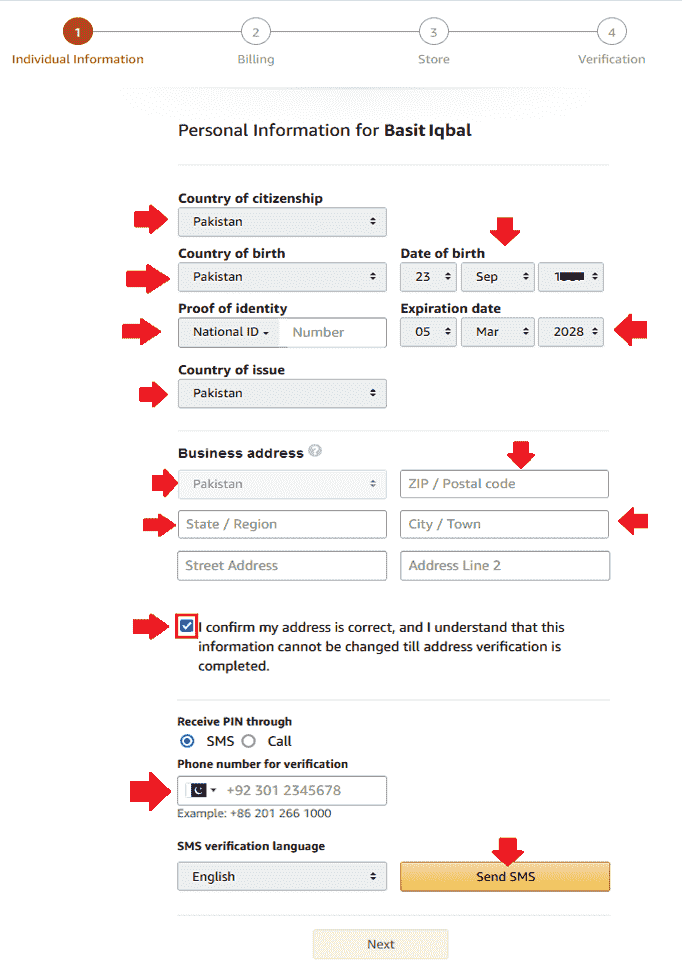
Personal Information
- In the “Country of citizenship” choose Pakistan.
- In the “Country of birth” choose the country where you were born. Also choose the Date of Birth written on your CNIC.
- Choose “Proof of identity“. There are two options (1) National ID means your CNIC (2) Passport. Also choose the Expiration date mentioned on the card.
- In the “Country of Issue” choose where your CNIC or Passport was issued.
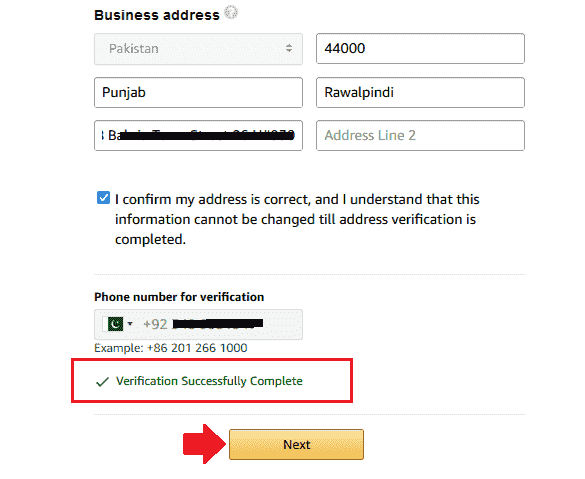
- In the “Business Address” text fields enter the complete information where you or your business are located. Don’t provide the incomplete and wrong information.
- Tick “I confirm my address is correct….“.
- In “Receive Pin through” choose an option between SMS and Call to receive a PIN code. Enter your Mobile Phone Number again and click “Send SMS” to receive the code.
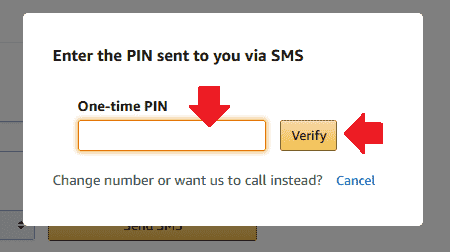
- Enter the PIN Code in “One-time PIN” text field.
- Click “Verify”.
- If the PIN Code is correct you will see “Verification Successfully Complete“.
- Click “Next” to continue to the Billing section.
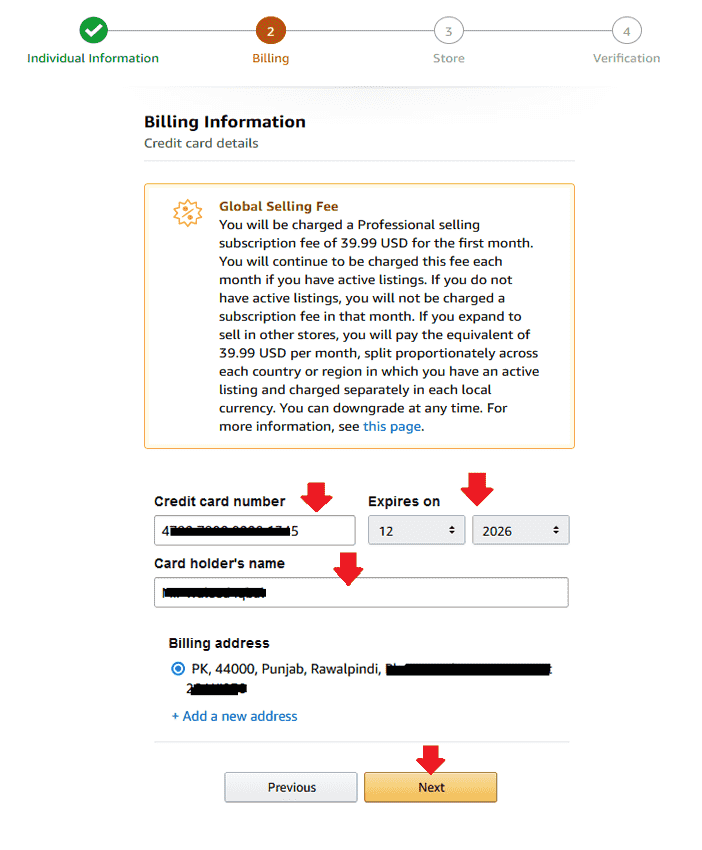
Billing Information
In this section you have to provide your Credit Card Information. On top of the form you will see the Global Selling Fee message.
- In the “Credit card number” enter your Credit Card Number. Also choose its expiry date.
- In the “Card holder’s name” enter the name written on the Credit Card that you want to use.
- Click “Next” to continue to the Store and Product Information section.
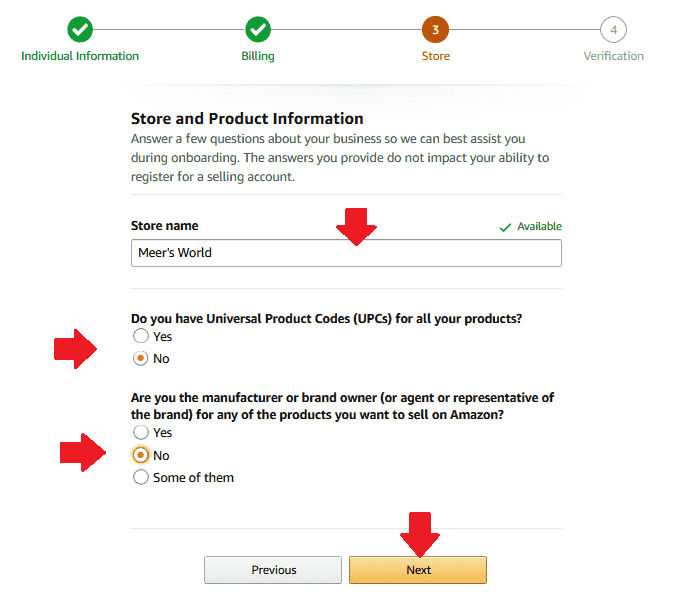
Store and Product Information
- In the “Store name” enter a name for your store. This could be anything, it is best if relevant to your product/products. Store contains all your Amazon listings/products.
- Choose “Yes” or “No” for the “Do you have Universal product Codes (UPCs) for all your products?“.
- A UPC is a 12-digit unique bar code assigned to each product on Amazon. It helps to uniquely identify individual products sold on Amazon. To know more more about UPCs and How to generate them, read this: Amazon UPC Codes: What are They and Why You Need to Buy Them?
- Choose “Yes” or “No” for “Are you the manufacturer or brand owner (or agent or representative of the brand) for any type of the products you want to sell on Amazon?“. If you choose “Yes” it will show you another question “Do you own government-registered trademark for the branded products you want to sell on Amazon?” Also choose between “Yes” or “No” for it.
- Once you’re done, click “Next” to continue to the “Verification” Section.
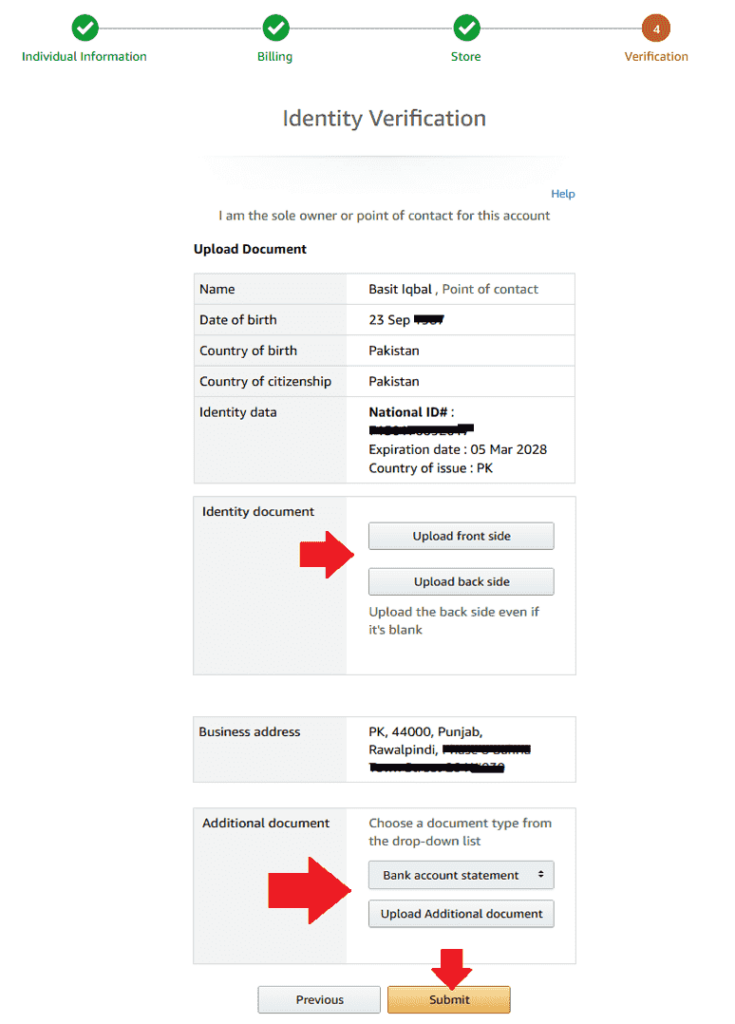
Identity Verification
This is the last section of creating Amazon Seller Account. It will ask you to provide the scanned copies of your Identity documents which you have mentioned earlier.
- In the “Identity document” upload the scanned copies of both sides of your CNIC. If you had chosen Passport it will ask you to provide the scanned copy of your Passport.
- In the “Additional document” upload the scanned copy of either your “Bank Account Statement” or “Credit Card Statement”.
- Once you’re done click the “Submit” button.
After verifying your information they will get back to you within 2 or 3 business days. If they ask for more information or documents like Utility bills, etc, provide them accordingly. They will also notify you whether your Amazon Seller Account is approved or not.
If you like this post then don’t forget to share with the other people. Share your feedback in the comments section below.
Also Read
- How Fiverr Can Help Scaling Up Your eCommerce Business
- How To Earn Money From Amazon In Pakistan
- How To Create Daraz Seller Center Account
- How to Request a Product for Fulfillment by Daraz (FBD) on DSC
- How to Open Amazon Seller Account in Saudi Arabia KSA
- What is an Amazon Fulfillment Centre & How Does It Work?
- What is Amazon Warehousing & Distribution (AWD)?
- Helium 10 Review: Best Amazon Seller Tool



Leave a Reply