Are you a beginner and want to set up your Blogger Settings? You’re in the right place. In this tutorial, I will guide you step-by-step on how to set up your Blogger blog settings from scratch.
From Basic Blogger Settings to Advanced Blogger Settings, everything is covered in detail. The sections below i.e. “Basic Settings“, “Privacy Settings“, “Meta Tag Settings“, “Errors and redirects Settings“, “Crawlers & Indexing Settings“, are Blogger SEO Settings.
There are total 16 Settings on Blogger that you can set up. These settings are set up in the same sequence as they are sequenced on Blogger i.e. top to bottom.
- Basic Blogger Settings
- Privacy Settings
- Publishing Settings
- Https Settings
- Permissions Settings
- Post Settings
- Comments Settings
- Email Settings
- Formatting Settings
- Meta Tags Settings
- Errors & Redirects Settings
- Crawlers & Indexing Settings
- Monetization Settings
- Manage Blog Settings
- Site Feed Settings
- General Settings
RELATED
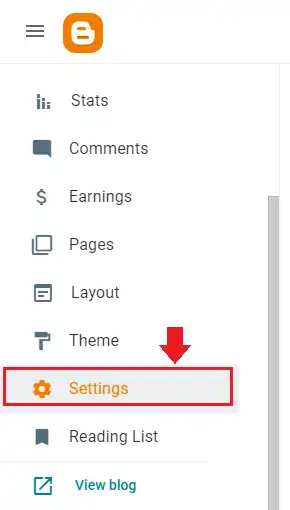
Login to your Blogger blog and go to Blogger Settings from the sidebar.
01. Basic Blogger Settings
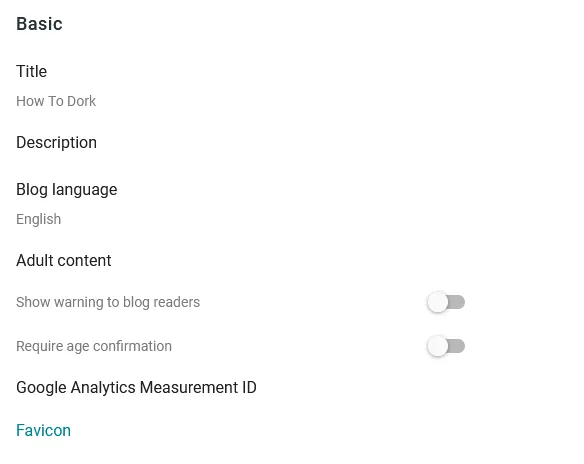
In this section, you will learn about how to set up the Basic settings in Blogger.
- In the Title enter the name of your blog.
- Click on the Description to enter your blog description. The maximum length of Description is 500 words.
- Choose your Blog Language. It supports almost all major languages spoken in the world.
- If your blog contains Adult Content then turn-on both the options (1) Show warning to blog readers (2) Require age confirmation.
- Click on the Google Analytics Measurement ID to enter your Google Analytics Measurement ID | To know what is Google Analytics Measurement ID and how to add on Blogger, Read this tutorial: How to Link Blogger to Google Analytics 4 | Measurement ID.
- Click the Favicon link to upload your blog favicon. To know more about What is Favicon and how to upload on Blogger, Read this tutorial: How To Change/Upload Favicon on Blogger | Create Favicon.
02. Privacy Settings
The Privacy settings allow you to decide whether you want your Blogger blog to be visible or indexed on search engines such as Google, Bing, etc.
If you enable this option people will be able to search/find you on Google, Bing, Yahoo, etc. As a result your blog will receive organic traffic. A traffic the comes to your website from search engines.
- Turn on the Visible to search engines option.

03. Publishing Settings
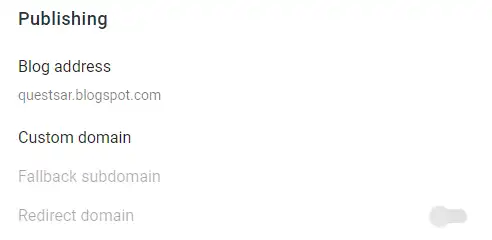
In this section, you will learn about How to set up Publishing settings in Blogger.
- You can change the URL/Subdomain of your blog in Blog address. The blog address is a URL through which a website or blog is accessed on internet. For example, techworld.blogspot.com. Note: It is not recommended to change your blog address again-and-again. It affects SEO.
- The Custom domain is an optional feature that allows you to redirect your .blogspot to a custom domain.
A custom domain is a domain that you own e.g. meersworld.net. A domain or blog address that you create on Blogger is a subdomain of .blogspot.com, means it is the property of Blogger.
If you want to avail the Custom Domain feature, What are its benefits, & How to redirect blogspot to custom domain, Read this tutorial: How To Redirect Blogspot To Custom Domain.
04. HTTPS Settings
The HTTPS stands for Hyper Text Transfer Protocol Secure, used for secure communication on internet.
The HTTPS protocol encrypts your sensitive data such as credentials, credit card details, online banking details, etc, before it is transmitted on internet. A website with “https” enabled on it can be identified by “s” at the end of “http”. For example, https://www.meersworld.net.
Remember that HTTPS is mandatory for every website. That’s why by default HTTPS is enabled in your Blogger settings.
- If HTTPS is disabled, turn it on HTTPS redirect to enable. All URLs of your blog will be redirect from http to https.

05. Permissions Settings
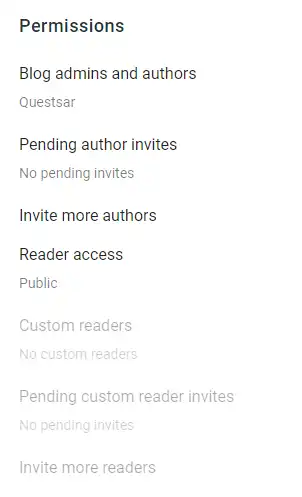
In this section, you will learn about How to set up Permission settings in Blogger.
- The Blog admins and authors option shows you list of your blog’s admins and authors. You can also delete authors/admins and change their status from the list i.e. from admin to author and author to admin.
- The Pending author invites option shows you list of pending authors to whom you have sent invitations to join your blog.
- The Invite more authors option allows you to send invitations to authors. The invitation is sent to an author through his email address. The author receives an email from Blogger to accept the invitation | Learn: How To Add An Author in Blogger.
- The Reader access option allows you to set who can read and access your blog. There are three options (1) Public (2) Private to authors (3) Custom readers.
Public: Anyone can access your blog and read content.
Private to authors: Only the authors of your blog can access and read your content.
Custom readers: Only those people can access your blog and read your content who you have invited. The below three options i.e Custom readers, Pending custom reader invites, Invite more readers, are active when you choose the Custom readers option from Reader access.
06. Posts Settings
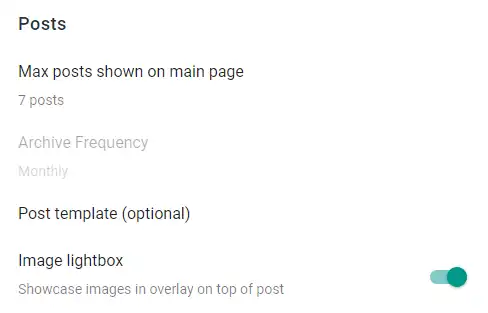
In this section, you will learn about How to set up your Posts settings in Blogger.
- Click on Max posts shown on main page to set how many blog posts you want to show on the homepage of your blog.
- Click on the Post template (optional) to add your post template.
Post Template is an advanced optional feature in Blogger that allows you to add a premade template to format your post editor with Text or HTML code.
Each time you create a new post the template will be available in your Post Editor. The Post Template feature provides re-usability, means you don’t have to create the same thing again-and-again. You can modify the content, text, images, of template in the Post Editor.
For example, you want to add the message “Please share your feedback in the comments section…..” at the bottom of every post. Simply put the message/text in the Post template, you don’t have to type the message again-and-again.
- The Image lightbox opens images on your blog posts in overlay on top of post when they are clicked. If you don’t want to avail this feature turn it off by dragging the slider.
07. Comments Settings
In this section, you will learn about How to set up your Comments settings in Blogger.
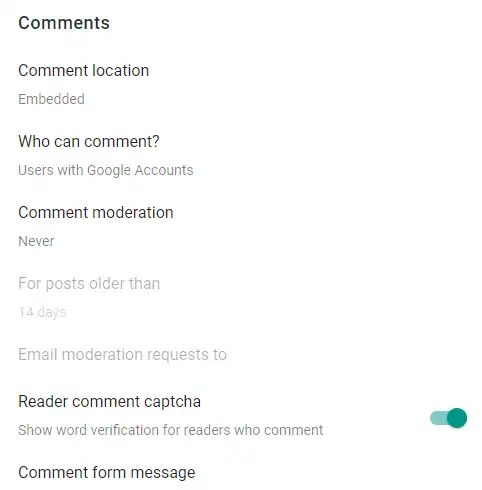
- The Comment location option allows you to do two things (1) Hide comments & comments section from your blog (2) Change style of comments section/box.
There are 4 options in Comment Location i.e. Embedded, Full page, Popup window, & Hide.
Embedded: It is the default style of Blogger’s comment section. The comments box appears at the bottom of existing comments.
Full page: It adds a link “Post a Comment” below the existing comments. When you click the “Post a Comment” link, the comment box appears in a full page.
Popup window: It also adds a link “Post a Comment” below the existing comments. When you click the “Post a Comment” link, the comment box appears in a popup window.
Hide: It hides all existing comments from your blog posts, and visitors cannot post new comments.
- The Who can comment? option allows you to set who can post comments in your blog posts. There are 3 options: (1) Anyone (including anonymous) (2) Users with Google Accounts (3) Only members of this blog.
- The Comment moderation option allows you to set whether visitors comments on blog posts should be published or not without your approval. It helps you to identify spam and fake comments before they are published under your blog posts. There are 3 options (1) Always (2) Sometimes (3) Never.
Always: This option allows you to enable the moderation on every comment posted on your blog posts. It means a comment will only be published on comments-section once you approve/moderate it.
Sometimes: This option allows you to enable moderation on comments for those posts which are older than specific days. You can specify the number of days in For posts older than option.
Never: Whenever someone posts a comment on your blog posts it will be published on the comments section.
- The Email moderation requests to option allows you to enter an email address to receive the notifications of new comments in your mailbox, when posted on your blog posts. This option is activated only when you choose Always or Sometimes options in the Comment moderation.
- The Reader Comment captcha when enabled, stops spam comments generated by autobots and spammers. It shows word verification for readers who comment. Make sure to enable it.
- In Comment form message you can enter a Thank You message which will be sent to anyone who will post a comment on your blog posts. The maximum length of the message is 4096 words.
08. Email Settings
In this section, you will learn about How to set up your Email settings in Blogger.
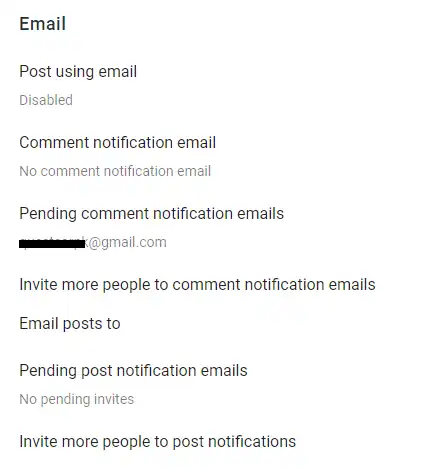
- The Post using email is a powerful feature that allows you to publish an email as a post on your Blogger blog. It means that you can create and publish a post on Blogger without using the Blogger Post Editor, directly from your email account.
How it Works: You create email from your email account and send that email to your secret Blogger email. The Subject of the email becomes the Post Title, and Content of the email becomes the Content of the post. To know how it works, its use, Read this tutorial: What is Post Using Email in Blogger, Its Benefits & How It Works.
- The “Comment notification email” contains those email address/es to which email notifications will be send each time someone posts a comments on your blog posts.
- The “Pending comment notification emails” contains those users’ email addresses who have not accepted your invitation to receive comment notification emails.
- The “Invite more people to comment notification emails” allows you to invite people to receive comment notification emails. You can enter up to 10 email addresses separated by commas.
- The “Email posts to” contains list of email addresses to which email notification will be sent each time a blog post is published on your blog.
- The “Pending post notification emails” contains those users’ email addresses who have not yet accepted the invitation to receive “Email posts to” email notifications.
- The Invite more people to post notifications allows you to invite people to receive Post notification emails. You can enter up to 10 email addresses separated by commas.
09. Formatting Settings
In this section, you will learn about How to set up Formatting settings in Blogger.
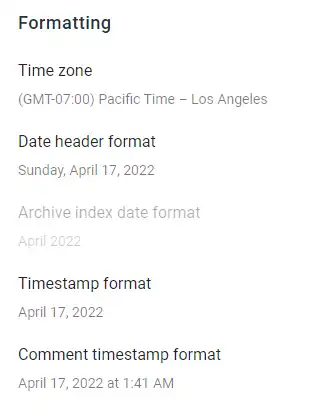
- The Time zone option is used to set your region’s time zone. Every region/country in the world has its own time zone. For example, China’s Time Zone is (GMT+08:00) China Standard Time – Shanghai.
- The Date header format option is used to choose a format of the date that appears above your posts. You can pick from 18 Date header formats.
- The Timestamp format option is used to choose a format of post’s timestamp. You can pick from 11 Timestamp formats. The post timestamp tells visitors at what time/date/day the post was published or posted.
- The Comment timestamp format option is used to choose a format of post comments timestamp. You can pick from 28 Comment timestamp formats.
10. Meta Tags Settings
In this section, you will learn about How to set up Meta Tags in Blogger.
The Meta Tags are embedded in the HTML code of your website for providing the information about your blog or website to search-engines and web crawlers. They help web crawlers to display your blog in the search-engine results in response to users searched queries.
For example, you have a blog about growing Cactus plants. You add Meta Tags (search description) about it like “This blog guides people on how to grow cactus plants….”. Let’s say someone searches “grow cactus” on Google. In response to this query (grow cactus) Google will list blogs with the search description containing similar keywords.
Meta Tags are not displayed on your blog, they are only provided for search engines and web crawlers.
In Blogger you can add Meta Tags by enabling and adding search description. A search description should define what your blog is all about.
You can add maximum of 150 words in the search description.
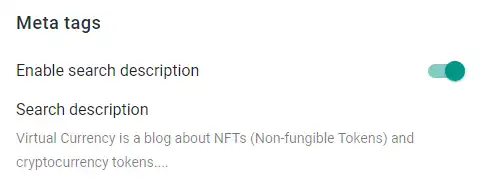
- Enable the Search description by dragging the slider towards right.
- Click on the Search description to add your blog’s search description. You can add maximum of 150 words.
11. Errors and redirects Settings
In this section, you will learn about how to setup Errors and redirects in Blogger.
There are 2 purposes of Errors and redirects in Blogger (1) To display an error message to visitors that the page doesn’t exist for some reason (2) To redirect a URL of a deleted page (post) to the alternate page (post) of your blog.
Following are some reasons that you need Custom 404 and Custom Redirects:
- Your deleted page’s URL is still indexed in Google or other search engines and bringing visitors to your blog.
- You might have changed/modified the URL of the page.
- Your deleted page’s URL might have been bookmarked by visitors on their browser. They might look for that page in future.
- Your deleted page’s URL might have been added by people in websites, pages, forums, comments sections, etc. While reading those pages/forums visitors might click your deleted post URL.
- Your deleted page might have been shared on different social media platforms like Facebook, Twitter, Pinterest, etc.
- A visitor might try to manually enter your page URL and misses a character or word in it.
Above were some of the reasons that how people can look for your deleted or missing pages and end up on 404 Page Error. Now it is your responsibility that when they visit those missing/deleted pages they should get a reasonable message and alternate solution.
By adding a meaningful Custom 404 message you can tell your visitors that the page your are looking for is not available and what he has to do next. The 404 code indicates that a page or resource someone is looking on a website is not available for some reason.
If you have re-created the page that you have deleted earlier you can use Custom Redirects to point/redirect deleted page’s URL to the re-created page’s URL on your blog. If you don’t remember the URLs of your deleted pages you can find in Google Analytics.
The Custom Redirects feature can also be used to redirect an existing page to another page of your blog.
Learn how to set up Custom 404 and Custom redirects in Blogger.
01. Custom 404
Follow the steps to set up Custom 404 message in Blogger.
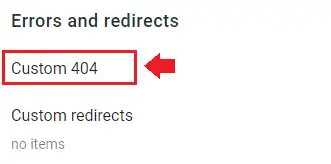
- Click on the Custom 404.
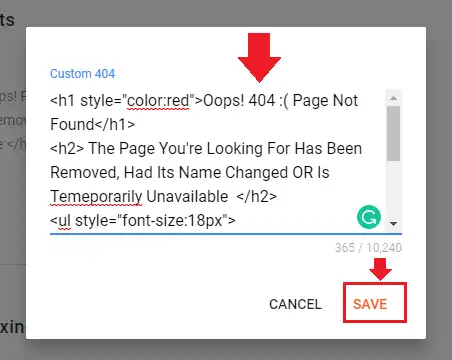
- Enter your Custom 404 message or Paste your HTML code.
You can add simple message as well as HTML code. There are specially-designed Custom 404 page templates that you can add here. You can find free 404 page HTML templates Here.
You can also use this HTML code that I have created to show Custom 404 Message and alternate solution. Simply Copy & Paste the code. Don’t forget to change the Email Address.
<h1 style="color:red">Oops! 404 :( Page Not Found</h1>
<h2> The Page You're Looking For Has Been Removed, Had Its Name Changed OR Is Temeporarily Unavailable  </h2>
<ul style="font-size:18px">
<li><a href="/">Return to Home Page & Explore There</a> <b> | OR</b> </li>
<li>Send Us An Email About The Page You're Looking For At: <b>contact@example.com </b></li>
</ul>- Click Save once you are done.
- This is the preview of Custom 404 message for above code.
- To preview how your Custom 404 page looks on your blog then open any of your blog post on browser and remove a character or word from its URL and press Enter.

02. Custom Redirects
Follow the steps to set up Custom Redirects in Blogger.
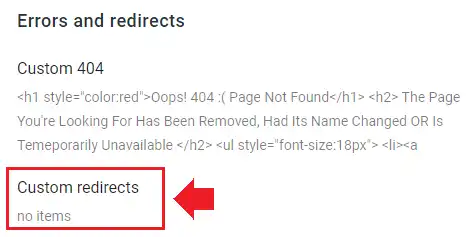
- Click on the Custom redirects.
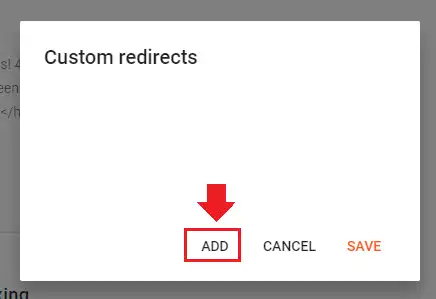
- Click ADD.
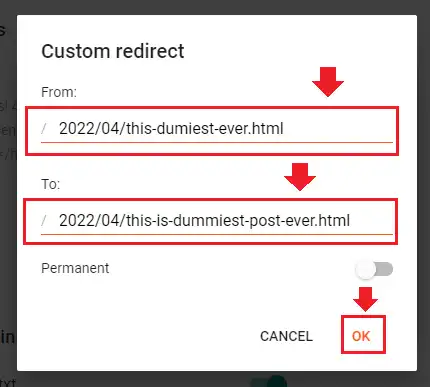
- In “From” add the URL of the deleted page (post) or URL of an existing page that you want to redirect to another page of your blog. Add the URL without domain after the Date like “2021/04/how-to-create-a-painting“.
- In “To” add the URL of the page (post) you want to redirect to, means From page’s URL will point to this URL.
- Turn on the Permanent option if the original page (post) was deleted or not present. If you’re redirecting an existing page of your blog to another page of your blog then don’t turn it on.
- Click OK.
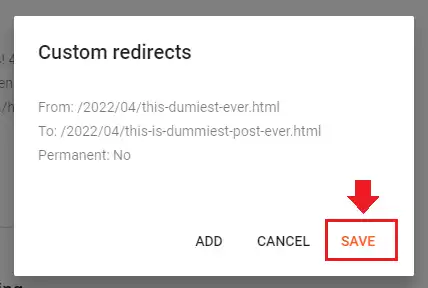
- Click SAVE.
- Now test whether Custom Redirects works or not. Browse your From URL and see whether it redirects to your desired page.
- You can add as many Custom Redirects as you want.
12. Crawlers & Indexing Settings
In this section, you will learn about How to set up Crawlers & Indexing in Blogger.
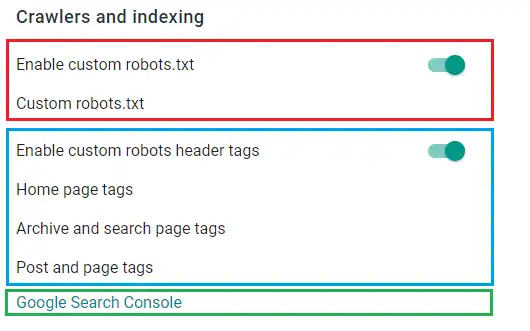
I will divide this section in 3 parts and set up them accordingly.
- Custom Robots.txt
- Custom Robots Header Tags
- Google Search Console
01. Custom Robots.txt
The Custom Robots.txt is a simple text file that instructs search engine crawlers & robots which pages, sections, folders, and URLs of a website are allowed to be crawled/traversed and which are not.
Before a web-robot or crawler wants to visit a URL it first visits Robot.txt and checks whether it is permitted to crawl or not.
Go through this tutorial that guides you step-by-step on:
02. Custom Robots Header Tags
In this section, you will learn about How to set up Custom Robots Header Tags.
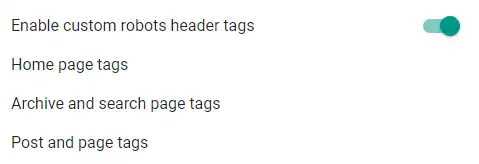
There are 3 types of Custom Robots Header Tags in Blogger:
- Home page tags
- Archive and search page tags
- Post and page tags
In order to understand what are the purpose of Custom Robots Headers Tags and How to set up them in Blogger, Read this tutorial: How To Set Up Custom Robots Header Tags in Blogger.
03. Google Search Console
In this section, you will learn about How to link Google Search Console in Blogger.
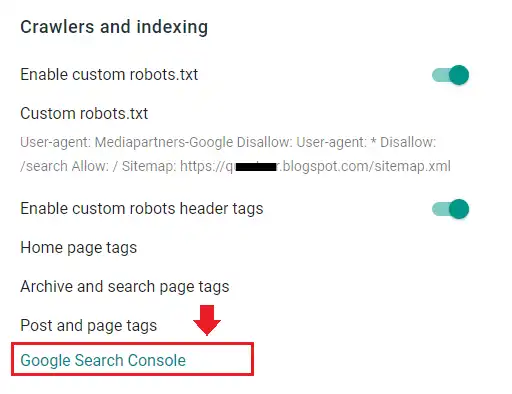
The Google Search Console is a free web service by Google that allows content creators, bloggers, web masters, etc, to check the indexing status of website and its pages in Google, and provides rich reports and recommendation to optimize the performance of a website.
- Click the Google Search Console link and follow this Tutorial: How To Connect Blogger Blog to Google Search Console.
13. Monetization Settings
In this section, you will learn about how to set up your Monetization settings in Blogger.
Set up Custom ads.txt settings only if your Blogger blog is monetized with Google AdSense ads. If not then skip this section.
The Custom ads.txt is a file that provides you more control over who’s allowed to sell or display ads on your blog.

RELATED
- How To Set Up Custom Ads txt in Blogger | Get AdSense Pub ID.
- How to Monetize Blogger Blog with Google AdSense | Show Ads
14. Manage Blog Settings
In this section, you will learn about How to set up Manage Blog settings in Blogger.
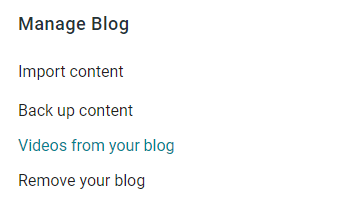
- The Import content option allows you to upload your Blogger export (backup) XML file. The content could be of your existing blog, some other blog, or your previously deleted blog. The export file contains Posts & Comments. All the imported Posts will be merged with your existing posts, sorted by date.
- The Back up content option allows you to take the back up of your Blogger content in XML file. The backup includes Posts, Pages, and Comments.
- The Videos from your blog link takes you to Video Management page. You can download and delete your Blogger videos.
- The Remove your blog option allows you to delete your Blogger blog. When you click Delete it provides you two options (1) UNDELETE (2) PERMANENTLY DELETE. With UNDELETE option you can restore your Blogger blog within 90 days. The Permanently Delete option removes your Blogger blog forever, means you can’t restore.
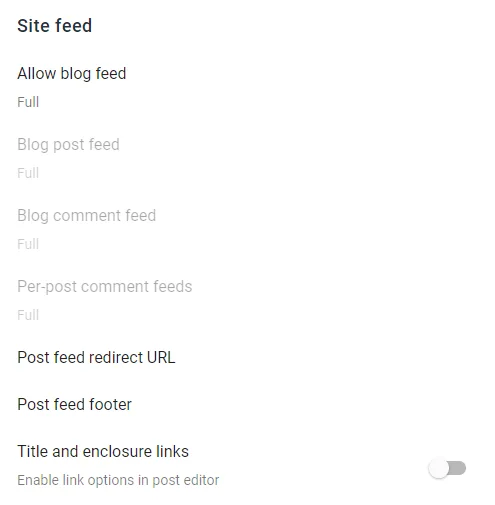
15. Site Feed Settings
In this section, you will learn how to set up Site Feed settings in Blogger.
The Site Feed also known as Web Feed, Blog Feed, or News Feed, is a data format (XML-based) that allows people to receive your blog’s latest content (Posts, Comments) on their blogs/websites/browsers/apps without visiting your blog. When you update or add new content on your blog, the Site Feed automatically notify users who have subscribed to your Site Feed.
If you have a multi-niche blog you can create separate Site Feed link for each category, so that people can subscribe only to those categories whose content they want to read.
The most popular Site Feed formats are RSS, Atom, and JSON Feed.
Blogger supports both RSS and Atom. The RSS Feed is the most widely used site feed format. In order to receive notifications or updated content one has to subscribe to your blog’s RSS Feed link.
In order to learn What are the benefits of Site Feed, How to create your Blogger blog’s Site Feed URL, How to display Site Feed on your blog, What are Title & Enclosure Links, read this tutorial: How To Set Up Site Feed Settings in Blogger | RSS Feed.
16. General Settings
In this section, you will learn about How to set up General Settings in Blogger.
- The Use Blogger draft if enabled, allows you to use the beta version or new features of Blogger before they are officially released or introduced to all Blogger users. It is up to you whether you want to enable this option or not.
- Click the User Profile link to edit your profile settings. You can set up Privacy, Identity, Profile Photo, General, Location, Work, and Additional Information.

Final Thoughts
So it was all about setting up your Blogger blog settings. I hope that it would have helped you to set up your Blogger settings. Create unique, original, and quality content by focusing a niche, about which you’re passionate. If you like this post then don’t forget to share with the other people. Share your feedback in the comments section below.
Also Read



Leave a Reply