Do you want to open/create an Amazon seller account on Amazon Saudi Arabia? You’re in the right place.
In this post, I will guide you step-by-step on how to register and set up Amazon Seller account (Individual or Business) in Saudi Arabia KSA from scratch. The process of registration is same for both “Individual” and “Business” account except the last step which is the “Identity Verification”.
If you’re a Foreign or Non-Saudi resident supplying the goods/products in the Saudi Arabia through Amazon FBA channel, you need to register for VAT. Go through the Subsection (Register for VAT) of Section 2 (Requirements for Registering a Seller Account on Amazon Saudi Arabia), below.
Following topics will be covered in this section.
- Is Amazon Saudi Arabia worth it?
- Difference Between Individual Account & Business Account
- Requirements For Registering a Seller Account On Amazon Saudi Arabia
- How to Create Amazon Seller Account in Saudi Arabia
01. Is Amazon Saudi Arabia Worth It?
Here are some facts that will help you to understand why investment on Amazon Saudi Arabia can be a great deal for you.
- Saudi Arabia is one of the world’s largest economies having a GDP of $833.54 billion USD (2022) and is currently at rank 18. It has a population of over 34.81 million (2020).
- The eCommerce market of Saudi Arabia is expected to reach US$11.74bn in 2022 and $20.04 billion USD by 2025 (Statista).
- In the Saudi Arabia eCommerce market, the number of users (customers) are expected to reach 26.4 million by 2025 (Statista). The buying power of Saudi citizens is also very high as compared to other countries.
- A golden opportunity, particularly for new sellers to flourish on a less competitive marketplace with low investment. You can easily launch and rank your products with minimum budget unlike competitive marketplace like Amazon USA where you have to invest huge advertisement (PPC) budget.
- You can make a successful launch on Amazon Saudi Arabia with a budget of $4000 USD with high profit margins. Since the competition is low so you can set profits margins above 50%.
- There are less brands on Amazon Saudi Arabia as compared to other marketplaces like Amazon US, Amazon UK, etc.
Looking for a Freelancer/Virtual-Assistant to manage your Amazon Seller account – A to Z? Find Here.
RELATED
- How To Create Amazon Seller Account From Pakistan | A to Z
- Amazon Search Analytics – How Can You Improve Selling Rate?
- How To Launch Your Own Professional Website
| Helium 10 Special Discount! 30% Off the First 12 Months. Get 20% OFF Your First 6 Months and 10% OFF Every Month for Life. Visit Our Helium 10 Page To Avail the Offers Using The Coupons MEERSWORLD20 and MEERSWORLD10. |
| Helium 10 Mega Discount! 58% Discount On Annual Plans for Customers in Pakistan, India, and Turkey (1) Platinum Annual (2) Diamond Annual. The discount coupons are included in our links. |

02. Difference b/w Individual & Business Account
In this section, you will learn about the difference between Amazon Individual Seller Account and Business Seller Account that will help you to pick the right account.
When you will go through the Section 3 (Requirements For Registering a Seller Account On Amazon Saudi Arabia) you will get to know more about Individual and Business account.
01. Individual Seller Account
Some important points to consider for individual sellers:
- You have not decided yet what to sell or you’re still deciding about your product.
- You don’t want advanced seller tools and ad-on programs or plans to advertise.
- Seller has to pay a fee for each unit sold on Amazon.
- Your sales are expected to be less than 40 or 50 units a month.
- You don’t own or represent a company.
02. Business Seller Account
Some important points to consider for Business sellers:
- You’re an established eCommerce seller.
- You’re planning to sell lot of items/products.
- You want to access advanced seller tools like APIs, Reports, and ad-on programs.
- Seller pays one flat fee per month, doesn’t matter how many units are sold.
- Your sales are expected to be more than 40 or 50 units a month
- You want to advertise your products.
- You want to qualify for top placement on product detail pages.
- You want to sell products in restricted categories.

03. Requirements For Registering a Seller Account On Amazon Saudi Arabia
In this section, you will learn about the requirements for registering a seller account on Amazon Saudi Arabia (KSA).
- Requirements for Individual Account
- Requirements for Business Account
- Register for VAT
01. Requirements for Individual Account
Following are the requirements for registering an Individual Account on Amazon Saudi Arabia:
- Account owner must have a copy of Government issued valid National ID or Resident (Iqama) ID having Name, Date of Birth, ID Number, Expiry Date and Signature. ID should have both sides. The Iqama is the official identification document in Saudi Arabia.
- You must have a valid copy of Bank/Credit-Card Statement or a Utility Bill in PDF format to confirm your Address. The Bank or Credit Card Statement shouldn’t be older than 180 days, and they should have Bank Name, Logo, Address and Account Holder’s Name.
- An Email ID or Amazon Customer Account (The Amazon Customer Account is an account that you create on Amazon to buy/purchase products).
- An active Phone/Mobile Number.
02. Requirements for Business Account
Following are the requirements for registering a Business Account on Amazon Saudi Arabia:
- Account Owner or Legal Representative must have a copy of Government issued valid National ID or Resident (Iqama) ID. The ID should have both sides.
- The account owner must have a copy of Business Trade License in PDF format. It must contain the Name of the owner. If you’re a Legal Representative of Business Account you must have a copy of “Business Trade License” and “Power of Attorney” both attached in the same PDF file.
- An Email ID or Amazon Customer Account.
- An active Phone/Mobile Number.
03. Register for VAT
VAT (Value Added Tax) is a form of consumption tax which is applied to purchase of goods and services. It is commonly known as a percentage of the total cost. For example, if a product costs $50 and there is a 15% VAT, the consumer will pay $57.5 to merchant. The merchant will keep $50 and remit $7.5 (15% VAT) to government.
On Amazon, VAT is required for two types of sellers:
- If you’re a seller whose yearly revenues have reached 375K SAR (Saudi Riyal).
- If you are a non-Saudi resident supplying goods in the Saudi Arabia through Amazon’s FBA channel. FBA (Fulfillment by Amazon) is a service in which you ship your inventory to Amazon warehouse. Amazon packages and ships your orders directly to customers.
Saudi Arabia (KSA) VAT rate is 15%, previously it was only 5%. A Foreign or Non-Saudi Amazon seller must be registered for VAT at 1st sale, within 30 Days. There is also a penalty for late VAT Registration.
How a Non-Saudi Arabia Resident Can Register for VAT?
You need a local-accountant/representative (Fiscal Representative) in Saudi Arabia who will be taking additional liabilities on your behalf as an Individual or as a company to deal with Tax affairs.
It takes 1 to 2 weeks for Saudi Arabia VAT Registration.
A Vat Registration company like Safari Star located in UK & China, helps all the sellers who are selling from outside Saudi Arabia to register for VAT. It is part of Amazon SPN (Service Provider Network) for VAT Compliance (VAT) services. Safari Star provides VAT registration services in Europe, Middle East, Americas and Asia.
Contact Safari Star to get KSA VAT Information or avail their services. You can also find other VAT Registration services like Safari Star to find the competitive price.
Some of the documents required for VAT Registration are:
- Certificate of company / Business License
- Bank details
- Passport Copy of Director/Owner | Passport Copy of Authorized Signatory
- POA (Plan of Action) authorized signatory of company
04. Create Amazon Seller Account in Saudi Arabia
In this section, you will learn step-by-step on How to create/open seller account in Amazon Saudi Arabia KSA.
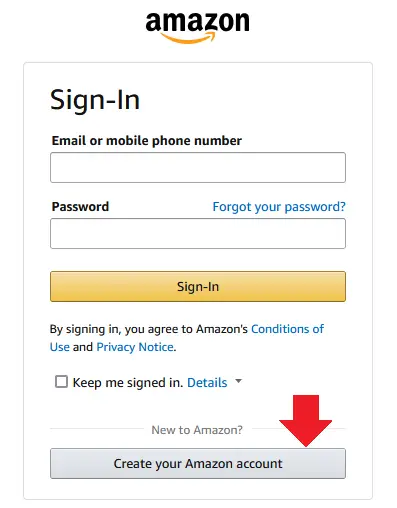
- Go to Amazon.sa (Saudi Arabia) Seller SignUp Page.
- Click the Sign Up button. For limited time there is no monthly subscription fee.

- Click Create your Amazon account button.
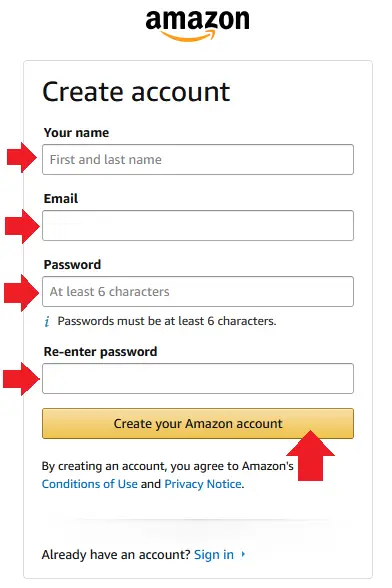
- Enter your Name.
- Enter your Email Address like example@example.com.
- Enter a secure Password for your account.
- Click Create your Amazon account button.
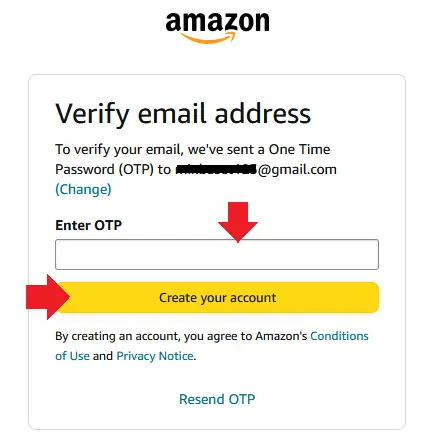
- Amazon will send an OTP code to your Email Account to verify that the email address you have entered above belongs to you.
- Go to your email account and open the email sent by Amazon.
- Copy the OTP (One Time Password) Code.
- Paste the OTP code in Enter OTP.
- Click the Create your account button.
01. Amazon Saudi Arabia Account Types
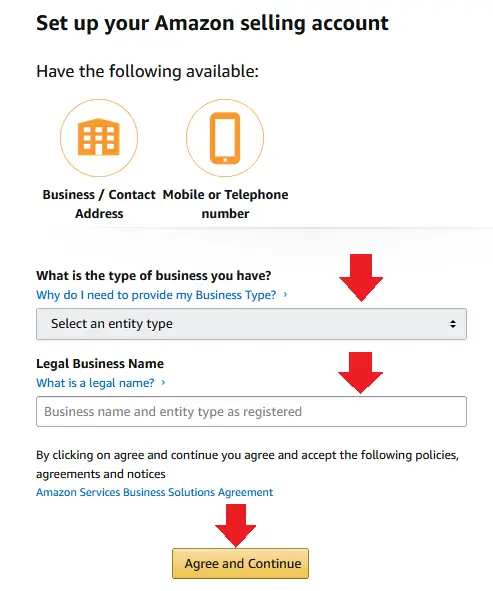
- In “What is the type of business you have?” Choose your desired seller account type. There are two options (1) None, I am an Individual (2) Business. Both account types have been discussed in the Section 2 above.
- Legal Business Name: If you are registering as an Individual Seller then enter your Full Name, written in the government issued identity document. If registering as a Business, then enter the Business’s Registered Name.
- Click Agree and Continue button.
02. Business Information
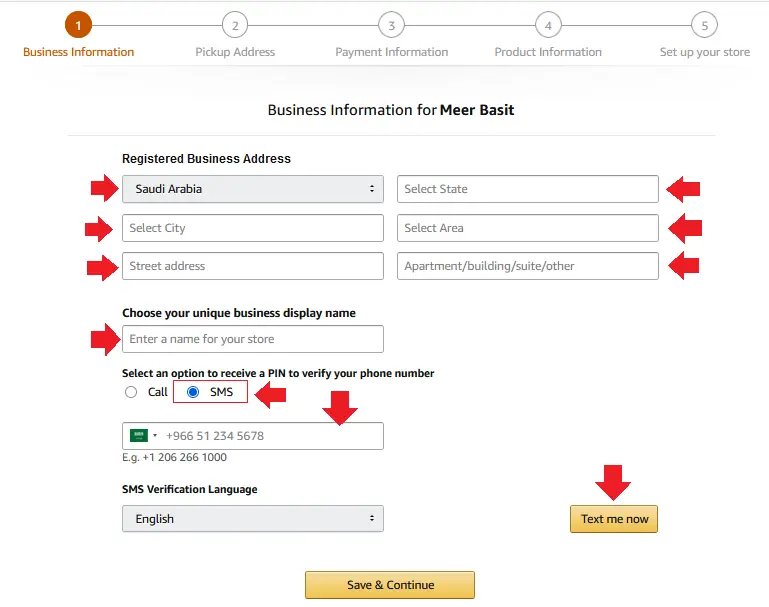
Fill your Business information here. It is for both Individual and Business accounts, so don’t get confused with term “Business”. Please provide the original and accurate information.
- Registered Business Address: Choose the Country where your business is registered. If you or your business is located in Saudi Arabia then choose “Saudi Arabia” (2) Select your State (3) Select your City (4) Select your Area (5) Enter your Street Address (6) Enter Apartment/Building/Suite, etc.
- In “Choose your unique business display name” Enter a name for your Amazon Store. It could be anything.
- In “Select an option to receive a PIN to verify your phone number” Choose SMS. Choose your Country from the dropdown list and enter your active Mobile Number to receive the verification code.
- Click Text me now button to send the PIN code to verify your Phone Number. Enter the code in Pop-up, as shown in the next step.
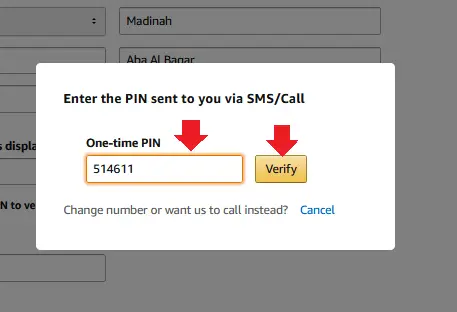
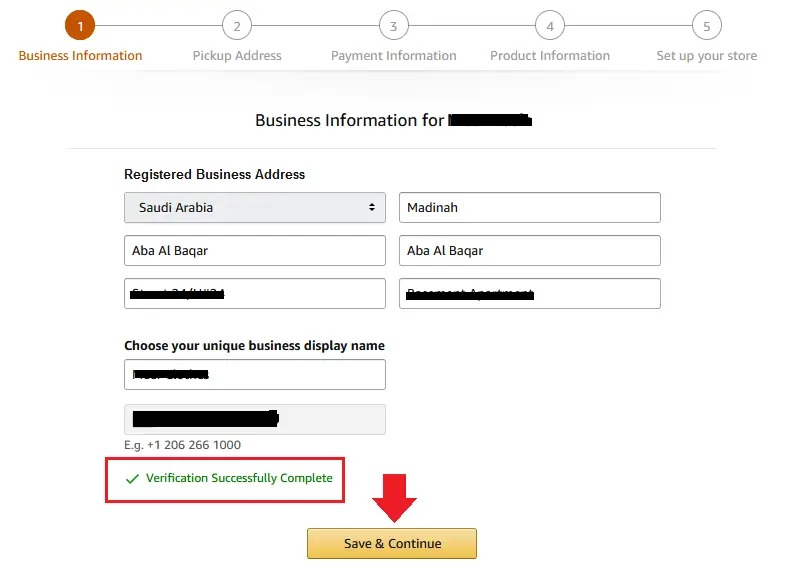
- Enter the PIN code in One-time PIN and click the Verify button. Once the phone number is verified you will see a message, “Verification Successfully Complete” as shown in the next step.
- Click Save & Continue button.
03. Pickup Address
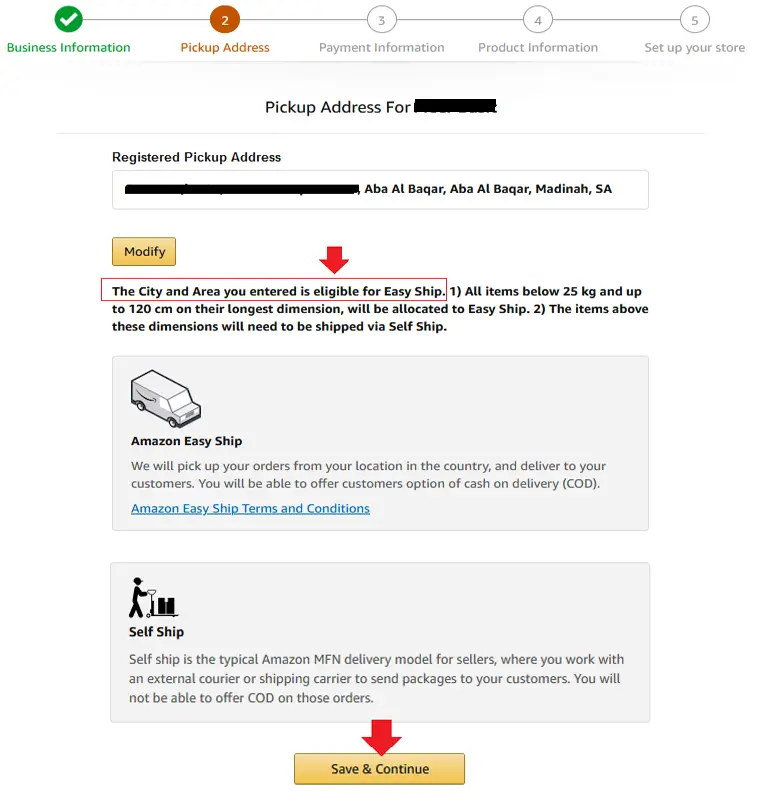
- Check your Pickup Address and click the Save & Continue button.
- It will also let you know whether Amazon shipping service is available at your location or not.
- The Modify button allows you to change the pickup address.
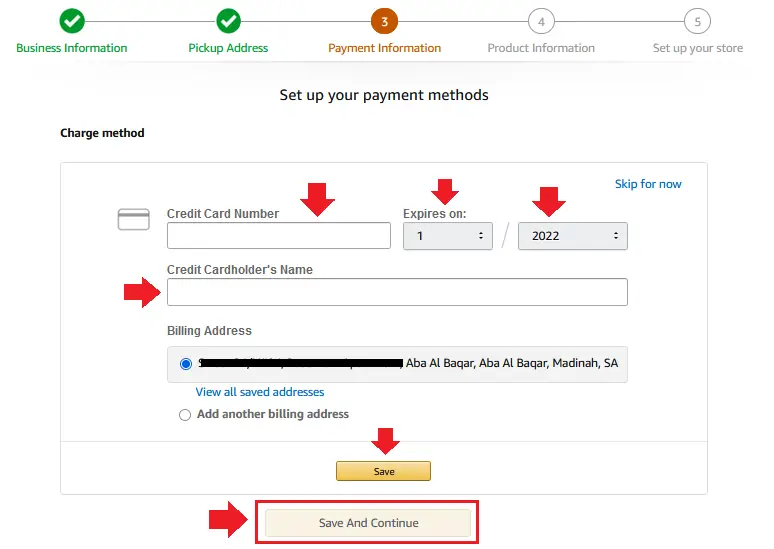
04. Payment Information
Fill your Credit Card information here. You can skip this step as well, to set up later.
- Enter your Credit Card Number and select its Expiration Date.
- Enter the Credit Cardholder’s Name, labeled on top of the credit card.
- Click Save to verify your Credit Card.
- Click the Save & Continue button.
05. Product Information
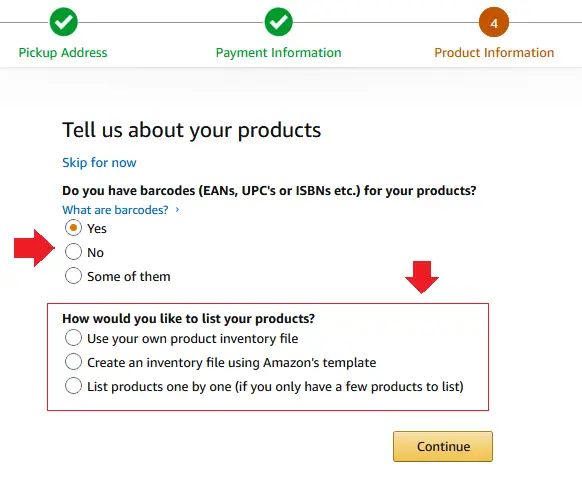
Provide your Product Information here. You can also skip this step to set up later.
- In “Do you have barcodes (EANs, UPC’s or ISBNs etc.) for your products?” Choose “Yes”, “No”, or “Some of them”. If you choose Yes, it will show you one more question below. If you choose No it will show you two more questions, as shown in the next step.
- The Barcodes are industry-standard product identifiers used by FBA (Fulfillment by Amazon) method to identify and track inventory throughout the fulfillment process. Each product you send to Amazon Fulfillment Center requires a barcode.
- In “How would you like to list your products?” Choose an option which is more suitable for you. The Inventory file (Microsoft Excel spreadsheet) templates let you add or edit product listings in bulk. Amazon sellers use inventory file templates to upload, update, and make changes to listings on Amazon.
- Click Continue.
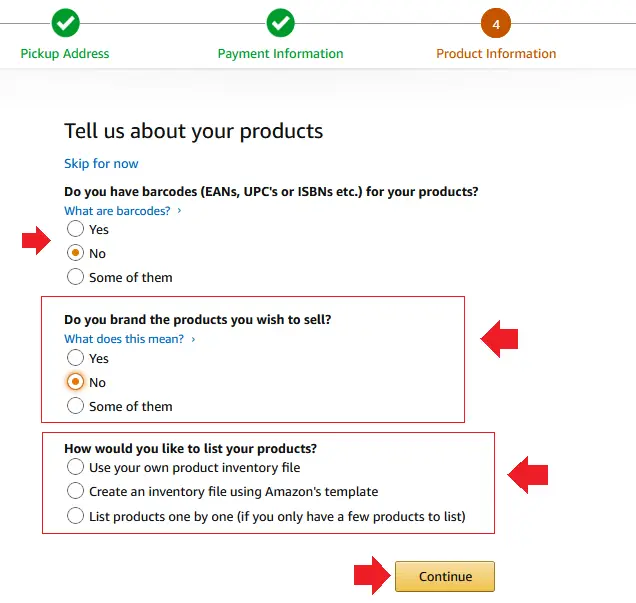
- If you choose No or Some of them it asks you two questions, as we mentioned above.
- In “Do you brand the products you wish to sell?” Choose Yes if you manufacture your own products and have visible branding on your product and/or packaging. Click on the “What does this mean?” link to see the preview.
- The 2nd Question (How would you like to list your products?) is discussed in the above step.
- Click Continue.
06. Set Up Your Store
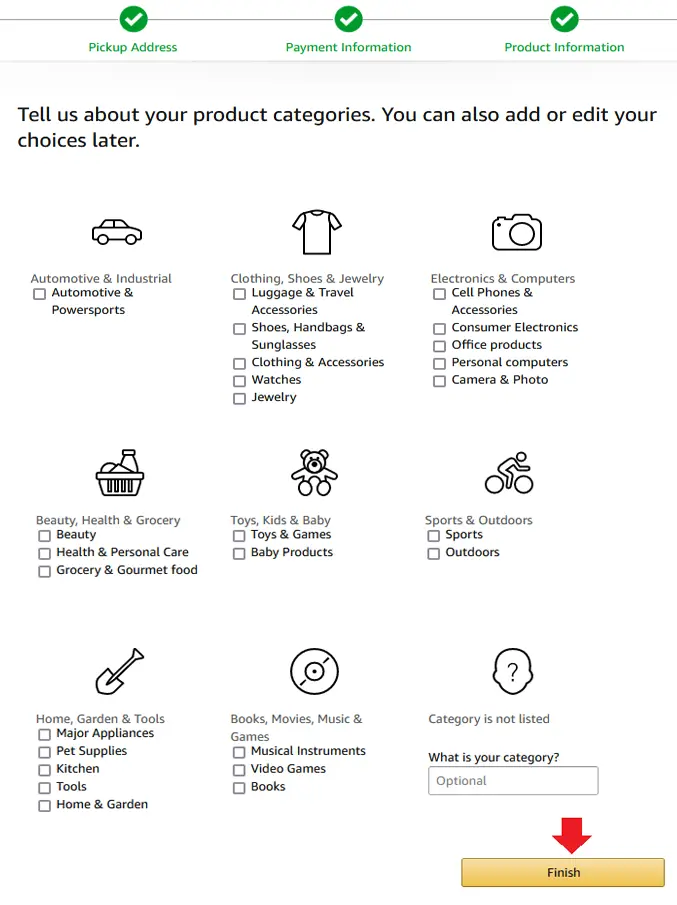
In this section, choose the product categories which are related to your store and products. You can add or modify categories in the future as well.
- Automotive and Industrial, Clothing, Shoe, and Jewelry, Electronics & Computers, Beauty, Health & Grocery, Toys, Kids & Baby, Sports & Outdoors, Home, Garden & Tools, Books, Movies, Music, are some of the popular categories.
- Click the Finish button.
07. Identity Verification
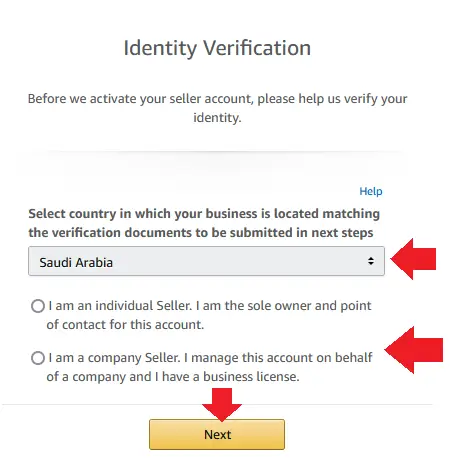
Before Amazon activates your seller account it verifies your identity. For that you have to submit required documents, as shown in the next steps. Make sure to choose the correct options, once you submit then this information cannot be changed.
- Choose a country in which your business is located. This location should match to the location mentioned in the verification documents, that you will submit in the next steps.
- Choose whether you are an Individual Seller or Company/Business Seller.
- Click the Next button.
If you are an Individual Seller follow the 01. Identity Verification for Individual Sellers and if you’re a Company/Business Seller follow the 02. Identity Verification for Business Sellers, below.
01. Identity Verification for Individual Sellers
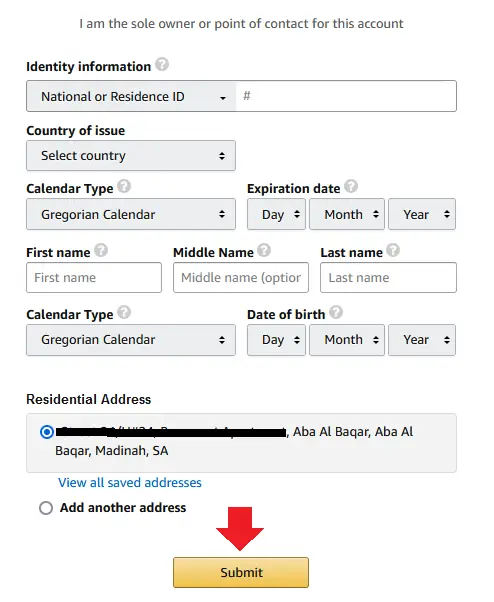
- In National or Residence ID, enter your National or Residence (Iqama) ID number.
- In Country of Issue choose a country that issued your National or Residence ID.
- Choose Calendar Type. There are two options (1) Gregorian calendar (2) Hijri calendar. If the Date of Birth on your National or Residence ID is in Hijri, then select Hijri Calendar from the dropdown list. Set Expiration date of your National ID. If there is no expiry date on your National ID then leave Expiration date fields empty (as it is).
- Enter the First Name, Middle Name (Optional), and Last Name. They should be same as written on your National/Residence ID.
- Choose Calendar Type and set Date of birth written on your National/Residence ID.
- Review your information and click the Submit button.
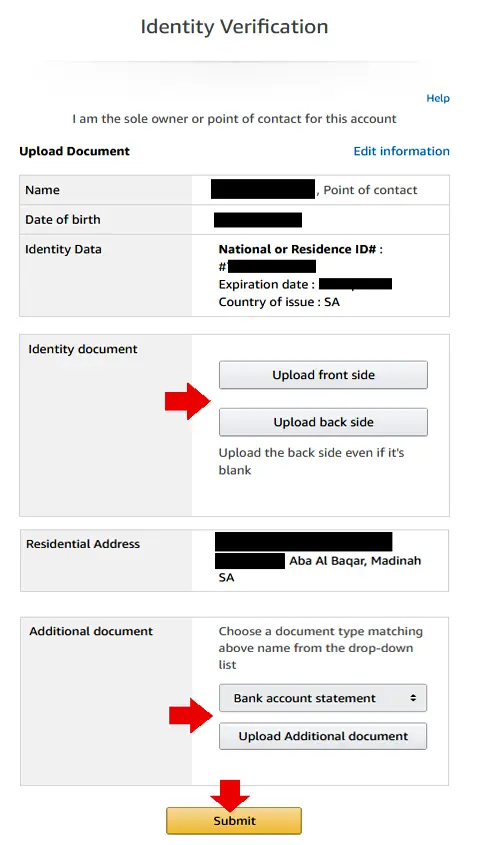
- In Identity Document, upload the copy of Front Side and Back Side of your National/Residence ID.
- In Additional document, choose a document type from the dropdown list. There are 3 types of document types (1) Bank Account Statement (2) Credit Card Statement (3) Utility Bills (Electricity, Water, Gas, Post-Paid Mobile or Internet). An Additional document is required to verify your Address.
- Once you choose a document type click Upload Additional document button to upload the document. It should be in PDF format.
- Click the Submit button.
02. Identity Verification for Business Sellers
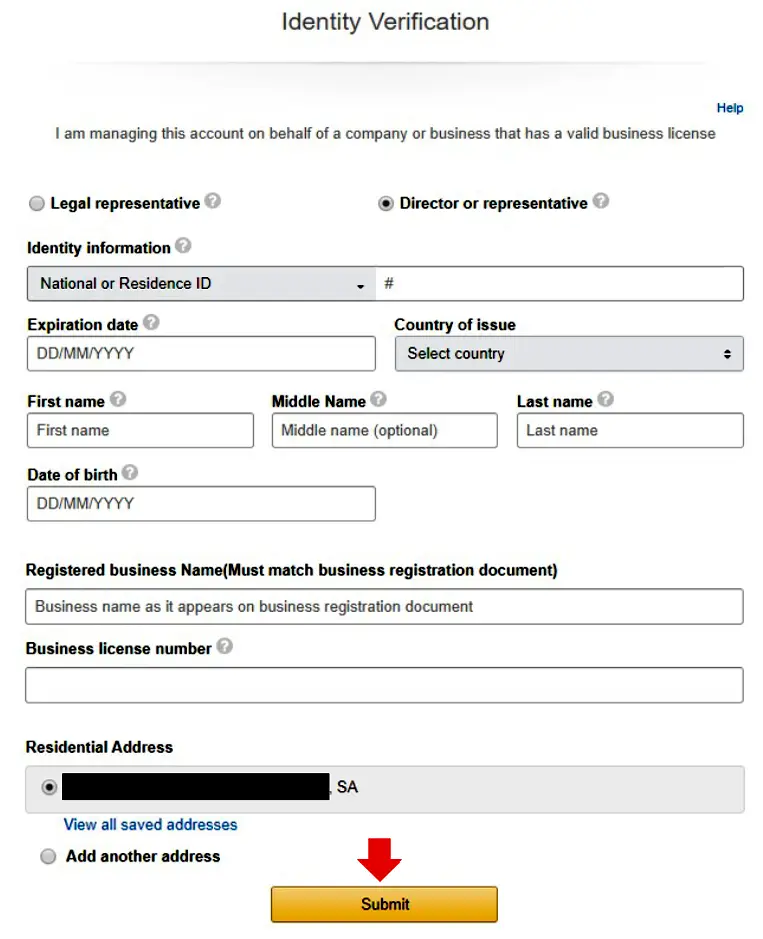
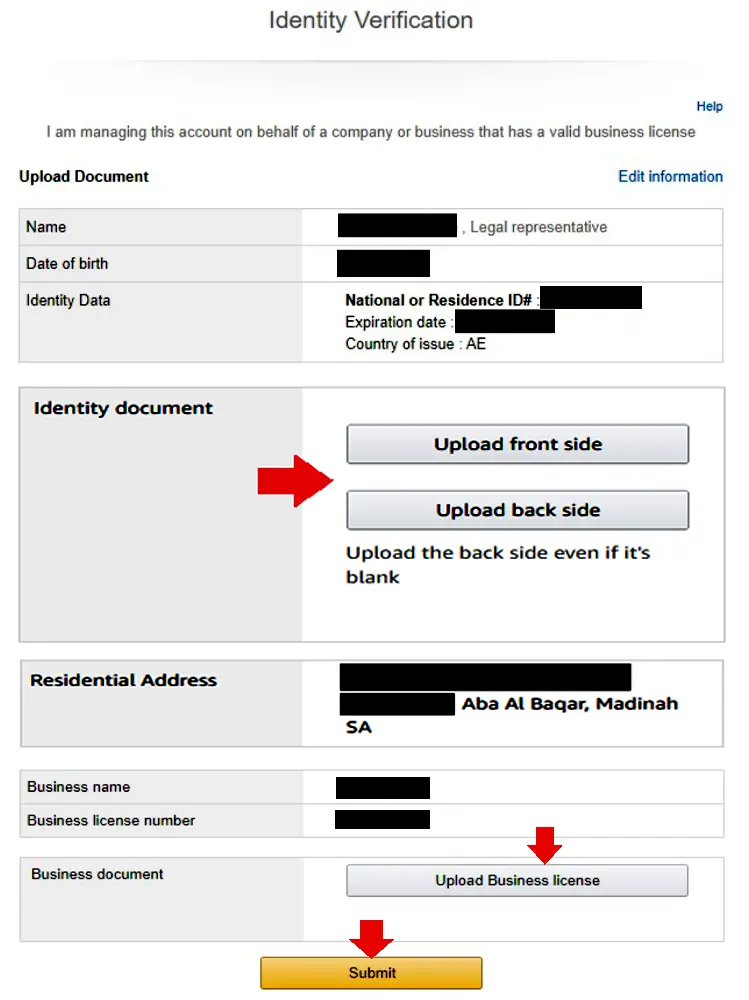
- Choose whether you’re a Legal representative or Director or representative. A Legal representative is someone with legal authorization from the company to use the Business Trade License for the purpose of selling on Amazon Whereas Director or representative is the owner of the company or one of the associate partner whose name is mentioned in the Business Trade License.
- In Identity information enter the National or Residence (Iqama) ID number.
- Enter the Expiration date of your National or Residence ID.
- Choose the country which issued your National or Residence ID.
- Enter the First Name, Middle Name (Optional), and Last Name. They should be same as written on your National/Residence ID.
- Enter your Date of Birth written on your National/Residence ID.
- Enter Registered business name which is written on your Business/Commercial Registration License.
- In Business License enter your Business/Commercial Registration License Number.
- Confirm/Preview your Residential Address and click Submit.
- In Identity document, upload the Front Side and Back Side of your Identity document (National/Residence ID).
- Upload the copy of Business Trade License in the PDF format. If you’re a Legal Representative of Business Account then upload “Business Trade License” and “Power of Attorney” both attached in the same PDF file.
- Click the Submit button.
Congratulations! You’re done. You have successfully completed the process of Creating Seller Account on Amazon Saudi Arabia KSA. Amazon will send you an email within 2 to 3 business days to let you know whether your application is accepted or rejected. If your application is rejected, login to your Seller Central Account and fix the rejection causes.
If you like this post then don’t forget to share with other people. Share your feedback in the comments section below.
Also Read
- Best Amazon Agency WordPress Themes
- How To Earn Money From Amazon Associates/Affiliate
- How To Create Daraz Seller Center Account | 4 Types
- How to Sell On Amazon | Start Your Own FBA Business
- What is an Amazon Fulfillment Centre & How Does It Work?
- What is Amazon Warehousing & Distribution (AWD)?
- Helium 10 Review: Best Amazon Seller Tool


Leave a Reply