Do you want to learn about how to set up Yoast SEO configuration and how to use it for your website pages? You’re in the right place.
Yoast SEO is one of the leading and easy-to-use free WordPress SEO plugin with 5 million+ active installations.
An SEO plugin optimizes your WordPress website to perform better in SERPs (Search Engine Results Pages).
Some of the features of Yoast free version are: SEO Analysis, Readability Analysis, Cornerstone Content, Text link Counter, Insights, XML Sitemaps, Usage Tracking, Enhanced Slack Sharing, Breadcrumbs, and more. You can also upgrade the Free Version to Yoast SEO Premium that costs only $99 USD/Year. The Yoast SEO Premium unlocks all the features of Yoast which are locked in the free version.
Following topics will be covered in this post:
- How to Install Yoast & Set Up First-time Configuration
- How to Find XML Sitemap URL in Yoast & Submit in GSC
- How to Use Yoast SEO for Website Posts/Pages
01. Install Yoast & Set Up First-time Configuration
In this section, I will guide you on how to install Yoast WordPress plugin and set up its First-time Configuration.
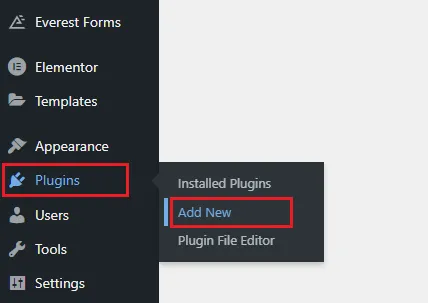
- Go to Plugins from the Sidebar.
- Click Add New.
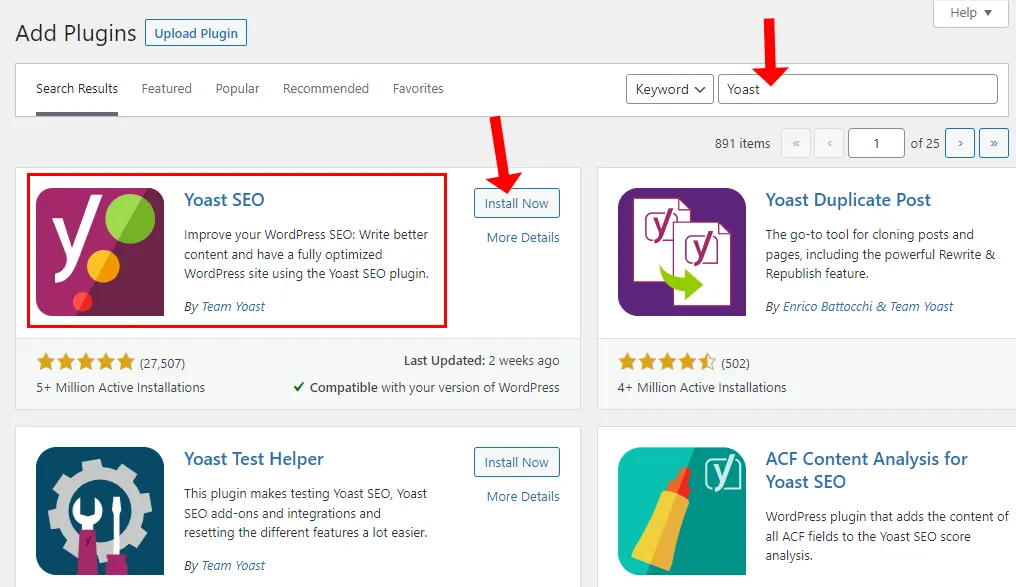
- Type “Yoast” in the plugins Search Box.
- The Yoast SEO will appear in the search results. Click the Install Now button.
- Click the Activate button.
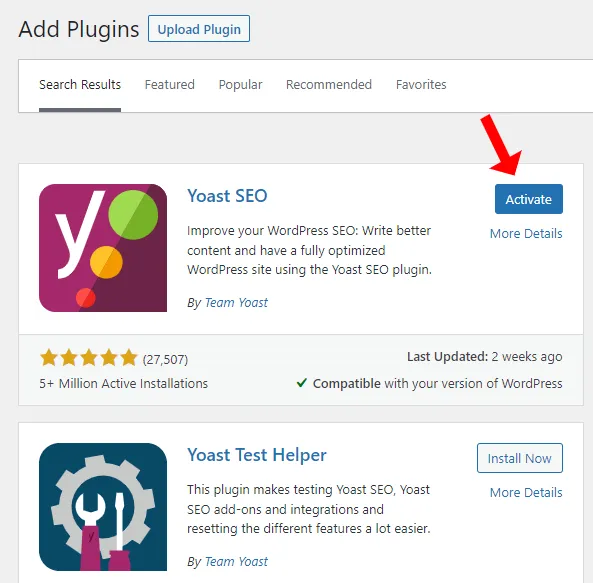
The Yoast SEO is installed and activated successfully, now it is time to set the essential Yoast SEO settings for your website.
- Click the Start first-time configuration! button.
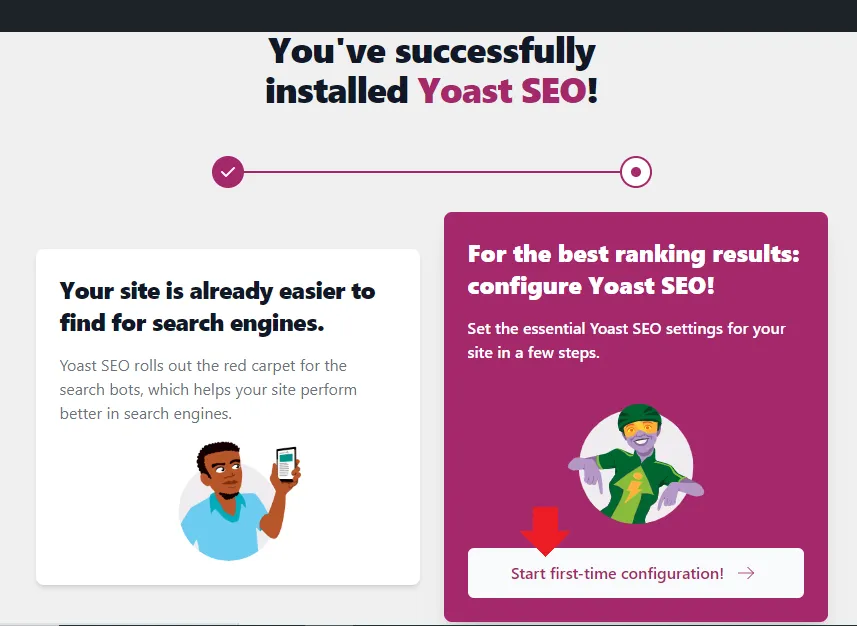
You’re now in the First-time configuration section.
- Click the Start SEO data optimization button located under the SEO DATA OPTIMIZATION.
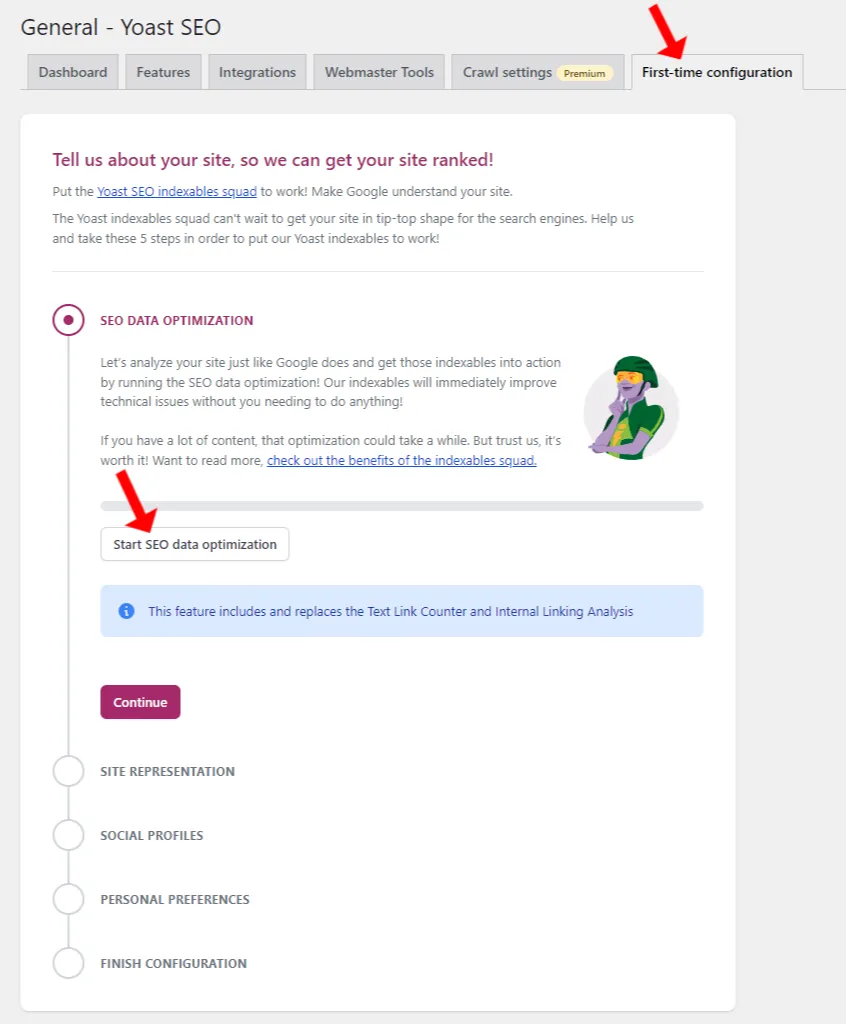
- The SEO data optimization will take some time, so be Patient.
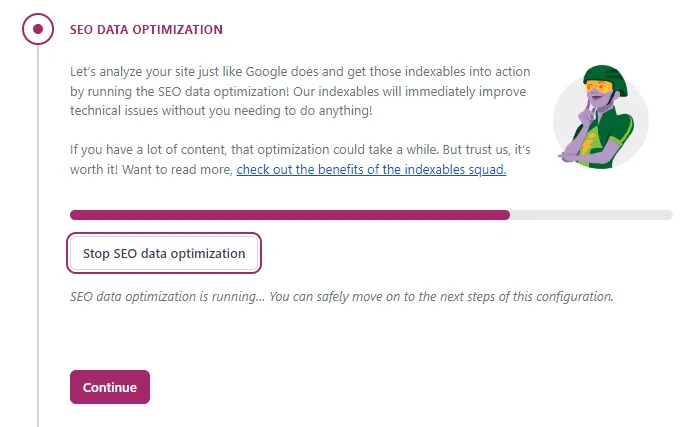
- Once it is done, you will see a message, “We’ve successfully analyzed your site“.
- Click the Continue button.
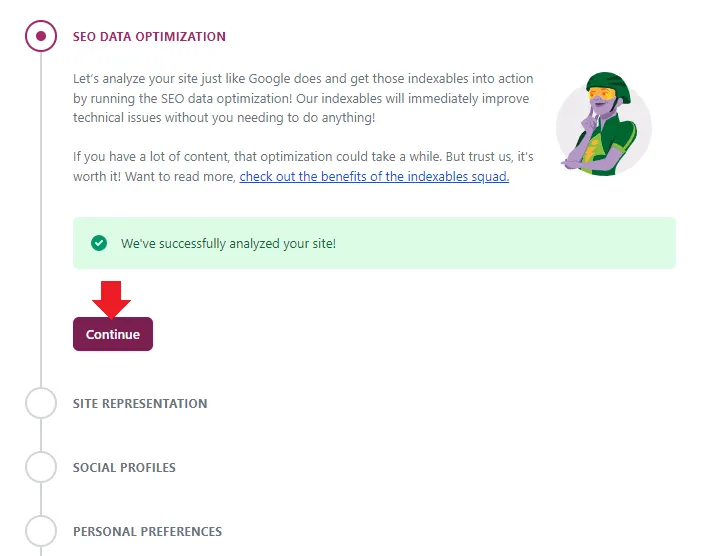
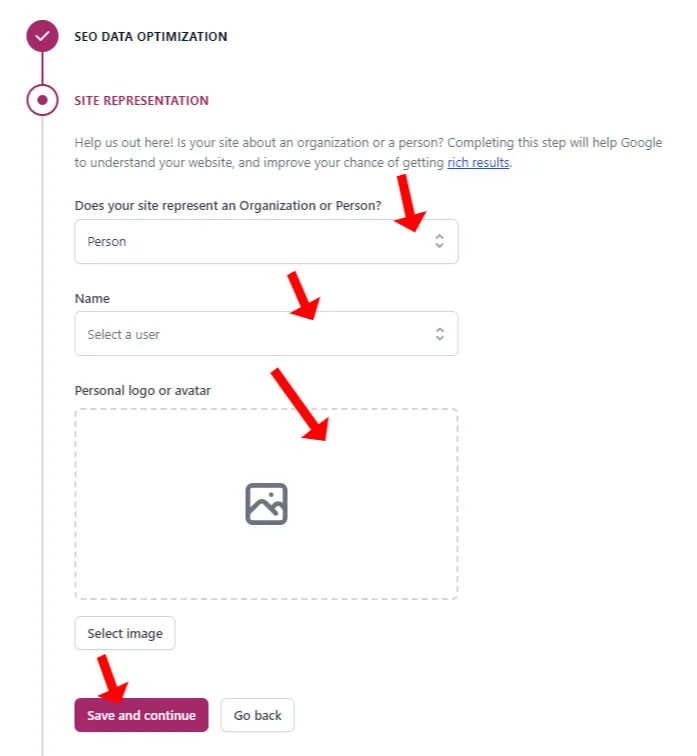
SEO Data optimization is done, now you are in the SITE REPRESENTATION section.
- In Does your site represent an organization or Person? Choose whether you’re a person or company/organization.
- In Name, select a user from the dropdown list. It will list your WordPress users.
- In Personal logo or avatar upload your personal picture. If your site represents a company then upload its logo.
- Click Save and Continue.
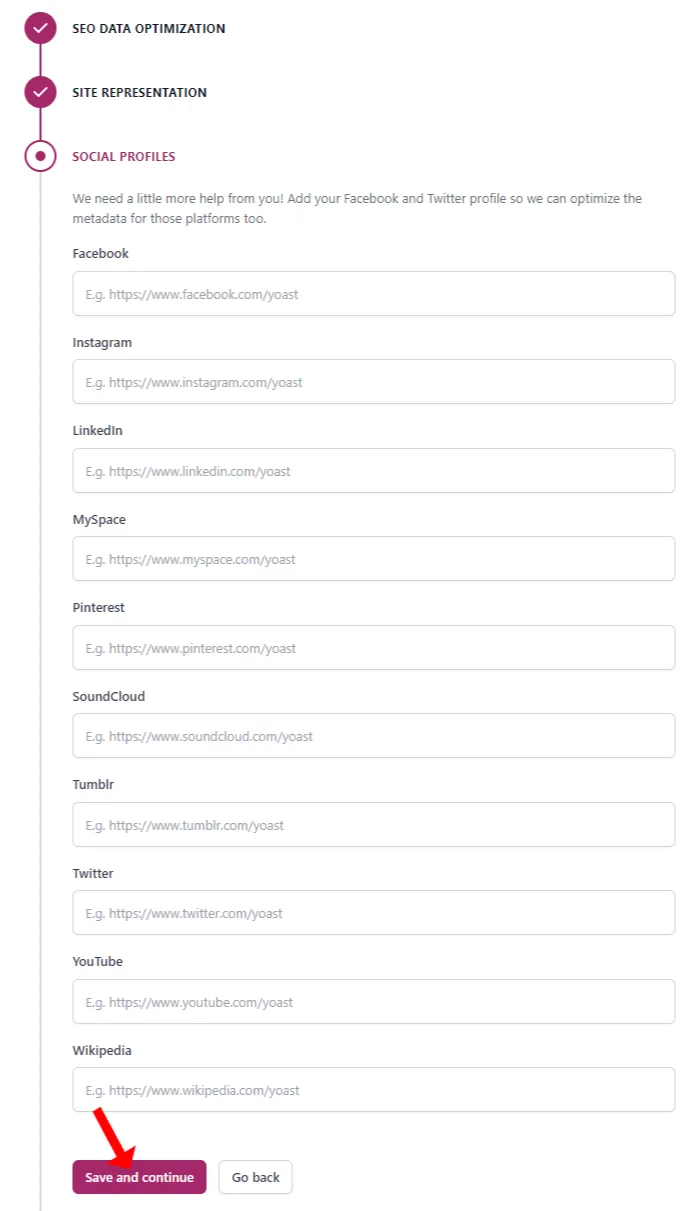
Social Profiles section.
- Provide the URLs of your Social Media profiles like Facebook, Twitter, Pinterest, Linked In, Instagram, YouTube, etc. The Social Media platforms that you don’t use leave their corresponding fields empty.
- Click the Save and Continue button.
PERSONAL PREFERENCES section.
- In “Can we collect anonymous information about your website and how you use it?“ Choose Yes, you can track my site data.
- Click the Save and Continue button.
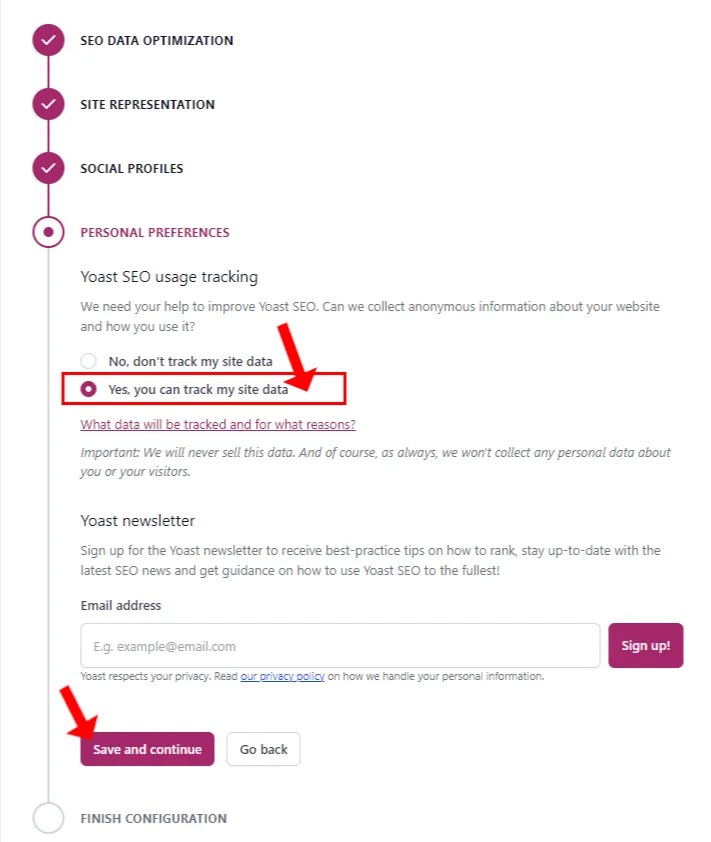
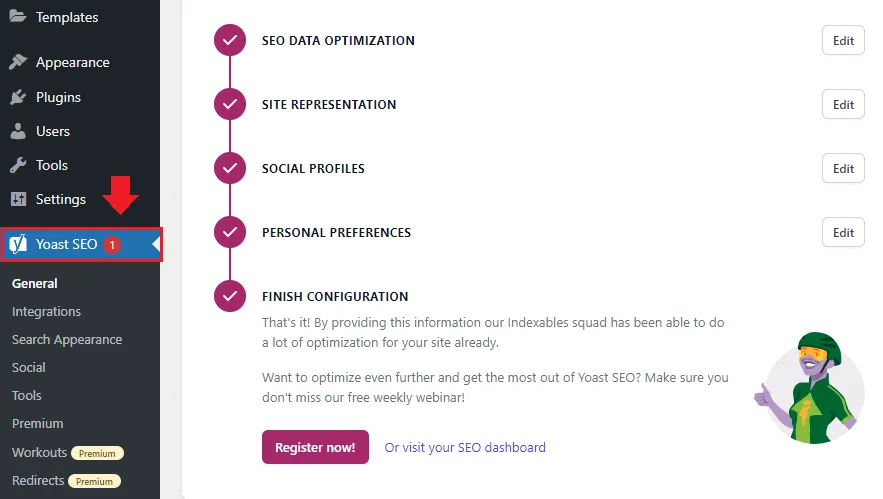
- You have successfully completed the Yoast First-time Configuration. In the next section, I will guide you on how to find your Sitemap URL in Yoast and submit in the Google Search Console.
You can access the Yoast SEO from the sidebar. It has 4 Settings sections i.e. General, Integration, Search Appearance, and Social, that are already configured during the First-time Configuration. You can go through these settings to preview them or make changes. The Tools page offers some builtin tools like Import & Export, File Editor, and Bulk Editor. Visit Yoast Academy to find more about Yoast settings and SEO.

02. How to Find XML Sitemap URL in Yoast
In this section, I will guide you on how to find XML Sitemap URL in Yoast and how to submit your XML Sitemap Index file URL in the Google Search Console.
A Sitemap is an XML file that lists the URLs of your website Posts, Pages, Categories, Tags, etc, that are available for crawling, and contains information related to each URL, like Number of Images, and Last Modified Data and Time.
Crawling is a process through which search engines using the crawlers to discover new and updated content (URLs, pages, images) for indexing and show them in the search results.
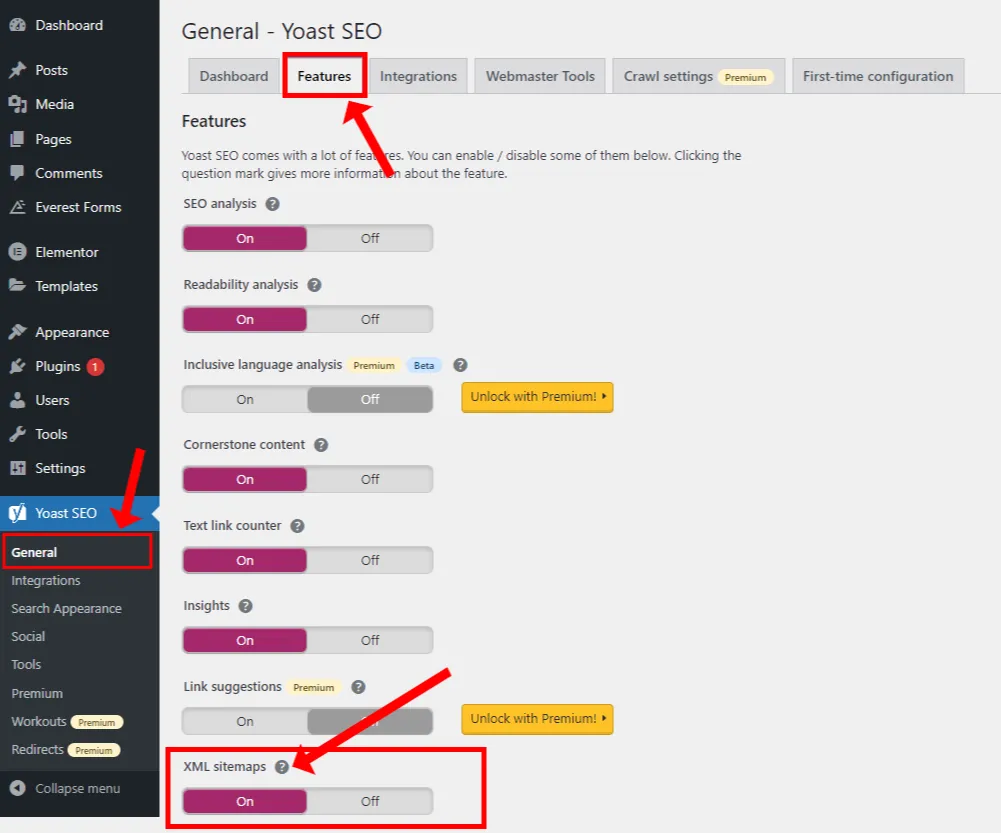
- Click Yoast SEO from the Sidebar and go to General section.
- Open the Features tab.
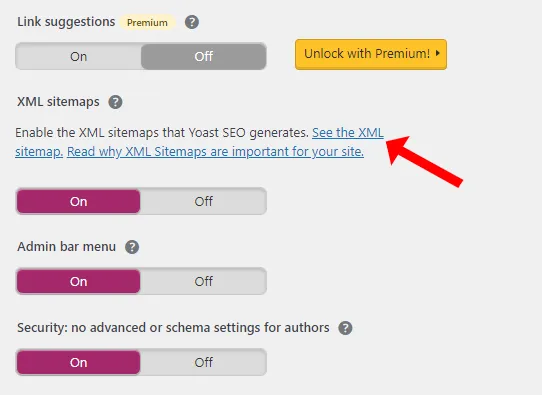
- Scroll-down to XML sitemaps. If it is not enabled, turn it On.
- Click the Question Mark symbol, as shown by the arrow. It will show the link of XML Sitemap Index file, as shown in the next step.
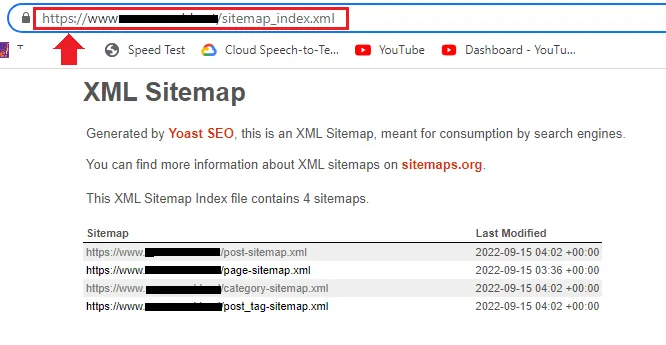
- Click See the XML sitemap link to open the XML Sitemap Index file. Its URL will be similar to this: “https://www.your_domain/sitemap_index.xml“.
- Here you can see that the XML Sitemap Index file contains four XML sitemaps. You can open them to view the URLs inside them.
- You have your XML Sitemap Index file URL, now Copy it from the browser’s URL Bar to submit it in your Google Search Console account, as I have guided in the below steps.
If you don’t have a Google Search Console account, follow this tutorial: How to Create Google Search Console Account and Connect Your Website to It.
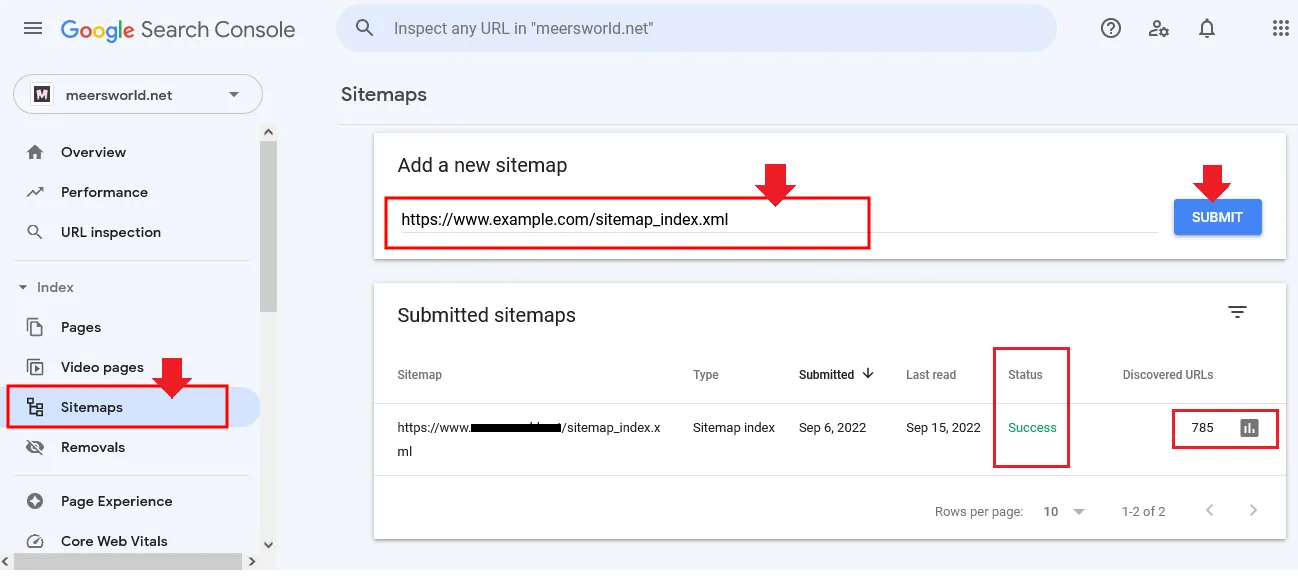
- Open your Google Search Console account.
- Go to Sitemaps from the Sidebar.
- In Add a new sitemap Paste the URL of your XML Sitemap Index file that you have Copied.
- Click the SUBMIT button.
- If it is submitted successfully you will see its Status “Success”. The Discovered URLs column shows you number of URLs Google Search Consoles has found from your XML sitemap files.
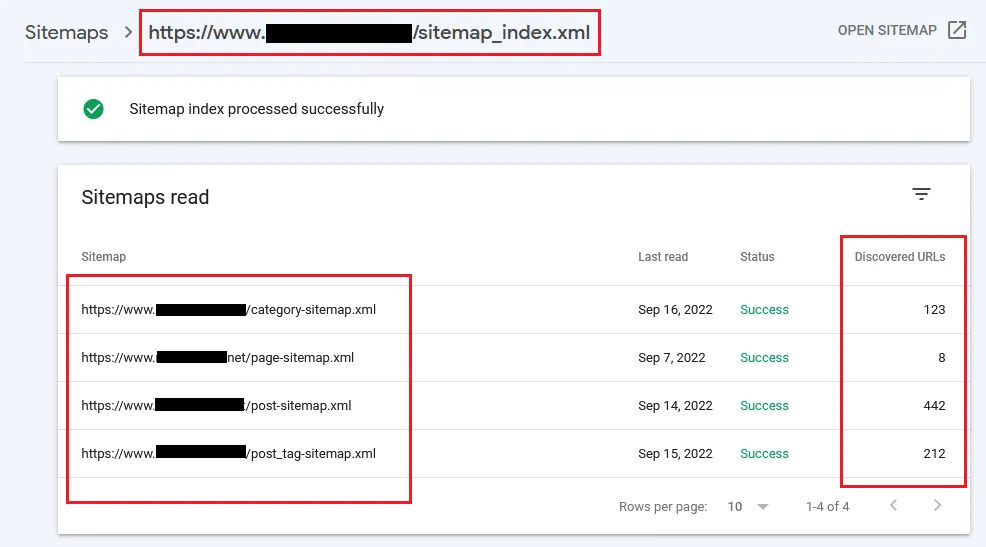
- In Submitted sitemaps table click on your submitted sitemap to know whether all your XML sitemaps inside the XML Sitemap Index file have been submitted or not.
- In the Sitemaps read table you can see that all the four sitemaps inside the XML Sitemap Index file have been submitted successfully. In the Discovered URLs column you can see how many URLs each sitemap contains.
03. How to Use Yoast SEO for Website Posts/Pages
In this section, I will guide you on how you can use Yoast for your individual website pages/posts in order to optimize them for SERPs.
- Create a new post or open an existing post or page of your website. The Yoast SEO settings for your pages are placed at bottom of the Post/Page Editor.
- The important parts of Yoast SEO are SEO and Readability. The SEO part does the content analysis of your page and tells you whether your page fulfills the SEO requirements, whereas the Readability part does the readability analysis using different checks to determine how readable your page content is. Both SEO and Readability are powered by Yoast’s advanced algorithm.
- If your page content passes the SEO & Readability analysis their corresponding “similes” and “dots” are turned green. You can fix the issues by going through the Problems and Improvements in Analysis Results, as I have shown below.
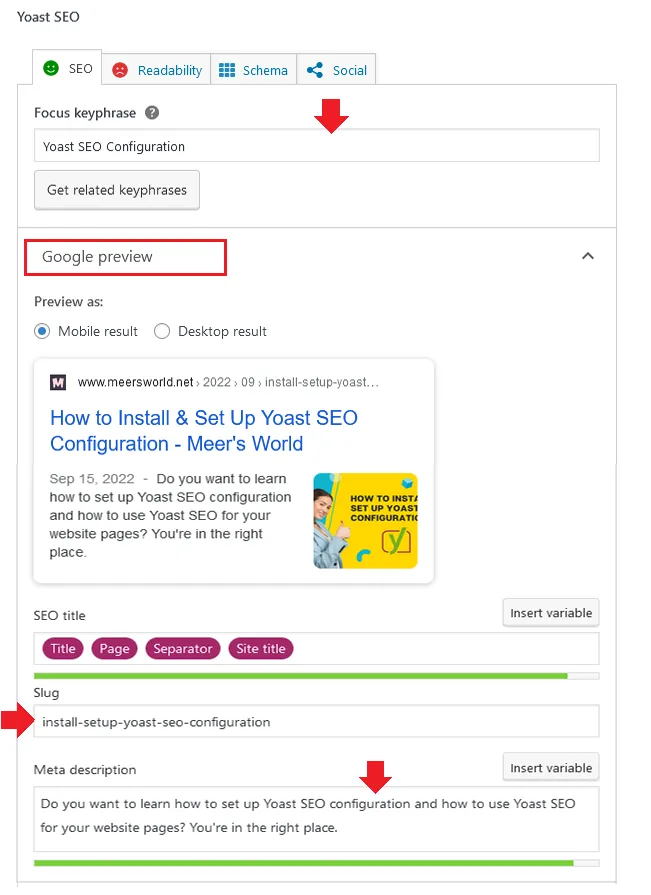
Let’s go through the SEO Configuration Part first.
- In the Focus keyphrase enter the keyword or phrase for which you want your page to be ranked in Google. The Keyphrase or Keywords should be present in your page’s Title and First paragraph.
- Google preview section shows how your page will be shown in the Google search results on Mobile and Desktop devices. It consists of Page Title, Page URL, Date, Featured Image (thumbnail), and Meta description.
- Site title allows you to control how your page title should be shown in the search results. The Title variable inserts title of the page. The Separator variables adds a symbol, like hyphen (-) between the Page Title and Site Title. The Site title variable is the name of your website, like here it is “Meer’s World“. You can add and remove variables. To add a variable click Insert variable or press % and type variable name like “%Page”.
- Slug is the unique identifying part of your page’s URL which is added after your domain address, like “https://www.meersworld.net/install-setup-yoast-configuration“. Yoast makes the slug from your page title. You can modify it. Each word or character in the slug are separated by hyphens (-). The Slug shouldn’t be too long.
- Meta description provides a brief summary of your page. Your Meta description should contain the “Focus keyphrase”.
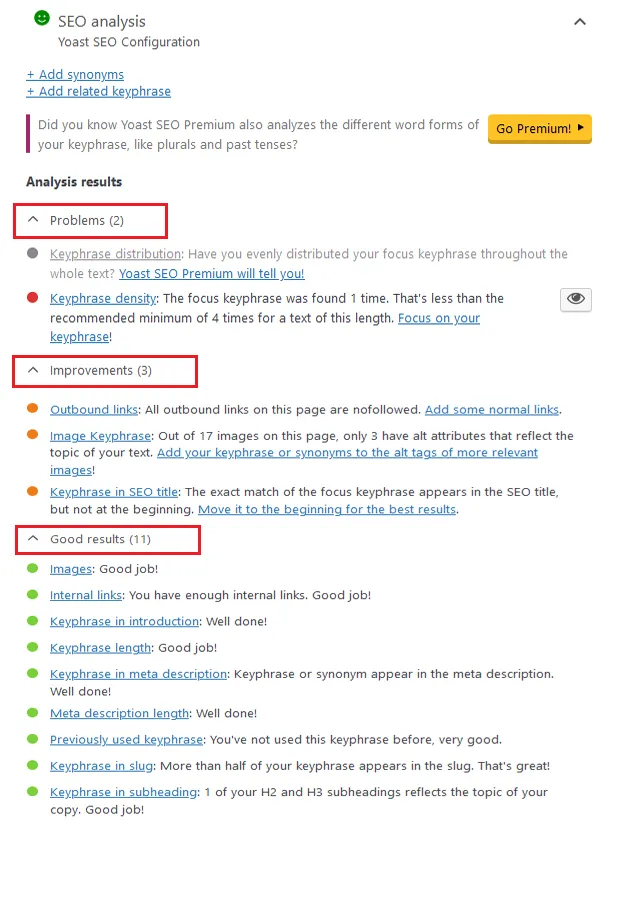
- Just below the Meta description there is SEO analysis section. It lists the Problems, Improvements, and Good Results for your page content. Yoast also provides a link to detailed information of the terms mentioned in Analysis Results, like Keyphrase density, Outbound links, Image Keyphrase, etc. Visit the pages to thoroughly understand them.
- Scroll-down to the Cornerstone Content section. The Cornerstone Content is the most important pages of your website that you want to rank highest in the Google search results. The Cornerstone posts/pages are those which are very detailed, informative and completely cover a topic. If you want to mark a page Cornerstone Content then turn on the Slider.

Readability Part.
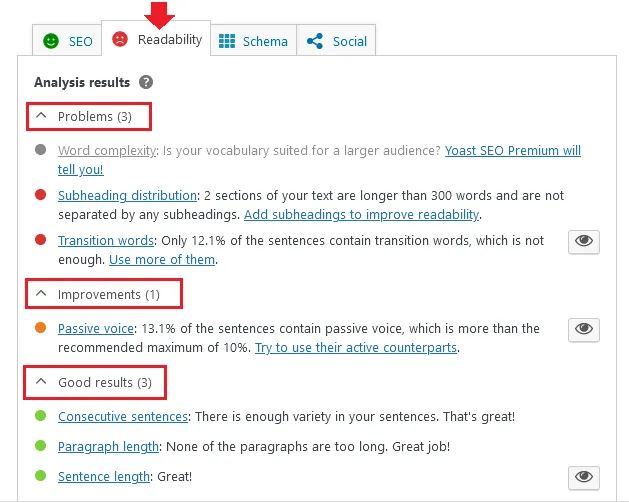
- You must have a good understanding of SEO part, now click the Readability tab to preview the Readability Analysis results.
- Like SEO Analysis, Readability Analysis also lists Problems, Improvements, and Good Results for your page.
- The Eye Icon highlights the relevant text in your content that needs to be correct. For example, if you click the Eye Icon of Passive Voice it will highlight the text of your page written in the passive voice.
Final Thoughts
So it was all about Yoast SEO, the leading WordPress SEO plugin. I hope that you would have a good understanding about Yoast SEO now. Read the Yoast documentation and helping material, there is lot more to explore on it. If you like this post then don’t forget to share with other people. Share your feedback in the comments section below.
Also Read
- How To Pass Core Web Vitals Test for Monetized WordPress Blog
- How To Stop Spam Comments In WordPress With reCaptcha
- Should We Use Nofollow & Sponsored With Affiliate Links?
- Solved: Yoast Meta Description Of Homepage Not Showing In Google
- How to Migrate Hosting & Transfer Domain to Namecheap
- How to Setup Free Newsletter Plugin on WordPress


Leave a Reply