Are you a beginner and want to create a new blog post in Tumblr, but don’t know how to use the Text Editor properly? You’re in the right place.
In this tutorial, I will guide you step-by-step on how to create a new Tumblr blog post and how to use Tumblr Text Editor (Settings, Options, Text Editing Tools).
Follow the steps to open the Text Editor and create a new blog post in Tumblr:
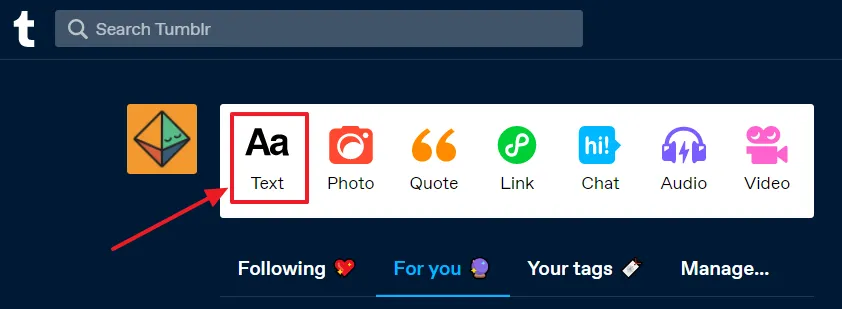
- Login to your Tumblr account and go to Dashboard.
- You can create 7 types of posts on Tumblr i.e. Text, Photo, Quotes, Link, Chat, Audio, and Video.
- Click the Aa (Text) post type. If you want to add a single photo, quote, link, chat, audio, or video then choose the corresponding post types. You can also add them in the Text post type.
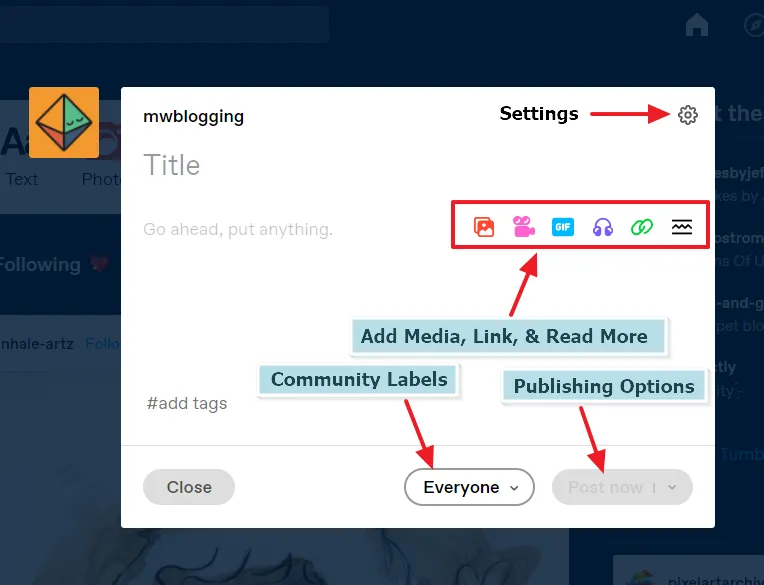
This is the Tumblr Rich Text Editor. Enter the post title in the Title and type your content in the text area that says, “Go ahead, put anything.“
The Text Editor Settings, Options, Adding Media, Adding Anchor Link to a Text, and Text Editing Tools are explained in the following sections:
- Settings
- Add Media, Links, and Read More
- Text Editing Tools
- Community Labels
- Publishing Options
RELATED
- Tumblr SEO Settings & On-Page SEO Guide | Increase Traffic
- How To Setup Custom Domain On Tumblr | Buy Own Domain
- How to Take Backup in Tumblr & Download to Your Computer
- 30+ Websites to Buy Premium Tumblr Themes | Free Download
01. Tumblr Text Editor Settings
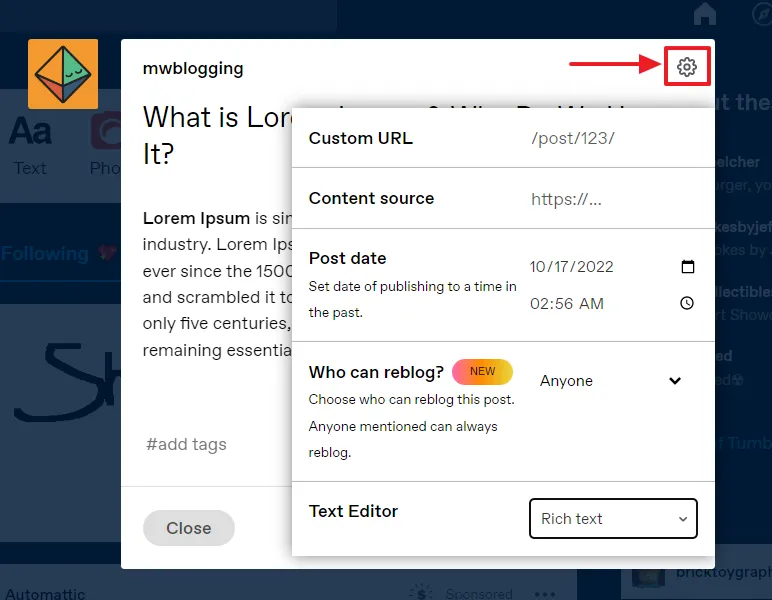
On the Text Editor, click the Settings icon located at top-right corner, as shown below.
- In the Custom URL you can add the slug of your blog post. A slug is a human-readable identifier that uniquely identifies a page of a website. In this post URL, slug is highlighted with the orange color, “https://example.tumblr.com/post/23567345356/how-to-create-a-blog-post“.
By default Tumblr generates slug from your post title. If you don’t want to customize the slug, leave this field as it is. Each character and word in a slug is separated by hyphen “-“. The slug shouldn’t be too long.
- If your post contains content from some other website, paste its URL in the Content source to provide the source reference. Otherwise leave this field empty.
- The Post date option allows you to publish your new post in the past (old) date. Click the Calendar icon to choose a past date.
- The Who can reblog option allows you to set permission whether you want to allow people to reblog your post or not. The “reblog” is same as what “retweet” on Twitter.
- The Text Editor option allows you to switch the text editor. There are three types of Tumblr Text Editors i.e. Rich Text Editor, HTML Editor, and Markdown.
The Rich Text Editor is the default Tumblr Editor made for common users. It is easy-to-use and loaded with plenty of features.
The HTML Editor in Tumblr allows you to edit or create your post in the HTML View (HTML Source Code View). The Markdown Editor in Tumblr allows you to create plain text formatting syntax using the Markdown, a lightweight markup language.
02. Add Media, Link, and Read More
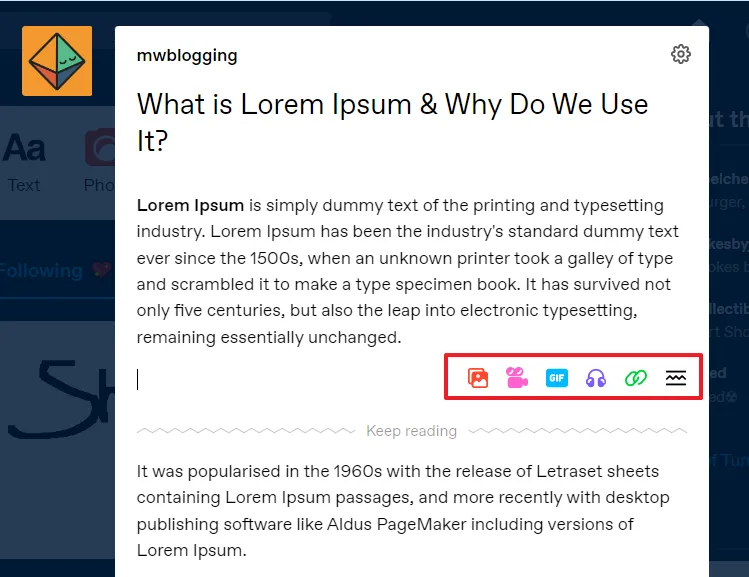
When you press Enter or go to a New Line in the Tumblr Rich Text-Editor, there appears a Media Toolbar from which you can add/insert Images, Videos, GIFs, Website Links, and Read More link into your post.
The Read More hides the content that lies below the line, instead it shows a Keep Reading link. Below you can see that I have added the Read More after the first paragraph. The whole content of the post will load only when a visitor will click the Keep Reading link. You can preview in the last step.
If you add an Image or GIF, don’t forget to add the ALT text (image description). I have shown in the next step.
The ALT stands for Alternate Text For. It describes the appearance or purpose of the image/GIF.
The ALT is mainly used for three reasons (1) Displayed when an image doesn’t load for some reason (2) Used by screen readers to help visually impaired people (3) Used by Search Engines like Google to display your image in the search results.
- Go to bottom of the image, and click the Ellipsis Icon (3 horizontal dots).
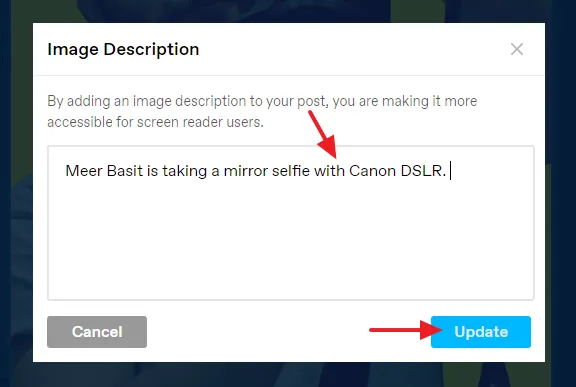
- Click the Update Image Description option.
Info: At opposite side (your left) of Ellipsis icon, you can see a Link Icon. It allows you to add a link of a website or a page to your image that will be opened when someone will click on the image.
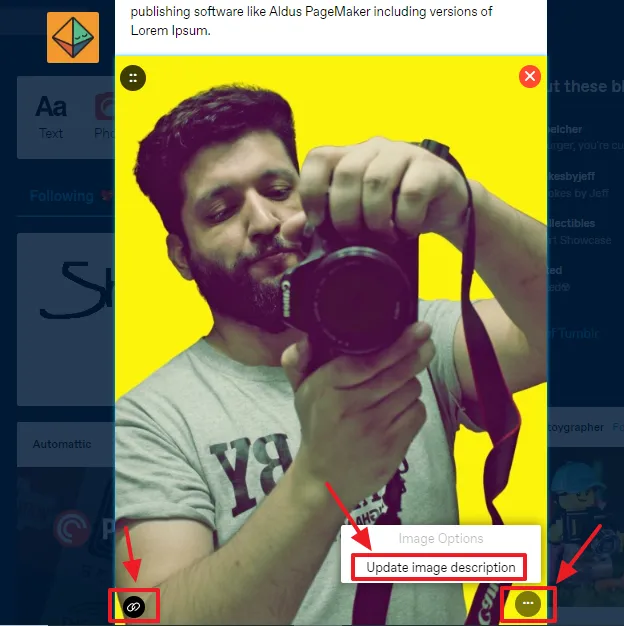
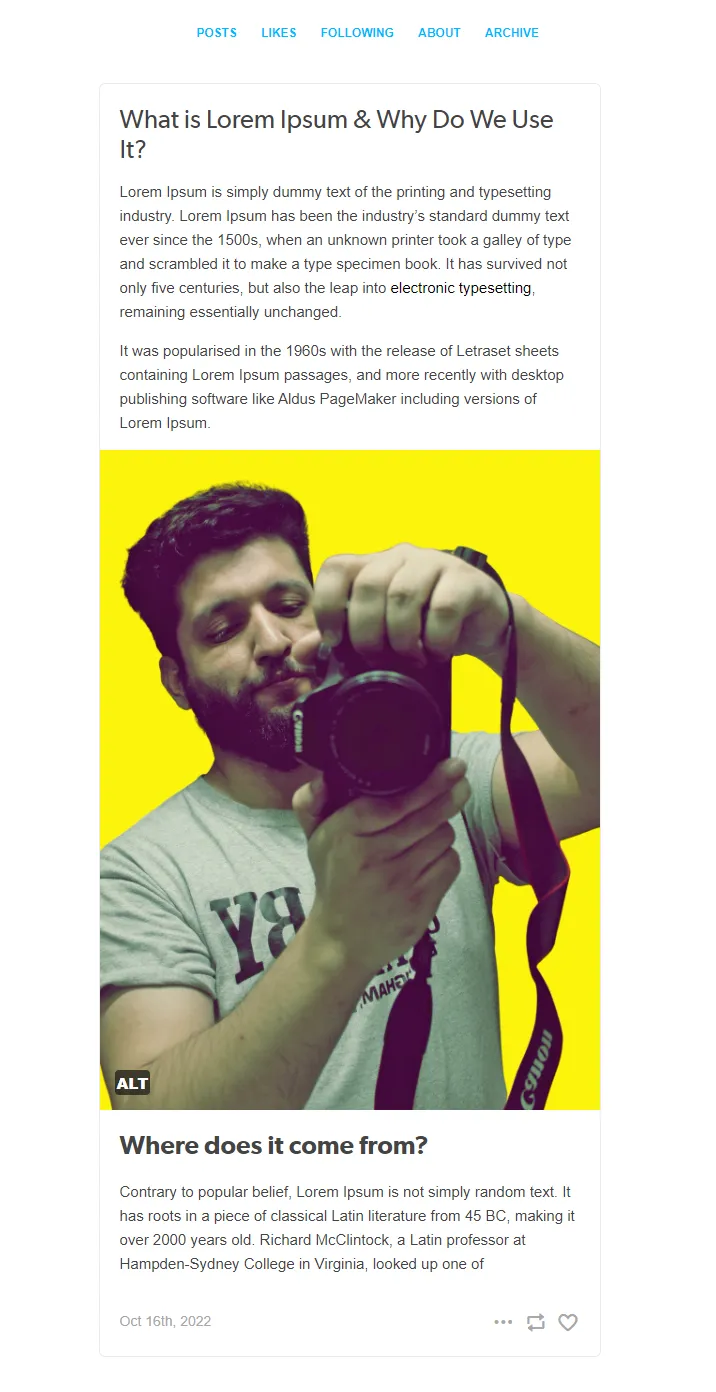
- Add the ALT text in the Image Description. For the above image I have added, “Meer Basit is taking a mirror selfie with Canon DSLR“.
- Click the Update button.
03. Text Editing Tools
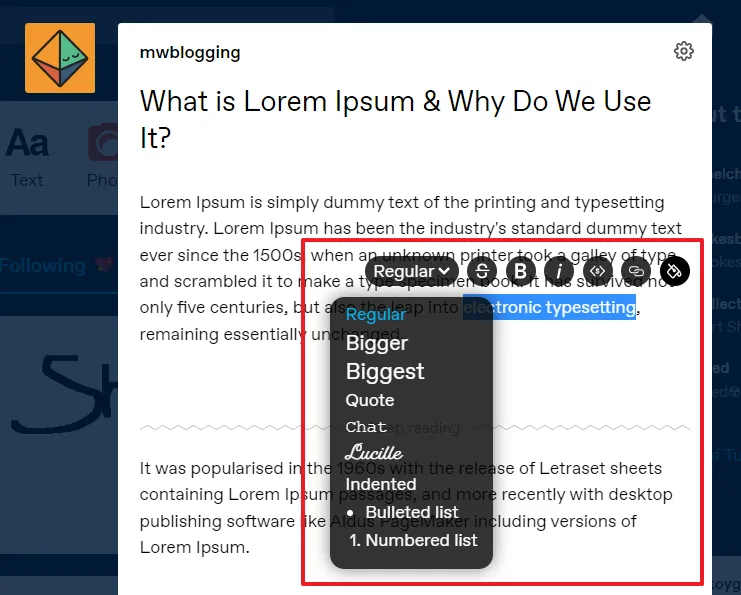
The Text Editing Tools allow you to customize/edit the text of your post. The Text Editing Toolkit appears on the Rich Text Editor when you select a text, as you can see below.
- The First Option (Dropdown list), contains Text Styles, Headings, and List Styles. These styles apply to whole paragraph.
Regular means a regular text of standard size. Bigger adds Heading H2, and Biggest adds Heading H1. Tumblr supports only H1, and H2 headings tags.
If you want to add a quotation use Quote. If you want to add a chat use Chat. The Lucille is a font with italic style. The Bulleted list and Numbered list are two list styles.
- The
Sis a Strikethrough symbol. The Strikethrough is used to indicate that text is no longer valid or has been removed. - B is used to bold the text.
- i is used to make the text italic.
- <s> makes the selected text small.
- The Link Symbol is used to add anchor link to a selected text.
- The last symbol is Text Color. You can apply any color to a selected text.
04. Community Labels
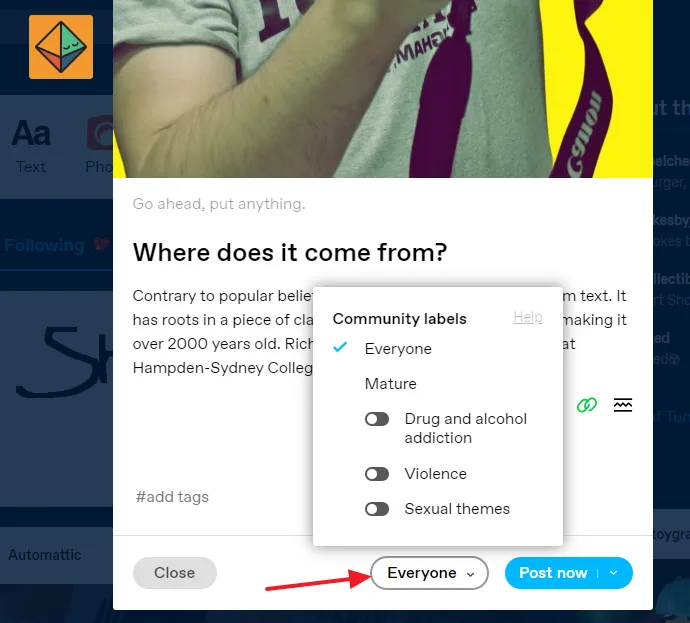
The Community Labels allow you to choose the right audience/community to view your post. They give you more control over who can see the post.
There are two main labels i.e. Everyone and Mature. Everyone means the post can be seen by anyone, no age restriction, no warning. For Mature, you have three more labels to further filter the visibility. You can use it on its own as well as with the sub-community labels.
Suppose you think your post is for mature audience, but none of the sub-community labels are related to it. In this case, for showing some sort of a warning on the post before people see it, then only select Mature.
If you enable any of the sub-community labels, Mature will be automatically selected.
05. Publishing Options
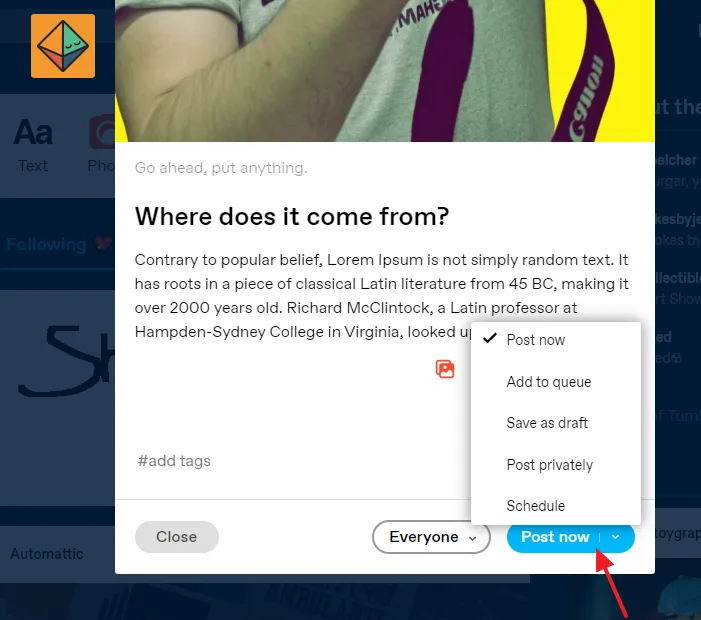
There are 5 Publishing Options for a Tumblr post i.e. Post now, Add to queue, Save as draft, Post privately, and Schedule.
- The Post now publishes the post as you click on it.
- The Add to queue option in Tumblr puts the post in a Queue. From Queue, the post is automatically published the next day over a period that you can set in the Queue settings. It is an easy way to make your blog consistent and active. In the next step, I have shown how to access Queue in Tumblr.
- The Save as Draft puts the post in Drafts. This option is used when your post is incomplete or you have to unpublish a published post. You can open the post from Drafts anytime and continue working on it.
- The Post Privately option in Tumblr allows you to make your post private. Only you can view the Private Post or the people/person to who you will share the Private Post URL. It is same as Unlisted option on YouTube. You can also change the status of post from Post Private to Post Now and vice versa.
- The Schedule option in Tumblr allows you to set a post-publishing Date and Time, on which it will be automatically published. You can schedule a post for later publishing even for years.
Follow the steps to access the Queue in Tumblr:
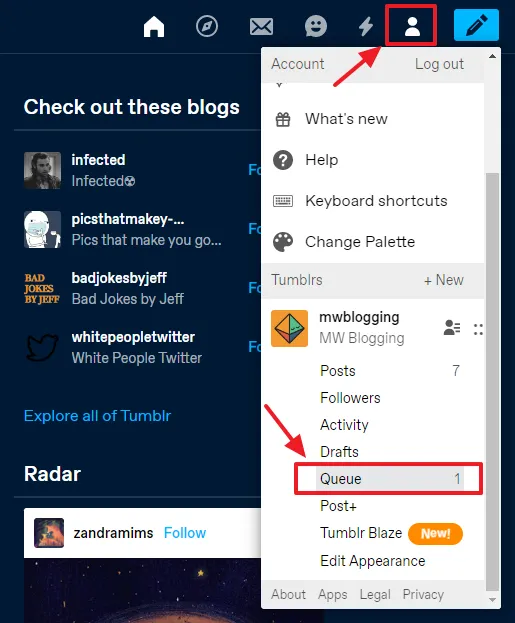
- Click the Account icon located at your top-right corner.
- Scroll-down to Tumblrs section and click the Queue. You can also see that there is a post in the Queue.
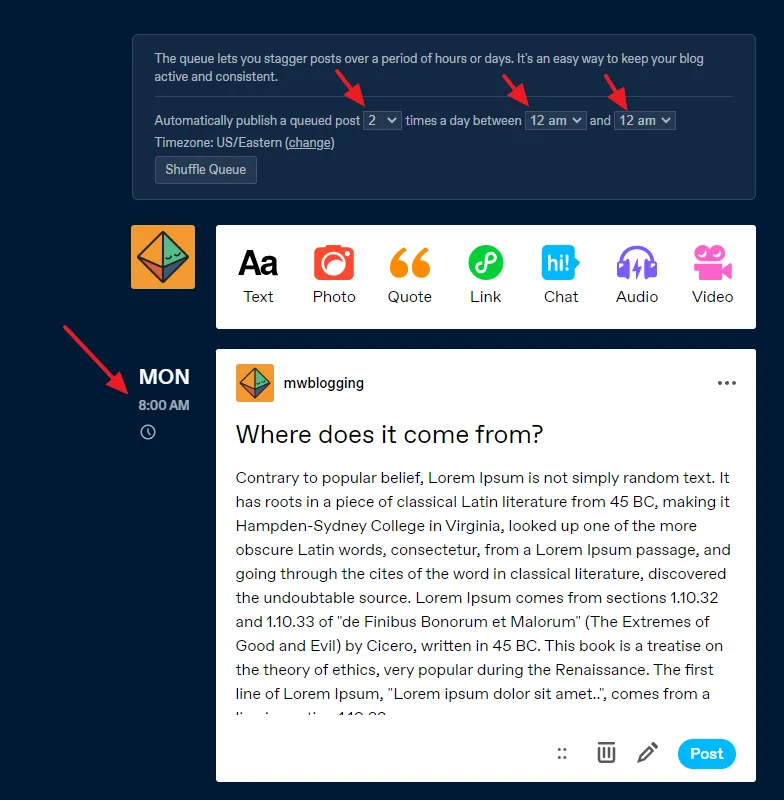
- On top of the page there are Queue settings where you can set how many times a day between a time range you want your Queued posts to be published. The Shuffle Queue option changes the publishing order of posts in the Queue.
- Below you can see that a post is set to be published automatically on Monday at 8.00AM.
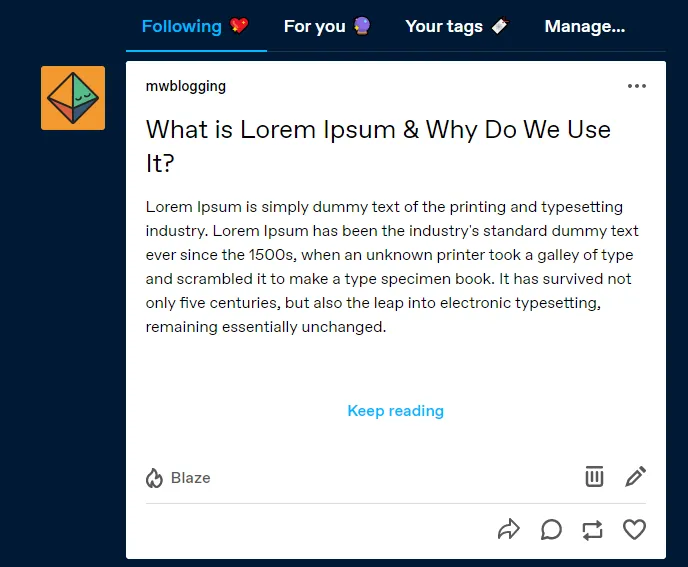
- This is how a published blog post with a Read More appears on Tumblr dashboard. The post is fully loaded when a user clicks on the Keep reading link, as I have shown in the next step.
- This is a fully loaded blog post on a Tumblr blog. The layout could be different depending on your theme. Find plenty of responsive aesthetics Tumblr themes.
So it was all about creating a new Tumblr blog post in the Rich Text Editor. Hope you would have enjoyed this guide. If you like this post then don’t forget to share with the other people. Share your feedback in the comments section below.
Also Read



Leave a Reply