Do you want to setup a free Newsletter plugin on WordPress to manage email lists and send your subscribers amazing newsletters (latest news, tips, promotions, updates relating to your products or services, etc)? You’re in the right place.
In this tutorial, I will guide you step by step on how to install & setup Newsletter plugin, customize its settings, create lists, and send newsletters to subscribers from your WordPress site.
Newsletter is a free email marketing tool developed by Stefano Lissa & The Newsletter Team, that allows you to manage lists, collect unlimited subscribers via subscription forms, and send unlimited professional newsletters in few clicks.
Following topics will be covered in this post:
- Benefits of Newsletter
- Features and Limitations of Free Newsletter Plugin
- How to Install Newsletter Plugin on WordPress
- How To Insert Newsletter Subscription Form On Website
- How to Customize Newsletter Main Settings
- How to Create Lists on Newsletter
- How to Customize Subscription Settings
- How to View Newsletter Subscribers and Customize Settings
- How to Create and Send Newsletters to Subscribers
01. Benefits of Newsletter
According to Statista number of email users worldwide are approximately 4.26 billion and it will reach 4.37 billion in 2026. From these statistics one can easily acknowledge that how big and powerful can be newsletter emails to grow your audience, reach, business, sales, and revenue.
Here are some of the key benefits of newsletter:
- Newsletters help you to improve the website traffic.
- You can keep your subscribers updated about the latest news, new content, promotional offers, sales, deals, new products, new services, and more. By doing so you can make your subscribers your loyal readers or customers.
- Your newsletter subscribers are your potential customers. It means that without spending money on advertising, social media marketing, guest posting, etc, you can directly access your potential customers.
- Newsletters help you to boost your revenue. For example, If you’re an affiliate you can share discount coupons & deals like Black Friday, Christmas, Cyber Monday, etc.
- In order to manage your subscribers you can create lists.

02. Features and Limitations of Free Newsletter Plugin
The Newsletter Plugin doesn’t have any limit on subscribers or newsletters, you can manage unlimited email addresses and send unlimited emails for free. In addition to free features the Newsletter plugin also offers advanced premium (paid) features through which you can automate actions, get detailed reports, and do much more.
There are three pricing plains (1) Basic (Free) (2) Blogger (supports 3 sites) (3) Agency (unlimited sites).
The Basic plan offers Welcome email, Double and single opt-in, GDPR compliant, Visual composer, Responsive emails, List management, Targeting logic (and/or), Tunable delivery speed, Subscription forms, Every text customizable, Multilanguage ready, and 10+ free addons.
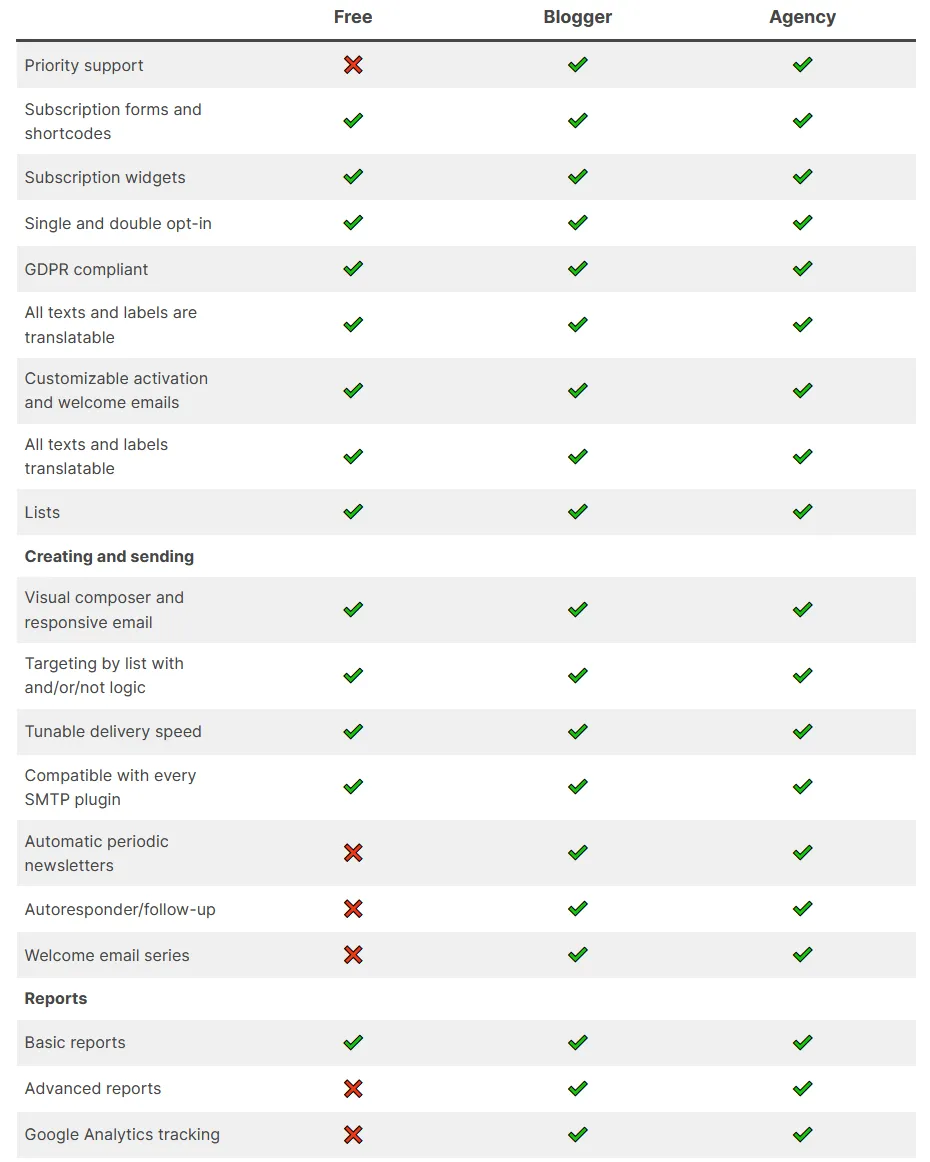
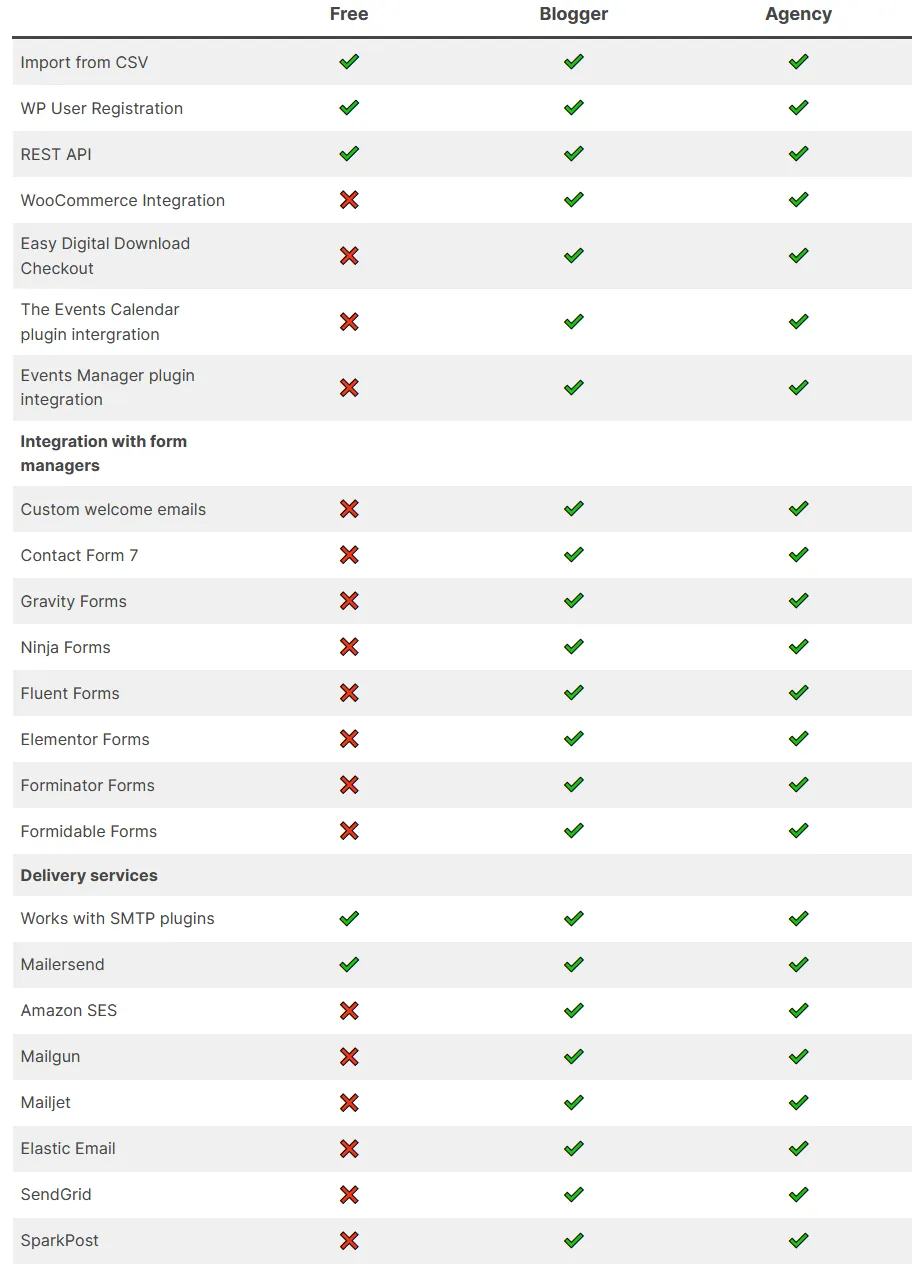
The Blogger and Agency plans offer 1 year of updates and priority support, Advanced reports and geolocation, Newsletters auto-generation, Autoresponders, Integration with delivery services, Integration with form builders, WooCommerce integration, 35+ professional addons, and much more, as you can see in the next step.
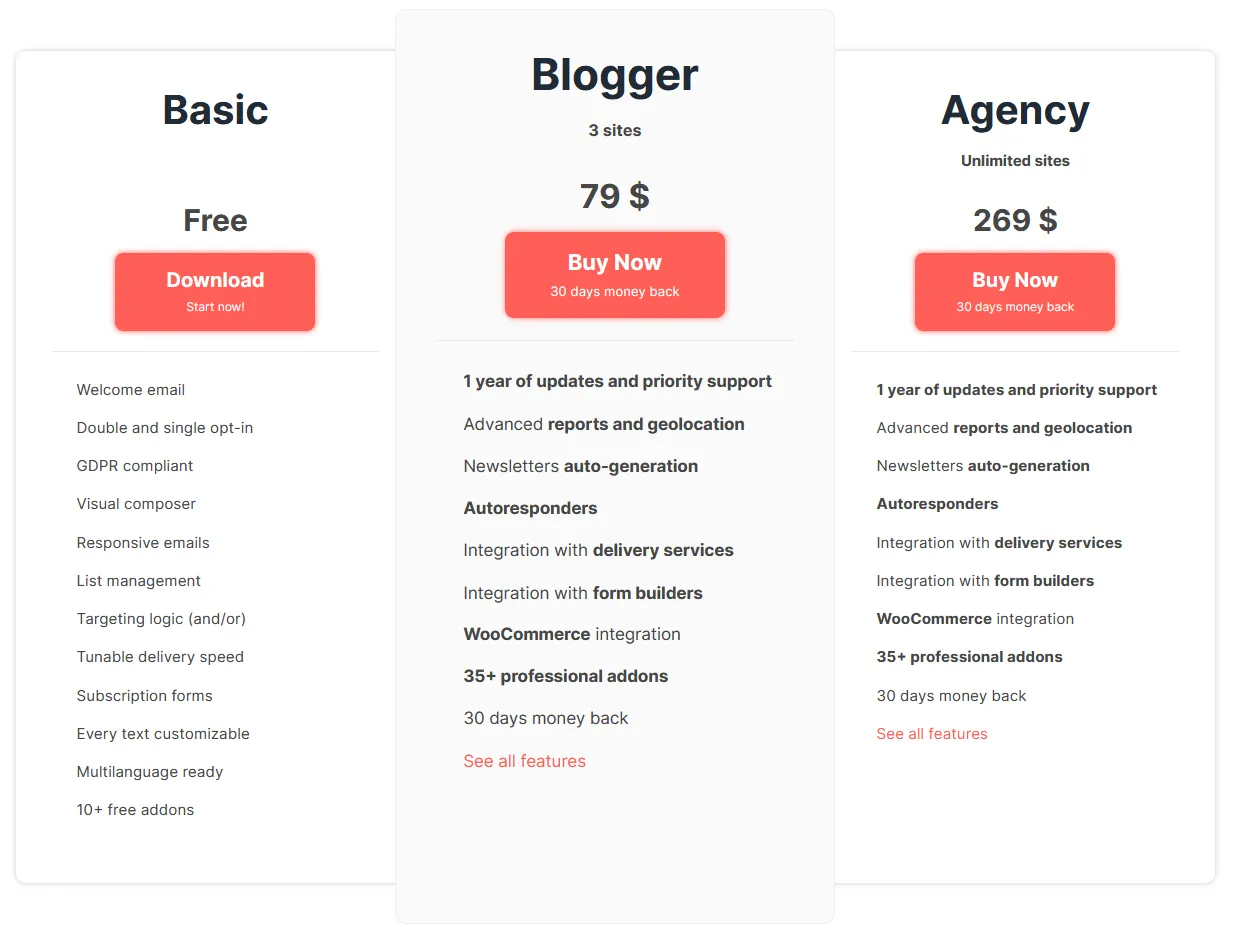
Main Features
Integrations and Advanced Features
03. How to Install Newsletter Plugin on WordPress
In this section, I will guide you on how to install Newsletter plugin on WordPress.
- On your WordPress Dashboard go to Plugins.
- Click on the Add New Plugin.
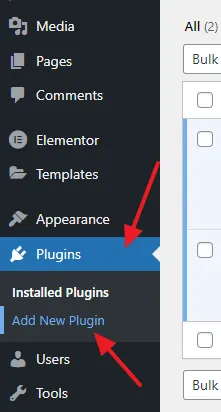
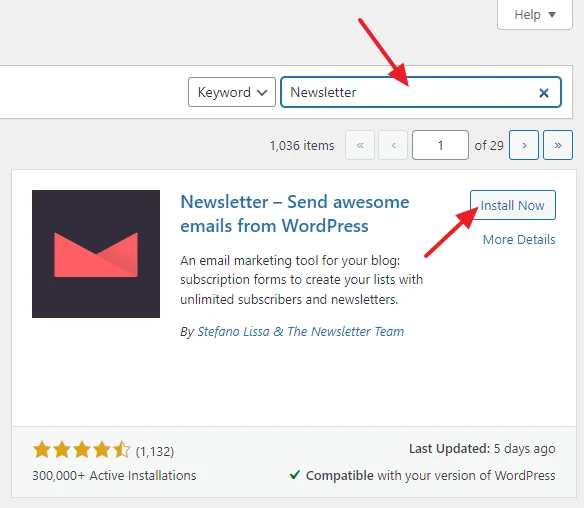
- Enter the Newsletter in the search box. The plugin will appear in the search results.
- Click on the Install Now button.
- Click on the Activate button.
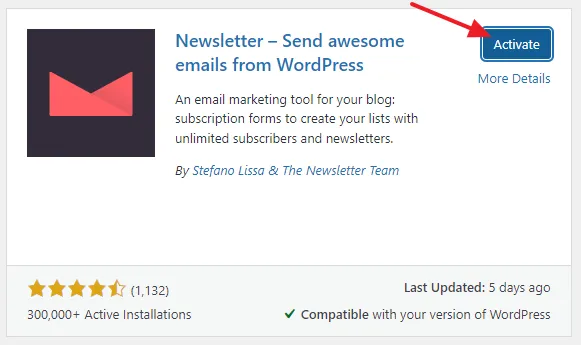
The Newsletter Plugin is installed successfully. Follow the next few steps to quickly setup the basic settings of the Newsletter plugin. You can customize these settings from the Settings after the installation is finished, as I have guided in the Section 6 below.
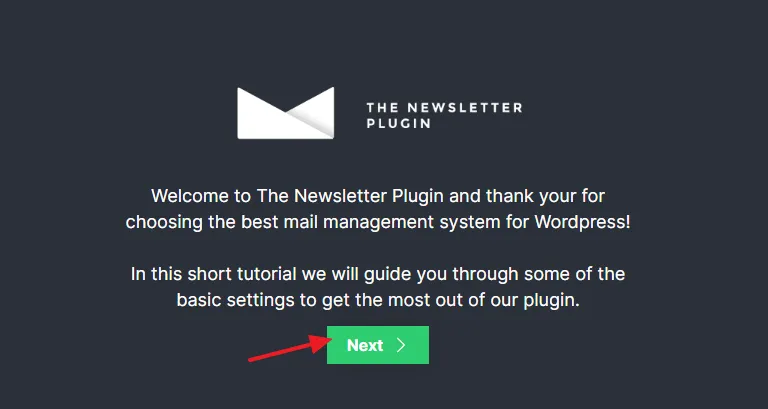
- Click on the Next button.
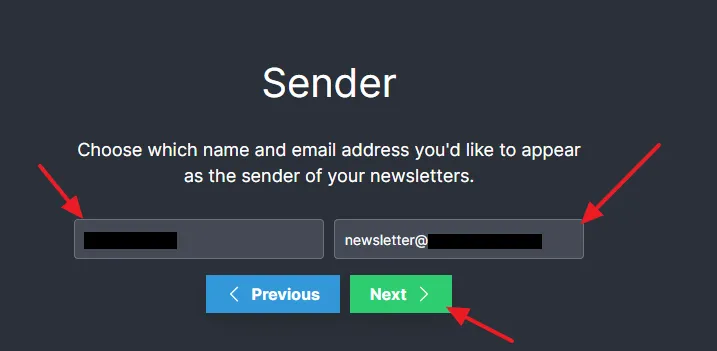
Note: If the Name and Email Address fields go behind the Previous and Next buttons, press CTRL button and hit the Dash (-) button on keyboard a few times to zoom out the screen.
- Enter Name and Email Address that you would like to appear as the sender of your newsletters. In the Name you can enter your blog/site name. Your email address can be like newsletter@your_domain. Don’t use public domain email address such as Gmail, Yahoo!, AOL, Outlook, etc.
- Click on the Next button.
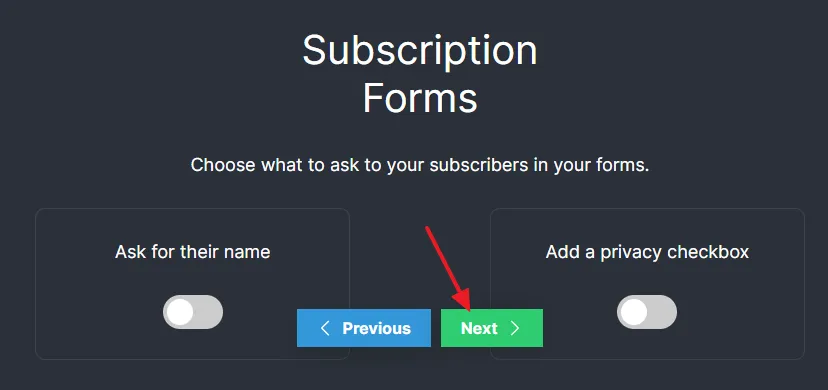
If you want to collect the name of a subscriber alongside email address on newsletter subscription form enable Ask for thier name, and if you want to add privacy checkbox enable the Add a privacy checkbox. Normally you don’t ask for name on subscription forms.
- Click on the Next button.
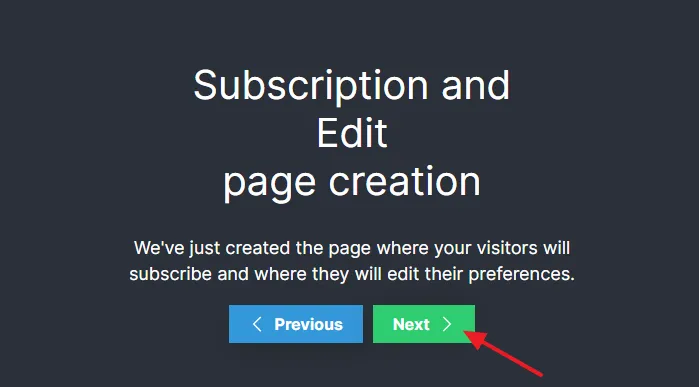
The Newsletter plugin also creates a separate page on your site where your visitors will subscribe and edit their preferences.
- Click on the Next button.
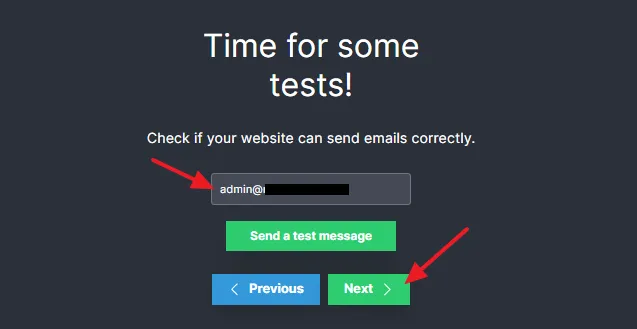
- Now it’s time to test whether your website can send emails correctly or not. Enter an email address and click on the Send a test message button.
- Open your email account and check whether the test email is received or not. If the email is received, means your site will send newsletter emails correctly.
- Click on the Next button.
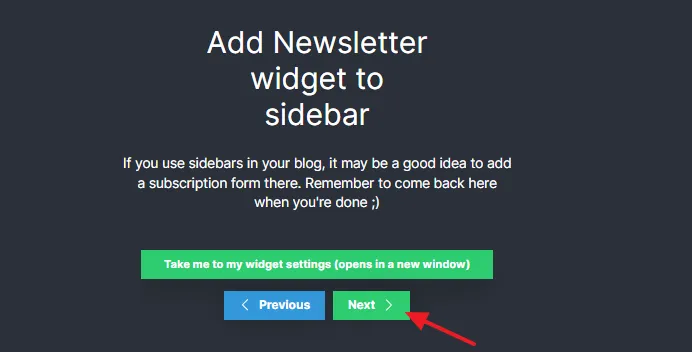
- One of the best places to insert Newsletter subscription form on your website is sidebar. If you want to insert the newsletter subscription form on sidebar click on the Take me to my widget settings (opens in a new window) button, otherwise skip this step and click on the Next button. I have guided in the next section, how to insert subscription form on your website.
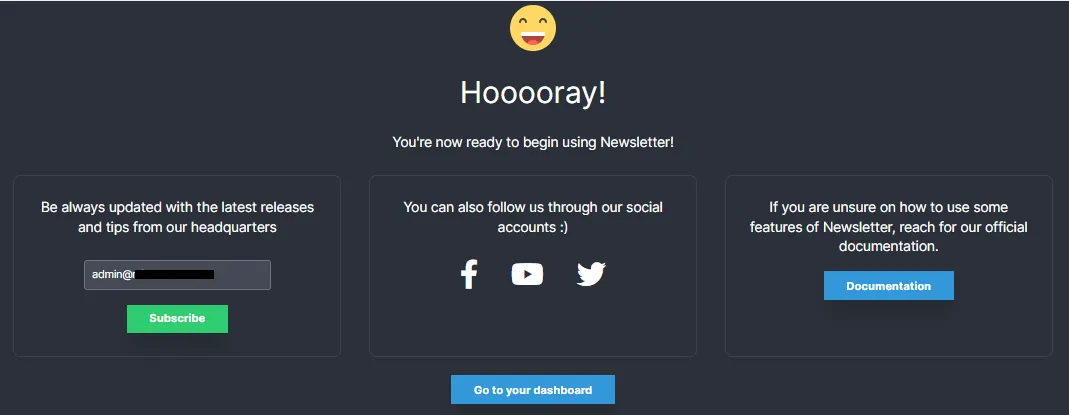
- The quick setup of Newsletter Plugin is completed successfully. Click on the Go to your Dashboard button.
04. How To Insert Newsletter Subscription Form On Website
In this section, I will guide you on how to insert the Newsletter Subscription Form on your WordPress site.
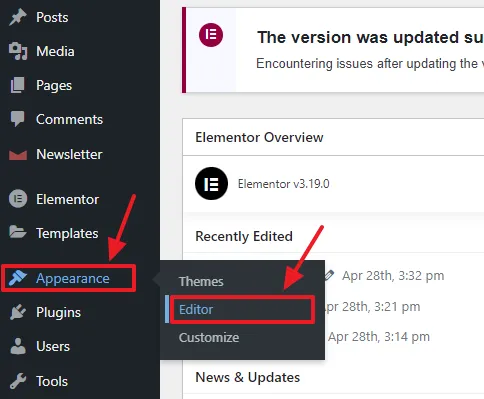
- Go to Appearance from the sidebar.
- Click on the Editor.
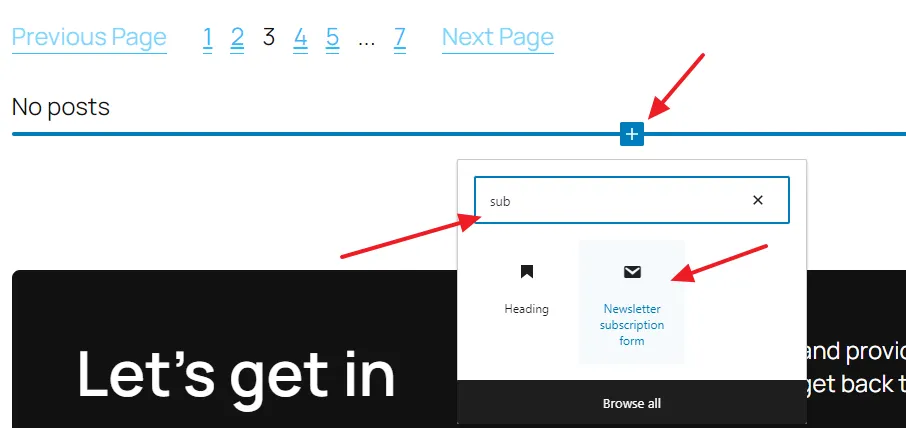
- Go to a place on your WordPress theme where you want to insert the Newsletter Subscription form and click on the Block Inserter icon (+).
- In the Block Search bar type Newsletter subscription form. It will appear in the search results. Click on it to insert.
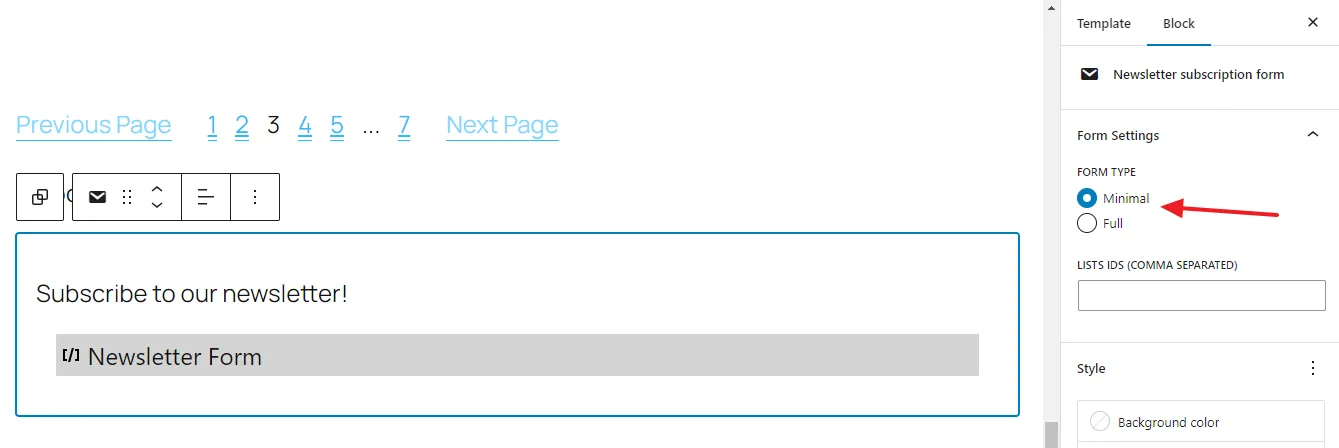
- You can see that the form has been inserted. Click on the form to open its settings. There are two types of forms (1) Minimal (2) Full. The Minimal Form shows only Email field and Subscribe button in a single row. It doesn’t display Lists.
- You can also change the Background Color, Text Color, Button Color, and Padding of Newsletter Subscription Form.
- You can add remove subscription form fields from the Form Settings, as I have guided in the Section 7 below.
- This is how the Minimal Newsletter Subscription form looks like.

- This is the Full Newsletter Subscription form. If you add Lists and other fields from Form Settings they will appear alongside email and Subscribe button.

05. How to Customize Newsletter Main Settings
In this section, I will guide you on how to customize the Newsletter Main settings.
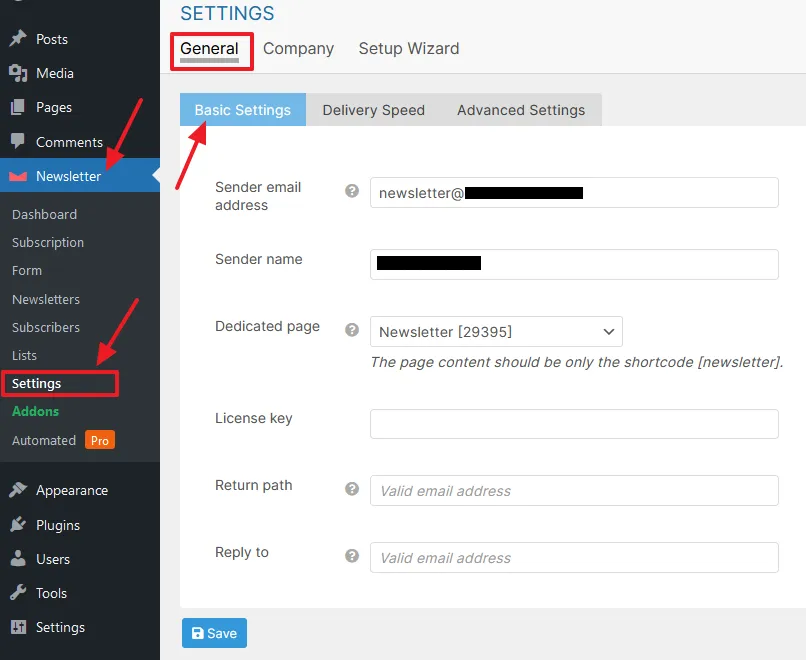
Go to Newsletter from the WordPress sidebar and click on the Settings. Click on the General tab and go to Basic Settings.
- The Sender email address and Sender name are already discussed in the installation section.
- A Dedicated WordPress standard newsletter page is created automatically during the quick setup to show its service messages such as activation, welcome, goodbye, etc.
- The Return path is an email address where all the returned messages are returned.
- The Reply to is an email address that you can specify to receive messages if a subscriber wants to reply to your newsletter.
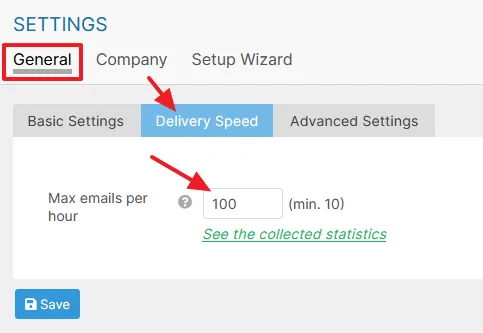
- Click on the Delivery Speed tab.
- In the Max emails per hour you can set the delivery speed of your newsletters per hour. For example, if you set 100 the delivery engine will send 100 newsletters per hour. You can also ask your hosting provider to give you the ideal value. If the value is too high your hosting provider may not tolerate the load.
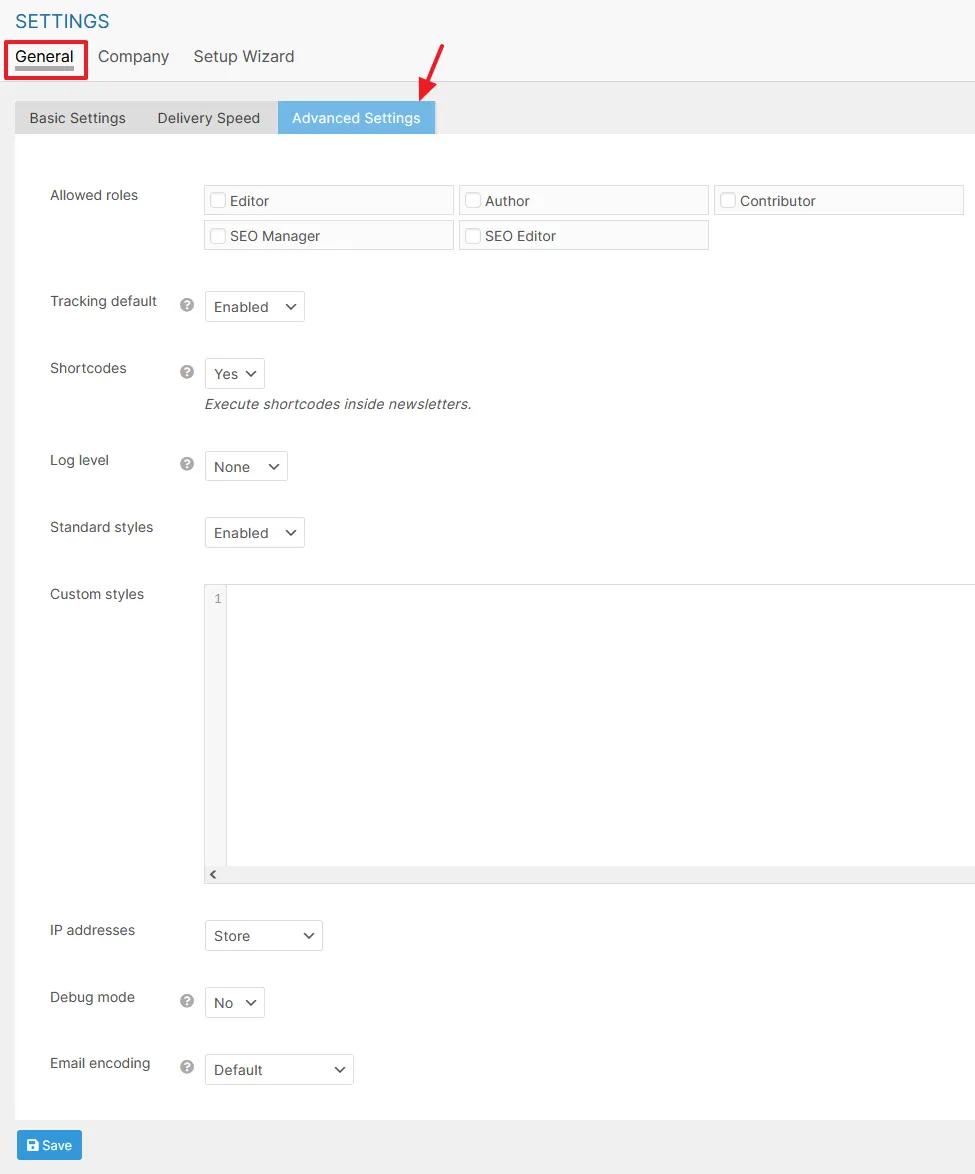
- Click on the Advanced Settings tab.
- The Allowed roles option allows you to choose who can access the administration functionality of Newsletter. For example, if you select Author, all your WordPress users with the author role can access your Newsletter section.
- The Tracking default if enabled tracks the clicks tracking for new newsletters.
- The Shortcodes if enabled allows the Newsletter to executes the shortcodes that you insert inside the newsletters.
- A Log file stores the record/details of activities and operations of Newsletter for a specific period of time. It offers three types of Log Levels i.e. Error, Normal, Debug to select the level of details.
- The Custom styles section allows you to add CSS code to customize the designs of forms, buttons, etc.
- The IP Addresses option allows you to Store, Anonymized, or Do Not Store IP Addresses. The IP address is collected during subscription. An IP Address is made Anonymized by replacing the last number with zero.
- The Debug mode is used for support operations and requires an advanced tech knowledge. It is better to disable.
- The Email encoding allows you to select the encoding scheme for your emails. Set it to Default because it works perfectly.
On Company settings you can add your site/company logo, Title, Company Name, Address, Motto, Copyright or legal text, and Social Media URLs.
The Setup Wizard allows you to run the quick setup of Newsletter for configuring basic settings, as we did in Section 3 above.
06. How to Create Lists on Newsletter
Lists are collection of unique email addresses which are used to target group of subscribers with similar interest or high-value when sending newsletter emails. The Newsletter plugin allows you to create maximum 40 Lists.
You can create both Public and Private Lists. The Public Lists allow the website visitors to select which list they want to subscribe either from the Subscription Form or by updating/editing the personal profile.
The Private Lists do not appear on Subscription Forms or Subscriber’s profile. These Lists are used by owner/administrator of the site for internal classification. For example, you can create a Private List to group only those subscribers to who you want to send the premium newsletters.
How to Create Lists on Newsletter
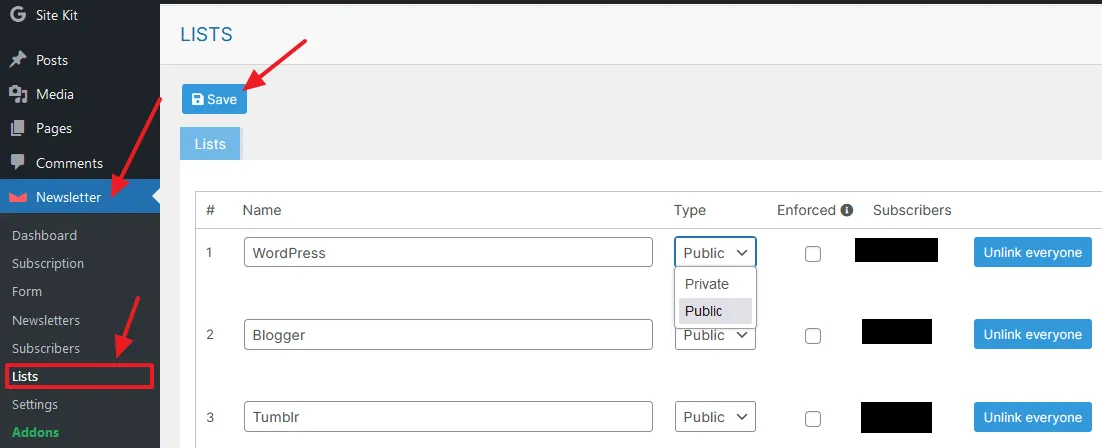
- Go to Newsletter from the sidebar.
- Click on the Lists.
- Enter a name of the list in the Name field.
- Select the list Type.
- The Enforced option, if enabled, all your new subscribers will be added to your list.
- The Subscribers column shows you the number of subscribers subscribed to a list. A subscriber can subscribe more than one list. You can also manually add/remove subscribers to lists from Subscription section, as I have guided in the Section 8 (How to View Newsletter Subscribers and Customize Settings).
- To empty a list click on the Unlink everyone button.
- To update the changes click on the Save button.
To show your Lists on the Subscription Form go through the Section 07(How to Customize Subscription Settings).
07. How to Customize Subscription Settings
In this section, I will guide you on how to customize the subscription settings of Newsletter.
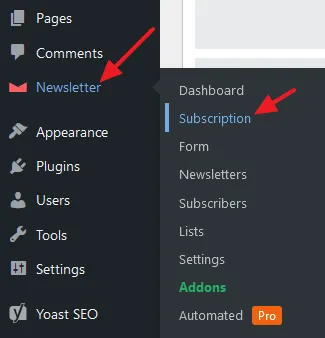
- Go to Newsletter and click on the Subscription.
Form Settings
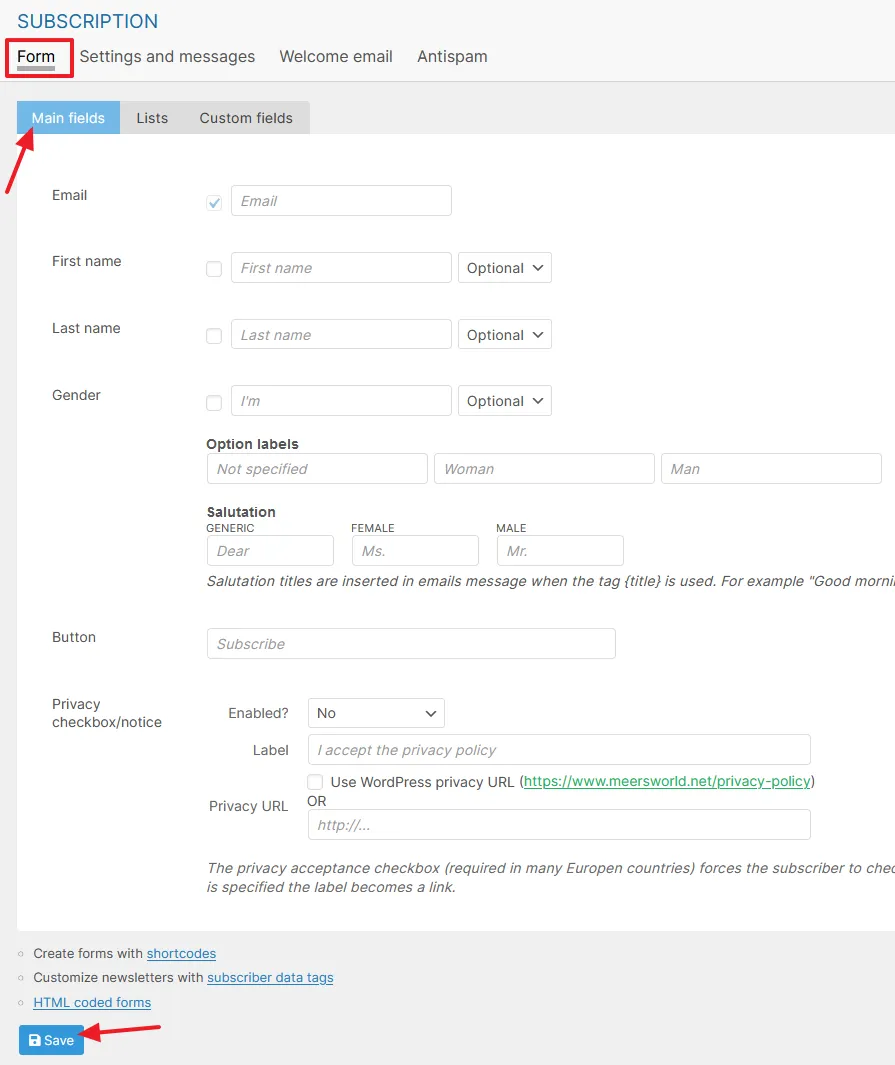
Go to Form tab and click on the Main fields tab.
- In this section you can select the fields and labels that you want to show on subscription form. If you want to make a field mandatory for subscribers make it Required.
- You can enable/disable Privacy checkbox/notice on your newsletter subscription form.
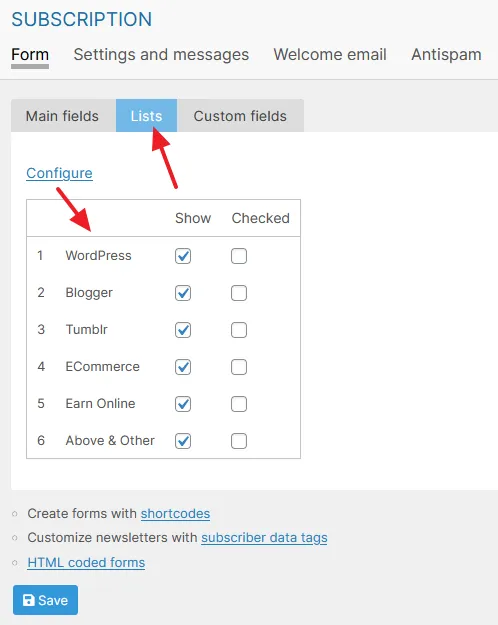
- Click on the Lists tab. You can select which List you want to show on newsletter subscription form. If you want to make a list already selected and mandatory to subscribe click on the Checked box.
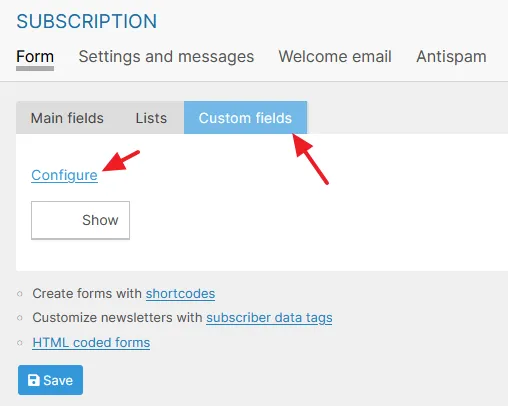
- Click on the Custom fields tab.
- Click on the Configure link to create custom fields to add on your subscription form.
- Enter a field Name.
- In the Placeholder field enter a short hint that would describe the expected value of an input field.
- Select a Status whether you want to make it Public or Private.
- Select a field Type whether it will be a Text or List. If you select List enter the list values separated by commas.
- Select a Rule whether you want to make it Optional or Required.
- Click on the Save button to update the changes.

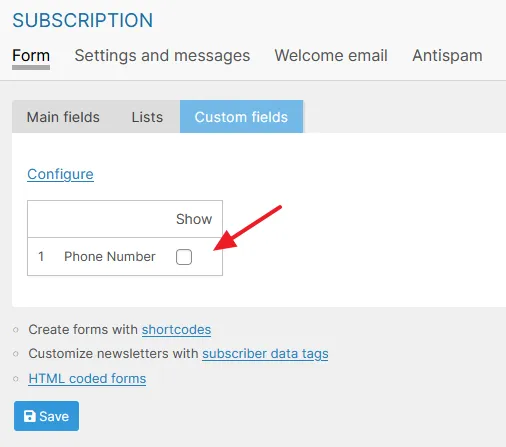
- You can see that the Custom Field is created. To display it on the subscription form check the Show checkbox.
- Click on the Save button.
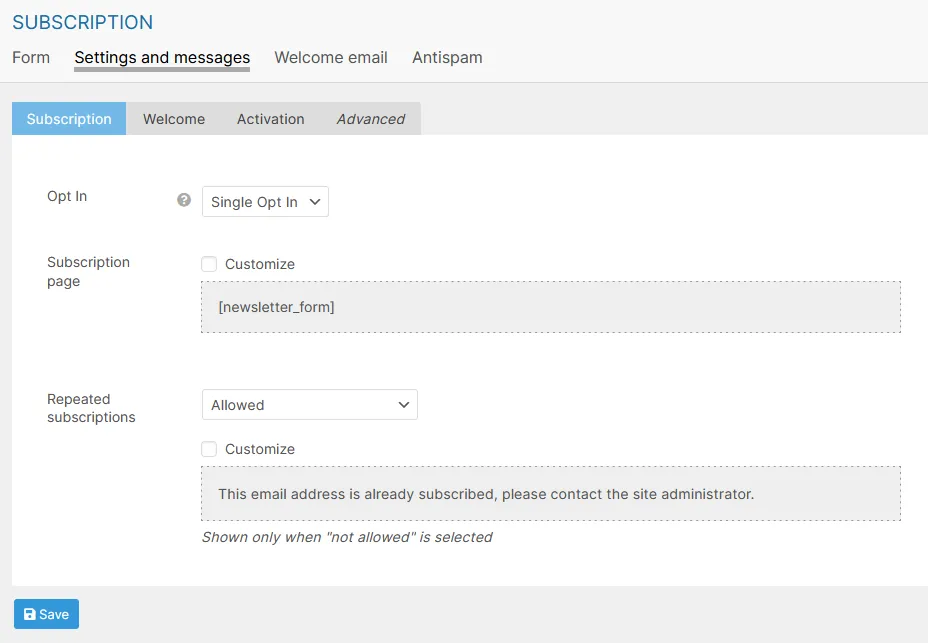
- Go through the Settings and messages, Welcome email, and Antispam tabs to customize thier respective settings, if necessary.
08. How to View Newsletter Subscribers and Customize Settings
In this section, I will guide you on how to view Newsletter subscribers and how to customize subscribers settings.
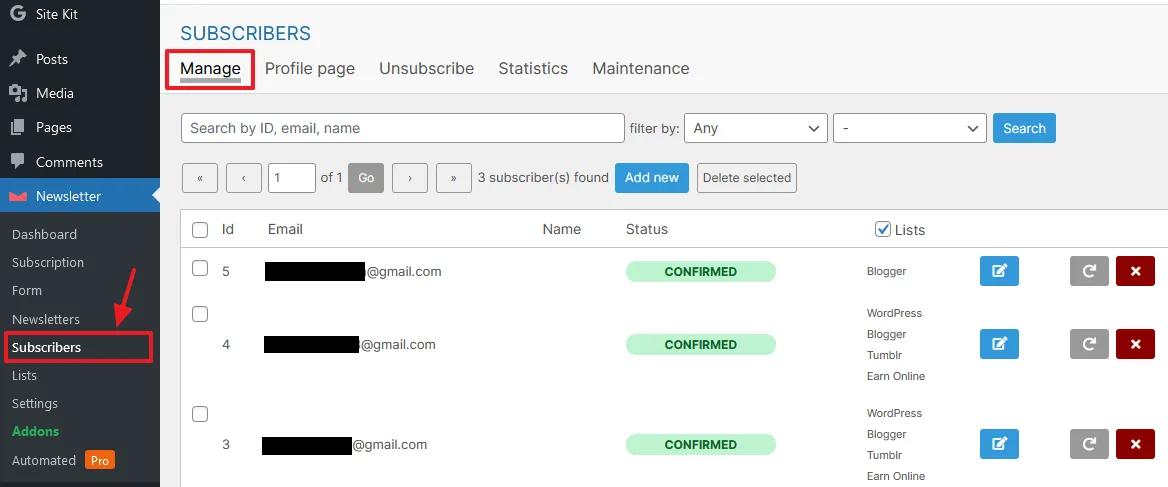
- Go to Newsletter from the Sidebar and click on the Subscribers.
- Open the Manage tab where you can view the list of your newsletter subscribers Emails, Name, Status, and Subscribed Lists. To edit a subscriber click on the Edit icon.
- The Profile page is a page for your subscribers they can change/edit their data.
- The Unsubscribe tab contains unsubscription messages and settings.
- The Statistics tab shows you the stats of subscribers in tables and graphs filtered by Status, Lists, Language, World Map, By Referrer, By URL, By Gender, and Time.
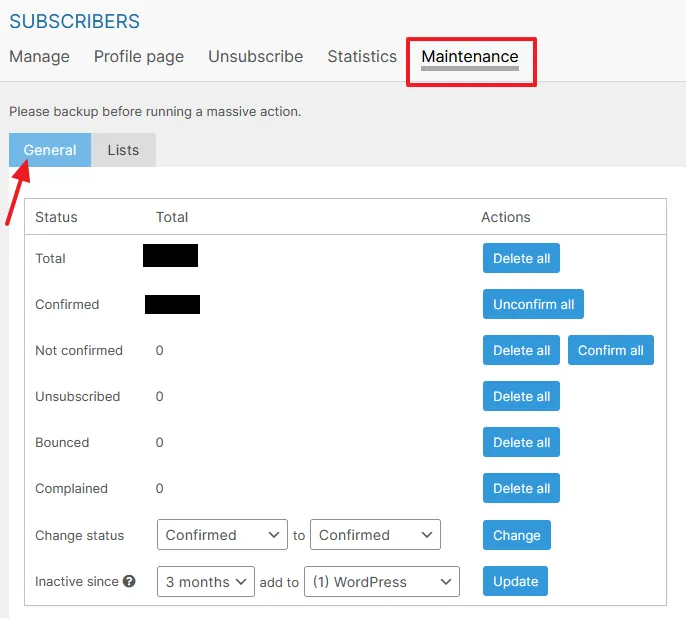
- The Maintenance tab contains options that allows you to run actions on your subscribers, as explained in the next step.
- Go to Maintenance tab.
- On General section you can perform Delete all action and Unconfirm all action. You can perform Change action on subscriber statuses.
- You can Add those subscribers who are inactive for certain period of time to a list. Newsletter automatically keeps track of subscriber whether he is active or not by storing a timestamp of his last action.
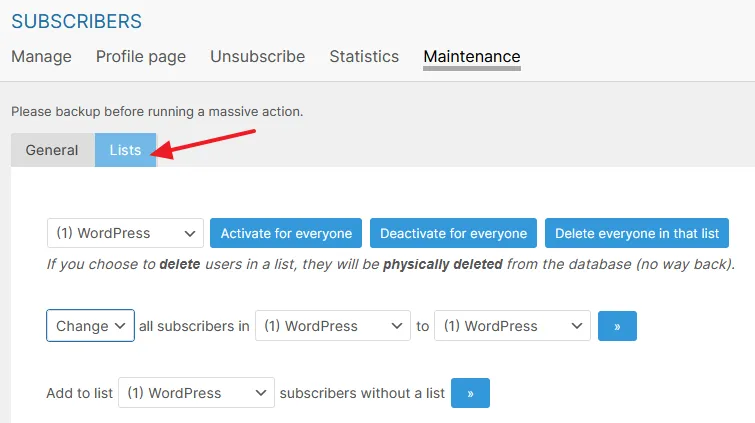
- Click on the Lists.
- You can Activate or Deactivate a list for subscribers. You can delete the subscribers of a list.
- You can move subscribers from one list to other.
- You can add subscribers of one list to another list.
- You can add subscribers to a list who have not subscribed any list or not part of a list.
09. How to Create and Send Newsletters to Subscribers
In this section, I will guide you on how to create a newsletter on WordPress and send it your subscribers.
- Go to Newsletter from the Sidebar and click on the Newsletters.
- Click on the Add new button to create a new newsletter. If you have a newsletter template you can use it.
:: Download Cheap Professional Newsletter Templates Made For All Niches.
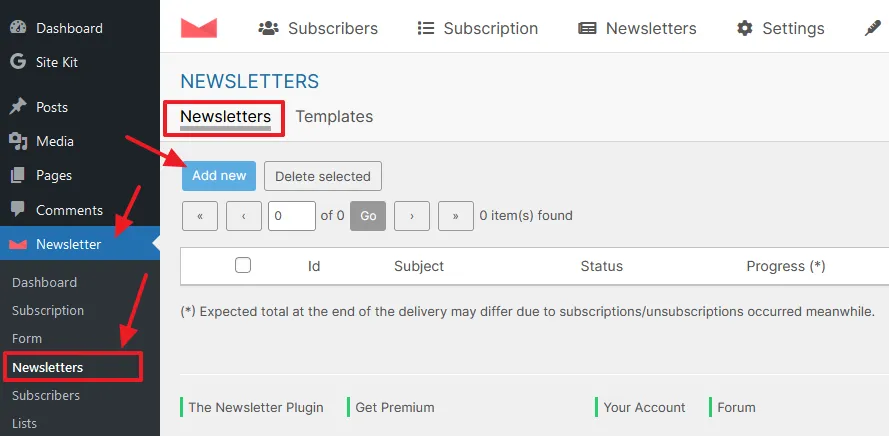
This is the Newsletter Composer where you can create and edit newsletters.
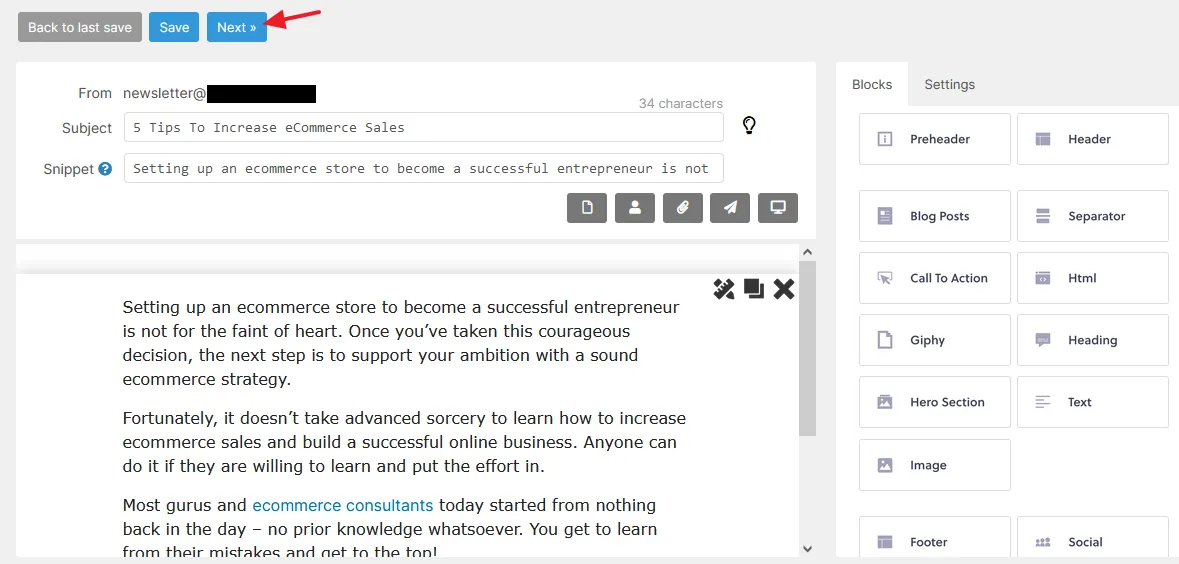
- Enter a newsletter Subject.
- Enter a Snippet. A snippet is a text that some of the email clients such as Gmail shows at the end of the email title on Inbox. If you leave it empty email clients automatically extract from your content.
- At your right side there is a Blocks section from where you can drag a block to composer. For example, if you want to add text you need to drag the Text block to composer. You can add Header, Blog Posts, Call to Action, HTML, Headings, Image, Social Links, Footer, and more.
- From Settings section you can change the Main background color and Blocks Background color. You can change the Font-family, Text-size, and Font-weight of Title, Text, and Buttons. You can also change the width of Newsletter.
- Click on the Next button once your newsletter is completed.
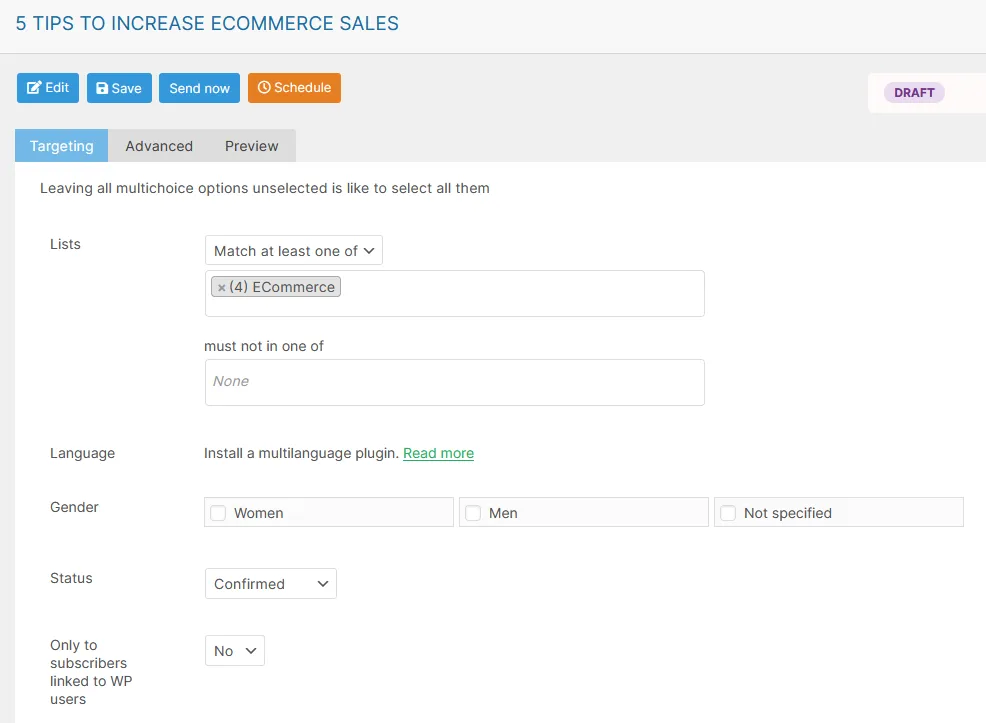
- On the Targeting section you can target the subscribers to who you want to send the newsletter using Lists, Gender, Status, and more.
- The Advanced tab give you options to customize newsletter settings like Track clicks and message opening, Sender name, Sender email address, etc.
- On Preview tab you can preview how your newsletter looks like on mobile and desktop devices.
- Click on the Send now button to send/email the newsletter to your subscribers. The Schedule option allows you to schedule your newsletter to be emailed automatically to subscribers on the scheduled date & time.
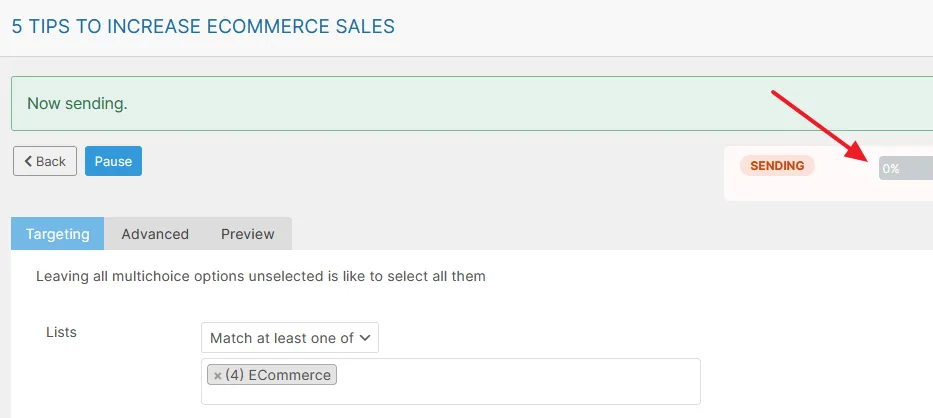
- It shows you the Sending status of newsletter.
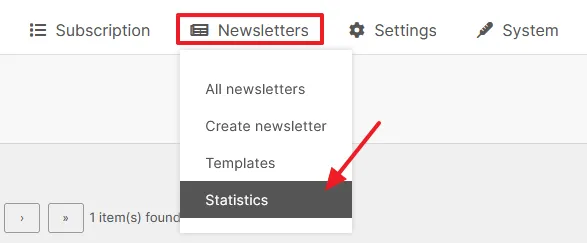
- To check the Statistics of your newsletters go to Newsletters tab located at top bar and click on the Statistics.
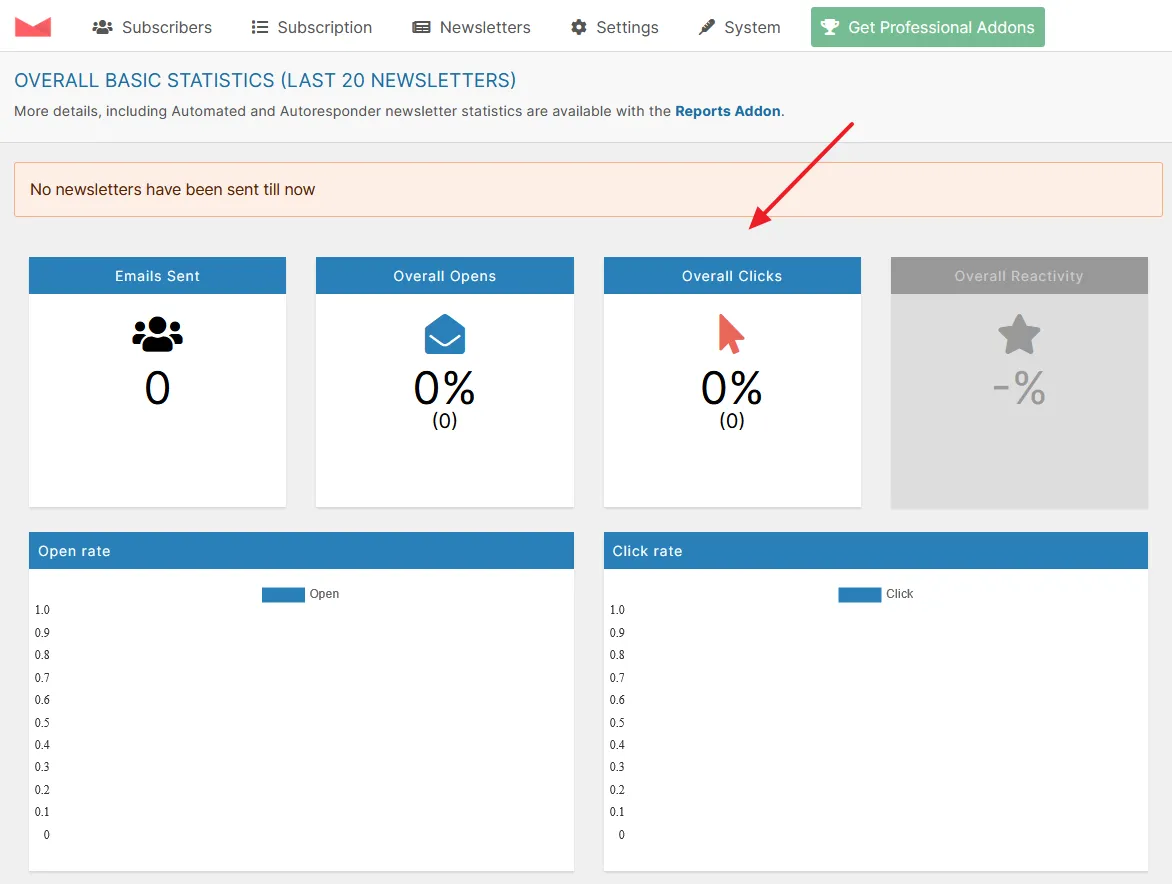
- You can view how many email sent, overall opens, overall clicks, overall reactivity, open rate, and click rate.
So it was all about setting up the free Newsletter Plugin on WordPress. I hope that this tutorial would have helped you. If you like this post then don’t forget to share with other people. Share your feedback in the comments section below.
Also Read



Leave a Reply